Tony Egan
Subscriber
My darkroom footprint is 2.2m x 4.6m (roughly 7ft x 15 ft). It's pretty much at absolute full capacity now.


Looking slick. Maybe you mentioned it earlier, but is your wet side ready?
Hi,
The wet side was essentially done in June, like most of the space there is still a lot of fine tuning to be done but it works really well. As it stands right now I am right on schedule, maybe even a bit ahead?
So just to re-cap, the room is roughly 13' x 35' feet with the ceiling height just below 9' feet and is in a finished basement of my home. Two of three Saunders LPL4550XLG enlargers are up and running, the center one which is wall mounted needs to have it's mobile / rolling work table designed and constructed. Then later the wall mounted LPL will have a floor easel made so I can print up to about 40" x 50". The egress is still in place but also serves as an exit for my exhaust which is hidden as a shelf directly above the 9' foot sink. The egress window stays closed until the ventilation is needed and is opened via an access cover to allow the exhaust fan to work, regardless of mode it is totally light tight and the egress access panel is quick to remove. Positive pressure air is delivered via a Doran 12"x24" louver vent on the darkroom door, ventilation in this space is excellent. The space is now fully plumbed and drains via a 1/3HP sump pump. In addition to the 9' foot sink, there is a 6' foot one that is 12" inches deep for processing film and other tasks. There is also a small utility sink for the Jobo CPP3 with it's own drain and dedicated cold water line for the cold water solenoid on the processor. The 6' and 9' foot sinks have T-valves on the drain to both capture water for re-use and chemistry from the larger trays. I am big on water conservation and the myriad of pumps and drains have made it a lot easier to accomplish this. The 16x20" and 20x24" print washers are also on re-circulator pumps to cut water usage. Since I am on a septic system, no chemistry is poured down the drain and is instead dumped into a vat and pump system that sends it to holding tanks in the garage above grade, another reason each sink has a diverter valve.
All lighting is LED, some dozen can lights in the ceiling and two 16" foot red only strip LED's from Superbight, so far tested to 10 minutes with no issues. There is also a nice accent light under the 6' foot sink that lights up both print washers and can change colors, really upps the "Night Club" effect of the place. The 25 print drying screens live on a rack on the crawlspace access doors. To get into the crawlspace I simply remove the screens and then open the doors, also moving out of the way what eventually will be a rolling table / storage cart. On the far left is my computer desk area with my Seal 210M on a storage cart that rolls out from the cabinet for use, totally out of the way when not. On the far right is what will be my dedicated film loading / unloading area with a film fridge underneath. It will have it's own dedicated vacuum for cleaning out camera gear and film holders, just to the right of that is a large cabinet for storage and then the darkroom door.
So far I am loving the workspace including the 15' foot or so distance of enlargers from wet side, never been a fan of the risk of having things splash from the sink area to the enlarger area and like the aspect of walking across the room during long print sessions. There is still a ton to do, final wire harnessing, shelving, removing the 2"x4" assembly joist from the 9' foot sink to gain 8" of storage underneath, table / cart underneath drying screens, mural components, etc. I figure another year for that. In the final analysis there is more space to work than I thought there would be which will be great for the larger prints down the road.
It only took 12 years of planning and patience to get this going, a huge improvement over the 15 square feet I had in a storage closet outside of my small condo.
View attachment 208350 View attachment 208351 View attachment 208352View attachment 208354

Ha.....It only took 12 years of planning and patience to get this going, a huge improvement over the 15 square feet I had in a storage closet outside of my small condo.
]
That makes two of us who would like you to answer that question. My screens are Zone VI. Does anyone else make them now?.........Regards!Ha.....
Sorry if i missed it, but.......what did you Buy/Use for those drying screens.?
Thank You
Ha.....
Sorry if i missed it, but.......what did you Buy/Use for those drying screens.?
Thank You
Very impressive!That's pretty much where I am at, got my first one in 2013, paired with some RH Designs electronics and never looked back. One of several reasons I love them is that they are still a current model and thus far, KHB Photografix has most of the goodies and parts that are still made. One no longer made unicorn was the 35mm condenser / diffuser mixing box, took years to find but I nailed one. You gain 2.5 stops of light using it and the print quality is amazingly good.
I am back on this build about full time, no major jobs after this month and until December, so I got ahold of my contractor today and we will likely have to rip out some drywall and reenforce between the metal studs for the wall mounted one.
I just scored some awesome countertop finish material today from our local thrift for cheap, two 3'x8 foot sheets of Melamine in a stunning black wood finish for the enlarger wall. I'll cut one into the material for the countertop on either end and then one for the center which will actually be a giant 65"x36" cart that moves for mural printing, countertop will be adjustable for alignment:
View attachment 207456
Yes and they should be available at/through any home improvement store, which means you would have a number of sizes to choose from. As for the racks its possible they are home made with a table saw, router and table or even hand cut if you are patient.If I remember right, those are basically just window screen frames, aren’t they?
Very impressive!
It’ probably a stupid question, but..... what’s the use of 3 of those enlargers?
I have one of those and have no idea how to use more than one.
Regards,
Frank
Most places will make them up to any size, so you needn't be restricted to standard sizes. Kits are available to make the yourself, too.Yes and they should be available at/through any home improvement store, which means you would have a number of sizes to choose from. As for the racks its possible they are home made with a table saw, router and table or even hand cut if you are patient.
That looks great . What are you using for the fume venting system? I put a 4 inch dryer vent through the sill board. I'm not happy with the fan setup I use currently. I'm thinking about getting a furnace power exhaust vent unit. These things have a durable plastic impeller and housing. I have flexible metal vent like your setup. Toning is what gets to me.The great thing about darkroom photography is you learn all kinds of new skills like plumbing electrical, carpentry and now, in my case, cabinet making.
Here is where I started and then I did a major renovation a few years ago.
I am still using the same sink setup on the wet side, but on the dry side I was seriously lacking in storage space, particularly flat storage. My previous setup was basically a table with a couple of sets of drawers shoved underneath.
I started this off when a large metal map cabinet came up for sale locally. I snagged it and then started to plan a new cabinet build around it. Because the file cabinet is so large I ended up with a very deep countertop (42 inches) but being quite tall I can easily use all that space. My finished counter height is 38 inches so I have an insane amount of storage in there. The removable shelving is only 24 inches deep so I can store little used items in plastic totes in behind the shelves. The map cabinet can hold 16x20 and 20x24 material with heaps of room to spare.
I built everything myself and re-used as much of the old material as I could. For example my old melamine countertop was used to make my drawers.
I've never done this before so am fairly pleased with the overall result. Making drawers was a pain in the butt though, and mine are defintely not perfect. If i did this again I'd just size my cabinets to accept Ikea drawers.
View attachment 212154 View attachment 212155 View attachment 212156
Here is an older photo of my wet side setup. I built an 8 foot plywood sink 3 years ago that is still going strong. Total room space is 8x12 feet and I share space with the laundry.

That looks great . What are you using for the fume venting system? I put a 4 inch dryer vent through the sill board. I'm not happy with the fan setup I use currently. I'm thinking about getting a furnace power exhaust vent unit. These things have a durable plastic impeller and housing. I have flexible metal vent like your setup. Toning is what gets to me.
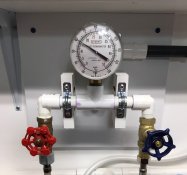
I like your thermostatic valve. I have the old giant darkroom type. We have a valve like you have in our bathroom, amazing, holds temperature steady as can be.
Looks like you are a plumbing genius now! I got a bunch of flat files from my former employer, drafting dept. got rid of the old blueprints, Bonanza!
Best Regards Mike
a dream darkroom - AND a great location for it!
Making of a Dream Darkroom in Florence, Italy: 4 enlargers, custom sinks and an Ansel Adams mural!
Alrighty, moving along really well now.
My contractor / handyman and I decided to just go big, rip out some drywall and create super solid mounting blocks for the mural enlarger that go right into the concrete foundation wall. It's perfectly plumb and as solid as it gets. Projection tests are showing prints up to 45"x54" from 4x5" negs, 45"x45" on medium format, etc. I also had him cut up all that second hand Melamine I got into what I needed so I don't destroy it with my less than ideal blades, it is really nice countertop, some pieces are in-between the pegboard sections for cosmetics and mounting areas. The wall is 13' feet wide and over 8.5' feet high, just enough for what I need this part of the room to do. Obviously I will do some darkening of the inside of the mural area near the floor but for now it is fine.
All three enlargers are up, I will likely hold off on the center piece / cart to give it some more design time but now at least I can print!
View attachment 207938
 , these portraits are driving me crazy - whoops, gotta go the waters running in the bathroom!
This made me think of a recommendation to darkroom designers and builders. Put the plumbing for the sink where you can get to it, in case you want to modify it later. The plumbing for my darkroom sink is hidden behind the "splash-guard" part of the sink and is a real hassle to get to.. I don't often need to temper my wash water but if I did, this would be a good way to do it..........Regards!I finally finished a simple water mixer panel for my darkroom. No thermostat or electronically controlled temperature, just separate valves for the hot and cold and a thermometer to monitor the mix. This is not the first darkroom I've had with hot and cold water, but prior to this, I've always just had a run-of-the-mill kitchen faucet for the hot water (and the mix) and cold only in any other faucets. That was the case here until the water got really too cold to do a good wash over this past winter. Of course, it’s almost Spring and the really cold water has abated somewhat, but I’ll be ready for next year. Only had one leak when I first hooked it all up, but that was quickly resolved. The mixer feeds all of the faucets in the darkroom across both sinks!
Make sure you put in plenty of plumbing. Setup for a thermostatic mixing valve. I've got two beautiful old chrome valves with big thermometers. HOWEVER we had our master bath redone and Delta has a thermostatic valve, the basic valve without trim was less than 70 bucks. It doesn't have a thermometer but that's easy to fix. If you set it to temperature ,it will hold dead on. And when you come back, it will remember the setting.Dream darkroom?
I've been struggling for a long time using a portion of my garage as a darkroom along with makeshift heating and cooling which has never been sufficient and without running water/sink, but recently my wife and I decided to purchase property and build a new house on a hillside overlooking pastoral rolling hills, horse farm, and long-range (180 degree) year-round view of the mountains. It turns out that the new house plan she loves (me too) that fits the property use has space for a lot of storage in the back-end of the walk-out basement. The width of the unfinished 'basement' (which will be level with the rest of the floor) is 10 feet wide by the full length of the home (54 feet I think). The far end of the unfinished space (the square part) is 12'x12' with a 9 foot ceiling. I've gotten by without running water up to now as have a mostly dry-to-dry process using a Phototherm Super Sidekick SK8 to process film up to 4x5 and process paper using a Fujimoto CP32 (but need water if I want to use the auto wash/dry module) and a Jobo CPP2. I have two enlargers - a 4x5 LPL4450 XLG and an LPL 670MXL (7700). as well as my digital space (a wide format 24" Epson 7880 printer, computer, and Epson V850), and a finishing area (dry mount press etc).
At first I thought the 12x12 was where utilities would be located, but it turns out not to be the case - I can use the entire 12x12 as a dark room. I expect that area to be below ground level with the front of the walk-out basement to be ground level); the basement will be naturally light tight. My plan is to rough in the plumbing, electrical, and ventilation during construction and then I'll finish off the room myself after construction (wall board, sink, cabinets, countertops, island with built-in light table, flooring, shelving etc). I ought to be able to directly tap into the H/C water line and drain opposite the tub in the adjacent bathroom quite readily - and maybe also tie into that bathroom's vent.
Anyhow, it was a nice surprise to be able to start from this point with a ready-made space - I'll add more detail once the project gets underway (likely not until late this year as the main construction will likely be done by then.)
Anything else I should consider now while planning the project?
View attachment 220350

| Photrio.com contains affiliate links to products. We may receive a commission for purchases made through these links. To read our full affiliate disclosure statement please click Here. |
PHOTRIO PARTNERS EQUALLY FUNDING OUR COMMUNITY:  |