• Welcome to Photrio!
    Registration is fast and free. Join today to unlock search, see fewer ads, and access all forum features.
    Click here to sign up

Darkroom Portraits (Part 2)

Street photo Nashville

A
Street photo Nashville

  • 2
  • 0
  • 61
Rome

H
Rome

  • 2
  • 2
  • 69

Recent Classifieds

Forum statistics

Threads
202,547
Messages
2,842,187
Members
101,375
Latest member
JoannaG
Recent bookmarks
0
I always sandwich my prints between sheets of archival mount board in the press. Wipe the sheets clean every session--no spots, no indents.

Mount board? Doesn't that drastically increase the needed "dwell" time? I use just plain acid-free art paper, and the instructions for my glue sheets says they require at least two minutes under pressure in the press.
 
View attachment 322658

Progress, going slow. Trying to enjoy the project. 😊

20230108_154154.jpg
 
Mount board? Doesn't that drastically increase the needed "dwell" time? I use just plain acid-free art paper, and the instructions for my glue sheets says they require at least two minutes under pressure in the press.

I heat the boards used to sandwich the print in the press so they are hot and dry. Doesn’t seem to increase the time in the press to flatten or dry-mount by much if at all.
 
Couple recent ones taken for a thread about safelight options in dimrooms, for hand coating & processing salt prints. (Rubylith sheets on the window).

_MXT2261.jpg


_MXT2262.jpg
 
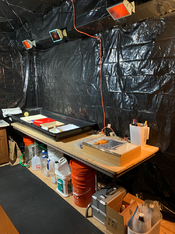
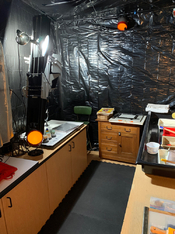
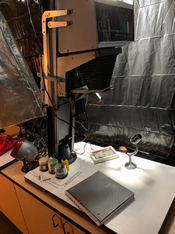
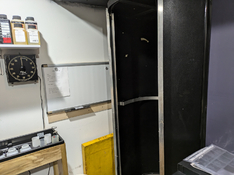
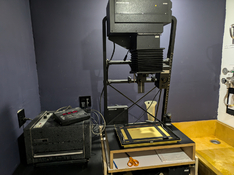
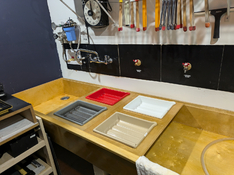
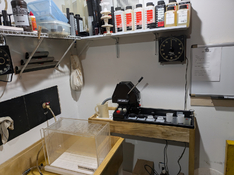
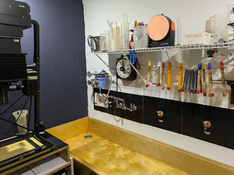
Well, I basically finished this new darkroom (my 6th) about five years ago but I've been improving and refining it ever since. It's located in a space formerly a coal room in my 80 year old house. I've had larger darkrooms in the past when I was a working commercial photographer but now I'm just a hobbyist and its 10' x 13' footprint is cozy and fine with me. For ventilation I installed a surplus industrial clean-room filter/blower (.3 micron) that I found online for $105 w/shipping and vent it out through louvers I installed over the eight-foot sink. It keeps the room from feeling like a swamp and also keeps it immaculately clean. I have been using Jobo tanks and reels for film for decades but always regretted that I couldn't dry the film on the reels like I could with SS wire reels without getting spots and streaks. From another home improvement project I had a leftover large and powerful inline duct booster fan and I found that a large ShopVac vacuum filter fit perfectly tight over the intake end and the output was still powerful. A dollar store plastic pitcher fit nicely over the output end and with a hole cut in the bottom just slightly smaller than the reels it would easily hold 5-6 35mm size Jobo reels. It works marvelously well. I give the film on the reels a last one-minute bath in distilled water and half-strength Photo Flo after washing, shake the excess off vigorously, put them and the pitcher under the blower and it just blasts the wet off them and dries the film in a jiffy. So far, my finished negatives have been virtually dust and spot free. I splurged on an Intellifaucet and it works brilliantly - a huge time and labor-saving device that I wish I had back in my working days. A magnetic automatic stirring motor and a hands-free bottle washer and valve are two other really handy gadgets I found at a local home-brewer supply store.

I really like the speakers, do you need to turn them off when exposing?
 
I really like the speakers, do you need to turn them off when exposing?

The Durst Laborator 138 is such a sturdy beast that no amount of sound pressure would make it shake. The Omega D-2 is almost as sturdy but I tend to only use it when I have to switch to multi-grade paper. Those speakers aren't woofers or sub-woofers, they're rebuilt old triaxial speakers in homemade cabinets and they don't rattle the house much.
 
I have two 15” Goodman triaxials just outside the darkroom. Bought them 40 years ago for $75. Too large to fit inside.

Never found any better.
 
20230123_132750.jpg


NOS shipped from Calumet in 1982, valve came with different pipes on top, I salvaged the thermometer and shut offs from another. Works great.
 
The darkroom is finally complete. Almost 15 years in waiting, 6 months in progress. Walls are a double layer of black landscape plastic hanging from ceiling joists or stapled to a stud wall. At my age, I want this to be sort of permanently temporary, so that when I'm gone, they can just tear it down in no time. I decided to skip the plumbing and use 5-gallon buckets instead. Door is a 3-layer light maze. All the equipment and furniture was FREE.
 

Attachments

  • darkroom-1a.jpg
    darkroom-1a.jpg
    607.4 KB · Views: 212
  • darkroom-3a.jpg
    darkroom-3a.jpg
    547.1 KB · Views: 209
  • darkroom-6a.jpg
    darkroom-6a.jpg
    500.4 KB · Views: 210
The darkroom is finally complete. Almost 15 years in waiting, 6 months in progress. Walls are a double layer of black landscape plastic hanging from ceiling joists or stapled to a stud wall. At my age, I want this to be sort of permanently temporary, so that when I'm gone, they can just tear it down in no time. I decided to skip the plumbing and use 5-gallon buckets instead. Door is a 3-layer light maze. All the equipment and furniture was FREE.

Well done.
 
Well done.

Thank you. I did a lot of reading and thinking about it in those years. The first print will go to the guy who gave me the Chromega enlarger.
 
I just finished my first print session in my new darkroom. This is the fifth darkroom that I have built (and hopefully the last). It is smaller than previous darkrooms - 7' x 9', it has an 8' long sink, made of plywood, sealed with marine varnish. There is a lip near the top to hold frames that allow me to keep trays at the height of the top of the sink - so less bending. My CPP2 died, and I replaced it with the new CPE-3 film processor jury still out on that. I kept the revolving door. My enlarger is an Ilford MG600 (Durst Multigraph in disguise), I shoot mostly MF now, with some 4x5 and some 35mm thrown in from time to time.
 

Attachments

  • Darkroom Door.jpg
    Darkroom Door.jpg
    402.2 KB · Views: 233
  • Darkroom Enlarger.jpg
    Darkroom Enlarger.jpg
    438.4 KB · Views: 246
  • Darkroom Trays.jpg
    Darkroom Trays.jpg
    494.2 KB · Views: 230
  • Film Processor.jpg
    Film Processor.jpg
    484.9 KB · Views: 227
  • Sink and water tempering.jpg
    Sink and water tempering.jpg
    483.8 KB · Views: 231
does the tray holder prevent you from agitating your developer?
 
What's the chassis?
And is the enlarger head height motorised because I don't see any handles for adjustment?
 
Not much new. I cleaned and aligned one of my enlargers and replaced a faulty LED readout. I also put a new drain valve on the Jobo and got a NOS paper dryer for test strips. My old one stopped heating.
DSC_0034.JPG
DSC_0282.JPG
DSC_0505.JPG
IMG_2958.JPG
DSC_0202.JPG
 
Photrio.com contains affiliate links to products. We may receive a commission for purchases made through these links.
To read our full affiliate disclosure statement please click Here.

PHOTRIO PARTNERS EQUALLY FUNDING OUR COMMUNITY:


Ilford ADOX Freestyle Photographic Stearman Press Weldon Color Lab Blue Moon Camera & Machine
Top Bottom