Can someone explain to me how to find out print size with DPI?

Humming Around!

D
Humming Around!

  • 3
  • 0
  • 47
Pride

A
Pride

  • 2
  • 1
  • 99
Paris

A
Paris

  • 5
  • 1
  • 173
Seeing right through you

Seeing right through you

  • 4
  • 1
  • 206

Recent Classifieds

Forum statistics

Threads
198,411
Messages
2,774,519
Members
99,610
Latest member
Roportho
Recent bookmarks
1

jeffreyg

Subscriber
Joined
Jun 12, 2008
Messages
2,629
Location
florida
Format
Medium Format
I have notes on my settings and previously made curves for the different films I use so I have pretty much standardized my work flow. My negatives are exposed for my wet printing but do scan well. I use an older version of PhotoShop for digital editing but use it mainly as I would a darkroom ie burning and dodging and cropping. I guess I am fortunate to be able to eyeball. It also helps that I do black and white so color balance is not an issue. I didn't mention that I scan in RGB, do initial editing in RGB, convert to grayscale apply my curve then back to RGB and make a layer 60%Sepia tone, a layer 30% brown tone merge all three layers and print with the printer set to luster paper. I am very pleased with the results I am getting and when things get back to "normal" will be having a gallery exhibition with silver gelatin , platinum/palladium and digital prints.
Plus 1 Les

http://www.jeffreyglasser.com/

http://wwwsculptureandphotography.com/
 
OP
OP
Salt&Light

Salt&Light

Member
Joined
Mar 21, 2020
Messages
43
Location
Orlando, FL
Format
Multi Format
Hey everyone! thanks so much for all your great knowledge. I have learned a lot, but it still is a weird process. Seems like there's a lot going on and some things I still don't know.

I think I'm going to move forward by scanning my negatives at high PPIs, sharpening my sharpening skills in PS, printing on different paper, and seeing how the prints turn out all while keeping track of the details so that I know how I can alter my process to get better over time.

But, I do have one last question:
After I scan a negative at 1600 ppi and then pull it up into PS. When I go to "image size" it asks me to plug in the resolution. Is that where I would plug in 1600? When I do so, it makes the file go from 80MB to 3GB :blink:

I feel like that can't be right. What do I put there?
 

Adrian Bacon

Subscriber
Joined
Oct 18, 2016
Messages
2,086
Location
Petaluma, CA.
Format
Multi Format
Hey everyone! thanks so much for all your great knowledge. I have learned a lot, but it still is a weird process. Seems like there's a lot going on and some things I still don't know.

I think I'm going to move forward by scanning my negatives at high PPIs, sharpening my sharpening skills in PS, printing on different paper, and seeing how the prints turn out all while keeping track of the details so that I know how I can alter my process to get better over time.

But, I do have one last question:
After I scan a negative at 1600 ppi and then pull it up into PS. When I go to "image size" it asks me to plug in the resolution. Is that where I would plug in 1600? When I do so, it makes the file go from 80MB to 3GB :blink:

I feel like that can't be right. What do I put there?

in PS, if you have the “resample” check box checked, it will resample the image so that it is at the same print size, but higher PPI. If you just want to change the PPI to see what the new print size would be, uncheck the resample check box, then plug in your ppi number and it should then reflect the new print size without changing anything else.

In terms of what to put there, if prepping for print, put 240-300 ppi
 

shutterfinger

Member
Joined
Feb 25, 2013
Messages
5,020
Location
San Jose, Ca.
Format
4x5 Format
But, I do have one last question:
After I scan a negative at 1600 ppi and then pull it up into PS. When I go to "image size" it asks me to plug in the resolution. Is that where I would plug in 1600? When I do so, it makes the file go from 80MB to 3GB
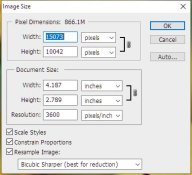
Here you have me confused. Why is PS asking for the resolution?
A screen shot of the image resize box as it first appears. The butterfly photo in post 16's main file is the image the values are for.
Image size.jpeg
 

Adrian Bacon

Subscriber
Joined
Oct 18, 2016
Messages
2,086
Location
Petaluma, CA.
Format
Multi Format
Here you have me confused. Why is PS asking for the resolution?
A screen shot of the image resize box as it first appears. The butterfly photo in post 16's main file is the image the values are for.
View attachment 242819

You have a *very old* version of PS. This is what the latest version looks like:
Screen Shot 2020-03-27 at 5.36.51 PM.png

When you first open the "Image Size" dialog in PS, the Width and Height will be the actual width and height of the image in pixels (if you have pixels selected in the dropdown to the right). The Resolution box is how many pixels per inch you want the image to be. You can select "inches" in the dropdown for the width and height, and it will show you how large the image would be in inches on a pieces of paper. If you change Resolution while the Resample box is checked, the size of the image in inches will stay the same, but the number of pixels will change and the image data will be interpolated to the new size. If you uncheck Resample, then the image size in pixels stays the same and the image size in inches changes.

So for example, if you had a scanned image of a 120 6x6 frame that was scanned in at 1600 PPI and opened that in photoshop, the Image Size dialog would show when first opened as 3600 pixels for the Width and Height and the Resolution would be 1600 Pixels/Inch (unless your scanning software is not correctly putting the image metadata into the file, if that's the case, then you should get that working correctly as it makes this part a lot easier to manage). If you uncheck the Resample checkbox and select "Inches" in the Width and Height dropdown you would see that it was approximately 2.25 inches on each side. Then if you change the Resolution to 300, the size in inches would suddenly grow to approximately 15 inches for the Width and Height. If you kept Resample checked and changed the resolution to 300, what would happen is the size in inches would stay the same, but the image would be downsampled to 300 pixels per inch or 675 pixels on each side.

Make sense?
 

MattKing

Moderator
Moderator
Joined
Apr 24, 2005
Messages
52,601
Location
Delta, BC Canada
Format
Medium Format
No wonder I like using FastStone Image Viewer :D

upload_2020-3-27_18-0-31.png
 

Adrian Bacon

Subscriber
Joined
Oct 18, 2016
Messages
2,086
Location
Petaluma, CA.
Format
Multi Format
No wonder I like using FastStone Image Viewer :D

View attachment 242822

Photoshop's Image Size dialog isn't *that* bad. You just select the units you want to work in for the image Width and Height, then set the resolution you want. Typically if you're prepping for print, regardless of image size, you set the units to inches, then check Resample and set the resolution you're going to print at, then set how large you want the image to be in inches. PS resamples it to the correct number of pixels needed to print at the resolution you put in. If you just want to resize the image, then you leave Width and Height in the Pixels unit, check resample, don't change the resolution box and simply put in the new pixels dimensions for the width and height. PS will resample it to the new dimensions.
 

MattKing

Moderator
Moderator
Joined
Apr 24, 2005
Messages
52,601
Location
Delta, BC Canada
Format
Medium Format
Photoshop's Image Size dialog isn't *that* bad. You just select the units you want to work in for the image Width and Height, then set the resolution you want. Typically if you're prepping for print, regardless of image size, you set the units to inches, then check Resample and set the resolution you're going to print at, then set how large you want the image to be in inches. PS resamples it to the correct number of pixels needed to print at the resolution you put in. If you just want to resize the image, then you leave Width and Height in the Pixels unit, check resample, don't change the resolution box and simply put in the new pixels dimensions for the width and height. PS will resample it to the new dimensions.
Res Ipsa Loquitur
:D:angel:

Actually, the Photoshop Resizer is one of many things in that program that show that Photoshop is/was essentially a commercial graphics program that people have re-purposed as a Photography tool.
FastStone is a lot more prosaic.
And its resizing tool is one of its strengths.
And it is small and quick and requires very little computer overhead.
And it is available free/by donation.
No Mac or Linux version though.
 

RalphLambrecht

Subscriber
Joined
Sep 19, 2003
Messages
14,631
Location
K,Germany
Format
Medium Format
+
1600 dpi input (what your scanner does) against a 300 dpi output (about what most inkjet printers do). 1600/300=5.333.

Take the size of a negative, and multiply it by 5.333, and you'll have your number. So, a 24mm x 36mm (.944" x 1.41") negative (35mm film) gives you about a 5" x 7.5" print at 300 dpi.

And a 6x4.5cm 120 film negative gives you about 11.7" x 8.8" print.

Now, using math I have definitively proven jack squat. Because in reality, you can't accurately predict how big you can print something without considering a lot more variables. For instance, some subjects, such as portraits, will allow you to print them at lower resolutions than things like detailed landscapes from a wide angle lens. Sometimes you can use various software algorithms to interpret missing information, and generate new pixels adjacent to your current ones, thus allowing you to blow up pictures far beyond what you could without these algorithms. At first they used simple averaging methods, then they switched to fractal geometry, and now they're using AI to predict missing pixels. Beyond that, one must consider the typical viewers distance and visual acuity, as well as the medium that the final print will be displayed on. Glossy inkjet paper can show a much sharper image, and will reveal limits quicker than uncoated watercolor paper. Also, the acuity of the camera system, original negative, and scanning equipment will also play a role. Plus there are other factors I haven't mentioned.

So basically, the only real way to know anything for sure is to try it for yourself.
1
 

Adrian Bacon

Subscriber
Joined
Oct 18, 2016
Messages
2,086
Location
Petaluma, CA.
Format
Multi Format
Res Ipsa Loquitur
:D:angel:

Actually, the Photoshop Resizer is one of many things in that program that show that Photoshop is/was essentially a commercial graphics program that people have re-purposed as a Photography tool.
FastStone is a lot more prosaic.
And its resizing tool is one of its strengths.
And it is small and quick and requires very little computer overhead.
And it is available free/by donation.
No Mac or Linux version though.

LOL... different strokes for different folks. I pay the Creative Cloud subscription because I also use Adobe Audition, Adobe Lightroom, Adobe Prelude, Adobe Media Encoder, Adobe Premiere Pro, Adobe After Effects, Adobe Stock, Adobe Acrobat DC, Adobe Dreamweaver, Adobe fonts, and Adobe Behance along with probably at least a couple others that I can't remember off the top of my head. That's a whole lotta functionality for about 50 bucks a month, and I make way more than 50 bucks a month to do things that having access to that allows.

Not everybody needs/wants that, but access to the full suite is money well spent in my case.
 
OP
OP
Salt&Light

Salt&Light

Member
Joined
Mar 21, 2020
Messages
43
Location
Orlando, FL
Format
Multi Format
I THINK I'M GETTING IT EVERYONE!

--- Honestly, I'm just a novice, and I just got PS because I thought Lightroom and PS is what most photographers use.... What are the post editing and image re-sizing software you all recommend? I would love to get rid of my adobe creative cloud subscription and save that money per month. I don't make much, soooo....
 

Adrian Bacon

Subscriber
Joined
Oct 18, 2016
Messages
2,086
Location
Petaluma, CA.
Format
Multi Format
I THINK I'M GETTING IT EVERYONE!

--- Honestly, I'm just a novice, and I just got PS because I thought Lightroom and PS is what most photographers use.... What are the post editing and image re-sizing software you all recommend? I would love to get rid of my adobe creative cloud subscription and save that money per month. I don't make much, soooo....

A lot of Professional Photogs/Creatives use Adobe's Creative Suite of software.
 

MattKing

Moderator
Moderator
Joined
Apr 24, 2005
Messages
52,601
Location
Delta, BC Canada
Format
Medium Format
A lot of Professional Photogs/Creatives use Adobe's Creative Suite of software.
And it is a very powerful Suite of tools.
I prefer my current mix of FastStone and Corel Paintshop Pro plus Corel Aftershot Pro 3, with a smattering of the Olympus Workspace that came with my digital camera.
 

shutterfinger

Member
Joined
Feb 25, 2013
Messages
5,020
Location
San Jose, Ca.
Format
4x5 Format
I use Nikon Capture NX-D to convert my NEF (Nikon Camera Raw format files) to 16 bit Tiff files which does a better job than Adobe Camera Raw. It is free from Nikon for Nikon cameras.
I use Creative Suite Photoshop 5. The software allows for resetting it to not registered for installation on a different computer so you can pick up a pre owned copy and install it and register it on your computer. PSCS5 is stand alone and does not require a subscription. If you have CS2 or later the upgrade version will work.
I run EpsonScan with my V700 for scanning. I set color controls to off to get and use a raw scan. Free on Epson's web site for Epson scanners.
I use Vuescan Pro for my Plustek 7600 and it will run my V700 also. This is better scanning software than Silverfast SE that ships with the Plustek scanner and SE+ which is a level upgrade.
Paint Shop standard products only work with 8 bit files, their Pro versions work with 16 bit files. Silverfast SE scans in 16 bit but converts the scan to 8 bits when saving the scan. Silverfast Ai is the best scan software but its pricey and saves to 16 bit files.
I prefer to work with 16 bit files for scanning and editing.
I'm running Windows 10 Pro on a Dell Precision M3800.
 

Les Sarile

Member
Joined
Aug 7, 2010
Messages
3,419
Location
Santa Cruz, CA
Format
35mm
I've used PS since it's first or second release through a couple of CS versions. Photoshop is a mainstay but the video editor Premiere was the best for me.

These days, for single layer photo editing, I've been using ACDSee through many versions now and it is all i need for editing photos. Free trial available at https://www.acdsee.com/en/index/ for the latest version but I am still at version 8. It is like the Swiss Army knife of photo viewer/editing/management - polished, quick and comprehensive at a very good price.
 

138S

Member
Joined
Dec 4, 2019
Messages
1,776
Location
Pyrenees
Format
Large Format
I THINK I'M GETTING IT EVERYONE!

--- Honestly, I'm just a novice, and I just got PS because I thought Lightroom and PS is what most photographers use.... What are the post editing and image re-sizing software you all recommend? I would love to get rid of my adobe creative cloud subscription and save that money per month. I don't make much, soooo....

Corel Photopaint is good and cheap, to me IIRC it has a simgle drawback: it does not allow sharpening in 16bits/channel images, so an additional sharpening sogtware may be required. Also you have GIMP for free, IIRC they were to allow sharpening in 16bits/channel, perhaps it's working yeat.

PS is the industrial standard totally pro choice, I use CS4 and CS6 older versions. PS is quite powerful but it requires an effort to master it.

For a proficient edition It's very important to master Layers and masks, lets say you make some adjustments for the highlights in one layer, later you make additional adjustments for the shadows in another layer, then you may blend the original image with different amunts of the layers that had the adjustments for the shadows and for the highlights until you get a good balance in the print. PS is an extremly powerful tool, it allows to saves incredible amounts of work while allowing a total flexibility, but you have to master it.

Take a good PS book and spend some 30h in learning and making the exercises, this will open your mind. The risk of PS is being lost with it because not knowing how to do what you want, because that some people get a better result with lightroom, but true power is in PS, layers are very powerful.

Please unsdertand that I'm not suggesting being intrusive (or not) in the image with PS... Personally I prefer having total respect for the original scene, what I say is that PS allows very refined control in all situations, both when we want to be intrusive and also when we want to respect the original capture, being always totally superior to LR, but we have to master PS to take advantage of it, and this requires an effort, take a good book and you won't regret.
 

mgb74

Subscriber
Joined
Jan 24, 2005
Messages
4,773
Location
MN and MA US
Format
Multi Format
To get the best of your scanner scan at the manufacturers stated Optical resolution limit. If your scanner's limit is 1600dpi then scan at 1600 dpi, if its 4800 dpi then scan at 4800 dpi. The optical limit of the scanner is the max you will get from that scanner, third party max is based on testing method an to get their figures they have to use the scanners optical limit or very near it.

Next if the file is too large you can reduce it in post with image resize. Use post software to determine the print size or select the print size and ppi in the print dialog and quit worrying about it.

To clarify a bit, scanner manufacturers will sometimes claim a resolution higher than the actual optical resolution. That higher resolution is based on interpolation (as noted in post 27); essentially looking at 2 optically derived values and guessing what should be in between. Though "guessing" might be a bit harsh as there is logic in that process.
 

mgb74

Subscriber
Joined
Jan 24, 2005
Messages
4,773
Location
MN and MA US
Format
Multi Format
There are many tutorials on digital post-processing technique and workflow. Here is one by Chris Crawford (who I think is a member here).
 
OP
OP
Salt&Light

Salt&Light

Member
Joined
Mar 21, 2020
Messages
43
Location
Orlando, FL
Format
Multi Format
Corel Photopaint is good and cheap, to me IIRC it has a simgle drawback: it does not allow sharpening in 16bits/channel images, so an additional sharpening sogtware may be required. Also you have GIMP for free, IIRC they were to allow sharpening in 16bits/channel, perhaps it's working yeat.

PS is the industrial standard totally pro choice, I use CS4 and CS6 older versions. PS is quite powerful but it requires an effort to master it.

For a proficient edition It's very important to master Layers and masks, lets say you make some adjustments for the highlights in one layer, later you make additional adjustments for the shadows in another layer, then you may blend the original image with different amunts of the layers that had the adjustments for the shadows and for the highlights until you get a good balance in the print. PS is an extremly powerful tool, it allows to saves incredible amounts of work while allowing a total flexibility, but you have to master it.

Take a good PS book and spend some 30h in learning and making the exercises, this will open your mind. The risk of PS is being lost with it because not knowing how to do what you want, because that some people get a better result with lightroom, but true power is in PS, layers are very powerful.

Please unsdertand that I'm not suggesting being intrusive (or not) in the image with PS... Personally I prefer having total respect for the original scene, what I say is that PS allows very refined control in all situations, both when we want to be intrusive and also when we want to respect the original capture, being always totally superior to LR, but we have to master PS to take advantage of it, and this requires an effort, take a good book and you won't regret.

I studied chemistry at university, so textbook/technical reading is right up my alley. I also think that's why my mathematical brain wanted to understand the whole PPI/DPI thing. Any books you recommend for Adobe Photoshop through today's creative cloud?
 

138S

Member
Joined
Dec 4, 2019
Messages
1,776
Location
Pyrenees
Format
Large Format
I studied chemistry at university, so textbook/technical reading is right up my alley. I also think that's why my mathematical brain wanted to understand the whole PPI/DPI thing. Any books you recommend for Adobe Photoshop through today's creative cloud?

Here you have several you may download for free, a book for an older version is also suitable for most of the exercises.

https://freepdf-books.com/photoshop/

https://freepdf-books.com/photoshop-cs3-restoration-and-retouching-bible/

One year ago I made all exercices in this book to "refresh" may skills, but's also perfect to learn from scratch:

51F2zJi-b0L._SX401_BO1,204,203,200_.jpg

It is for an older version, but to me it's the same.

For color manipulation I recommend you 3D LUT Creator software for a totally pro tool, it can be integrated with PS.
 
Last edited:

Les Sarile

Member
Joined
Aug 7, 2010
Messages
3,419
Location
Santa Cruz, CA
Format
35mm
I'm just so confused as to how big I can print a photo without losing resolution based on the DPI I scanned the negative at. The optimal resolution max without interpolation on my scanner is about 1600 dpi. So, how do I figure out how big I can print a 35mm and 120mm exposure without losing resolution?

I studied chemistry at university, so textbook/technical reading is right up my alley. I also think that's why my mathematical brain wanted to understand the whole PPI/DPI thing. Any books you recommend for Adobe Photoshop through today's creative cloud?

Your mathematical brain is not what's holding you back from fully understanding this. Fortunately, there are optical/visual ways that you can verify what is real detail.
Going back to your first question about losing resolution, you have to go to the source of where the real detail resides - your frame of film. How much of it was captured. To verify this, you can use a loupe or microscope depending on just how far you want to see. I use something like a Carson loupe/microscope that gives me 6X to 40X magnification. At 40X, I can see what my 4000dpi Coolscan can resolve.
large.jpg


Every film has a different amount of resolution it can capture. For instance something like Kodak Techpan @ ISO 25 can resolve much more detail then say Rollei ScanFilm CN400 Pro as the grain size will intrude on the detail. The scene itself may not have enough detail to distinguish this resolution. The lens used, camera settings, motion, conditions will definitely compromise the potential detail that can be captured on the film.

Now that you have captured the detail on the film as confirmed by your loupe/microscope, the method of extracting that detail varies greatly. For instance comparing my Coolscan 4000dpi to an Epson V500 at 6400dpi yields very different level of actual detail resolved from the scan.

Coolscan on Fuji RVP
thumbnail.jpg
Full res version -> http://www.fototime.com/02BB797801DCA89/orig.jpg

Epson V500 on Fuji RVP
thumbnail.jpg
Full res version -> http://www.fototime.com/33269E445D10043/orig.jpg

On the Epson, scan setting greater then 2400dpi doesn't seem to provide more detail. Clearly, there is a vast difference in actual detail resolved between the two.

Then of course when you print, the paper type and size also affects the detail. I used to have different examples of paper types and actual detail resolved but will have to renew this at some point.

So in order for a straightforward mathematical equation to work, you would have to account for many other factors. Fortunately, you can visually verify all these things easily.

What's really hard is color/contrast accuracy . . . :whistling:
 

138S

Member
Joined
Dec 4, 2019
Messages
1,776
Location
Pyrenees
Format
Large Format
So in order for a straightforward mathematical equation to work, you would have to account for many other factors. Fortunately, you can visually verify all these things easily.

OP's question is quite precise, he suggests his scanner takes some 1600 dpi effective performance (which is around the V500/550/600).
 

Les Sarile

Member
Joined
Aug 7, 2010
Messages
3,419
Location
Santa Cruz, CA
Format
35mm
OP's question is quite precise, he suggests his scanner takes some 1600 dpi effective performance (which is around the V500/550/600).

There are many steps involved that affect how big a print can be made from a 35mm and 120mm exposure without losing resolution. Sometimes, it is not obvious that every step introduces a loss. By listing them - and providing an easy way to verify, the OP can evaluate just how big a print can be achieve now or address the losses accordingly to get to what is needed. A good exercise that can be done in the safety of our home.
 
  • 138S
  • 138S
  • Deleted
Photrio.com contains affiliate links to products. We may receive a commission for purchases made through these links.
To read our full affiliate disclosure statement please click Here.

PHOTRIO PARTNERS EQUALLY FUNDING OUR COMMUNITY:


Ilford ADOX Freestyle Photographic Stearman Press Weldon Color Lab Blue Moon Camera & Machine
Top Bottom