• Welcome to Photrio!
    Registration is fast and free. Join today to unlock search, see fewer ads, and access all forum features.
    Click here to sign up

C41 Color Film - Reversal Process

Tied to the dock

D
Tied to the dock

  • 2
  • 0
  • 39
Running in the Snow

H
Running in the Snow

  • 0
  • 1
  • 51

Recent Classifieds

Forum statistics

Threads
203,080
Messages
2,849,557
Members
101,646
Latest member
theshininglad
Recent bookmarks
0
Ah, but it'll look interesting for sure!

Of course, and I'm all for doing it for that reason.

You may well be right, but there's only one way to find out for sure :wink: If I manage to find another roll of Phoenix, I'm gonna give it a try. For science, of course.

It's been done before. I believe he shot it with warming filter and applied further edits in post to get something close to useful. You can browse through his stream and see whether you prefer Phoenix processed in C-4 or in E-6.
 
Thanks for posting that @brbo. I quite like that blue palette. It'll work very well indeed for certain subject matter, also with that pronounced grain. Very interesting; maybe I should give this a go.
 
So i have developed a second roll, but with first developer 1:31 for 13 Minutes but 22°C.

It came out much darker, pictures are barely visible, so i am very much confused now...
My understanding was lower time/temperature of first developer = lower density? But it seems not to be so easy - as always ;-)

Some advises would be highly apreciated!
 
My understanding was lower time/temperature of first developer = lower density?

Yes, after the first developer. But since you then bleach out that lower density image and proceed to develop the remaining silver halide, of which more remains, you end up with exactly the opposite.
Sorry, I meant to tell you earlier, but to make your slides brighter, you either have to develop more in the first developer (higher concentration, higher temperature, longer time) or you have to add more silver solvent to the first developer to remove some of the silver halide. Which approach you choose, depends on the contrast and in particular highlight rendition. If the slides are essentially OK but the highlights are muddy, the silver solvent approach is the most logical. If they're overall too dark, then just give some more development in the first developer.
 
Dear Korax,

ahh, interesting, thank you for the explanation! I always aprecieate your knowledge. So next roll i will try with stronger solution, because i would like to keep the temperature (39°C), and time is second option for me.

I will report...
 
So i have developed a second roll, but with first developer 1:31 for 13 Minutes but 22°C.

It came out much darker, pictures are barely visible, so i am very much confused now...
My understanding was lower time/temperature of first developer = lower density? But it seems not to be so easy - as always ;-)

Some advises would be highly apreciated!

The process of reversing the film is in two stages. The first stage is the important one - everything depends on it. It's surprising to some people, but the black and white developer is critical. If you want higher density, you need to reduce the time/temperature of the first developer and vice versa. If you got too dark shots on your first try, then you're looking for more intensive black-and-white processing (or exposure correction). The color developer after the reverse is finishing treatment - only what is left of the first phase is developed there - even twice as long time with the color developer, will not cause a change in density. The process of bleaching and fixing destroys the image obtained in black and white processing, leaving only that of the color one.
 
I experimented recently with developing E-6 film with HC-110 as first developer (+ECN-2/RA-4 for colour developer)...

My first try was for first developer was 6min @38°C HC110 dil. A (1+15) in Jobo and it worked surprisingly well. I don't know, maybe the nature of C-41 film requires considerably different regime, but you might use that as a starting time?

The color developer after the reverse is finishing treatment - only what is left of the first phase is developed there - even twice as long time with the color developer, will not cause a change in density.

I'd have to disagree. I did notice a slight change of density (higher Dmax) with doubling the time of colour developer (10 vs 5min in ECN-2).
 
I'd have to disagree. I did notice a slight change of density (higher Dmax) with doubling the time of colour developer (10 vs 5min in ECN-2).

I have no explanation for this. Maybe change the density of the mask?
In one of the tests I did, I left the film in the color developer for over 10 minutes, in daylight at a falling temperature (I had left the tank on the table without heating). I don't have a baseline for comparison, but it seems like only the highlights were somehow more distorted, which maybe comes from the mask itself. But in a film without a mask, it wouldn't matter at all :smile:
 
I wasn't very surprised by slight increase in density since I recalled reading about this in Fuji 6x E-6 kit manual:

1710501687172.png


That, of course, doesn't mean that you can indefinitely increase density with extending colour dev. time. It's just that you need to establish whether you are actually getting max Dmax with your times. My 5min with ECN-2 developer were not giving me max. possible Dmax.
 
Well, of course there will always be an underdevelopment problem with the color developer. In fact, the "standard" development time is 6 min, some kits even have instructions to go above 8 min :smile:
 
So now i have developed it 20 minutes in HC 1:11. I could have paid more attention to the temperature, but thanks to you i think i am on the right track now...
For the next film i will lower the ASA setting
 

Attachments

  • PT28.jpg
    PT28.jpg
    68.4 KB · Views: 122
  • PT30a.jpg
    PT30a.jpg
    56.5 KB · Views: 113
still a bit dark,

I don't know how the slides could be anything else than "a bit dark" -- using cyan dye to offset the orange base is like including a ND filter in the film.
 
No no Koraks, you are right, i was using Phoenix, the base is colorless after developing...
....And hope its stays with newer versions....
 
Mask dye is part of colour couplers in film emulsion (not of film base), in form of atomal group in its molecule, placed in its active part. During development, this group is being replaced by the atomal group from developing agent. So the coupler loses its pre-development colour and gets its developed colour.
This pre-colored are magenta couplers (yellow) and cyan couplers (red), but only part of them. Part of the couplers are normal, colorless.
If we removed their masking colour by some chemical before development, we would probably destroy the molecules of colour couplers and they wouldn't work anymore.
Theoretically it should be possible to somehow chemically destroy unused couplers after color image is developed, but I don't know if such chemical exists.
 
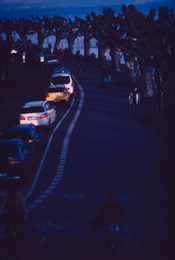
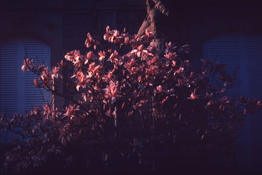
I tried something similar with Vision3 500T several years ago. Being a tungsten balanced film means you don't need to use any additional cyan filtering to counteract the orange mask when using it in daylight. I exposed it at ISO 100 and used an ECP-2 color developer which has curve characteristics that further act to 'mask the mask', as it were.

I too found that the results don't scan well but do look quite good when viewed in person with daylight illumination.

View attachment 364312

Hi there! I’m fascinated with ECP-2 because I want to develop Kodak 2383 the correct way. Do you have an IG page where you post more results? Where did you buy the chems?
-Adrian
 
After lots of tries with little sucess i think this evening i got the break through..
I tried with richer developer (Fx-39 1:9 for 25 minutes), bracketing and a doubling of bleaching time and in the first time i got some promising results.
I will show the scans when it has dried.
I have the impression the bleaching time was way to short in my last experiments...
 
Very interesting. Thank you for sharing your results.

Gregory Davis made an excellent video on RA 4 reversal filters:

As always, he used a systematic approach to figuring out the optimal combination of filters.
While film reversal is different from RA4 paper you can certainly adopt his methodology.

From very little I know about reversal processing, the first developer is the most critical step. It controls the contrast and the color shift. I am not sure if HC-110 is the optimal choice here. You might experiment with other developers. The formulas for several processes like E-6 and B&W are available if you choose to mix your own.


I'm only just seeing this thread, so I apologize for replying to an old post. I've also only discovered his channel in the past few weeks, but have loved it both for how thorough/methodical he is on everything, his technical explanations, and it doesn't hurt that he's in Central Kentucky(my happy place for photography and life in general...).

I hadn't seen this video before watching the link here last night, and I know his goal here was direct positives from the camera, but I'm wondering-could this same general approach(obviously without the daylight correction assuming using a tungsten enlarger, which is all I have) for RA4 reversal could be used to do direct positives from slides.

I know scanning is the easy route, but also never had the chance to print Ciba. I've never done color darkroom printing anyway, and want to start although obviously conventional RA4 is going to be the best way to do that. Still, though, it's something I wouldn't mind to play with if it's a viable option, and obviously RA4 is at least capable of a direct positive.
 
I hadn't seen this video before watching the link here last night, and I know his goal here was direct positives from the camera, but I'm wondering-could this same general approach(obviously without the daylight correction assuming using a tungsten enlarger, which is all I have) for RA4 reversal could be used to do direct positives from slides.

Short answer: yes. There are a couple of threads here on Photrio with examples and experiments along those lines, including some posts by (RIP) @Photo Engineer.
There's also some stuff on Instagram, but I'm not sure how easy that is to find presently.
 
I'm only just seeing this thread, so I apologize for replying to an old post. I've also only discovered his channel in the past few weeks, but have loved it both for how thorough/methodical he is on everything, his technical explanations, and it doesn't hurt that he's in Central Kentucky(my happy place for photography and life in general...).

I hadn't seen this video before watching the link here last night, and I know his goal here was direct positives from the camera, but I'm wondering-could this same general approach(obviously without the daylight correction assuming using a tungsten enlarger, which is all I have) for RA4 reversal could be used to do direct positives from slides.

I know scanning is the easy route, but also never had the chance to print Ciba. I've never done color darkroom printing anyway, and want to start although obviously conventional RA4 is going to be the best way to do that. Still, though, it's something I wouldn't mind to play with if it's a viable option, and obviously RA4 is at least capable of a direct positive.

I have had "try enlarging slides onto reversal RA4" on my "obscure projects to do" list for years now. Haven't gotten around to it yet. Please do post if you give it a try! Mat Marrash has some videos on his channel where he shoots 8x10 sheets of RA4 paper in-camera through a slew of filters. He has to use studio strobes with the hatred of 1000 suns to get enough light for a decent portrait, but at the end of the day his results look surprisingly good.

I always figured it should be much easier to get a good color balance and not have to worry about anything more than perhaps some slightly long exposure times, if I were to adapt the same concept to printing slide film in my enlarger. I also missed out on Cibachrome and would absolutely love to try what is probably the next best thing.
 
Photrio.com contains affiliate links to products. We may receive a commission for purchases made through these links.
To read our full affiliate disclosure statement please click Here.

PHOTRIO PARTNERS EQUALLY FUNDING OUR COMMUNITY:


Ilford ADOX Freestyle Photographic Stearman Press Weldon Color Lab Blue Moon Camera & Machine
Top Bottom