Adventures in film characteristic analysis

Recent Classifieds

Forum statistics

Threads
199,129
Messages
2,786,644
Members
99,819
Latest member
stammu
Recent bookmarks
1
OP
OP
radiant

radiant

Member
Joined
Aug 18, 2019
Messages
2,135
Location
Europe
Format
Hybrid
I haven’t read this whole thread, but, yes, correctly exposed and processed black and white film will generally have at least 4 stops of tone values below a correctly exposed 18% gray card, and the upper limit of highlights varies from film to film, but you can usually get at least 4-5 stops over middle gray.

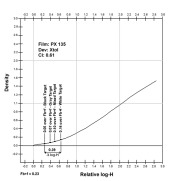
what you’re doing is interesting, but doesn’t necessarily directly relate to data I’ve posted online, as my information is relative to exposing a gray card through a camera lens and using an incident light meter to set exposure. That being said, if you’ve processed the film to ISO contrast, an 18% grey card will land ~0.90 log density above film base plus fog. The catch is, where middle grey lands is going to vary a lot based on developer used, agitation, temperature, and how long it was in the developer.

Yes the first test had a bug and your information was pretty useful to track that down. Thanks!

I don't agree on the second paragraph; essentially I'm doing the same. I try to avoid exposing the test strips with camera and use a device to do the exposure. I'm removing the extenral meter from the equation here and reducing amount of film needed (by half). And no I'm not saying this is better way. Building sensitometer by yourself is not generally a good idea :smile:

But doesn't your test vary by developer too? I probably do not understand your claim here.
 
OP
OP
radiant

radiant

Member
Joined
Aug 18, 2019
Messages
2,135
Location
Europe
Format
Hybrid
The responsivities (ADC units per µW/cm2) shown in Fig.8 of the datasheet have allowed changes min-max +/-15%. Plus conversion from µW/cm2 to lux is not entirely trivial. Since this thread discusses fine points of sensitometry at the level of 1/3 stop (26%) or less, the measurement should be accurate to 10% or better, total error budget, not just calibration of zero point of illumination. In that respect, I believe that a good exposure meter might actually not be that bad; Gossen used to include with some of its meters a calibration constant in lux.

Interesting data. I'm not using the lux meter to calibrate invidual slots at all; I trust in manufacturing of the LEDs to be pretty similar and also to my code. And both seem to be decent, I would guess. I used the sensor to just check the ballbark of the lux amount and getting pretty much same results from each slot was enough for me to continue with the project. I would like to remind that I'm not doing any "real" science here; this is build for my own purposes where the accuracy doesn't need to be that high.

They promise certain accuracy, but you never know how much you are under the tolerances. Getting constantly same results from different slots might be indication that the sensor is far more better than what the spec says. But that is just guessing.

A good reminder, yes. But I mean, I've 3D printed, used chinese ebay LEDs, built my own diffusors etc. What can you expect, really? :smile:
 

bernard_L

Member
Joined
Feb 17, 2008
Messages
2,053
Format
Multi Format
They promise certain accuracy, but you never know how much you are under the tolerances. Getting constantly same results from different slots might be indication that the sensor is far more better than what the spec says. But that is just guessing.
A good reminder, yes. But I mean, I've 3D printed, used chinese ebay LEDs, built my own diffusors etc. What can you expect, really? :smile:
Point taken. I guess I was reacting to the thread as a whole, including a discussion of the speed point to 3 decimal places in logE, which possibly raised my expectations.
upload_2022-2-15_18-32-6.png


Good luck in your endeavor. And do not forget the overall goal: images.
 

Adrian Bacon

Subscriber
Joined
Oct 18, 2016
Messages
2,086
Location
Petaluma, CA.
Format
Multi Format
essentially I'm doing the same

You're making exposures, yes, but not using a camera. There's nothing wrong with that approach. My setup more closely replicates what you'd get out in the real world because it's using a camera and actually going through the camera lens, and technically, if the in-camera reflective meter (if it had one) was correct, would net the same results as using an incident meter. That's why I did my setup the way I did. Anybody can replicate it with nothing more than an 18% gray card and a camera with a built in meter. Put the card with the light shining on it and have the card directly facing the camera, put the lens at infinity, fill the frame, meter and take a shot at the metered settings. Reduce the exposure by 4 stops, take a shot. Process and look at the two densities. Adjust exposure and processing time until desired film speed and contrast is reached. If you want to characterize the whole thing, once you have the film speed and processing time down, it's pretty straightforward to use the lens aperture to walk up and down the exposure range. This does mean your camera lens aperture and shutter need to be reasonably accurate, but most reasonably well maintained cameras aren't going to be so off that it causes huge problems. It's not scientific level, but for most users is accurate enough to calibrate their own setup to their liking and be within a third to a half stop of scientific methods.

In that respect, your method's intent isn't the same, so yes, you're exposing film and characterizing the curve, which is useful, but doesn't directly relate it to in camera exposures.

But doesn't your test vary by developer too? I probably do not understand your claim here.

Yes, which is why I also list which developer was used, dev temperature, agitation scheme, and processing time. The processing time and claimed film speed was arrived at by doing what I described above. I used a transmission rated lens so I could be fairly confident that the amount of light reaching the film was very close to what I thought it was if not exactly on. Every developer will net different results (along with dev temperature, agitation scheme, etc).
 
OP
OP
radiant

radiant

Member
Joined
Aug 18, 2019
Messages
2,135
Location
Europe
Format
Hybrid
You're making exposures, yes, but not using a camera. There's nothing wrong with that approach. My setup more closely replicates what you'd get out in the real world

Ok, I understand. Yes of course calibrating the process on the real equipment is of course far better. But that can be of course left out, but then.. it is not calibrating for the whole process. If one wants to just analyse only development effects, then there is no need to use a camera. And it is true that everyone has equipment to do their own analysis; no need to build the device I have built.

Yes, which is why I also list which developer was used, dev temperature, agitation scheme, and processing time.

Of course one needs to do that. I think I've described my method; but as a reminder - Rodinal 1+25 20degC, 1 min agigation in Paterson, times 6 and 12 minutes. Very basic stuff.
 
OP
OP
radiant

radiant

Member
Joined
Aug 18, 2019
Messages
2,135
Location
Europe
Format
Hybrid
Some tests that I would like to do but I don't know if I have enough interest:

- Egg-inside-agitation vs maniac shaking
- 30sec vs 1 minute interval in agitation
- Coldinal
- Rodinal semi-stand 30min vs 60min (aka "does the Rodinal actually die after 30 minutes")
- Violent abuse; 40degC developer, heavy overdevelopment
 
Joined
Jan 7, 2005
Messages
2,624
Location
Los Angeles
Format
4x5 Format
First of all, I agree that for most users your method is accurate enough to produce a film curve can yield satisfactory results, but I was wondering if you could elaborate on a couple of claims?

My setup more closely replicates what you'd get out in the real world because it's using a camera and actually going through the camera lens

Does it really. and more importantly, should it? Film curves are a graphic depiction of how a film responses to varying amounts of light in a given developmental situation. The idea is to eliminate as many variables as possible which is why a step tablet or step wedge is usually used. Camera exposure can then be projected upon the film curve. At best, testing with a camera will only incorporate the effects of the camera and optical system under the specific testing conditions and not reflect optical systems in general.

Obviously you are not testing the accuracy of the camera and lens. So how exactly does your testing conditions represent the results from a camera operating system in the real world?

and technically, if the in-camera reflective meter (if it had one) was correct, would net the same results as using an incident meter.

A TTL meter measures the actual light passing through an optical system. A hand held meter must assume general conditions. While as far as I can tell, you've minimized some of the variables, the actual exposure is still an unknown. If you are concerned about more than relative log-H (and most people really shouldn't be), then the measurement should be made as close as possible to the plane of exposure.

you're exposing film and characterizing the curve, which is useful, but doesn't directly relate it to in camera exposures.

The test doesn't need to be made with a camera to directly relate to camera exposure. The camera image is made up of a range of exposure values. The film curve shows the resulting densities to corresponding exposure values.

The film curve is one part of the photographic process. It is the film\s response to exposure. Camera exposure should be a separate measurement. It is superimposed upon the film curve. With a camera image curve in addition to a film curve, any shooting condition can be applied and not just the one from the test. You only need to test the film once and then it can be apply it to a range of conditions..
 

Adrian Bacon

Subscriber
Joined
Oct 18, 2016
Messages
2,086
Location
Petaluma, CA.
Format
Multi Format
Does it really. and more importantly, should it?

It's a matter of intent. My intent was to provide a documented way that most anybody could easily reproduce with their own equipment in order to calibrate their particular setup to their own conditions in a reasonably accurate and consistent way. The OPs intent isn't that. I've never said one is better than the other or either one should be followed.

Obviously you are not testing the accuracy of the camera and lens. So how exactly does your testing conditions represent the results from a camera operating system in the real world?

Other people may not be testing the accuracy of their own set up, however I have gone through that exercise with my equipment to the best accuracy I can muster with what I have available to me. This is why I use a transmission rated lens If you're not familiar with them, they're lenses where the actual amount of light passing through the lens is measured and the f-stop markings (more appropriately t-stop markings) are marked on the barrel of the lens with the aperture control ring on the barrel of the lens so you can grab it and turn it to the t-stop you want. Awful handy. You can incident meter a scene and turn the ring to the t-stop the meter says and sure enough, that's the amount of light actually hitting the image plane, minus any in-accuracies you might have in actually putting the mark on the t-stop mark on the barrel. The same goes for why I use a strobe and incident meter. It's about accuracy and repeatability while taking things like shutter accuracy out of the equation. I have multiple strobes and multiple light meters (and multiple cameras) that I've gone through this exercise with to compare against each other just to eliminate any one piece that might not be that accurate.

Going back to how this replicates a camera system out in the real world? That wasn't the direct intent. The direct intent was two fold. One was to allow me to come up with development times for film coming into my lab, the other intent was to provide a documented way that others could use their real cameras out in the real world to reproduce it for themselves if they so desired. You can't realistically claim that this is for real users using real cameras out in the real world if what you're doing doesn't itself have a real camera with a real lens. Yes, I've done some things to eliminate variables for my particular setup based on my own needs, however, those are variables that a real user with a real camera may actually need to have in the equation so that they can calibrate their own particular setup to their own working conditions and practices.

A TTL meter measures the actual light passing through an optical system. A hand held meter must assume general conditions. While as far as I can tell, you've minimized some of the variables, the actual exposure is still an unknown.

No it isn't. The camera I'm using has a TTL meter in the camera, and guess what? If I turn the strobe modeling light on and measure that with the incident meter, set the t-stop of the lens to what the incident meter says and the cameras shutter speed to what the incident meter says and half press the shutter button so that it meters using the camera TTL meter, the camera TTL meter agrees that the exposure is correct. So, while yes, technically, I don't know *exactly* how many MCS is actually hitting the image plain, I'm well inside of a quarter of a stop and given that my incident meters measure in 1/10 stop increments, it'd be willing to wager I'm easily +-1/10 of a stop or less in terms of accuracy.

The test doesn't need to be made with a camera to directly relate to camera exposure.

See my comment about intent above.

Again, as I've stated multiple times elsewhere in material I've posted here on Photrio and in other threads, the goal was not to reproduce super stringent and scientific methods, or to try to match methodologies that others here on Photrio deem acceptable (or not, some on here are weird), but rather to be as reasonably accurate as I can be with easily accessible and reasonably affordable equipment and then document that and make it publicly available for others to adapt to their own needs. I've disclosed that more times than I'd care to remember. I never ask if I can do something until after I've already done it. I generally find that often times people tend to be overly clingy to the status quo or old established practices, which usually leads to being dismissive of other ways of getting to a destination. I have zero problems with taking the status quo or old established practices and throwing them right out the window and coming up with something using a different path. You'd be amazed at the things you learn when you're willing to do that, and shockingly (or not) still arrive at something useful. That's not to say the status quo or established practices don't have value, they do, or did at one point for a given intent. That just may not necessarily match my intent. Nothing wrong with that.
 
Joined
Jan 7, 2005
Messages
2,624
Location
Los Angeles
Format
4x5 Format
It's a matter of intent. My intent was to provide a documented way that most anybody could easily reproduce with their own equipment in order to calibrate their particular setup to their own conditions in a reasonably accurate and consistent way. The OPs intent isn't that. I've never said one is better than the other or either one should be followed.


Other people may not be testing the accuracy of their own set up, however I have gone through that exercise with my equipment to the best accuracy I can muster with what I have available to me. This is why I use a transmission rated lens If you're not familiar with them, they're lenses where the actual amount of light passing through the lens is measured and the f-stop markings (more appropriately t-stop markings) are marked on the barrel of the lens with the aperture control ring on the barrel of the lens so you can grab it and turn it to the t-stop you want. Awful handy. You can incident meter a scene and turn the ring to the t-stop the meter says and sure enough, that's the amount of light actually hitting the image plane, minus any in-accuracies you might have in actually putting the mark on the t-stop mark on the barrel. The same goes for why I use a strobe and incident meter. It's about accuracy and repeatability while taking things like shutter accuracy out of the equation. I have multiple strobes and multiple light meters (and multiple cameras) that I've gone through this exercise with to compare against each other just to eliminate any one piece that might not be that accurate.

Going back to how this replicates a camera system out in the real world? That wasn't the direct intent. The direct intent was two fold. One was to allow me to come up with development times for film coming into my lab, the other intent was to provide a documented way that others could use their real cameras out in the real world to reproduce it for themselves if they so desired. You can't realistically claim that this is for real users using real cameras out in the real world if what you're doing doesn't itself have a real camera with a real lens. Yes, I've done some things to eliminate variables for my particular setup based on my own needs, however, those are variables that a real user with a real camera may actually need to have in the equation so that they can calibrate their own particular setup to their own working conditions and practices.


No it isn't. The camera I'm using has a TTL meter in the camera, and guess what? If I turn the strobe modeling light on and measure that with the incident meter, set the t-stop of the lens to what the incident meter says and the cameras shutter speed to what the incident meter says and half press the shutter button so that it meters using the camera TTL meter, the camera TTL meter agrees that the exposure is correct. So, while yes, technically, I don't know *exactly* how many MCS is actually hitting the image plain, I'm well inside of a quarter of a stop and given that my incident meters measure in 1/10 stop increments, it'd be willing to wager I'm easily +-1/10 of a stop or less in terms of accuracy.


See my comment about intent above.

Again, as I've stated multiple times elsewhere in material I've posted here on Photrio and in other threads, the goal was not to reproduce super stringent and scientific methods, or to try to match methodologies that others here on Photrio deem acceptable (or not, some on here are weird), but rather to be as reasonably accurate as I can be with easily accessible and reasonably affordable equipment and then document that and make it publicly available for others to adapt to their own needs. I've disclosed that more times than I'd care to remember. I never ask if I can do something until after I've already done it. I generally find that often times people tend to be overly clingy to the status quo or old established practices, which usually leads to being dismissive of other ways of getting to a destination. I have zero problems with taking the status quo or old established practices and throwing them right out the window and coming up with something using a different path. You'd be amazed at the things you learn when you're willing to do that, and shockingly (or not) still arrive at something useful. That's not to say the status quo or established practices don't have value, they do, or did at one point for a given intent. That just may not necessarily match my intent. Nothing wrong with that.

I was attempting to start a conversation on theory. It's probably not realistic to expect questioning points of disagreement will come across as anything other than an attack. It was not my intent.

You may have noticed i wrote your process can be effective and that exposure accuracy isn't all that important on this level. I wasn't questioning your technique, but the assumptions that came with your statement. My emphasis was your assumption that it represented the real world, not that it was a method people can use. People can also contact a step tablet under an enlarger too. In an indirect way, I was getting at how shooting a gray card doesn't really represent shooting in the real world either, and even if all the other factors having to do with shooting with a camera does, it doesn't incorporate flare. Don't misunderstand me, this is desirable in testing. It just doesn't represent the real world use.

When I wrote that you obviously are not testing the lenses with this set-up was an acknowledgement that you weren't making the mistake thinking this type of testing will factor in (and correct) problems with shutter and f/stop calibration. Not that ou were working with uncalibrated lenses. It was supposed to be a compliment. Anyway, I'm late for work.
 

Nodda Duma

Member
Joined
Jan 22, 2013
Messages
2,685
Location
Batesville, Arkansas
Format
Multi Format
Adrian, I think your approach is valid in that you are attempting to eliminate all the variables. However, the major variable that I don’t see addressed is the spectral content of the ambient light as well as the spectral transmission of the optics. This is true even when lighting conditions *appear* the same (ie sunny conditions from day to day) and, obviously, why studio lighting was invented. Regarding studio lighting: It’s not clear to me if you are testing in a studio or outdoors, but the difference in effective speeds between these two lighting sources is well known. Variances in glasstypes and coatings means variations in spectral transmission *separate and distinct* from absolute transmission (T-stop calibration), which means your results are really only valid for the specific lens you are using unless you account for spectral content. I would also recommend performing a veiling glare test to eliminate the effect of lens contrast….again, a variable separate and distinct from T-stop characterization. These effects contribute as much variability as varying agitation techniques or minor changes in developer times.

Whether Stephen knows it or not, that is a major point of deviation between the controlled conditions he discusses and testing under ambient conditions. It’s also why engineers test systems for performance in *both* controlled settings and out in the field.

Again, nothing wrong with your approach at all, but all the variables should be accounted for in the type of controlled tests you’re performing. Controlling variables is required to determine causality. You may not be aware of these variances due to spectral content and contrast, so I wanted to bring it to your attention.
 
Joined
Jan 7, 2005
Messages
2,624
Location
Los Angeles
Format
4x5 Format
Adrian, I think your approach is valid in that you are attempting to eliminate all the variables. However, the major variable that I don’t see addressed is the spectral content of the ambient light as well as the spectral transmission of the optics. This is true even when lighting conditions *appear* the same (ie sunny conditions from day to day) and, obviously, why studio lighting was invented. Regarding studio lighting: It’s not clear to me if you are testing in a studio or outdoors, but the difference in effective speeds between these two lighting sources is well known. Variances in glasstypes and coatings means variations in spectral transmission *separate and distinct* from absolute transmission (T-stop calibration), which means your results are really only valid for the specific lens you are using unless you account for spectral content. I would also recommend performing a veiling glare test to eliminate the effect of lens contrast….again, a variable separate and distinct from T-stop characterization. These effects contribute as much variability as varying agitation techniques or minor changes in developer times.

Whether Stephen knows it or not, that is a major point of deviation between the controlled conditions he discusses and testing under ambient conditions. It’s also why engineers test systems for performance in *both* controlled settings and out in the field.

Again, nothing wrong with your approach at all, but all the variables should be accounted for in the type of controlled tests you’re performing. Controlling variables is required to determine causality. You may not be aware of these variances due to spectral content and contrast, so I wanted to bring it to your attention.

Stephen does know this. I was attempting to draw the conclusion out instead of simply lecturing. With a camera test and shooting a single toned target, there is little flare and certainly not enough to represent real world conditions. Flare comes from non-image forming exposure from the higher values scattered by the camera and optical system which disproportionately affect the shadow area. In a camera test shooting a single toned target, there are no highlights and there are no shadows. Even if there existed average flare, it has little affect on the mid-tones (~ 3% vs 100% for the shadow exposure). In the camera test, the mid-tone is stopped down to determine the shadow exposure. It's still a mid-tone value with mid-tone flare if any exists. So the statement that testing with a camera reflects real world conditions is a fallacy, because flare is part of the real world and isn't in a test using a target with a single tonal value. In other words, flare will still need to be factored into the interpretation of the film curve.

I'm working on a thread about interpreting the film curve which means incorporating flare into a graph that doesn't have flare. Not factoring in flare is where sooo many people screw up (especially with the Zone system, but so did Adams).

I made a reference to how the test affects general optical systems vs specific optical systems. Adrian's use of the T-stop almost factors out the whether the tests are valid only for his specific lens. However, having a lens bench tested is something the average person doesn't do, so is this something anyone can do or maybe contacting a step tablet is less effort and maybe less expensive. This leaves how testing with a camera relates in general with all cameras in real world conditions. My point is just because you are using a camera doesn't mean it relates to real world conditions. The purpose of Jones' psychophysical first excellent print tests is to find a correlation between the photographic process (real world shooting condition and the perception of print quality) and a sensitometric interpretation of the process. This is how scientific testing reflects real world use.

There are a lot a variables in any testing situation to consider and I have to hand it to Adrian for his efforts to address them. Of course one of my favorite examples is how the ISO speed constant would have been 0.95 except that the color temperature of sensitometers had changed from (I believe) sunlight to daylight, which has more blue. So the constant was adjusted to 0.80 to account for the higher degree of blue.

I tend not to get involved in how to discussions, but I have a bit of a pet peeve when people make statements like ISO film speed isn't accurate because it is tested in a lab, or such and such does not represent real world conditions. My whole point with Adrian was that a camera test doesn't necessarily represent the real world and that a film curve isn't supposed to but is part of a process that does. It wasn't meant as an attack on the procedure.
 
Last edited:

Adrian Bacon

Subscriber
Joined
Oct 18, 2016
Messages
2,086
Location
Petaluma, CA.
Format
Multi Format
I was attempting to start a conversation on theory. It's probably not realistic to expect questioning points of disagreement will come across as anything other than an attack. It was not my intent.

No worries. I try to take middle of the road.

People can also contact a step tablet under an enlarger too.

Assuming they have a darkroom, or access to a darkroom, yes. In this day and age, that's really rare. I get regularly contacted by people that want to use my darkroom.

I was getting at how shooting a gray card doesn't really represent shooting in the real world either,

True, but, if you're trying to calibrate your own process and want a relatively static fixed point of reference, it's a reasonably good place to start that's not expensive. People can also just pick a scene and shoot a series of over/unders and use massive dev chart and go with the exposure they like best and get to something that works for them that way too. There isn't really any right or wrong here. Just be aware of the variables and what's being included (or not) when factoring in changes to make to exposure or process.
 

Adrian Bacon

Subscriber
Joined
Oct 18, 2016
Messages
2,086
Location
Petaluma, CA.
Format
Multi Format
It’s not clear to me if you are testing in a studio or outdoors

In a studio. With black walls. There are no windows. If I don't put a light on it, it doesn't exist.

Variances in glasstypes and coatings means variations in spectral transmission *separate and distinct* from absolute transmission (T-stop calibration), which means your results are really only valid for the specific lens you are using unless you account for spectral content.

True. I'm using a fairly modern lens and assuming that it doesn't introduce significant spectral shifts. When shooting it on a digital camera, it renders what many would call "clinical", but to your point, yes, that is a variable that I don't really have any control over other than to just be aware of it.

I would also recommend performing a veiling glare test to eliminate the effect of lens contrast….again, a variable separate and distinct from T-stop characterization. These effects contribute as much variability as varying agitation techniques or minor changes in developer times.

Agreed. I fill the frame for exactly that reason, though in general use, the lens doesn't flair a lot. I don't have specific values or anything like that, but it's not a flair monster.
 
Joined
Jan 7, 2005
Messages
2,624
Location
Los Angeles
Format
4x5 Format
No worries. I try to take middle of the road.


Assuming they have a darkroom, or access to a darkroom, yes. In this day and age, that's really rare. I get regularly contacted by people that want to use my darkroom.


True, but, if you're trying to calibrate your own process and want a relatively static fixed point of reference, it's a reasonably good place to start that's not expensive. People can also just pick a scene and shoot a series of over/unders and use massive dev chart and go with the exposure they like best and get to something that works for them that way too. There isn't really any right or wrong here. Just be aware of the variables and what's being included (or not) when factoring in changes to make to exposure or process.

We are in agreement there and on many other points. Whatever works for the individual. But bad theory can get out of control leading to such claims as "true film speeds" and conspiracy theories about manufacturers lying about film speeds.
 

Adrian Bacon

Subscriber
Joined
Oct 18, 2016
Messages
2,086
Location
Petaluma, CA.
Format
Multi Format
We are in agreement there and on many other points. Whatever works for the individual. But bad theory can get out of control leading to such claims as "true film speeds" and conspiracy theories about manufacturers lying about film speeds.

LOL... yeah, I tend to take those with a grain of salt. Just through my own efforts, I've gotten differences and have spent time and effort investigating and sussing certain things out just for my own edification, and am not under any illusions that my setup is any better than what Kodak can muster.
 
Joined
Jan 7, 2005
Messages
2,624
Location
Los Angeles
Format
4x5 Format
In an earlier post, I wrote about limited flare in a camera test that shoots a target consisting of a single tone, but I didn't have access to any visuals.

The example below is of the camera image. It's from a statistically average 2.20 log Luminance range. Curve A is a no flare curve used as a reference. Curve B is the camera image curve with one stop of flare. Flare is non-image forming light created mostly by the higher illuminance values interacting with the optical system and camera. Flare is mostly produced by the subject. Even though the exposure covers the entire negative, it disproportionately affects the shadows. One stop of flare means the value of the exposure for the shadow is added to the overall exposure. This doubles the shadow exposure (one stop) yet has a negligible affect on the highlight exposure. The metered exposure is only slightly influence by flare.

In order to have flare, you need higher exposure values influencing lower values. If the shadow didn't reach as far down in the example, the degree of flare would no longer be 1 stop. In fact, the camera image would look the same except the lower end would be cut off. If the degree of higher values was reduced, the degree of flare would also be reduced. If only a target made up of a single tone was photographed, flare from the subject would practically be eliminated. The camera image and no flare reference curves would effectively merge.

upload_2022-2-18_18-29-24.png


By stopping down isn't the gray card moved into the shadows where there is a greater chance for it to be affected by flare?

The answer is, it doesn't work like that. What is actually happening is the mid-tone subject value will be exposed at a lower point where the shadow exposure would normally fall. Using a more extreme example of a full range subject with a stop flare (basically the same as above) might better illustrate the point. A gray card is metered and the camera is stopped down four stops, the entire curve will move downward in the camera image, but the relationship between the exposure values will not change. The small amount of flare at the metered exposure point will not increase just because it takes the place of where the shadow exposure would normally be. Most people will test with a gray card that fills the frame, which effectively makes for a no flare test.

upload_2022-2-18_19-20-24.png


I did a camera test to check for this. I shot a number of different targets. The camera setting were set. I made an exposure at the meter reading and stopped down four stops using ND gels. A sensitometric test was ran along with the camera tests. The table below has the Δ log-H differences between the metered exposure density and the stopped down density over three repeated tests. Four stops is 1.20 log-H range. Anything falling around a Δ1.20 range, most likely, is due to the absence of flare adding to the exposure.

upload_2022-2-18_19-30-17.png


upload_2022-2-18_19-39-48.png


I also did a test using what Phil Davis describes as a shadow box. It's a box lined with velvet and a hole cut our with the hole surrounded by a hood. The Idea is to make the hole as dark as possible. For the test the exposure was set to a metered gray card. I used four targets of differing values with the centers cut out for the shadow box opening. The targets weren't being shot. Their purpose was to introduce flare. A sensitometric test was run along with the shadow box test and the resulting densities were placed on the curve.

upload_2022-2-18_19-50-52.png
 

Attachments

  • upload_2022-2-18_19-49-59.png
    upload_2022-2-18_19-49-59.png
    79.8 KB · Views: 58

Adrian Bacon

Subscriber
Joined
Oct 18, 2016
Messages
2,086
Location
Petaluma, CA.
Format
Multi Format
In an earlier post, I wrote about limited flare in a camera test that shoots a target consisting of a single tone, but I didn't have access to any visuals.

The example below is of the camera image. It's from a statistically average 2.20 log Luminance range. Curve A is a no flare curve used as a reference. Curve B is the camera image curve with one stop of flare. Flare is non-image forming light created mostly by the higher illuminance values interacting with the optical system and camera. Flare is mostly produced by the subject. Even though the exposure covers the entire negative, it disproportionately affects the shadows. One stop of flare means the value of the exposure for the shadow is added to the overall exposure. This doubles the shadow exposure (one stop) yet has a negligible affect on the highlight exposure. The metered exposure is only slightly influence by flare.

In order to have flare, you need higher exposure values influencing lower values. If the shadow didn't reach as far down in the example, the degree of flare would no longer be 1 stop. In fact, the camera image would look the same except the lower end would be cut off. If the degree of higher values was reduced, the degree of flare would also be reduced. If only a target made up of a single tone was photographed, flare from the subject would practically be eliminated. The camera image and no flare reference curves would effectively merge.

View attachment 298697

By stopping down isn't the gray card moved into the shadows where there is a greater chance for it to be affected by flare?

The answer is, it doesn't work like that. What is actually happening is the mid-tone subject value will be exposed at a lower point where the shadow exposure would normally fall. Using a more extreme example of a full range subject with a stop flare (basically the same as above) might better illustrate the point. A gray card is metered and the camera is stopped down four stops, the entire curve will move downward in the camera image, but the relationship between the exposure values will not change. The small amount of flare at the metered exposure point will not increase just because it takes the place of where the shadow exposure would normally be. Most people will test with a gray card that fills the frame, which effectively makes for a no flare test.

View attachment 298698

I did a camera test to check for this. I shot a number of different targets. The camera setting were set. I made an exposure at the meter reading and stopped down four stops using ND gels. A sensitometric test was ran along with the camera tests. The table below has the Δ log-H differences between the metered exposure density and the stopped down density over three repeated tests. Four stops is 1.20 log-H range. Anything falling around a Δ1.20 range, most likely, is due to the absence of flare adding to the exposure.

View attachment 298700

View attachment 298701

I also did a test using what Phil Davis describes as a shadow box. It's a box lined with velvet and a hole cut our with the hole surrounded by a hood. The Idea is to make the hole as dark as possible. For the test the exposure was set to a metered gray card. I used four targets of differing values with the centers cut out for the shadow box opening. The targets weren't being shot. Their purpose was to introduce flare. A sensitometric test was run along with the shadow box test and the resulting densities were placed on the curve.

View attachment 298704

This is awesome, and just goes to reinforce that it's important to know what's being included (or not included) when making decisions about what to change when calibrating your own setup.
 
Photrio.com contains affiliate links to products. We may receive a commission for purchases made through these links.
To read our full affiliate disclosure statement please click Here.

PHOTRIO PARTNERS EQUALLY FUNDING OUR COMMUNITY:


Ilford ADOX Freestyle Photographic Stearman Press Weldon Color Lab Blue Moon Camera & Machine
Top Bottom