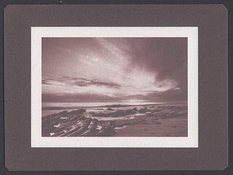
A New Cuprotype?

Dog Opposites

A
Dog Opposites

  • 2
  • 3
  • 111
Acrobatics in the Vondelpark

A
Acrobatics in the Vondelpark

  • 6
  • 5
  • 192
Finn Slough Fishing Net

A
Finn Slough Fishing Net

  • 1
  • 0
  • 108
Dried roses

A
Dried roses

  • 13
  • 7
  • 196
Hot Rod

A
Hot Rod

  • 5
  • 0
  • 118

Recent Classifieds

Forum statistics

Threads
197,470
Messages
2,759,548
Members
99,513
Latest member
yutaka96
Recent bookmarks
0

nmp

Member
Joined
Jan 20, 2005
Messages
1,995
Location
Maryland USA
Format
35mm
Background:

I thought it would be a good idea to open a new thread continuing the work started in an another thread started by @Jan de Jong on possibility of a VDB-like process using residual silver content in a depleted fixer:


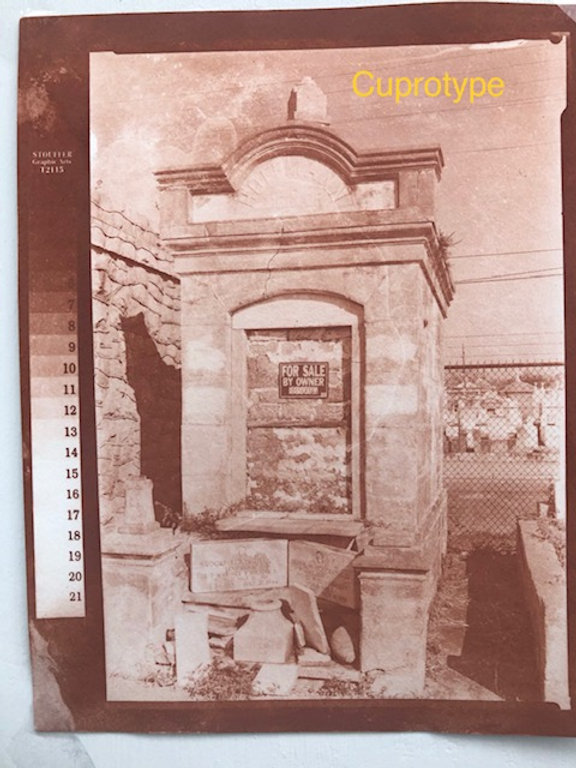
There it was demonstrated that a photogram can be made with a photosensitizer consisting of used film fixer, CuSO4 and ferric ammonium citrate (FAC). Questions regarding the role of CuSO4, which is obviously not a part of a typical VDB recipe, in the image formation led to the possibility that the active ingredient in the observed photo activity may also be the thiosulfate ions and not necessarily only the silver ones. Based on that, I speculated what would happen if a photosensitizer was made simply with pure sodium thiosulfate in lieu of the spent fixer. The image obtained in that case would be more akin to a cuprotype dating back to 1850’s and 1860’s (works of Burnett and Obernetter) with the most recent update by Jim Patterson:

Upon quick examination, I found that an image did form with such a photosensitizer on exposure to UV. This was followed up with some preliminary work by me presented on that thread to look at the viability of this process. Since the scope of this work is no longer use of spent fixer and the outcome no longer a variant of VDB-like process as originally premised, I felt a separate thread will be more appropriate - where a discussion with digital negatives can also be possible.

Continuing that work, based on a starter set of sensitizer formulation and process conditions, I was able to print an actual image of what I am terming as the New Cuprotype, to differentiate it from Patterson's version. The two are similar in that they both use FAC and CuSO4 in the photosensitizer. In the Patterson process, first a Cu(i) image is formed from Cu(ii) reduced by Fe(ii), itself the result of UV photoreduction of Fe(iii), which is then converted to a grey Cu(i) thiocyanate image by developing in ammonium thiocyanate. Finally, a copper(ii) ferrocynide, also known as Hatchett’s brown, image is formed by treatment with potassium ferricyanide.

In the current process the “developer” in a sense is the sodium thiosulfate, incorporated in the photosensitizer - so no separate intermediate image is required. A strong print-out of yellowish-brown image is obtained upon exposure. The exact nature of the pigment responsible for the image at this stage is not being proposed yet, but it’s safe to say it is some form of complex between Cu(i) and sodium thiosulfate. The development is simply washing out of the un-reacted chemicals in the paper in a similar fashion as cyanotype. Unlike cyanotype though, there does not seem to be any intensification of the image from what is already printed out during exposure. Copper ferrocyanide image is then obtained by treatment with potassium ferricyanide as usual.

In short, we may have stumbled upon a new cuprotype variant - thanks to @Jan de Jong' s creative experimenting.

The print in the next post.


:Niranjan.
 
Last edited:
OP
OP

nmp

Member
Joined
Jan 20, 2005
Messages
1,995
Location
Maryland USA
Format
35mm
..cont. from Post#1

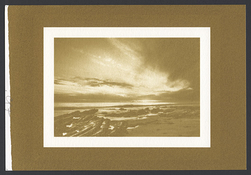
The following is how the print looks like at the first stage of copper/thiosulfate complex formation, made using a digital negative originally tailored for commercial gelatin chloride based POP:

2022-08-03-0001.jpg

As seen here, the print is handling the tones quite well from the shadows to the highlights, with smooth transitions and the white border, which is made with ink (not with external barrier such as Al foil or rubylith,) has come out quite clear - nearly as good as the bare un-processed paper (compare with the edge of the print on the left.) So at this stage it looks like there is no fog or stain – the bane of any new process.

Next post: Process details and the next step of toning with potassium ferricyanide.


:Niranjan.
 
Last edited:
Joined
Dec 29, 2018
Messages
982
Location
USA
Format
Traditional
Chiming in to confirm I was able to print out a random digital negative using a slapdash sensitizer of CuSO4, hypo crystals, and FAC. Subsequent steps of washing and attempted clearing degraded the image but that is not too surprising given the nascent stages of understanding. This seems like a natural adjunct to silver and pure iron processes. Good luck in your additional refinements!

Unwashed --
sdneocupro.jpg
 
OP
OP

nmp

Member
Joined
Jan 20, 2005
Messages
1,995
Location
Maryland USA
Format
35mm
...cont. from Post#2.

Here are the particulars of the process:

Paper: COT 320
Image size: about 3 ½” x 4 ½”

The composition of the sensitizer (it is kind of ad hoc first approximation using the solutions I already at hand):

FAC (50%), 1 part; CuSO4 pentahydrate (10%), 3 parts; Na Thiosulfate pentahydrate (15%), 1.2 parts. % are in distilled water (w/w). Add CuSO4 to FAC first, mix well to an emerald green color. Add the thiosulfate next.

Process:

1) Rod-coat solution. Air dry for 5 minutes until matte appearance, further dry in convection oven @ ~40 C for 6 minutes.

2) Exposure 40 minutes, home made UV box made of spiral BLB’s.

3) Process the print in a series of tap water washes for a total of 30 minutes and 8 changes of water. This sequence is not completely optimized, but long washes seem to be required to clean out any iron or CuSO4 which will cause fog with ferricynide later.

4) Dry (optional - can go straight to 6, although I have not tried that yet.)

5) Soak in tap water for 2 minutes.

6) Tone the print with potassium ferricyanide by leaving it face down in 2% solution for 15 minutes with intermittent agitation. Color changes from brown to brick or copper red. Follow by rinse/wash for 10 minutes with several changes of tap water.

7) Dry.

Final print in the next post.


:Niranjan.
 
OP
OP

nmp

Member
Joined
Jan 20, 2005
Messages
1,995
Location
Maryland USA
Format
35mm
...cont. from Post#5.

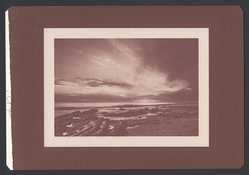
Final Print after toning looks like this:

2022-08-03-0002.jpg

The white border took some warmth (the print in person looks much better than the scan - I am actually amazed at the difference, as the scanner tends to cross-contaminate white areas from the areas in the immediate proximity.) Overall, I think I would be very happy with it. There is thankfully no so-called "bleeding" that afflicts cyanotypes all too often. The fact that it is able to handle a negative that was created based on POP printing (which requires even greater density than a salt print) without any blown-outs in the clouds is pretty impressive.

In conclusion, I am taken by how simple this process is and pleasantly surprised at how quickly I was able to make a print that does not have the usual bug-a-boos of other processes. This is simpler and more robust than cyanotypes for sure. More work of course needs to be done to increase the Dmax and reduce the remaining fog and reduce the Dmin and also make it faster-exposing. The recipe (the ratio of the 3 ingredients and their concentrations) and the wash-out process can be further optimized to address these aspects.

Comments and ideas for further improvements most welcome.


:Niranjan
 
Joined
Jul 28, 2016
Messages
2,568
Location
India
Format
Multi Format
Looks good. Thanks for sharing the results and the technical details.

Comments and ideas for further improvements most welcome.


Can it be toned further like Jim's Cuprotypes? A Kala Namak based Sulfide toning would be interesting :wink: Or Rodinal?

IIRC one could convert a Cuprotype into a Cyanotype using Ferric ammonium sulphate. Doing it selectively might give results similar to what @Jan de Jong posted yesterday.
 
OP
OP

nmp

Member
Joined
Jan 20, 2005
Messages
1,995
Location
Maryland USA
Format
35mm
Chiming in to confirm I was able to print out a random digital negative using a slapdash sensitizer of CuSO4, hypo crystals, and FAC. Subsequent steps of washing and attempted clearing degraded the image but that is not too surprising given the nascent stages of understanding. This seems like a natural adjunct to silver and pure iron processes. Good luck in your additional refinements!

Unwashed --
View attachment 311860

That's wonderful...thanks for sharing.

:Niranjan.
 
OP
OP

nmp

Member
Joined
Jan 20, 2005
Messages
1,995
Location
Maryland USA
Format
35mm
Looks good. Thanks for sharing the results and the technical details.


Can it be toned further like Jim's Cuprotypes? A Kala Namak based Sulfide toning would be interesting :wink: Or Rodinal?

IIRC one could convert a Cuprotype into a Cyanotype using Ferric ammonium sulphate. Doing it selectively might give results similar to what @Jan de Jong posted yesterday.

Thanks, Raghu. Hope I am not boring Photrio to death with all these long posts.
Those are all good ideas. I need to find what exact toner he is using - I think it's a combination Se and S toner - perhaps the polytoner. I have one similar to it from Moersch that I bought for salt prints but all it did was to bleach them. I will try it here. and of course the old stand by, Kala Namak.

What will Rodinal do?

:Niranjan.
 

Herzeleid

Member
Joined
Oct 31, 2008
Messages
381
Location
Ankara/Turkey
Format
Multi Format
Congratulations Niranjan,
Results look better than older cuprotypes and it is definitely a simple method.
I did some tests with copper toning cyanotypes a while back. Pink-reddish copper tones look quite pleasing. Mike Ware's Cyanomicon p.268 details a copper toning process with copper nitrate, I have tested copper sulphate and it works too. The toning process is detailed in US patent US397480. I hope you find something useful in there.

Regards
Serdar
 
OP
OP

nmp

Member
Joined
Jan 20, 2005
Messages
1,995
Location
Maryland USA
Format
35mm
Congratulations Niranjan,
Results look better than older cuprotypes and it is definitely a simple method.
I did some tests with copper toning cyanotypes a while back. Pink-reddish copper tones look quite pleasing. Mike Ware's Cyanomicon p.268 details a copper toning process with copper nitrate, I have tested copper sulphate and it works too. The toning process is detailed in US patent US397480. I hope you find something useful in there.

Regards
Serdar

Thanks, Serder. I will check those references out.

:Niranjan.
 
OP
OP

nmp

Member
Joined
Jan 20, 2005
Messages
1,995
Location
Maryland USA
Format
35mm
Rodinal gives a bit of Sepia-like tone.

OK....my memory is really not what it was and what it should be - I had this conversation with Jim Patterson so it should have clicked on me:


Tried Kala Namak - nothing happens except some loss of density but the color stayed the same.

With Moersch Se/S toner (MT16) - interestingly it bleached the red color back to brown.

Will be nice to get a black image from this. Not going to be easy.


:Niranjan.
 
Joined
Dec 29, 2018
Messages
982
Location
USA
Format
Traditional
A few anecdotal observations from yesterday, please take with a grain of salt (no pun intended).

Immersing a ferricyanide-developed print into a solution of FAC acidified with bisulfate shifts the tone towards grey, presumably due to prussian blue formation. The effect is short-lived however, as it appears vulnerable to both pH and mechanical removal. PB formation is probably limited to the very surface of the paper and is easily rinsed away.

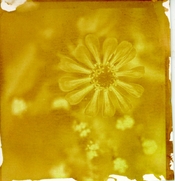
The availability of thiosulfate has an impact on Dmax. I tried two mixtures 1) something like 3% solutions and then 2) saturated CuSO4 & FAC + minimal thiosulfate. The first sensitizer gave much better Dmax (the flower print). I'll attached a scan of a developed print from the 2nd formulation -- the upper left corner was dipped into an acidic bisulfate solution prior to development..

In both instances the dried prints still stunk of hypo, so I tried a wash in a sulfite clearing bath. While it seemed effective in removing the residual hypo, it also appears to bleach the image.

Don't try this process with thiocyanate in place of thiosulfate. That is all. 😄

_img548.jpg

Edit: paper is (buffered) Canson XL watercolor, brush & gravity coated.
 
OP
OP

nmp

Member
Joined
Jan 20, 2005
Messages
1,995
Location
Maryland USA
Format
35mm
A few anecdotal observations from yesterday, please take with a grain of salt (no pun intended).

The availability of thiosulfate has an impact on Dmax. I tried two mixtures 1) something like 3% solutions and then 2) saturated CuSO4 & FAC + minimal thiosulfate. The first sensitizer gave much better Dmax (the flower print). I'll attached a scan of a developed print from the 2nd formulation -- the upper left corner was dipped into an acidic bisulfate solution prior to development..

Makes sense. That is the first knob I would want to turn. There is a limit though. As you increase the thiosulfate proportion, there is a greater propensity for it to react with CuSO4 on its own acting as a reducing agent to form Cu(i) and then going on to form insoluble complexes when an excess is available. It may not happen immediately so there is some time to do coating and exposure. For example, the formulation I used, it takes about 24 hours to form precipitates. If thiosulfate is added to CuSO4 separately, it takes even shorter time to develop solids. This was the reason I limited the ratio of CuSO4 to thiosulfate to 1:0.6 initially.


In both instances the dried prints still stunk of hypo, so I tried a wash in a sulfite clearing bath. While it seemed effective in removing the residual hypo, it also appears to bleach the image.

Same experience with sodium sulfite - heavy bleaching.

I wonder why you are getting thiosulfate smell - I have been using freshly prepared which has barely any smell (at least I can't discern any.) Last couple of days I have been keeping the solution in the refrigerator when I am not using. Without an alkali or stabilizer like sodium sulfite which you would have in a normal fixer, thiosulfate has a very short shelf life, particularly at elevated temperatures. Having said that, slightly decomposed thiosulfate is probably more potent - one reason I only want to use fresh, trying not to complicate the chemistry further.


View attachment 311945

Edit: paper is (buffered) Canson XL watercolor, brush & gravity coated.

Is this post ferricyanide treatment or before?


Thanks for sharing your experience and adding to the knowledge base.


:Niranjan.
 
Joined
Dec 29, 2018
Messages
982
Location
USA
Format
Traditional
Makes sense. That is the first knob I would want to turn. There is a limit though. As you increase the thiosulfate proportion, there is a greater propensity for it to react with CuSO4 on its own acting as a reducing agent to form Cu(i) and then going on to form insoluble complexes when an excess is available. It may not happen immediately so there is some time to do coating and exposure. For example, the formulation I used, it takes about 24 hours to form precipitates. If thiosulfate is added to CuSO4 separately, it takes even shorter time to develop solids. This was the reason I limited the ratio of CuSO4 to thiosulfate to 1:0.6 initially.

I had this happen during an intermediate run using 3 saturated solutions, IIRC. There was heavy precipitate formed within minutes after mixing, likely due to the mixing order you mentioned.

Same experience with sodium sulfite - heavy bleaching.

I wonder why you are getting thiosulfate smell - I have been using freshly prepared which has barely any smell (at least I can't discern any.) Last couple of days I have been keeping the solution in the refrigerator when I am not using. Without an alkali or stabilizer like sodium sulfite which you would have in a normal fixer, thiosulfate has a very short shelf life, particularly at elevated temperatures. Having said that, slightly decomposed thiosulfate is probably more potent - one reason I only want to use fresh, trying not to complicate the chemistry further.

I'm using hypo crystals rather than a stock solution, but they are several years old at this point. It could be age or even the paper itself at play.

Is this post ferricyanide treatment or before?

Post-ferricyanide.
 
Joined
Jul 28, 2016
Messages
2,568
Location
India
Format
Multi Format
That is the first knob I would want to turn. There is a limit though. As you increase the thiosulfate proportion, there is a greater propensity for it to react with CuSO4 on its own acting as a reducing agent to form Cu(i) and then going on to form insoluble complexes when an excess is available.

Would taking Thiosulphate out of the sensitiser and then using it as the developer help?
 
OP
OP

nmp

Member
Joined
Jan 20, 2005
Messages
1,995
Location
Maryland USA
Format
35mm
Would taking Thiosulphate out of the sensitiser and then using it as the developer help?

Good question - it's in the my list of things to do. That process would have the advantage that you can make the FAC/CuSO4 combo ahead of time and store - I think it should be stable for a long period of time. Then coat/expose and then develop with a "fixer"....who knew...🙂

:Niranjan.

P.S. Then tone with a developer!
 
Last edited:

Jan de Jong

Subscriber
Joined
Jul 20, 2022
Messages
56
Location
Germany
Format
Analog
I thought it would be a good idea to open a new thread
Thanks Niranjan, indeed after 160 years we have to get to the bottom of the actions of Copper Sulfate and how to use it. I will continue in my pace my experiments further. Top of the list is to use the fixer as developer . 😀
 
OP
OP

nmp

Member
Joined
Jan 20, 2005
Messages
1,995
Location
Maryland USA
Format
35mm
Only the colour changed without any loss in density?

Dmax - may be improved a bit or stayed the same while the white border is showing marked improvement, so I would say the contrast improved by some amount. Other than that the color is main story.

:Niranjan
 
Photrio.com contains affiliate links to products. We may receive a commission for purchases made through these links.
To read our full affiliate disclosure statement please click Here.

PHOTRIO PARTNERS EQUALLY FUNDING OUR COMMUNITY:


Ilford ADOX Freestyle Photographic Stearman Press Weldon Color Lab Blue Moon Camera & Machine
Top Bottom