Wet Plate Collodion Questions

Watering time

A
Watering time

  • 0
  • 0
  • 12
Cyan

D
Cyan

  • 1
  • 0
  • 12
Sunset & Wine

D
Sunset & Wine

  • 3
  • 0
  • 18
Adam Smith

A
Adam Smith

  • 1
  • 0
  • 69
Adam Smith

A
Adam Smith

  • 4
  • 0
  • 89

Recent Classifieds

Forum statistics

Threads
199,098
Messages
2,786,130
Members
99,809
Latest member
OttoMaass
Recent bookmarks
0
OP
OP
schrochem

schrochem

Member
Joined
Nov 1, 2004
Messages
329
Location
Austin,Tx
Format
Multi Format
Well I had a little better luck today. I posted two plates in the gallery. I tried 'in hand' but got some (there was a url link here which no longer exists).
I went back to the helper tray and 30ml and seem to be getting better blacks.
Ty, could you explain how exactly you pour for in hand?
I was practicing for awhile with just water and felt pretty good, but I think only only used 20mls instead of my planned 30 so it didn't cover the plate completely.
 
OP
OP
schrochem

schrochem

Member
Joined
Nov 1, 2004
Messages
329
Location
Austin,Tx
Format
Multi Format
Joe, I was looking over your darkbox you posted earlier in this thread. I really dig it! I NEED to be mobile now.....
I'd like to build one similar to yours so I might pester you with questions. First off, is there anything you would have done differently?

Thanks
Scott
 

smieglitz

Member
Joined
Oct 18, 2002
Messages
1,950
Location
Climax, Michigan
Format
Large Format
Well, I built the box to fit easily into the backseat of my car after having one that was slightly bigger and a hassle to transport. I then decided to put the thing on wheels with handles that would convert to legs. I should have used 2x2s instead of 1x2s for this purpose since the legs flex a bit when setting it up and I've even had one snap on me in the field.

With thicker legs/handles, I'd also rig some sort of net to carry equipment or chemicals when it is in the cart position. Otherwise, I'm pretty satisfied with the design overall. The way the wheels are attached, I can always go to a larger diameter bicycle wheel if I wanted and I think that would be better on rough terrain.

I made the mistake of trying to glue the shroud seam after it was attached to the box. In hindsight, I'd do that before attachment now.
 
OP
OP
schrochem

schrochem

Member
Joined
Nov 1, 2004
Messages
329
Location
Austin,Tx
Format
Multi Format
Thanks Joe.
I can see some bigger wheels working well.
How are they attached?
Is that 1/2" ply you used for the main box?
How did you attach the legs for 'cart mode'?
Is it one long hinge holding the main door in place or did I see some side things also?
last question....
what shroud seam were you talking about in your statement above?
Thanks
scott
 

smieglitz

Member
Joined
Oct 18, 2002
Messages
1,950
Location
Climax, Michigan
Format
Large Format
Thanks Joe.
I can see some bigger wheels working well.
How are they attached?

I drilled a 1/2"+ hole through a piece of 2x4x6 attached to the bottom of the box and slipped a 1/2" carraige bolt through it for an axle on each side. A large wing nut, washer and spacer keep the wheels in the proper spot.

Is that 1/2" ply you used for the main box?

1/4" to reduce weight. However, the box interior corner seams are all reinforced with 1/2" square dowels for strength and stability and to allow attachment of hinges.

How did you attach the legs for 'cart mode'?

02_wheels_detail.jpg
06_side.jpg

I built a covered track that the legs/handles slide through. In the cart position (first pic) the handles are held in place by several quick release ball pins. After pulling the pins, I insert the outside handle into a channel & slide both until they abut as in the second picture to become the legs of the box. The outer handle inserts to become a stop for the inner handle as seen in the second pic. The channel guide also becomes a stop for the outer handle when positioned as a leg. The weight of the box stabilize the legs and the two wood pieces shown on the top of the box in the first picture become crossbeams for the legs. The quick release ball pins hold the crossbeams in position when in use.

Is it one long hinge holding the main door in place or did I see some side things also?
last question....
what shroud seam were you talking about in your statement above?
Thanks
scott

There are three small hinges holding the doors onto the box with a couple cables on the box sides with hooks and turnbuckles to hold the doors open. This eliminates the need for corner rods to support the upper door. The lower door/tabletop is also held by a couple side chest-hinge/lid supports.

The shroud is the the black lightproof material.
 
OP
OP
schrochem

schrochem

Member
Joined
Nov 1, 2004
Messages
329
Location
Austin,Tx
Format
Multi Format
I could have sworn I hit send...
I just typed up a reply and it went into the ether....
The right pic clears up a lot of questions. Genius joe!
On the left pic I see how the bottom most pin works but are the other two (right side of triangle) holding the leg in place?
If 2X2s were used for the legs, do you think the cross beams could be eliminated?
Thanks
 
OP
OP
schrochem

schrochem

Member
Joined
Nov 1, 2004
Messages
329
Location
Austin,Tx
Format
Multi Format
Joe, are you sure you used 1/4" plywood on the box? compared to the 1X2s it sure looks like 1/2"
Thanks
 

smieglitz

Member
Joined
Oct 18, 2002
Messages
1,950
Location
Climax, Michigan
Format
Large Format
...
On the left pic I see how the bottom most pin works but are the other two (right side of triangle) holding the leg in place?
If 2X2s were used for the legs, do you think the cross beams could be eliminated?
Thanks

The legs are slightly different lengths. The ones on the inside actually form the handles that are pulled along. The two pins through the guides secure those to the box. The other pair of legs are just along for the ride with a pin at the bottom to keep it in place and an eyebolt and wingnut further up and through both handles to keep the outside one from rotating. That pair of bolts/wingnuts become the bolts that secure one of the crossbeams to the legs. One of the other pair of bolts can be seen holding the two crossbeams against the handles in the left pic.

I drilled holes through the legs so the pins or bolts could be used to easily stabilize the legs with the crossbeams. But, this also weakened them so, another reason to use 2x2s instead of 1x2s for the legs. I would still use the 1x2 crossbeams even if 2x2s were used as legs. They really do add stability and the additional weight isn't significant overall, partly because I'm not hefting this weight around but rather rolling it. Also, somehow I see the crossbeams fitting in to becoming a supporting part of the net arrangement in the cart position.
 

smieglitz

Member
Joined
Oct 18, 2002
Messages
1,950
Location
Climax, Michigan
Format
Large Format
Joe, are you sure you used 1/4" plywood on the box? compared to the 1X2s it sure looks like 1/2"
Thanks

Oops. You're right. I was thinking about the first box where I used 3/4" and then went to a thinner stock for the second box. So it progressed from 3/4 to 1/2, not 1/2 to 1/4. Sorry for the confusion. (There is a bit of 1/4" used for the cover of the leg channels.)
 
OP
OP
schrochem

schrochem

Member
Joined
Nov 1, 2004
Messages
329
Location
Austin,Tx
Format
Multi Format
Thanks again Joe, I think it's all clear now.
This morning something occurred to me.
Has anyone tried using vertical baths for washing?
It could certainly save quite a bit of space in the darkbox.
Especially if it was doubled up.
My last session I used a helper tray and stopped development by pouring water on the plate while it was still in the tray, then removed and placed in wash tray.
I would have two concerns with using vertical baths. One would be accidentally nicking the collodion taking the plate in and out, the other would be being able to clean it well.
Thoughts?
 

smieglitz

Member
Joined
Oct 18, 2002
Messages
1,950
Location
Climax, Michigan
Format
Large Format
...
Has anyone tried using vertical baths for washing?
It could certainly save quite a bit of space in the darkbox.
...
I would have two concerns with using vertical baths. One would be accidentally nicking the collodion taking the plate in and out, the other would be being able to clean it well.
Thoughts?

Tank_04.jpg


I rinse in the helper tray and then a horizontal tray inside the darkbox, then wash after fixing (ammonium thiosulfate, not KCN) in the above tank outside the box. So far, no problems with scratching. The tank shown will do full-plates in the long direction and 1/4-plates in the short. They double as storage boxes. Wish I had more of them built when I first thought of it. Apparently business is good now at the plastics vendor. They grooved the first batch for me from a cutoff for about $75. Now they want nearly a grand to groove a 4x8.

So, I use these in the field for the wet process and then build wooden boxes for plate storage.
 
OP
OP
schrochem

schrochem

Member
Joined
Nov 1, 2004
Messages
329
Location
Austin,Tx
Format
Multi Format
Ah yes, I remember seeing that Joe. That's an excellent idea.
I was thinking more of way to use it like you made your silver bath in the darkbox (below the bottom). I attached a quick sketch of what I had in mind. It could be a box with three baths in it. That box could be 'dropped' in the bottom of the darkbox like you did your silver bath. The silver bath would have a lid on it to keep it light tight.
I would rinse in the helper tray, remove plate and put it on a dipper and place in bath one with agitation then bath two, bring out and fix (I guess I could keep it on that same dipper). Maybe have the fixer with two rinse baths as well in a box. Easy to transport also.
 

Attachments

  • verticalbath.jpg
    verticalbath.jpg
    20.2 KB · Views: 100

Kerik

Member
Joined
Nov 24, 2002
Messages
1,634
Location
California
Format
Large Format
Scott,

One quick comment on your multi-tank idea. This would NOT be a good idea if you use KCN to fix. KCN + collodion developer => cyanide gas => dead photographer.
 
OP
OP
schrochem

schrochem

Member
Joined
Nov 1, 2004
Messages
329
Location
Austin,Tx
Format
Multi Format
I agree Kerik.
They would definitely be separate just as I do with trays.
The above sketch is two rinse baths (for development) and the silver bath.

I could make another set (two rinse baths and a fixer bath) and have them elsewhere, just like with trays.

I was just thinking it would take up less space in a darkbox, if the silver and dev baths were all vertical and together.
 
OP
OP
schrochem

schrochem

Member
Joined
Nov 1, 2004
Messages
329
Location
Austin,Tx
Format
Multi Format
Last week I made a 'double' bath out of some spare acrylic I had. It's just two baths together that share the middle wall.
I also made a box for my silver bath with a lid.
Next I made some simple wooden boxes about 7.5" cube without a lid.
I made one to hold the silver box (in essence just a stand) and another for the double bath. The work great for just carrying and storing.
I used the double bath for the developer rinse.
It worked great and I really like using it over trays.
I stop development by pouring water over the plate when it's in the helper tray. Then I take the plate out and put it on the dipper. Place in the topmost bath for about ten seconds, then the bottom, gently going up and down. Then I take the whole box with bath over to the fixer area and pull the plate out with the dipper and place it in the fixer bath.
What's nice is that I probably use less water. It's also easier to rinse and fill then carry over the trays. Best of all it takes up much less space.
I plan to make a double bath for the fixer as well.
 
OP
OP
schrochem

schrochem

Member
Joined
Nov 1, 2004
Messages
329
Location
Austin,Tx
Format
Multi Format
Joe, I've started to put the darkbox together. I was wondering what dimensions you went with for your shroud. Do you think it needs to be that long?
Thanks
 

smieglitz

Member
Joined
Oct 18, 2002
Messages
1,950
Location
Climax, Michigan
Format
Large Format
The shroud I made was initially too long. The shroud was made from two widths of Porter's better grade nylon darkroom cloth at a length of 4 yards.

The width of the material is 54" and sewing two widths together gave a piece approximately 3 yards wide x 4 yards long (9'x12'). The length was then sewn into a tube with a circumference of 12'. The perimeter of the darkbox is about 100" so there is a bit of extra fabric there. I'm 5' 8" and also needed to trim some of the shroud from the bottom near the ground. I think there is about 18" extra there. With the exception of cutting off a few narrow strips of materials to be glued on the sewed seams, I'd recommend trimming the shroud after it is attached to the box since the rear portion of the shroud (connected to the box top) needs to be longer than the front (connected to the box bottom).

You do want the tube circumference big to be able to work in comfortably. The fabric is tacked to the back wall starting at the bottom (I put the seam to the right corner), then up the sides and finally at the top. You need to put a couple pleats on the top to accommodate the excess fabric which allows for greater freedom of movement outside the box.

shroud.jpg
 
Last edited by a moderator:
OP
OP
schrochem

schrochem

Member
Joined
Nov 1, 2004
Messages
329
Location
Austin,Tx
Format
Multi Format
thanks joe, I got the porter fabric wednesday. However, it's 60" wide.
So you used 12' circum for a 100" circum 30+30+20+20, and I believe coffer used a 90" circ. for a 34" wide box. That's what confuses me. I guess I can't mess up using more....
Thanks also about the tip of bottom versus top, hadn't thought of that one.

How high did you end up putting the 'table'? around waist height?
thanks
 

smieglitz

Member
Joined
Oct 18, 2002
Messages
1,950
Location
Climax, Michigan
Format
Large Format
thanks joe, I got the porter fabric wednesday. However, it's 60" wide.
So you used 12' circum for a 100" circum 30+30+20+20, and I believe coffer used a 90" circ. for a 34" wide box. That's what confuses me. I guess I can't mess up using more....
Thanks also about the tip of bottom versus top, hadn't thought of that one.

How high did you end up putting the 'table'? around waist height?
thanks

I imagine you could use too much but the amount I used seems to work well. It was a bit harder to attach I suppose. But, it is easy to gather and make light-tight and also hang over the door supports. It does seem like quite a bit more than Coffer used, but I'm OK with it.

I made the table slightly lower than elbow height. I actually replaced the legs with longer ones to raise the table and safelight window a little higher than I originally had placed them. I like a little glare on the plate when I pour and having the window higher helps there.
 
OP
OP
schrochem

schrochem

Member
Joined
Nov 1, 2004
Messages
329
Location
Austin,Tx
Format
Multi Format
Thanks for the input. I had noticed Coffer's was quite high...so I asked.
If the fabric wasn't so expensive I'd just go to hacking away.
Hence, I wanted more information.
I might actually get some $1 fabric from wally world and do a mock up.
Another way I was thinking of doing this would be to attach the fabric to a piece of ply and then fit it into the back. I'm not sure if this would help me out or not, but 'if' I was to make another box, I could transfer the shroud....
 
OP
OP
schrochem

schrochem

Member
Joined
Nov 1, 2004
Messages
329
Location
Austin,Tx
Format
Multi Format
Well I made some progress of the holiday. The weather was crummy and so I started in on the box. Joe, I was wrong about coffers circum. The 90" was the length and he made ~140" circum. That still sounds a bit much to me. I got some $1/yd fabric and made a quickie shroud. It was 60" wide fabric like the stuff from porter's (which is 60" but without fringe is 58"). I sewed it so there was ~120" circum. I then tacked it in the box to see how it would fit. I believe coffer said to stretch tight the bottom and sides and pleat at the top. Well after messing with it for a bit, I realized it's best (with my design) to have the top and bottom tight and pleat the sides. The reason being is the sides 'grow' after the come out of the box up to the top of the holder over the head. Thus, they need extra fabric to do that. I redid the temp shroud like that and it worked much better.
I will be installing the 'real' shroud tonight, because I went ahead and threw some stain and poly on the box first.
Joe, I went with your "three pole on the top door" design to hold up the shroud. The final part of that will be incorporated tonight as well.
It will basically be ready for car or table top use after that.
I have been mulling over what to do about legs. Joe, I really like your incorporated style and the wheels. Yesterday, I had a brainstorm that I think I'm going to try. I have this little table at home that folds up for storage. One set of legs detaches and goes to the other set so they are pressed together. I 'think' I could make a table/dolly combo thingie gizmo :D 
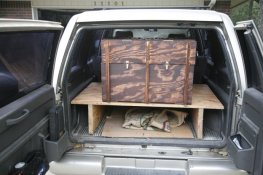
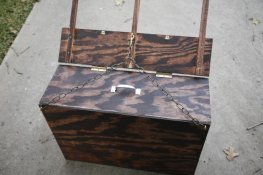
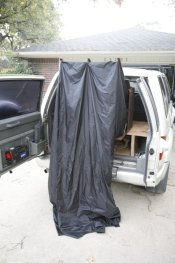
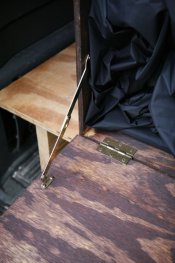
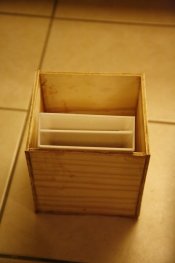
so I could convert a table (to put the box on) into a dolly (to haul the box around). I just need to hit the hardware store and look at hardware options. At any rate, I'm excited to get out in the field!
 

smieglitz

Member
Joined
Oct 18, 2002
Messages
1,950
Location
Climax, Michigan
Format
Large Format
Thanks for the tip about side pleats. Now that you've mentioned it, it makes a lot of sense and I'll remember to do so when I build my next box. It makes sense to keep the bottom tight (i.e., flat) and have the other sides expand.

I'm looking forward to seeing the "table/dolly combo thingie gizmo" when it is finished.

Joe
 
OP
OP
schrochem

schrochem

Member
Joined
Nov 1, 2004
Messages
329
Location
Austin,Tx
Format
Multi Format
Thanks fellas. I'll try to take a few digipics tonight after I install the shroud. Hopefully familial duties won't detract too much.
 
OP
OP
schrochem

schrochem

Member
Joined
Nov 1, 2004
Messages
329
Location
Austin,Tx
Format
Multi Format
Darkbox

Okie dokie fellas I worked hard at it but finally got the box together. The first pic is the box closed and in the back of my truck. It's on a homemade skid I made years ago for camping. The next pic show how I keep the top up (and the three prong approach ala Joe). Then you can see what it looks like with the shroud deployed.
I took a couple of close up shots to show some details. You can see the inside and the white table cloth (removable) that I placed down. You'll also notice no window. I decided to forgo that and just use a red led light. The next pic shows how I attached the shroud to the upper supports. This was a last minute change. I was going to use a cross board but decided this is less rigid and there aren't any holes. You can also see the hinge system I used to lower the front door. I flipped the hinges upside down to the would be relatively smooth with the surface. The last pic is of the double bath I made for rinsing the plate after development.
It took me a little longer than I expected last night to install the shroud. Even though I used a mock up, I stop short of taking it completely to it's functional intention. So...I learned a little more last night. I basically had a 116" circum, 10' long tube. As I mentioned yesterday it seems the only place extra fabric is needed is on the sides. Well, that's true but there is another caveat. I spent a lot of time figuring out how to do this last night....
The best way to do it is to staple in the bottom part of the tube into the bottom corners with it tight across the length. To maximize the table space we want the fabric to come straight out to the edge of the table (essentially covering the whole table. The other important thing it to get the height up to the upper support. This is where a wider circum tube helps out (but it's not necessary. What I had to do, since my circum. was only 116" was 'go back' farther on the top part of the tube to attach to the support. If I was too close to the front it would lift the fabric off the table and thus loose working space. So I found the spot it needed to be to keep the fabric on the table, tie it to the support, THEN went to tack the rest of the cloth to the inside of the box. What ended up happening is there is extra cloth at the top (in the horiz. plane) so it will actually come down the wall. Then I had fabric to make up for on the sides and just put in one huge pleat on each side. I know that might not be clear but perhaps you can see what I mean by the pic of the inside. I'll also go into photoshop here in a minute and do a mock up.
 

Attachments

  • darkbox_05.JPG
    darkbox_05.JPG
    88.8 KB · Views: 164
  • darkbox_06.JPG
    darkbox_06.JPG
    82.6 KB · Views: 151
  • darkbox_01.JPG
    darkbox_01.JPG
    83.5 KB · Views: 175
  • darkbox_02.JPG
    darkbox_02.JPG
    36.2 KB · Views: 149
  • darkbox_03.JPG
    darkbox_03.JPG
    40.8 KB · Views: 150
  • darkbox_04.JPG
    darkbox_04.JPG
    79.3 KB · Views: 150
  • darkbox_07.JPG
    darkbox_07.JPG
    48.7 KB · Views: 160
Photrio.com contains affiliate links to products. We may receive a commission for purchases made through these links.
To read our full affiliate disclosure statement please click Here.

PHOTRIO PARTNERS EQUALLY FUNDING OUR COMMUNITY:


Ilford ADOX Freestyle Photographic Stearman Press Weldon Color Lab Blue Moon Camera & Machine
Top Bottom