Wet Plate Collodion Questions

Watering time

A
Watering time

  • 0
  • 0
  • 9
Cyan

D
Cyan

  • 1
  • 0
  • 11
Sunset & Wine

D
Sunset & Wine

  • 3
  • 0
  • 17
Adam Smith

A
Adam Smith

  • 1
  • 0
  • 68
Adam Smith

A
Adam Smith

  • 4
  • 0
  • 87

Recent Classifieds

Forum statistics

Threads
199,098
Messages
2,786,125
Members
99,809
Latest member
OttoMaass
Recent bookmarks
1
OP
OP
schrochem

schrochem

Member
Joined
Nov 1, 2004
Messages
329
Location
Austin,Tx
Format
Multi Format
Robert, thanks for the tip on Porter's. I think I had seen that before somewhere. It sure isn't cheap at $13/yd. What I'd really like to try is to make a 'popup' type tent made out of the stuff. Wouldn't it be cool if you could take one of Dead Link Removed and use darkcloth instead of netting? Talk about portable!

Well, I know it can be done, but $13/yd would make it quite expensive....
There are also the ez up type canopies out there. Again, that's a lot of fabric.
Scott
 

smieglitz

Member
Joined
Oct 18, 2002
Messages
1,950
Location
Climax, Michigan
Format
Large Format
Jeremy,
I considered how much room I would need to do a 10x12 plate in it with a dropped silver tank at a 20 degree angle, and also how much of a tabletop I could get using the vertical dimension I came up with. IIRC, the depth of the box was 10" with a 20" height and 30" width. I cut the front to provide a 14" piece that gives a 24" tabletop when open. Something like this cutaway view:

darkbox_cutaway.jpg


The position of the sensitizing tank can be rotated 180 for doing smaller plates at a more convenient orientation. The wheel axles are 1/2" carriage bolts set into 2x4 blocks attached to the bottom of the box. I think the legs are set at 20 degree angle from vertical also and simply slide into channels I made on the outside of the box. .
 
Last edited by a moderator:

smieglitz

Member
Joined
Oct 18, 2002
Messages
1,950
Location
Climax, Michigan
Format
Large Format
Scott,

At first I considered building a darktent using the pop-up frame from a camping shower tent. Alas my sewing skills prevented the successful completion of that project. I then built a tent out of inexpensive white curtain blackout material and PVC pipe. The stuff was too heavy and too fragile to be practical.

Then I built the silver darktent. Nice to work in, lightweight but bulky, and a pain to set-up frequently. If I'm staying in the same spot for a couple days, I would set it up at camp.

Next I built a darkbox using the curtain blackout material again. This particular box was just slightly too large to fit easily into my car and it lacked wheels. The second darkbox uses Porter's premium darkroom fabric which is much lighter weight than the other stuff. The wheels make the darkbox easy to transport and it takes about a minute to set it up or tear down. It is much more convenient in that respect and it has adequate room. It could also be set up on a picnic table, the bed of a pickup truck, etc., using a smaller inside sensitizing tank and covering the hole in the bottom using a sliding door I've also incorporated there. The downside is the fabric is black and it can get hot inside, but once the plate is in the tank with the cover on, I can leave the shroud and open the sliding safelight window if I choose so it is not really a problem.

The last was the RV which sets up in about 5 minutes. It is the most comfortable and convenient to work in plus it has a lot of storage space. Downside is the mpg and fact that it can't go places where the darkbox could be hauled. But, I actually have the darktent and darkbox stored inside it in case I want to go well offroad.

I had about $300 into the first tent, $1000 into the silver one, about $100 into the first darkbox, maybe $250 into the second darkbox, and the RV was $900 to start (then a suspension job and some upcoming work) plus $100 in Velcro.

The darkbox represents a nice compromise between economy, transportability, and ease of use at a relative low cost.

Joe
 
Last edited by a moderator:

smieglitz

Member
Joined
Oct 18, 2002
Messages
1,950
Location
Climax, Michigan
Format
Large Format
Joe, if I calculated it right your internal volume on your silver bath is about 2L. I read somewhere (I haven't received coffer's manual yet) that the bath is 9% AgNO3. If that's correct that's 180g to fill your bath up. That gets pricey....
Sounds like it's the most expensive part of the process that I have noticed so far.


I figure it is about 2.25 liters and $200 worth of silver nitrate. I've been fortunate so far since I have received a bunch of silver nitrate as a gift and found an old pound bottle of it in an antique shop for $5. And, I have smaller tanks of the same design for doing smaller plates. The capacity of a 1/4-plate tank is probably 20% of the big one.

The collodion and ether are both about $50/500ml so that is fairly pricey too.

Some of the glass I use is $15/square foot. Ouch.

But it is all worth it. Wetplate is so much fun and looks like nothing else.
 
OP
OP
schrochem

schrochem

Member
Joined
Nov 1, 2004
Messages
329
Location
Austin,Tx
Format
Multi Format
Joe, again, thanks for all the info.
I got coffer's manual and dvds. I have already watched the DVDs and read most of the manual. I have ordered the chemicals and started collecting bottles and such. Next is to build the baths.
I'm going to hold off on making a darkbox/tent, etc. until I have my process down in my back yard... :D

One question I'd like to ask is how everyone is doing your development?
Coffer offered up two ways for the beginner, tilt tray and keeper tray methods. Also, how many of you just use the developer once and pitch it?

thanks
Scott
 

RobertP

Subscriber
Joined
May 11, 2006
Messages
1,190
Format
ULarge Format
Scott. I use the helper tray method. I get a much more even development that way with less developer.But either way will work well. Don't toss your developer. Filter it back into a used developer bottle. When you mix a new batch then add some of the used to the new. For instance if you're using 100ml of developer to develop a plate then use 70ml of new and 30 ml of used. It can even be 50/50 what ever you decide. The idea is that some of the silver in the used developer helps give you better development.
 

smieglitz

Member
Joined
Oct 18, 2002
Messages
1,950
Location
Climax, Michigan
Format
Large Format
Scott,

I have to confess I use a helper tray but I think you get better development using just the simple pour without a tray of any sort.

I reuse my developer mixed 50/50. I usually use a sugar developer and try to keep the time around 15-20 seconds for positives.

Joe
 

Jeremy

Member
Joined
Oct 26, 2002
Messages
2,761
Location
Denton, TX
Format
Multi Format
Scott,

I have to confess I use a helper tray but I think you get better development using just the simple pour without a tray of any sort.

I reuse my developer mixed 50/50. I usually use a sugar developer and try to keep the time around 15-20 seconds for positives.

Joe

Like Joe I use sugar developer for around 15-20 seconds (I only shoot positives right now), but use new developer. I'm using ~20mL of developer on 5x7 images developed in hand, no helper tray. I'm looking at moving up to 8x10 for which I have built a helper tray. If anyone is looking for an 8x10 helper tray, I actually built 2 and someone would be welcome to the 2nd for say $20 plus whatever shipping is.
 
OP
OP
schrochem

schrochem

Member
Joined
Nov 1, 2004
Messages
329
Location
Austin,Tx
Format
Multi Format
Thanks for the responses. I went back and looked at some of you pics Joe because I remembered seeing your helper tray (not sure where I got 'keeper tray' lol!). It looks just like a simple low walled tray. Any advantage of that over the way Coffer made his?
Also, how do yall pour it on? Coffer does a sweep across and in the reverse direction of the collodion pour. Is it really all that critical?
BTW, anyone see Quinn post on his forum lately?? I still can't get in there....
I feel banished :smile: I bet there is lots of good stuff.

thanks again
Scott
 

Kerik

Member
Joined
Nov 24, 2002
Messages
1,634
Location
California
Format
Large Format
What a great thread! Joe's designed and made some great tools for the process. Regarding development, I first learned with the tilted tray method, then in-hand development. I now mostly use a helper tray, especially with larger plates. Applying the developer properly is probably the trickiest part of the process and will take the most practice to get it 'right'. Although getting it 'wrong' often results in some wonderful swirly background effects. Unlike most, I don't re-use my developer. Even with filtering, I found that re-using it caused problems and my plates are plenty bright with fresh developer.

Don't fret the cost of the silver nitrate. It will last a long time (unless you forget to latch the lid of your silver bath and it falls over in your mobile darkroom when you leave your shooting site, which I managed to do a couple weeks ago. It made for a very expensive stain on the floor of my camper/darkroom.)
 

RobertP

Subscriber
Joined
May 11, 2006
Messages
1,190
Format
ULarge Format
Scott, Also the sugar developers have a little more of a syrup like consistency which makes it somewhat easier flowing it across the plate compared to the standard ferrous sulphate developers. At least it seems that way in my limited experience.
 

smieglitz

Member
Joined
Oct 18, 2002
Messages
1,950
Location
Climax, Michigan
Format
Large Format
Thanks for the responses. I went back and looked at some of you pics Joe because I remembered seeing your helper tray (not sure where I got 'keeper tray' lol!). It looks just like a simple low walled tray. Any advantage of that over the way Coffer made his?...

Well I don't know why John's trays have such low sides and IIRC, they only have three walls. Maybe it is a period thing.

I built mine with walls that are about 3/4" high. They have a second piece of acrylic glued on the right side to form a ledge slightly higher than the level of the glass. A hole is centered in the area where the plate will rest and I smeared some acrylic cement over that surface to make it slightly uneven. So, a finger can be pushed from below and easily break the tension holding the plate to the tray.

helper_tray.jpg

A top view

In use the plate is placed in the tray and the tray tilted to the right. I pour the developer onto the ledge and let it level. Then I quickly tilt the tray back to the left and the developer flows evenly off the ledge and over the plate. If it looks like I might get an island, the tray allows me to violently move the plate horizontally to cover the spot without the plate flying off into space or the developer being spilled.
 
OP
OP
schrochem

schrochem

Member
Joined
Nov 1, 2004
Messages
329
Location
Austin,Tx
Format
Multi Format
Thanks for the added information fellas.
So what's the sugar developer formula?
Kerik...ouch on the AgNO3!
Joe, I like your design of the helper tray. It seems to utilized the tilt tray method without using too much developer.
In Coffer's manual, he has helper trays for small plates that just have low sides and a hole. For larger plates he has three higher walls and one wall low. The low wall allows him to put his beaker close to the plate and flow it on. He also mentions that he puts a piece a thin glass or plexi to keep the plate off the bottom instead of hole.
Do you lose much developer on the larger helper with a hole?
 

RobertP

Subscriber
Joined
May 11, 2006
Messages
1,190
Format
ULarge Format
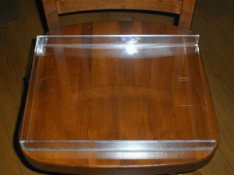
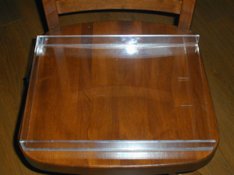
(there was a url link here which no longer exists) ... Its not so much as losing the developer as it is the mess that much developer will cause. This is an 11x14 helper tray. The small piece of plexi that holds the plate up off the bottom slightly is 1/16 thick all other pieces are 1/4". Robert
 

Attachments

  • DSCN0010_1.jpg
    DSCN0010_1.jpg
    40 KB · Views: 179

RobertP

Subscriber
Joined
May 11, 2006
Messages
1,190
Format
ULarge Format
(there was a url link here which no longer exists)... Maybe this is a little better view
 

Attachments

  • DSCN0010_1.jpg
    DSCN0010_1.jpg
    56.2 KB · Views: 156

RobertP

Subscriber
Joined
May 11, 2006
Messages
1,190
Format
ULarge Format
This is a Coffer designed tray. The idea is that this creates a small ledge on the open end that keeps just enough of the developer on the plate. It works pretty well.
 
Last edited by a moderator:

RobertP

Subscriber
Joined
May 11, 2006
Messages
1,190
Format
ULarge Format
Scott there is a sugar developer formula in your Coffer manual. Look in the Addendum.
 
OP
OP
schrochem

schrochem

Member
Joined
Nov 1, 2004
Messages
329
Location
Austin,Tx
Format
Multi Format
Thanks Robert! I found the sugar formula. I knew I had seen it somewhere. Based on what yall have said and Coffer says in his manual, I think I'll use the sugar developer. Once I start, I plan to keep the chemistry the same until I get the technique down.
Thanks also for posting a pic of your tray. So do you apply the developer like coffer explained? That being across the end, down and swoosh to the back corner? That sounds more difficult (for a beginner) than the way Joe's tilt/helper method 'appears' to work.
 
OP
OP
schrochem

schrochem

Member
Joined
Nov 1, 2004
Messages
329
Location
Austin,Tx
Format
Multi Format
I have a question again about how the collodion sees colors. Specifically in landscapes.
As we head into winter (if you want to call it that where I live) the muted colors have we me wondering how all this will appear on the plate. I can 'see' how the reds are going to go dark and the blues light but how bout in between? I'm specifically interested in the greens and yellows.
Kerik, if you check back in on this thread, I'd be interested in what the colors were like in your recent post of gualala trees. Are the dark trees mostly a green pine like leaves? What color are the fern looking plants in the lower left of the horiz. version?
Muchas gracias,
Scott
 

RobertP

Subscriber
Joined
May 11, 2006
Messages
1,190
Format
ULarge Format
Scott, Yes that is exactly how I do it. I also started with the tip tray method and it worked fine. Once you get use to the helper tray I think you'll like the results. It is like everything else, you just need to get a feel for it. Don't be afraid to use a little extra developer when you first start. You'll find your way what ever method you use. Whatever is easiest and comfortable to you is the right way.
 

smieglitz

Member
Joined
Oct 18, 2002
Messages
1,950
Location
Climax, Michigan
Format
Large Format
...
Do you lose much developer on the larger helper with a hole?

Nope. The development is pretty much over and developer being dumped by the time any fluid can find its way to the hole. I try to keep the minimum amount on the surface of the plate but if I shake the tray, some may get underneath so I try not to do that.

Joe
 
OP
OP
schrochem

schrochem

Member
Joined
Nov 1, 2004
Messages
329
Location
Austin,Tx
Format
Multi Format
Well, I found a place that sells acrylic locally in just about any thickness or color. I opted for opaque black for the silver bath and clear for the helper tray and cyanide fixer bath. The cool thing is, they are going to cut all the pieces for free. I was trying to calculate in my head how much I'd need and she mentioned they would cut them for me. I also got some of the weldon adhesives. I'll be picking it up tomorrow so that's one more piece of the puzzle put in place....

Scott
 

Bruce Schultz

Member
Joined
Dec 23, 2005
Messages
98
Location
Lafayette, L
Format
8x10 Format
What's the name of that seller? I'd much rather have someone cut it for me and do a better job than I could. Every container that I've built has had leaks that I've had to fix gradually because my cuts weren't perfect.
 
OP
OP
schrochem

schrochem

Member
Joined
Nov 1, 2004
Messages
329
Location
Austin,Tx
Format
Multi Format
Hi Bruce.
The name of the company is Regal Plastics.
It looks like they have a location in Baton Rouge.
I'll be picking the pieces up tomorrow so I can comment on the quality.
While on hold the 'hold guy voice' was talking about the new high accuracy cutting something or other....so it should be pretty good.
Scott
 

RobertP

Subscriber
Joined
May 11, 2006
Messages
1,190
Format
ULarge Format
I bought mine and had them cut it at Ridout Plastics. Rplastics.com. These are cut to the thousandth. I know I could have never cut them this close. This has to be CNC cuts. I had all the pieces in three days.
 
Photrio.com contains affiliate links to products. We may receive a commission for purchases made through these links.
To read our full affiliate disclosure statement please click Here.

PHOTRIO PARTNERS EQUALLY FUNDING OUR COMMUNITY:


Ilford ADOX Freestyle Photographic Stearman Press Weldon Color Lab Blue Moon Camera & Machine
Top Bottom