For B&W negative film users only.
Right I think this is what you need to understand. The numbers I'm going to give you are ball park numbers just to make it easy for you to understand. You will likely need to refine them with experience.
Firstly you need to know that manufacturers ISO speed and recommended dev is designed to capture 7 stops of subject range onto film which will print exactly to a Grade 2 paper.
straight away this means yo need to be aware of how many stops of subject brighness range there are in your composition. If you don't know that then you have no idea how to set camera exposure. If you are using in camera meter it will usually just average the scene which if the scene has too much light sky in it will result in your neg being underexposed for the shadows. The highlights would be fine.
So question is, what is your subject brightness range? We'll refer to that as SBR from now on. I'll also introduce the terms "Closed Subject" and "Open Subject".
A closed subject is one which which doesn't have any brighter sections behind or in front of the main subject so would be something like a portrait where the background was a high hedge so there was no sky in the frame.
An open subject is one where there is some background lighting brighter than main subject so typically a landscape with sky, especially when there are a lot of bright white clouds.
A closed subject is highly unlikely to have a SBR of as much as 7 stops. It may only be 5 stops so if you have metered it reasonably well you will get it all on film without the shadows being too thin(blocked out).
An open subject can be as high as 12 stops SBR or even more in extreme cases but is often between 7 and 10 stops depending on brightness of sky and clouds or background.
So what is going on with your metering and exposure placement?
My bet is that when you get what you call a flat negative is actaully your averaging meter underexposing the shadows because it is being overly influenced by the highlight values in the subject. So you get mid tones and highlights which print fine but shadows go completely black which is what you are describing.
So how do you deal with that? Well the standard advice is expose for shadows and develop for the highlights.
With roll film this its not so easily doable because you can't develop each frame individually but you can always expose for the shadows which ensures you don't get blocked shadows.
However if your SBR is say 9 stops then its going to be tricky to print becasue 9 stops doesn't fit on G2 paper so you end up having to print shadows and midtones with G2 and then burn in highlights.
There is a better way which follows:
Adjust your film speed to half the ISO box speed which loses you a stop of speed but gains you better shadow details. It does however push the neg highlight densities up too. So what you do is reduce your development by 30% (to 70%) of the manufacturers recommended development time when using ISO box speed. This will bring the neg highlight densities down to much more easily printable values.
The result of doing this is your subject neg densities will have lower contrast than they did before BUT will have some shadow details them and it will print far more easily than it would have if you had not reduced film speed and development.
So the price of doing this is that you lose 1 stop of speed but the benefits outweigh that.
Now just to complicate it a little further, you must get your exposure correct. You have three choices, you either expose for the shadows or you expose for the highlights or you expose for the mid tones. Most expose for the shadows to make sure everything is captured on film from deepest shadows and up. Seems like good idea BUT if your SBR is only 7 stops then highlights on neg won't be as dense as they should ideally be and you need to increase printing time and contrast. Unfortuantely that will very likely mean you need to sacriice some of that hard won shadow detail on the neg. So what I do is expose for for the highlights in the knowledge that providing my SBR is 10 stops or less I won't lose any shadow detail on the neg. Only if the SBR is greater than 10 stops do I expose for the shadows to be sure I get them on film and deal with excessive highlight densitty that casues when printing.
The big advantage of exposing for the highlights is that you get consistent highlight negative densities. The normal method of printing is to work out a print time for highlights and then adjust contrast for the shadows. This is becasue some (not all) VC printing filters are speed matched on a highlight print density. Ilford filters definitely are. Your enlarger Y+M filters could be anywhere depending on your enlarger.
Now how to take a meter reading? Well for your landscape images I would always use a spot meter (which I believe you have). What you do is to look at the subject and spot meter tha darkest significant (not tiny black bits) and lightest part (e.g. brightest part of white cloud ) of your subject and the difference between them in stops is your SBR. If the SBR is 10 stops or less then you need to meter a highlight. The highlight to meter is one that you want to retain full textural detail in just before its going to lose detail due to its brightness. So this may be a bright part of a cloud in which you want to be able to see the texture in the cloud or a brides white gown which youw ant retain texture of the cloth. You then take that reading and Open up TWO Stops from that reading and that is the exposure setting you use (or its equivalent value).
If on the other hand your SBR was more than 10 stops, then you spot meter a shadow area that you want to retain full full shadow detail in (just before it starts to become blocked up) and you Close Down 2 Stops from the meter reading and use that as your exposure setting (or its equivalent value).
Thats all there is to it. You may need to adjust your film speed up or down a 1/3 of a stop to refine it once you have tried a few rolls of film and you may need to adjust dev time down by upto another 20% to refine it but use the values I gave you above for starters.
Thats' all there is to it. A spot meter is your friend becasue it allows you to place exposure with a good deal of precision. And most of your subjects will be less than 10 stops SBR so most of your negs will be really easy to print. I expect most to require G3 to print and some more than G3 but none of them should lose shadow detail unless you increase print contrast too much.
And what about those closed subjects which have lower contrast to start with? Well above will work for them too but may require printing at G4 or occasionally G5 if subject is really low contrast.
However, if you are in the studio or you know all the images on a single roll of film will be of closed subjects then I would revert to using ISO box speed and manufacturers recommended development. But in this case I would meter a highlight in which you want full textural detail and open up 1 1/2 stops (not 2) and expose using that. Again you will get consistent neg highlight densities which is desireable and makes printing easier.
Wow.. thanks for this post! It was really helpful and learned a lot... but there are some questions now haha..
First, I have been using a spotmeter to do exactly what you tell me to do. Except that I measured the skin tones and then placed the skin tone in the desired zone. (As I did mostly portraiture) However, due to the skin being different for every person, and the small light/shadow differences I got very mixed results and inconsistent exposures. So I went back to an incident meter, a Minolta IVf. (I never or rarely use in camera metering).
However, you think that I get a flat negative due to my shadows being underexposed... but you can't probably know.. but that's not the case. I've been studying my negatives this afternoon and I have seen many different results:
- A very contrasty negative that prints great on grade 1. I can see the highlights very good on the negative, as well as darker parts.
- Most of my negatives are however much less contrasty, in meaning that the difference between the brightest and darkest part is much smaller and is forcing me to print on grade 3-4. However the print looks great on those grades.
- I have seen overdeveloped negatives (dense highlights) which still require a grade 4 to print
- I've seen very flat negatives, almost no blacks or whites
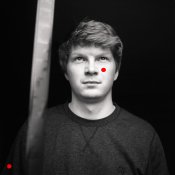
- And especially (see attachment), this was a test portrait to see the exposure problems, (
it's an editted scan). I placed a friend in front of a window, having so much exposure on the face that the background fades away because there is more then 7 stops of separation between highlight and shadow.... BUT if I check with my densitometer.... it's quite contrastless (no real white highlights)... because the brightest part is the skintone... so zone 6...
(The contrasty negative is between 150-300, so a difference of 150 on the densitometer.. and the grade 3-4 negatives are more like 230-300 ... a difference of 70.. or sometimes even as low as 50)
I'm using an RH designs Analyzer Pro, since a few weeks ago to print my negatives. I get very good results with it but the question is ... if I would expose the attachment here. I would place the the darkest part of the sweater on the greyest zone where there is still detail. (since I want the background to be black with no detail) and I would place the brightest part where there is still texture on the cheek (see red dots). If I want to do that, I have to go to grade 4.5-5 to get the maximum separation between the darkest textured tone and the lightest textured tone... but
the question here is is the cheek really the brightest tone? Since it's skin, I should probably put it more in a greyer zone, which makes the print printable on ex. grade 3... but then I have no real highlights (referring to your
closed subject).
So what they told me is that a negative is good in contrast if it exposes a full range of tones, but in this case, there is no real highlight... (zone 7-8) is it bad to print it like that or do I really have to go for the full range of tones or just print it, like that, without the real white highlights.
So again, I metered that shot with an indicent meter... There is SURE more then 7 stops of visible exposure... and still I have no real highlights. Is it because of the scene? Maybe if the background would be a bright sunny sky, I would have had my full range of tones? But if the brightest skintone would be indeed the brightest textured area, it wouldn't be natural?
I came to the conclusion (for what I know now) that my agitation scheme is too slow, that most of the scenes I photograph are below the
SBR of 10. But then, I can't do a magic trick and cast a spell to happily increase the SBR. How do I deal with those situations as you mostly do not have control in situations using available daylight?
I find it weird that even with the incident meter, I get average results, even in a scene like the attachment where there is plenty of tonal range. Maybe it's a combination of using a new enlarger that feels like it's color head is less contrasty, then my previous enlargers and also, using an analyzer to get my exposure / grades. I'm not a pro with it yet and still learning and maybe I'm interpreting it wrong on occassions that I feel like it needs a high grade... I came to realize that not every picture has a deep shadow or bright highlight and I'm trying to achieve that with the analyzer (as you measure the negative, you can see where the tone will end up in the print)... As the manual said you have to put the brightest part on the brightest point in the analyzer, and the darkest part on the darkest part in the analyzer... but as said before and shown here... not every negative has a really bright (clouds/sun like white) and still look good without it on print....
Any thoughts about that?
And last... How do you recommend to meter for portraits? Incident or spot and go for the skin tones or your technique with shadows and highlights?