Vandyke brown question

There there

A
There there

  • 3
  • 0
  • 38
Camel Rock

A
Camel Rock

  • 7
  • 0
  • 151
Wattle Creek Station

A
Wattle Creek Station

  • 9
  • 2
  • 142
Cole Run Falls

A
Cole Run Falls

  • 3
  • 2
  • 117

Forum statistics

Threads
198,959
Messages
2,783,792
Members
99,758
Latest member
Ryanearlek
Recent bookmarks
2
Joined
Sep 26, 2012
Messages
612
Location
USA
Format
Multi Format
How many watts are the UV units? I ask because with my 1000W unit it takes about 30 minutes to expose to full dmax.

Geez, I'd have to go add that up.

Am I a moron? I'm thinking I'm just underexposing these... so they appear too light? I'm used to underexposed being too dark! Agh, I'm a newbie to this process.

Using standard fixer, dilluted down to 1:9 without a hardener.
 
Joined
Sep 26, 2012
Messages
612
Location
USA
Format
Multi Format
(8x) 30W Normal CFL = 240 Watts
(8x) 15W Black Light CFL = 120 Watts

Total 360 Watts
 
Joined
Sep 26, 2012
Messages
612
Location
USA
Format
Multi Format
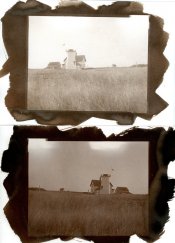
here are my first two attempts... I have a kit from formulary for ages and mixed probably 2 months ago before using it today. People make this process seem to be a fun and EASY process but I beg to differ. Just like collodion, nailing down exposure times is a task... and like with varnishing, the fixing and drying process alters the final product drastically.

11244662786_3593cd3333_c.jpg
 

Vlad Soare

Member
Joined
Jan 16, 2009
Messages
261
Location
Bucharest, R
Format
8x10 Format
Indeed, there are a lot of variables that affect the end result. The trick is to change them one by one, until you find an optimum value for each, then keep everything as constant as possible.
The only thing that will always vary from a negative to the next is the exposure time. But that's easy to nail down. Make a few test prints with different exposure times, process them exactly as you would process the final prints (including toning, if you plan to do that with the final prints), then let them dry over night. Assess them the next day. That's all.
It's really easy once you get the hang of it. :smile:
Anyway, the second print doesn't look bad at all. You're getting very close. I think it needs just a bit more contrast, but that depends entirely on the negative you're using - it's not a vandyke processing error.
 
Joined
Sep 26, 2012
Messages
612
Location
USA
Format
Multi Format
Indeed, there are a lot of variables that affect the end result. The trick is to change them one by one, until you find an optimum value for each, then keep everything as constant as possible.
The only thing that will always vary from a negative to the next is the exposure time. But that's easy to nail down. Make a few test prints with different exposure times, process them exactly as you would process the final prints (including toning, if you plan to do that with the final prints), then let them dry over night. Assess them the next day. That's all.
It's really easy once you get the hang of it. :smile:
Anyway, the second print doesn't look bad at all. You're getting very close. I think it needs just a bit more contrast, but that depends entirely on the negative you're using - it's not a vandyke processing error.

serious light leak in my holders lol... I hate the holders, personally. I don't like how the only thing keeping the darkslide in are those little puny clip that turn way too easily.
 

Andrew O'Neill

Moderator
Moderator
Joined
Jan 16, 2004
Messages
12,011
Location
Coquitlam,BC Canada
Format
Multi Format
That's the only thing that might persuade me to take up kallitypes. But that will have to wait because in the meantime I've discovered the carbon transfer.

Hi Vlad, glad to hear you discovered carbon transfer printing. I've been "discovering" it for the past 5 years. Love it. I also have been kallitype printing for about 10 years. I've tried van dyke, cyanos, and platinum, finally settling on kallitype... easier and cheaper than platinum.
 

cliveh

Subscriber
Joined
Oct 9, 2010
Messages
7,539
Format
35mm RF
I have followed this thread with interest, but I seem to be alone in using borax solution.
 

Vlad Soare

Member
Joined
Jan 16, 2009
Messages
261
Location
Bucharest, R
Format
8x10 Format
I'm sorry, I think I missed that. What's the borax solution for, and at what stage of the process do you use it?
 

cliveh

Subscriber
Joined
Oct 9, 2010
Messages
7,539
Format
35mm RF
I'm sorry, I think I missed that. What's the borax solution for, and at what stage of the process do you use it?

Dissolve about 2 or 3 teaspoons of Borax per litre of tap water (quantity not critical), then after exposure soak the print in this bath for about 5 minutes and then wash in running water for about 10 minutes. Follow this with 2 minutes in a 2% solution of Sodium Thiosulphate (with about 2% ammonia solution added) and then wash in running water for 30 minutes and dry. Try it.
 

Loris Medici

Member
Joined
Sep 13, 2005
Messages
1,154
Location
Istanbul, Tu
Format
Multi Format
Best method of imbedding iron in the paper. Detrimental to both the paper and image in the long term... See Marco B.'s article about iron in paper.
 

cliveh

Subscriber
Joined
Oct 9, 2010
Messages
7,539
Format
35mm RF
Best method of imbedding iron in the paper. Detrimental to both the paper and image in the long term... See Marco B.'s article about iron in paper.

I beg to differ and speak as someone who does not follow formulas from books or articles, but use these merely as a guide and derives at image results through continuous practical experimentation. My van Dyke browns show no detrimental effects over time. You may also refer to the reply by Mike Ware about this question, who mentioned when silver nitrate is employed use Borax.
 
Last edited by a moderator:

Gadfly_71

Member
Joined
May 5, 2006
Messages
224
Location
Phoenix, AZ
Format
Multi Format
I think that folks are needlessly complicating what should be a very simple process. The biggest issue I'm seeing in this thread is paper choice. Choose the right paper and most of the complications go away. Papers that work well for me; Arches Platine, Canson Edition, Arches Vellin, and Borden & Riley Cotton Rag Drawing paper. There are other papers that work as well but personal testing is usually the recommended way to go (I'm going to test Revere Platinum this weekend). Once you have the right paper (and the right negative) vandykes can be done with reasonable consistency.

My processing method (single tray):

1. Wash - I use distilled water with a bit of lemon juice (my tap water is very chlorinated). I do seven, one minute soaks (constant agitation), dumping and refilling the tray each time.

2. Tone - I use a gold chloride toner (for at least three minutes). This toning bath is mostly for permanence, but also cools the image slightly and helps eliminate bleaching during fix.

3. Rise - Running water is fine at this point, but I usually just use the distilled water that's already sitting on the counter.

4. Fix - 1 minute in a plain hypo solution (1 tbsp crystals to 1 liter distilled water).

5. Wash - 15 to 20 minutes in running water

Prints are dried with my chromega set to "warm" and then waxed after drying.

Vandykes should never be more complicated than that. If you're adding that much complication, you may as well be doing kallitypes instead.
 

Loris Medici

Member
Joined
Sep 13, 2005
Messages
1,154
Location
Istanbul, Tu
Format
Multi Format
I beg to differ and speak as someone who does not follow formulas from books or articles, but use these merely as a guide and derives at image results through continuous practical experimentation. My van Dyke browns show no detrimental effects over time. You may also refer to the reply by Mike Ware about this question, who mentioned when silver nitrate is employed use Borax.

I don't mean a short timespan here.

Can you provide the link to Mike Ware's reply about borax usage?

See (there was a url link here which no longer exists) meanwhile. (Messages by Russ Young and Sandy King.)

And I agree with the former post, let's keep it simple. VDB is a simple and effective process. No need for special developers.

Regards,
Loris.
 

cliveh

Subscriber
Joined
Oct 9, 2010
Messages
7,539
Format
35mm RF
I don't mean a short timespan here.

Can you provide the link to Mike Ware's reply about borax usage?

See (there was a url link here which no longer exists) meanwhile. (Messages by Russ Young and Sandy King.)

And I agree with the former post, let's keep it simple. VDB is a simple and effective process. No need for special developers.

Regards,
Loris.

Loris, I can't find the link at present, but was part of a discussion on APUG. I also agree about keeping the process simple, which I try and do.
 

Jim Noel

Member
Joined
Mar 6, 2005
Messages
2,261
Format
Large Format
I think that folks are needlessly complicating what should be a very simple process. The biggest issue I'm seeing in this thread is paper choice. Choose the right paper and most of the complications go away. Papers that work well for me; Arches Platine, Canson Edition, Arches Vellin, and Borden & Riley Cotton Rag Drawing paper. There are other papers that work as well but personal testing is usually the recommended way to go (I'm going to test Revere Platinum this weekend). Once you have the right paper (and the right negative) vandykes can be done with reasonable consistency.

My processing method (single tray):

1. Wash - I use distilled water with a bit of lemon juice (my tap water is very chlorinated). I do seven, one minute soaks (constant agitation), dumping and refilling the tray each time.

2. Tone - I use a gold chloride toner (for at least three minutes). This toning bath is mostly for permanence, but also cools the image slightly and helps eliminate bleaching during fix.

3. Rise - Running water is fine at this point, but I usually just use the distilled water that's already sitting on the counter.

4. Fix - 1 minute in a plain hypo solution (1 tbsp crystals to 1 liter distilled water).

5. Wash - 15 to 20 minutes in running water

Prints are dried with my chromega set to "warm" and then waxed after drying.

Vandykes should never be more complicated than that. If you're adding that much complication, you may as well be doing kallitypes instead.

Finally a simple and complete answer. You have stated the basic method I have used and taught for over 20 years with success. My toning process is slightly different, and I fix in 2 one minute baths.
I find that most people who have trouble with VDB are using an incompatible paper. My latest favorite is Revere Platinum, lightweight.
 

cliveh

Subscriber
Joined
Oct 9, 2010
Messages
7,539
Format
35mm RF
My variation about Van Dyke brown processing has surfaced on several occasions now, which seems to be a difference of opinion. Would someone on APUG please try my method and report back?
 

davido

Member
Joined
Dec 15, 2005
Messages
575
Location
Toronto, Ontario, Canada
Format
4x5 Format
What I have found with Vandyke and Kallitype is that the paper is the most important factor, absolutely! But even using the best paper (ie. Platine or Bergger Cot) totally clearing the whites can be really difficult.
Cliveh, the vandyke work I have seen of your is fabulous truly! Though, I don't see any paper white highlights, which is cool because the image may not have those tones. But my biggest issue with both Vandyke and Kallitype is getting completely clear paper whites. This is something which I have been struggling with for a long time, and I have almost given up dozens of times! But I keep coming back and trying new strategies. From what I understand, if pretty much of all of the yellow is not cleared in the developer or first clearing bath (vandykes) then you've got a problem. With Vandyke, I starting double coating to get good dmax but then clearing was more difficult. I then switched to Kallitype to get good blacks with one coat, but the total clearing has been hit and miss.
 

Andrew O'Neill

Moderator
Moderator
Joined
Jan 16, 2004
Messages
12,011
Location
Coquitlam,BC Canada
Format
Multi Format
What I have found with Vandyke and Kallitype is that the paper is the most important factor, absolutely! But even using the best paper (ie. Platine or Bergger Cot) totally clearing the whites can be really difficult.

Your tap water is very important, too. My PH varies, but it is usually very alkaline. I make kallitypes. By adding a pinch of citric acid in the rinse, the problem was solved. I use Rising Stonehenge.
 

Vlad Soare

Member
Joined
Jan 16, 2009
Messages
261
Location
Bucharest, R
Format
8x10 Format
Would someone on APUG please try my method and report back?
The detrimental effects of an incomplete clearing, if any, will be seen after many years, perhaps decades. So reporting back is not an option, at least not in the near future. :D :tongue:
In regard to paper white highlights, I have them in my vandykes.
 

Herzeleid

Member
Joined
Oct 31, 2008
Messages
381
Location
Ankara/Turkey
Format
Multi Format
My variation about Van Dyke brown processing has surfaced on several occasions now, which seems to be a difference of opinion. Would someone on APUG please try my method and report back?

There are different historical brownprint formulas, the one uses oxalic acid involves %1 borax, but that does not necessarily mean high ph clearing is a good for the print.

I doubt that Mike Ware recommended borax, because he states in the Argyrotype process the reason he looks for a different silver salt is to minimize the loss of silver in the print, and to avoid the use of high ph developer used in kallitype.

http://www.mikeware.co.uk/mikeware/Argyrotype_Process.html
"An Alternative Silver Salt
Without exception all the iron-silver processes to date have used the most commonly available soluble salt of the metal, namely silver nitrate. But nitrate is an oxidising anion, and tends to dissolve the colloidal image silver during wet processing, especially under acidic conditions. To minimise this loss of image the Kallitype process employs alkaline-buffered developers of high pH, e.g. Borax. Alas, these create a new problem, because they cause hydrolysis of the excess iron(III) in the sensitizer and the deposition of insoluble ferric hydroxide in the image, which ultimately causes it to fade."
 
Joined
Sep 30, 2009
Messages
457
Location
Huntsville,
Format
Multi Format
So, I've got kind of a dumb question, and I didn't want to start a new thread for it (but, I'm not convinced resurrecting a thread dead for 6 months is the best idea either :smile: ). I'd like to get in to Vandyke printing, and I'm looking around for the chemicals. I've noticed that Photographer's Formulary and Artcraft.com both list Ferric Ammonium Citrate as "Ferric Ammonium Citrate green." What's up with the term "green"? Is this the right chemical or is there something different/special about the designation green?
 

Vlad Soare

Member
Joined
Jan 16, 2009
Messages
261
Location
Bucharest, R
Format
8x10 Format
There's no standard, fixed molecular formula for the ferric ammonium citrate. There are several variations, depending on the way they're obtained.
As I understand, the green one is preferrable for iron-based printing processes, because it's said to be more consistent, but the brown one is also perfectly usable.
 
Joined
Sep 30, 2009
Messages
457
Location
Huntsville,
Format
Multi Format
There's no standard, fixed molecular formula for the ferric ammonium citrate. There are several variations, depending on the way they're obtained.
As I understand, the green one is preferrable for iron-based printing processes, because it's said to be more consistent, but the brown one is also perfectly usable.
Thanks. Chemistry was never my forte, so I've gotta ask those silly questions or risk getting frustrated with bad prints or melting my fingers off :smile:
 

Vlad Soare

Member
Joined
Jan 16, 2009
Messages
261
Location
Bucharest, R
Format
8x10 Format
It's not silly at all. I think it's a very pertinent question. :smile:
Good luck with your prints. Vandyke is a very nice and rewarding process.
 

Loris Medici

Member
Joined
Sep 13, 2005
Messages
1,154
Location
Istanbul, Tu
Format
Multi Format
As Vlad put out, both variants (green and brown) are usable. OTOH, the green variant has more Fe(III) content than the brown, more Fe(III) means more sensitivity to light.

P.S. Definitely consider gold-thiourea toning later... Gives very nice colors and much darker prints, additionally and more importantly, protects the image in the long term.
 
Last edited by a moderator:
Photrio.com contains affiliate links to products. We may receive a commission for purchases made through these links.
To read our full affiliate disclosure statement please click Here.

PHOTRIO PARTNERS EQUALLY FUNDING OUR COMMUNITY:


Ilford ADOX Freestyle Photographic Stearman Press Weldon Color Lab Blue Moon Camera & Machine
Top Bottom