Thinking of buying a Rolleiflex 2.8C with lens separation

No Hall

No Hall

  • 0
  • 0
  • 9
Brentwood Kebab!

A
Brentwood Kebab!

  • 1
  • 1
  • 88
Summer Lady

A
Summer Lady

  • 2
  • 1
  • 119
DINO Acting Up !

A
DINO Acting Up !

  • 2
  • 0
  • 69
What Have They Seen?

A
What Have They Seen?

  • 0
  • 0
  • 82

Recent Classifieds

Forum statistics

Threads
198,782
Messages
2,780,787
Members
99,703
Latest member
heartlesstwyla
Recent bookmarks
0

Dan Daniel

Subscriber
Joined
Jul 4, 2009
Messages
2,883
Location
upstate New York
Format
Medium Format
Below is the part. It is commonly referred to as a bellows because in between the top and bottom metal rings is a piece of clothe that folds in and out as the lens is retracted and extended (not for sale).

The discussion of velvet and such will get you nowhere on this model. It is not built like most other Rolleis (similar bellows are on the TeleRollei and some models of the 3.5F Rollei, not sure if it was random selection, using up parts, or what on Rollei's part). I've made new bellows like this using material cut from a changing bag. If you want a template file or a new piece of clothe, send me a note.

All in all I would send it back. Lots going wrong in that camera and you haven't even opened it up yet. If you haven't taken the lens panel off of a early '50s Rolleiflex before, the C is not a good model to learn on. More fussy than others, a few unusual decisions like the bellows, etc. Get an MX Automat and work on it first.
 

Attachments

  • IMG_0690.JPG
    IMG_0690.JPG
    341.9 KB · Views: 180
  • IMG_0691.JPG
    IMG_0691.JPG
    355.2 KB · Views: 179
OP
OP

campy51

Subscriber
Joined
Oct 16, 2014
Messages
1,215
Location
Boston area USA
Format
Multi Format
Below is the part. It is commonly referred to as a bellows because in between the top and bottom metal rings is a piece of clothe that folds in and out as the lens is retracted and extended (not for sale).

The discussion of velvet and such will get you nowhere on this model. It is not built like most other Rolleis (similar bellows are on the TeleRollei and some models of the 3.5F Rollei, not sure if it was random selection, using up parts, or what on Rollei's part). I've made new bellows like this using material cut from a changing bag. If you want a template file or a new piece of clothe, send me a note.

All in all I would send it back. Lots going wrong in that camera and you haven't even opened it up yet. If you haven't taken the lens panel off of a early '50s Rolleiflex before, the C is not a good model to learn on. More fussy than others, a few unusual decisions like the bellows, etc. Get an MX Automat and work on it first.

Thanks for the info. I have sent for a quote to fix the 3 problems of the bellows, fungus and shutter and hope to hear from them tomorrow. I assume the whole front standard has to come out to remove that part and also rear lens elements. Do you know of anybody besides Harry Fleenor that can handle this? I know hes's good but don't want to wait that long. I wish there was a video of removing the front on the 2.8 models.
 

NB23

Member
Joined
Jul 26, 2009
Messages
4,307
Format
35mm
This definitely looks like separation to me. Now, is there fungus in there, I can’t see. But separation can look like this.
 
OP
OP

campy51

Subscriber
Joined
Oct 16, 2014
Messages
1,215
Location
Boston area USA
Format
Multi Format
I may have spoke too soon. I think I may have one of the viewing cells in backwards or not sitting right. The view is blurred on longer distance. Anyone have a diagram of the cell placement on the viewing lens?
 

Dan Daniel

Subscriber
Joined
Jul 4, 2009
Messages
2,883
Location
upstate New York
Format
Medium Format
I may have spoke too soon. I think I may have one of the viewing cells in backwards or not sitting right. The view is blurred on longer distance. Anyone have a diagram of the cell placement on the viewing lens?

Flip the rear element.
 
OP
OP

campy51

Subscriber
Joined
Oct 16, 2014
Messages
1,215
Location
Boston area USA
Format
Multi Format
Thanks for all the help. I managed to get the viewing lens cleaned of the fungus and back together in proper order and cleaned the front taking lens. The back inner cells would involve taking the whole front standard assembly off and I am not sure I want to try at this point. If it weren't for the shutter needing to be cleaned I think I would try to repair the bellows myself and shoot a roll to see if the light leak is gone. I am tempted to go cheap and try the Ronsonol on the shutter but my gut is telling me no. There's a shop in VA. that said they could do the shutter, lens and bellows for around $200 so I might just do that. I paid $350 for the camera which would bring the cost to around $550-600 which I think would be a pretty good deal for a good looking and good working 2.8C.
 

shutterfinger

Member
Joined
Feb 25, 2013
Messages
5,020
Location
San Jose, Ca.
Format
4x5 Format
Lighter fluid in Synchro Compur shutters may not damage components but it will likely further damage the light seal ring and likely gum up the shutter more than it is now.
I agree that rubberized cloth is needed to repair the light seal ring.
Congrats on getting the view lens clean and assembled in correct order.
 
OP
OP

campy51

Subscriber
Joined
Oct 16, 2014
Messages
1,215
Location
Boston area USA
Format
Multi Format
I want to ask another question about focus on the Rolleiflex. Everybody says to adjust focus for infinity but why can't you adjust focus for say 3.5 or 4 feet? If it's sharp there won't infinity be sharp? The reason for question is after I removed the viewing lens to clean it, obviously focus was off when I re-installed it. So what I did was to place an old Rolleicord focus screen on the film plane and checked focus at 3.5 ft and then checked through the viewfinder and just kept moving the viewing lens in until it was focused. I did this on a previous Rolleiflex that I sold and the pictures off that camera were sharp as can be. Adjusting for infinity is difficult where I live because it's hard to get a clear shot of something that's at least a mile away and I don't want to have to do this in winter for obvious reasons.
 

itsdoable

Member
Joined
Aug 26, 2013
Messages
823
Location
Canada
Format
Medium Format
I want to ask another question about focus on the Rolleiflex. Everybody says to adjust focus for infinity but why can't you adjust focus for say 3.5 or 4 feet? If it's sharp there won't infinity be sharp? The reason for question is after I removed the viewing lens to clean it, obviously focus was off when I re-installed it. So what I did was to place an old Rolleicord focus screen on the film plane and checked focus at 3.5 ft and then checked through the viewfinder and just kept moving the viewing lens in until it was focused. I did this on a previous Rolleiflex that I sold and the pictures off that camera were sharp as can be. Adjusting for infinity is difficult where I live because it's hard to get a clear shot of something that's at least a mile away and I don't want to have to do this in winter for obvious reasons.
That works fine. Infinity stop is easier to keep aligned, you can always check the lens is still on the infinity stop, and your infinity obect does not change when your camera moves a few cm's.

However, if the viewing and taking lens' actual focal length are not perfectly matched (and they never are perfect), then the focus accuracy is best where you calibrate it. Thus the use of infinity instead of MFD.
 

shutterfinger

Member
Joined
Feb 25, 2013
Messages
5,020
Location
San Jose, Ca.
Format
4x5 Format
On a clear sky day or night with the Moon showing infinity is easy to obtain. Waiting for the moon to show is another subject for another day. A clear day sun is also a good infinity target but you need a #11 welding glass or similar filter for the lens to prevent damage to your organic optical sensors.
A tenth or two difference in focal length between the viewing and taking lens will result in an inch or two difference of actual focused distance at close distance while a mm will be several inches difference. The difference increases as you progress from infinity.
 
OP
OP

campy51

Subscriber
Joined
Oct 16, 2014
Messages
1,215
Location
Boston area USA
Format
Multi Format
If I can bother you guys again I am wondering if repairing the bellows would be wise for me to do. Someone suggested using changing bag material which I have. From what I have read it is attached to the rear element and clipped onto the body. What I am afraid to do is remove the whole front assembly since there may be some spacers and shims involved and I don't want to get careless and lose them or not put in correct order since some may be different thickness. I cannot find any videos or instructions on removing the front assembly so I can get some sort of idea how it's done. I took one off an old Rolleicord but I don't think it's going to be the same. I am trying to self teach myself minor camera repairs and up to this point I have taken cheap TLR's cameras apart but never on an expensive camera. I repair copiers and printers so I not unfamiliar with disassembly but then I am working on parts that are usually larger than what's found in cameras and lenses.
 

shutterfinger

Member
Joined
Feb 25, 2013
Messages
5,020
Location
San Jose, Ca.
Format
4x5 Format
Changing bags are rubberized nylon or cotton and will be a good source of repair material if you have a bad bag provided the rubber is not failing off or you use a section that has pin holes. Use contact cement such as Pliobobd
https://www.amazon.com/W-J-Ruscoe-P-612-LV-Multi-Purpose/dp/B004JOYXR4/ref=sr_1_3?crid=V7FRPRQQEXJS&keywords=pliobond+contact+cement&qid=1574288197&sprefix=pliobond,aps,251&sr=8-3 which remains flexible when dry and any excess rubs off.

Follow the disassembly instructions for the 2.8 E in the manual link I provided in post 31. You have the skills, time to get some experience.
The shims stick to the back side of the plate or the surface they sit on. Loosen all mount screws, 2 or 3 turns, remove one screw and slide the shim out, put it on a piece of painters tape, fold the tape over and label it as to which position it was in. Repeat for the remaining screws.
 
OP
OP

campy51

Subscriber
Joined
Oct 16, 2014
Messages
1,215
Location
Boston area USA
Format
Multi Format
Changing bags are rubberized nylon or cotton and will be a good source of repair material if you have a bad bag provided the rubber is not failing off or you use a section that has pin holes. Use contact cement such as Pliobobd
https://www.amazon.com/W-J-Ruscoe-P-612-LV-Multi-Purpose/dp/B004JOYXR4/ref=sr_1_3?crid=V7FRPRQQEXJS&keywords=pliobond+contact+cement&qid=1574288197&sprefix=pliobond,aps,251&sr=8-3 which remains flexible when dry and any excess rubs off.

Follow the disassembly instructions for the 2.8 E in the manual link I provided in post 31. You have the skills, time to get some experience.
The shims stick to the back side of the plate or the surface they sit on. Loosen all mount screws, 2 or 3 turns, remove one screw and slide the shim out, put it on a piece of painters tape, fold the tape over and label it as to which position it was in. Repeat for the remaining screws.
Do you happen to know how I should release the tabs that hold the baffle onto the body. Should they be done before I remove the front assembly?
 

shutterfinger

Member
Joined
Feb 25, 2013
Messages
5,020
Location
San Jose, Ca.
Format
4x5 Format
Never done one. From the looks of the photo provided by Dan it simply sits into place and turns like a bayonet filter for the camera or similar.
If you make a new one using the existing mount rings then make sure its the same diameter on each end and glue the ends of the cloth to the inside edge of the ring with an 1/8 inch / 3mm overlap and glue the edge. If one end is wider than the other then center the narrower on the center of the wider and cut the sides accordingly.
I just looked at the pictures (and diagram) again, the front slips on over the lens cell barrel and the back snaps into tabbed groves on the main body. Its a simple twist to remove/install setup. The front looks smaller than the rear so its either tapered or steped. Careful removal of the existing material should provide an adequate pattern. A patch should overlap the edges by a millimeter or two beyond the ring and be flush inside the ring. If I were patching the overlap would be on the outside of the light block tube.
 
OP
OP

campy51

Subscriber
Joined
Oct 16, 2014
Messages
1,215
Location
Boston area USA
Format
Multi Format
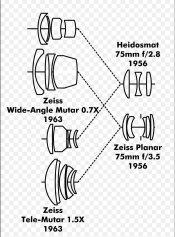
Does anyone here know if the Planar lens group have a rolled over casing securing the elements or are they just removable as groups?
 
Joined
Aug 4, 2020
Messages
1
Location
João Pessoa - Brazil
Format
Hybrid
Hi there. So I wonder how your lens adventure worked out. Did you repair the lens? I'm asking because I have the same issue at hand. Was wondering if UV cured glue used for cel phone screens would be effective for regluing optical elements of classic lenses. Unfortunately, it's the only kind of glue available where I live ..
 

JPD

Member
Joined
Mar 24, 2007
Messages
2,155
Location
Sweden
Format
Medium Format
Hi there. So I wonder how your lens adventure worked out. Did you repair the lens? I'm asking because I have the same issue at hand. Was wondering if UV cured glue used for cel phone screens would be effective for regluing optical elements of classic lenses. Unfortunately, it's the only kind of glue available where I live ..

I wouldn't use that. Who knows what refractive index that glue has and if it's optically pure enough for lens elements. Optical adhesive for lenses can be bought online.

Welcome to Photrio/APUG!
 
Photrio.com contains affiliate links to products. We may receive a commission for purchases made through these links.
To read our full affiliate disclosure statement please click Here.

PHOTRIO PARTNERS EQUALLY FUNDING OUR COMMUNITY:


Ilford ADOX Freestyle Photographic Stearman Press Weldon Color Lab Blue Moon Camera & Machine
Top Bottom