Separating old negatives stuck together

Rebel

A
Rebel

  • 0
  • 0
  • 18
Watch That First Step

A
Watch That First Step

  • 0
  • 0
  • 23
Barn Curves

A
Barn Curves

  • 0
  • 0
  • 20
Columbus Architectural Detail

A
Columbus Architectural Detail

  • 0
  • 0
  • 19
img421.jpg

H
img421.jpg

  • Tel
  • Apr 26, 2025
  • 1
  • 1
  • 32

Forum statistics

Threads
197,483
Messages
2,759,788
Members
99,514
Latest member
cukon
Recent bookmarks
0

Romanko

Member
Joined
Sep 3, 2021
Messages
890
Location
Sydney, Australia
Format
Medium Format
I have 6x9 cm negatives from probably 1930s that were stored in an envelope for decades and stuck/glued together, see pictures. What would you try to separate them? I was going to try soaking in distilled water, photoflo solution or ethanol (stock or diluted). Any other ideas?
envelope.jpg
top.jpg
bottom.jpg
 

Don_ih

Member
Joined
Jan 24, 2021
Messages
7,374
Location
Ontario
Format
35mm RF
Probably the only thing you can do is soak them in distilled water with some photoflo. Looks like there's nothing to lose at this point. Let the water work at it, though. My bet is they'll split all to pieces if you try to pry them apart.
 

Deleted member 88956

Certainly what @Don Heisz said. Not sure if I would bother with distilled water, but can't hurt either. I would add a bit more Photoflo than for normal film soak after processing and then wash each separately in water with final standard Photoflo soak before drying.

In the end it all depends how they got stuck to begin with. You may get lucky and see them all mostly intact.
 

Don_ih

Member
Joined
Jan 24, 2021
Messages
7,374
Location
Ontario
Format
35mm RF
Not sure if I would bother with distilled water

Not a whole lot of reason to use distilled water, except it doesn't already have anything dissolved in it. Maybe a little alkalinity would help.
 

removed account4

Subscriber
Joined
Jun 21, 2003
Messages
29,844
Format
Hybrid
Hi Romanko,
Sorry to see that messed up film, it does look like it could be fun as it is though. ..
Years ago Aaron Siskind and Harry Callahan were traveling together and they stoped at some somewhere and photographed a wrecked hospital. AS was taking photographs of the paint and stuff he was photographing and HC picked up a bunch of X-rays that were melted and fused together. He made contact prints of them. If you can't separate the films ( I don't think you will be able to and when you do they will kind of be ruined ) I'd just put paper underneath and make contact prints of your fused negatives.

Good luck!

John
 
OP
OP

Romanko

Member
Joined
Sep 3, 2021
Messages
890
Location
Sydney, Australia
Format
Medium Format
I'd just put paper underneath and make contact prints of your fused negatives
Hi John,
Thanks for the advice. Unfortunately, the negatives are too dense/opaque.

You are probably right, I will be surprised if I could restore any images from them but it's worth a try.

The negatives have been soaking in Photo Flo solution for almost half an hour now. There's some visible change in them but it is too early to tell. I might leave them overnight.
If that does not work I'll try film-compatible solvents: ethanol, isopropyl and maybe hydrocarbon (shellite/naphta). All technical grade ~100% concentration.

Regards,
Romanko
 

Deleted member 88956

Hi John,
Thanks for the advice. Unfortunately, the negatives are too dense/opaque.

You are probably right, I will be surprised if I could restore any images from them but it's worth a try.

The negatives have been soaking in Photo Flo solution for almost half an hour now. There's some visible change in them but it is too early to tell. I might leave them overnight.
If that does not work I'll try film-compatible solvents: ethanol, isopropyl and maybe hydrocarbon (shellite/naphta). All technical grade ~100% concentration.

Regards,
Romanko
Overnight is the least before you could expect a reaction to dried up emulsions. Unless they visibly float away before, I would not touch before then.

Naphtha might help if this does not.

I'd be interested to know how this works out in the end.
 

RalphLambrecht

Subscriber
Joined
Sep 19, 2003
Messages
14,562
Location
K,Germany
Format
Medium Format
Probably the only thing you can do is soak them in distilled water with some photoflo. Looks like there's nothing to lose at this point. Let the water work at it, though. My bet is they'll split all to pieces if you try to pry them apart.
There's no hope for these; sorry about your loss.
 
OP
OP

Romanko

Member
Joined
Sep 3, 2021
Messages
890
Location
Sydney, Australia
Format
Medium Format
Surprisingly, I had some success separating the negatives. I lost some emulsion at the edges of each frame but the rest was preserved. I did exactly what you suggested: left the stuck negatives in a photo flo solution for several days. We are heading into the summer in Australia with the daily temperatures above 30 oC so I put the negatives in a jar and kept it in the fridge for a couple of days agitating gently once or twice a day. (Disclaimer: My wife is a former chemist. Your mileage can differ significantly when you decide to put photographic chemicals in a family fridge). I left the negatives in the solution (still cold) and letting it slowly come to room temperature before hanging the negatives to dry. I'll post the pictures once they are dry and safe to scan.

Is there anything I can do at this stage to further preserve them? Would you harden them? I personally don't think it is necessary but I would like to hear your opinions.

Thanks a lot for your replies. Even the most pessimistic comments were strangely encouraging, sort of "go ahead, there's nothing to lose".

Regards,
Romanko
 

Deleted member 88956

Encouraging to know things at least partially worked out. Personally I'm not an expert on preservations methods, but I doubt there is much else you can do except keep them in archival sleeves/boxes and not in high humidity conditions if possible.

Can't wait to see what they look like.
 

tokam

Subscriber
Joined
Nov 7, 2008
Messages
586
Location
Sydney, Aust
Format
Multi Format
Well done so far. The scans will probably show a lot of damage which can be fixed up in post with Photoshop / Gimp etc. Think healing brush and clone stamp and similar tools. It's unlikely that you will attempt to wet print from these negs and I would be focusing my efforts on a good quality scan and then hours of post processing to clean them up. Then make sure you have plenty of backups of your cleaned scans. I usually keep separate backups of (i) raw TIF file from the scanner, (ii) The TIF file after removing dust and scratches and (iii) the JPG final files after any Levels / Brightness / Contrast adjustments etc. At this point the negs are a historical artifact but not as important as the best images that you can extract from them.
 

Don_ih

Member
Joined
Jan 24, 2021
Messages
7,374
Location
Ontario
Format
35mm RF
It's good to know it worked well. The quality of the images at this point would not be as important as having them (which you didn't when they were a block of toffee). It can be interesting to make prints from damaged negatives (and sometimes repaired damage can make a photo look like a still from Gumby and Pokey). A print (even a digital one) is probably the best preservation. After you're dead, no one will be looking at your scans but they may find prints.
 

Sirius Glass

Subscriber
Joined
Jan 18, 2007
Messages
50,132
Location
Southern California
Format
Multi Format
I am happy to see that you are having success with separating the negatives. When you have each negative cleaned up be sure to hang them to day out completely.
 
OP
OP

Romanko

Member
Joined
Sep 3, 2021
Messages
890
Location
Sydney, Australia
Format
Medium Format
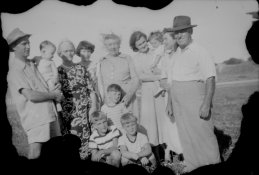
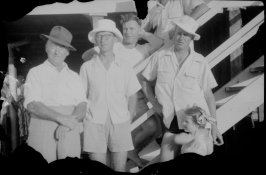
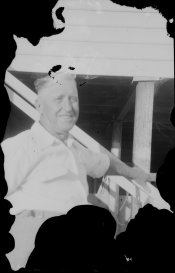
Here are some of the images that I recovered. Thanks again for your help.
If you ever have to do something similar my advice is to be patient. It takes several days for water / photo flo to penetrate between the negatives. It might be a good idea to keep the negatives cool while they are soaking. I changed the solution several times as some of the emulsion was dissolvingand I did not want it to re-deposit on the film.

DSC00002.jpg DSC00003.jpg DSC00005.jpg
 

Kino

Subscriber
Joined
Jan 20, 2006
Messages
7,602
Location
Orange, Virginia
Format
Multi Format
Those are great images that were well worth the time and effort!
 

Sirius Glass

Subscriber
Joined
Jan 18, 2007
Messages
50,132
Location
Southern California
Format
Multi Format
I am glad that we could help and that your well spent time and effort paid off.
 

Deleted member 88956

Fantastic and an encouraging lesson for many who will have found themselves in similar position.
 

LLF

Member
Joined
Jan 28, 2023
Messages
3
Location
Los Angeles
Format
DSLR
Hi Romanko - sorry to restart this old thread, but I have exactly the same problem, I have a block of 1930s negatives that looks exactly like your before pic... can I ask for more detailed instructions.. how much Photo Flo did you use for instance? When you kept them in the fridge, were they flat or upright? etc?
 

Sirius Glass

Subscriber
Joined
Jan 18, 2007
Messages
50,132
Location
Southern California
Format
Multi Format
Hi Romanko - sorry to restart this old thread, but I have exactly the same problem, I have a block of 1930s negatives that looks exactly like your before pic... can I ask for more detailed instructions.. how much Photo Flo did you use for instance? When you kept them in the fridge, were they flat or upright? etc?

Welcome to APUG Photrio!!
 
OP
OP

Romanko

Member
Joined
Sep 3, 2021
Messages
890
Location
Sydney, Australia
Format
Medium Format
Hi Romanko - sorry to restart this old thread, but I have exactly the same problem,
No problem, this is what this thread is for.

I used standard Photo Flo solution (1 + 200). The negatives were placed in a jar with the solution in an upright position. I let them soak for 2 or 3 days in the fridge. I changed the solution once or twice. The goal is to soften the emulsion enough to separate the sheets but not too much to lose adhesion to the substrate. There is no guarantee that this is always possible, but it worked for me to some extend.

The best advice I can give you is to be patient and handle the negatives very gently. It is very tempting to start separating them before they have soaked enough. This is how I ruined the first frame. Good luck and please share you experience in this thread.
 

Tim Stapp

Member
Joined
Dec 21, 2012
Messages
556
Location
Big Rapids, MI
Format
4x5 Format
This process indicates why the local "Disaster Reclamation Company" get the BIG insurance dollars that they do for just what you did.

They have a team of 3-5 people that "Recover from fire/flood damage" photos and negatives. It's been a few years since I was there. They probably went out business because insurance companies quit paying for such restoration services.
 

awty

Subscriber
Joined
Jul 24, 2016
Messages
3,643
Location
Australia
Format
Multi Format
Here are some of the images that I recovered. Thanks again for your help.
If you ever have to do something similar my advice is to be patient. It takes several days for water / photo flo to penetrate between the negatives. It might be a good idea to keep the negatives cool while they are soaking. I changed the solution several times as some of the emulsion was dissolvingand I did not want it to re-deposit on the film.

View attachment 293802 View attachment 293803 View attachment 293804

Great work, looks like they were taken in Queensland, judging by the house on stilts and the clothes......like that Nanna put on her pearls for the photo.
 
Last edited:
Photrio.com contains affiliate links to products. We may receive a commission for purchases made through these links.
To read our full affiliate disclosure statement please click Here.

PHOTRIO PARTNERS EQUALLY FUNDING OUR COMMUNITY:


Ilford ADOX Freestyle Photographic Stearman Press Weldon Color Lab Blue Moon Camera & Machine
Top Bottom