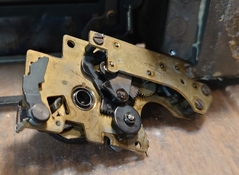
Repair notes for Praktica L-series cameras

Brentwood Kebab!

A
Brentwood Kebab!

  • 0
  • 0
  • 26
Summer Lady

A
Summer Lady

  • 0
  • 0
  • 31
DINO Acting Up !

A
DINO Acting Up !

  • 0
  • 0
  • 23
What Have They Seen?

A
What Have They Seen?

  • 0
  • 0
  • 32
Lady With Attitude !

A
Lady With Attitude !

  • 0
  • 0
  • 34

Recent Classifieds

Forum statistics

Threads
198,758
Messages
2,780,511
Members
99,700
Latest member
Harryyang
Recent bookmarks
0

kl122002

Member
Joined
Apr 17, 2022
Messages
391
Location
Hong Kong
Format
Analog
Intro:

Praktica L-series cameras has a long run history, from 1960s til the fall of the Berlin wall. What makes it truly unique is not just its history background, but also the design inside. Because of export regulations and marketing strategy, there could be many names on the same models. Most of the L-series cameras share similar design with minor internal variations and that makes their parts are almost all interchangable.

Need to note the EE -series is considered as the most advanced models with Aperture Priority+ Open Ap. metering ; VLC series is the "system camera" answer to the " system " in the market with Open AP metering; PLC is similar to VLC but just without interchangable prism. These 3 core lines parts are quite unique and hard to share with other L series, but it's possible to be shared within their production line.
Only these 3 main lines can use "electric" version Pentacon or CZJ lens for Open Ap metering .

Since it has been marked as a "underpriced" camera and the production amount was so large, many users had ignored the fact it is also a very sensitive camera. Poor handling causes faults, and thus resulted these cameras ended up like trash. However most of them can be rescued.


There is a documentary with interviewing former Pentacon staff, showing another fact is the unstable supply materials sourcing causes the cameras likely to fail at random. It is true. I have seen rust spots on steel shutter blades or brass plates with no obvious cause, poor reflex from springs, thin metal pulls, and they even glued the prism on top of the focusing screen frame. 😅

I am writing this topic because I afraid I might forget in one day, and I hope my info can help those who are looking for tips or hints in servicing their own cameras. There are too many stupid videos doing ignorant things on the internet that are for ads or the makers click rate-profit. As I (and also other places with real pros ) mentioned many times, to service a camera needs correct tools. Make sure you have the correct tools for the correct works, even though you will later find Praktica just need few spanner wrenches, slotter screwdrivers, pillers and soldering iron ( small tip). Always remember: right tools for the right job.

(TBC)
 
Last edited:

Andreas Thaler

Subscriber
Joined
Nov 19, 2017
Messages
4,862
Location
Vienna/Austria
Format
35mm
I am writing this topic because I afraid I might forget in one day, and I hope my info can help those who are looking for tips or hints in servicing their own cameras.
This is an attitude that I really appreciate and that helps everyone who is interested. We need enthusiasts who pass on their knowledge. Thank you very much for that!

There are too many stupid videos doing ignorant things on the internet that are for ads or the makers click rate-profit. As I (and also other places with real pros ) mentioned many times, to service a camera needs correct tools. Make sure you have the correct tools for the correct works, even though you will later find Praktica just need few spanner wrenches, slotter screwdrivers, pillers and soldering iron ( small tip). Always remember: right tools for the right job.

Absolutely right!

But you also have to be able to use the right tools. This is a skill that cannot be bought.

That is why it is so important that those who have these skills pass them on. Because there are no classes or training courses for our common area of interest: camera repair. Everything has to be aquired by yourself.
 
Last edited:
OP
OP

kl122002

Member
Joined
Apr 17, 2022
Messages
391
Location
Hong Kong
Format
Analog
Short info about the Design & Basic operation in Praktica L series :

As a successor of former Nova models, it has replaced horizontal cloth traveling shutter with newly developed vertical traveling metal shutter . It is a breakthrough design since it has nothing like the Japanese Copal shutter and was fully designed by Pentacon staff. Since the shutter blades traveling distant is shorter, it can provide faster electronic flash sync (X-Sync) speed and stand out from the common flash speed at 1/60 during late 1960s. (The original L (1969) has about 1/100, vs Nikon F in 1/60v at that time. Later L-series models has reached 1/125).

The L shutter is actually simple and can be separated as 3 parts :
-The timing gear is mounted next to the advancing lever on a brass plate
-The region below the shutter speed dial contains the shutter blades release lever
-The shutter curtain body as a unit, mounted vertically, secured by 2 screws.
This design is registered and so no other company is able to clone . Of course the Japanese Copal has developed their own

Just like Japanese's Pentax design, but also unlike the Pentax,
  1. The Praktica L series would also tension the mirror box when advancing the film. This process is to provide instant mirror rise action before OPening curtain falls down for exposure.
  2. When the user press the shutter release, the mirror will instantly raise up and hold as long as it needs to be.
  3. A blade has kicked the upper shutter release for Op curtain drop for exposure
  4. Timing gear runs to determinate the exposure duration .
  5. Once the exposure ends, the clamp push and let CLosing curtain drops down.
  6. The upper pin of the shutter comes and kick the hook behind mirror box, unlocking the hold to release the mirror fall back to its initial position.
  7. Exposure completed and waiting user to advance film and get ready for another exposure.

I found a video that has recorded how L shutter works ( MTL 5) :


We can also see the flash (white transparent plastic) and its operation .
 
Last edited:
OP
OP

kl122002

Member
Joined
Apr 17, 2022
Messages
391
Location
Hong Kong
Format
Analog
Common mechanical faults:

A.
- unresponsive shutter release
- Failed lever advance ( can't move)
- mirror stays up but shutter has no movement / after exposure

Most common reason :
The camera has been dropped. The shock accidentally released the tensioned hook (shutter or mirror box) and that area got released.

B.
- A loud "Bang" sound and then everything is dead

Reason:
The shutter blades can't hold its position at top, and so they dropped at the very end of film advancing action .
It has accidentally released the mirror box tension causing the loud "Bang"


C.
- shutter snapped after advancing

Reason:
The shutter does not reset well, either insufficient pulling distance or some of the levers are stuck/holding as it position because of old grease

D.
- Film Advancing lever swings freely without driving the film or tension the shutter

Reason:
Use has forced to advance the film/shutter after the above fault present.
The re-tension shutter process is paused at the mid-way and so the winding lock clamp failed to perform

E.
- film counter failed to move

Reason:
Camera dropped on gound, the dented metal compress on the Film Counter push clamps
The FC clamps are detached from driving the counting disk , or from bottom of the advance lever.
 
Last edited:
OP
OP

kl122002

Member
Joined
Apr 17, 2022
Messages
391
Location
Hong Kong
Format
Analog
This is an attitude that I really appreciate and that helps everyone who is interested. We need enthusiasts who pass on their knowledge. Thank you very much for that!


Absolutely right!

But you also have to be able to use the right tools. This is a skill that cannot be bought.

That is why it is so important that those who have these skills pass them on. Because there are no classes or training courses for our common area of interest: camera repair. Everything has to be aquired by yourself.

I only hope my experience and notes here helps. Their is a training course from Learn Camera Repair which I found very useful in these days.

Once you have serviced few broken Prakticas in serious way you will know how it was designed and how much hard work is there, and amazed how it could back to life and perform. The solutions to the mentioned common faults are not difficult , but is important understanding to how it happed, what causes, and the related solutions is the technician should do.
 
OP
OP

kl122002

Member
Joined
Apr 17, 2022
Messages
391
Location
Hong Kong
Format
Analog
D.
- Film Advancing lever swings freely without driving the film or tension the shutter

Reason:
Use has forced to advance the film/shutter after the above fault present.
The re-tension shutter process is paused at the mid-way and so the winding lock clamp failed to perform
The small spring that holds the driving clamp under the winding gear is loose. The camp therefore failed to hold by spring and lost winding function.

*Supplementary edit*
 
OP
OP

kl122002

Member
Joined
Apr 17, 2022
Messages
391
Location
Hong Kong
Format
Analog
Identifying faults
Any users who wished to DIY repair should first identify the fault and deduce any possible causes . It is essential since it could limit the extra faults accidentally created.
It is also true that the cause is beyond your expectation . If that fault is over your current skill you can save it til later you got the knowladge to repair, or treat that as a part.

Dissembling & assembling the Praktica-L series

General Tools:
Soldering iron with fine tip
Slotted precision screwdriver
Anhydrous alcohol
Crab-eye opener/ point tip spanner-wrench
Fine tip piler
Precision tweezers

General reminder :

  • Actually most Praktica has a not-so-tight screws . It is funny to see the "tightness" is likely done by hand but in fact in was by electric screwdriver. driven . The truth is the metal bodies on Praktica have a softer metal. Over tightening will break the screw or damage to the pre-tapped threads. If you have a strong hand, consider to practice the feeling or invest a nice torque-screwdriver.
  • My practice is to set ISO to below 12 and Speed dial at flash before dissembling. Some people like on the highest end which is also ok . This practice helps to set the resistor wheel underneath at a reference point to as reminder before reassembling the whole unit.
  • Release the mirror box tension and shutter tension whenever possible. You don't want anything fly out when accidentally triggered.
  • The plates on dial or the advance lever are glued. In most cases Anhydrous alcohol is enough to dissolve them and lift up the plates. I use sharp hobby knife to lift up the small plate on the advance lever (It applies to many models , Except EE (unscrew) and MTL 5B , MTL 50 (plastic, lift up) )
  • There are insulation tapes on the electric circuit . Replace them with a new one since those old tapes are likely to fall at anytime .
  • The weak economy in DDR/East Germany causes the materials variations, even it is the same model . I would treat this as warning since unstable material could cause more RANDOM issues than you imagine.
DSC_3158~4.JPG
**Note: Paper (!) is used instead of thin metal plate under the surface leatherette for support! . It is not surprising but quite a warning instead. It means either this camera has been serviced (less likely) or poor materials have been used during production **


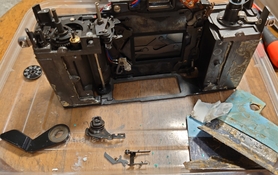
All dissembling process are similar in every model . It has not been a secret since internet bloom and so I am not gonna to write it too detail. User can refer to any websites or videos to get the idea. However I just wan to add notes :

General:
  • All Prakitca can divided into 2 main parts:
  1. The body, (shutter, timing gear, film take-up spool )
  2. The mirror box (light meter system , battery compartment)
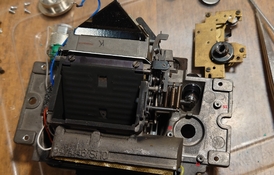
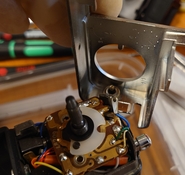
**Note the resistor disk (for changing the resistance to calculate exposure ) is installed underneath the body and linked next to the battery compartment. If any user need to take it out he has to pre-set the meter first and loosen it (2 or 3 screws). It will come out with the mirror box .

  • Self-Timer
All ST are just the same . Installed on the mirror box (3 screws ) and covering the shutter release bottom .
The front is the unscrew the ring surrounding the middle press-button .
It is noisy for sure, and lubricants doesn't help much 😅
DSC_3169~2m.jpg

  • VLC models
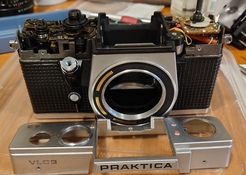
There is no fixed prism , and so there are extra 3 flat headed screws need to remove.
Flash /PC socket is installed on the top plate. In VLC 3 , unscrew it and the top plate can be safely detached .

DSC_3189.JPG
DSC_3190.JPG

  • PLC/LLC/ VLC light meter switch
The light meter stich is install on the camera body (left hand side) . It has a steel ball for click-stop . Don't loose it and the spring below
There is an extra screw or lock ring (variations) to secure the PCB board there. Loose this screw and user can lift up the plate before taken out the mirror box.
Also remember to take out the resistor disk from the lower part of the body
 
Last edited:
OP
OP

kl122002

Member
Joined
Apr 17, 2022
Messages
391
Location
Hong Kong
Format
Analog
(Con't)

**Note:
This is why setting ISO & Shutter Speed is important when starting working below here. Once you set the reference point the else workflow would be very easy when reinstalling .
Don't loose anything , like screws or springs . All stuff are start getting tiny from now on **


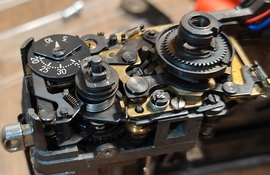
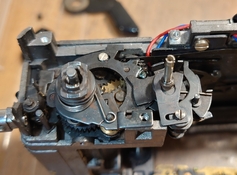
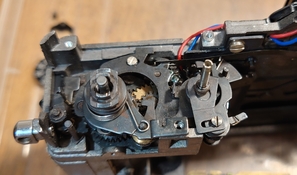
  • The Speed /Timing gears
All speed control is done at here.
It is installed on the Right top of the camera. Hold by screws (1 under frame counter) + 1 long screw in the center of the speed selector disk .
To dissemble, I prefer to remove the frame counter.
The frame count is done by unscrew the indicator and lift it up, the other end of spring is hold by a small rod. Just lift it up and everything will be done.

DSC_3168~2.JPG


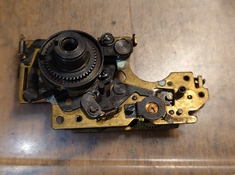
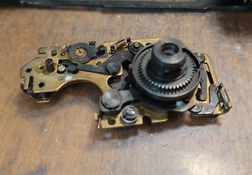
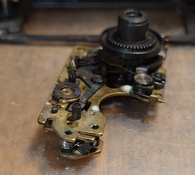
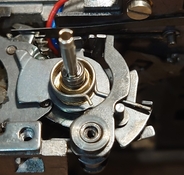
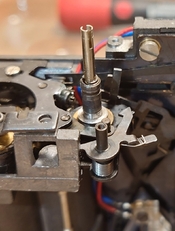
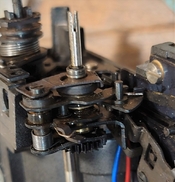
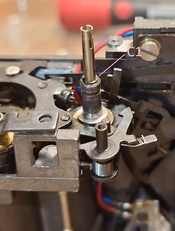
Different views of the Speed/Timing gear :
DSC_3159~2.JPG

DSC_3160~2.JPG

DSC_3161~2.JPG

DSC_3162~2.JPG


Note: the levers are nearly flat on the brass plate. Very light lubricant can be added for smoother process.


  • The Frame Counter clamps
The Upper Counter Clamp can be detached by pulling out ;
The Lower CC one, which has as Push Clamp and the Driving Clamp under the winder, release them and just pull it out .


  • Reading the below pics you will have the idea how L series shutter operates :

Tensioned :

DSC_3166~2.JPG

Released :

DSC_3165~2.JPG

  • The Film Advancing and the Charging gears:

DSC_3166~2m.jpg

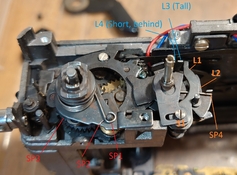
The FA can be lift up after detaching Red spring SP1 and SP2 .
Red SP3 (inside) is the small hooked like spring that sometime would lose from pressing the driving clamp in advancing film.

  • Most old oil and grease could be found at the orange words area . It makes the levers (L1, L2) failed to released pressing L3/4 and so resulting failure in holding the curtain.
    • Use 1 drop or 2 naphtha (lighter fluid) to dissolve & loosen, and air blower to blow out could be fine sometimes. Or user may need to disassembly the whole for complete cleaning
  • The blue words L3, L4 are the levers on the curtain site:
    • L3 - OP Curtain release lever
    • L4 - CL Curtain release lever
      • The hair spring could be detached that makes the lock failed to hold the shutter curtain during tensioning .
  • Apply very light oil , or even graphite since it is a fast moving part.

  • Disassembling the Orange word area (aka shutter's Main Spring Release / MSR)
    • The orange S1 is the screw with multiple uses :
      • Secure that parts
      • Adjust the high speed spring (SP4) and secure the OPening (L1) / Closing levers (L2) . Thus mark the position and the slot (behind that plate) used before disassembly
DSC_3183.JPG
After removing Orange S1 and cover

DSC_3181~2.JPG
Parts (Orange L1, L2, Main Spring) in sequence.
  • Note to the first left parts, that is for holding the main spring with tension . Main Spring doesn't need much force as imagined. But remember which slot on the First Left used is very important.

DSC_3179~2.JPG
New we the release lever , where mirror box would kick in order to release the shutter , is seen .

.
A lateral view when it has completed the works and reinstalling.
DSC_3164~2.JPG
 
Last edited:
OP
OP

kl122002

Member
Joined
Apr 17, 2022
Messages
391
Location
Hong Kong
Format
Analog
I got interrupted recently and that make me paused the update here, sorry.

Before I continue , I wish to share some Q&As I did recently :
  • Why should I repair the Praktica? "They are dirty cheap and poor quality cameras ...."
    • Good and functioning Prakticas are getting less for sure. For those working one aren't cheap. You can check in auction sites and see the result.
    • Prakticas were made to export and gain income for former East German. The quality shuoldn't be bad originally.
    • In fact the camera on your hand could be poorly handled previously, which has nothing related to its design or QC.
    • "I have the money and I can get the another!" Failures in camera are independent individually.
  • Which model would you recommend to buy for use ?
    • Praktica MTL 5, 5B, 50 for general & modern feeling.
    • Praktica VLC2, 3 for electronic lens and enjoy open aperture metering
    • Praktica L, L2 for vintage feeling
  • Which model would you avoid?
    • Praktica MTL 3 . Massively produced and the QC was unstable during this long run.
    • EE series . One have to understand the complex design of electronics to repair.
    • LB, or rebranded LB. The selenium meter is less accurate today and it is uncoupled.
  • If I wish to get a "For parts" Praktica camera and attempt DIY repair , what should I look up ?
    • The appearance and completeness . Camera spares are expensive in Praktica.
    • Praktica used sliver plated plastic covers (up & down ) , and so they can't handle the impacts from dropping, resulting in cracked cover(s) or broke in internal parts
    • Avoid silver-lost prism . Not all models have detachable prism for exchange and cleaning
    • Avoid seriously corroded battery compartment .
  • Is there any way to lift up the metal cover plates (speed dial or above winding lever) without damaging?
    • Yes. Use anhydrous alcohol or acetone (1-2 drops ) on it. Wait for solvent to get inside at the slit for a while, then clean up the extra solvent
    • Next, use tape with higher adhesion power (e.g. electric wire tape ) to stick and get cover.
    • It also apply on Pentacon Six or Exakta RTL1000
  • Is it true that Exakta RTL1000 is same as Praktica L ?
    • Yes , and no :
      • Yes - RTL1000 is made earlier than Praktica L . The shutter inside RTL1000 has influence on L's design
      • No - Not all designs are identical and they are non-exchangeable.
 

mabuse68

Member
Joined
Jan 15, 2011
Messages
5
Location
Belgium
Format
35mm
This is a treasure trove of camera repair information! Many thanks for taking the time to publish it.
 

ic-racer

Member
Joined
Feb 25, 2007
Messages
16,544
Location
USA
Format
Multi Format
I have one of those. When I acquired it in the 1970s, It had been dropped, the bayonet ring on the lens broke clean off and a dent in the top plate broke the exposure counter mechanism and the strap lug broke off.

A new lens was easy to find and the top plate was straightened back in the early 1980s. I would need a donor camera to repair the exposure counter, so the camera sits on the 'collectors shelf' for now.
 
OP
OP

kl122002

Member
Joined
Apr 17, 2022
Messages
391
Location
Hong Kong
Format
Analog
I have one of those. When I acquired it in the 1970s, It had been dropped, the bayonet ring on the lens broke clean off and a dent in the top plate broke the exposure counter mechanism and the strap lug broke off.

A new lens was easy to find and the top plate was straightened back in the early 1980s. I would need a donor camera to repair the exposure counter, so the camera sits on the 'collectors shelf' for now.

TBH I have seen plenty donor cameras in UK and they are quite cheap.

In early 2000s a local camera shop owner have given me a box of 30+ L series cameras after I just asked for 1 donor camera. He really wished someone could took away his old parts stock that had kept since 1970s. Recently I have rebuilt a few from these parts and given to the teens who are look for a film camera to have a try. They are happy with the results and no flaws so far.

I have repaired a few recently as well and there are still 6 on my working table. Plenty of them are claimed "the light meter isn't working" or "jumped to the high". The actual fact are:
  • the old battery leaked and left the electro-conductive residue on the brown PCB board,
  • the PCB board has corroded
  • old insulation tape has been "polluted" by the leaked electro-conductive residue, or lost its position.
  • the plastic driving wheels (connect and transfer from speed selector to the rotatory resistor disk ) are cracked.
So far I have never seen any dead Cds cells from any Praktica L series cameras.
 
OP
OP

kl122002

Member
Joined
Apr 17, 2022
Messages
391
Location
Hong Kong
Format
Analog
Con't

There was a time the owner had told "some small e-clips and rings came out from the camera" and no idea where it belongs. The shutter snapped once completed winding .

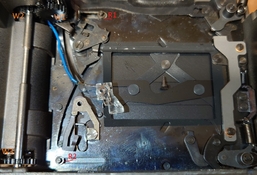
These tiny rings and e-clips are actually used for holding the pins in shutter : 1 e-clip above a washer.
If they are loose the shutter might failed to hold in place. See R1 and R2 from the picture below.

The wheels that I mentioned in #15 are also here , see W1, 2, 3 in the last picture below.
To replace , it has to remove the retaining ring after removing the speed gear C1 first. After the removing it , the W1 with the rod will drop at instant .
W2 and W3 can be loosen by unscrewing a pointed screw from the bottom and slide out as a unit.


DSC_3179~2-ed.jpg


And here you can see how it looks when the flash sync has been dissembled. It is not complicated.
Models with 2 flash PC sockets uses the same flash sync gear , and just added a red wire for the flash next to lens mount.
(When taking out mirror box in this 2-PC sockets flash model, one has to desolder the Red and Blue flash wire on top of the shutter )

DSC_3187-ed.jpg
 
  • kl122002
  • Deleted
  • Reason: politics and controversy

MattKing

Moderator
Moderator
Joined
Apr 24, 2005
Messages
52,880
Location
Delta, BC Canada
Format
Medium Format
With some consideration and doubt, the previous post has been deleted as straying too far into the area where our rules prohibit political discussions.
Speaking very generally, it indicated that there were concerns about the working conditions in the Pentacon factories. We are sure that if people wish to learn more about that, information can be obtained outside of Photrio on the internet.
 
OP
OP

kl122002

Member
Joined
Apr 17, 2022
Messages
391
Location
Hong Kong
Format
Analog
With some consideration and doubt, the previous post has been deleted as straying too far into the area where our rules prohibit political discussions.
Speaking very generally, it indicated that there were concerns about the working conditions in the Pentacon factories. We are sure that if people wish to learn more about that, information can be obtained outside of Photrio on the internet.

Understand & Agree.
 

chuck3565

Member
Joined
Oct 25, 2015
Messages
94
Location
United States
Format
35mm
The IV and V cameras were well constructed and had bright viewfinders. The cloth shutter cameras after these had darker viewfinders and weren't as reliable. The L series cameras with the metal shutters had a tendency to jam and the viewfinders went from dim to pretty dim. The B and BX series were mechanically reliable and mostly electronically reliable with very bright viewfinders.
 

Andreas Thaler

Subscriber
Joined
Nov 19, 2017
Messages
4,862
Location
Vienna/Austria
Format
35mm
The IV and V cameras were well constructed and had bright viewfinders. The cloth shutter cameras after these had darker viewfinders and weren't as reliable. The L series cameras with the metal shutters had a tendency to jam and the viewfinders went from dim to pretty dim. The B and BX series were mechanically reliable and mostly electronically reliable with very bright viewfinders.

Thanks!
 
OP
OP

kl122002

Member
Joined
Apr 17, 2022
Messages
391
Location
Hong Kong
Format
Analog
@kl122002

What is your impression of the material and manufacturing quality of Praktica cameras across time and range?

Perhaps because of the L series has been sold underpriced. Most "jammed" art not actually jammed, but previously have been mishandled by the user, like drops or abuse . For 7/10 cameras I repaired are actually just need to open the top, use a small screw driver to kick the shutter release underneath the speed dial, let the shutter completes its run and then everything would be back to normal again .
The others, from today's pov, is mostly due to old dried oil and grease + mishandling (WD40 inside...) causing improper operation.

MTL3 is the only model I always find troubles inside, even it looks super new there. That is the only model I would avoid .

Older Prakticas , like IV , or before they changed their name, e.g. Contax S M42 SLR, Pentacon SLR , I won't say they are excellent camera , but just a camera that historically important .
 

imcanderson

Member
Joined
Sep 13, 2024
Messages
11
Location
Edinburgh
Format
35mm
*Supplementary edit*

Thanks so much for this wonderful resource! I have a VLC (first version) with the problem you describe here - listed as (D) - where the film advance lever is loose. I wonder if you have any suggestions for how I might fix this? Thanks in advance!
 
Photrio.com contains affiliate links to products. We may receive a commission for purchases made through these links.
To read our full affiliate disclosure statement please click Here.

PHOTRIO PARTNERS EQUALLY FUNDING OUR COMMUNITY:


Ilford ADOX Freestyle Photographic Stearman Press Weldon Color Lab Blue Moon Camera & Machine
Top Bottom