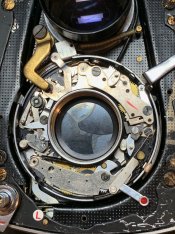
Repair Copal SV shutter stuck on highest speed

Waiting to board

H
Waiting to board

  • Tel
  • May 5, 2025
  • 1
  • 0
  • 20
Tomato

A
Tomato

  • 5
  • 0
  • 60
Cool

A
Cool

  • 6
  • 0
  • 69
Coquitlam River BC

D
Coquitlam River BC

  • 6
  • 3
  • 58
Mayday celebrations

A
Mayday celebrations

  • 2
  • 3
  • 108

Recent Classifieds

Forum statistics

Threads
197,568
Messages
2,761,190
Members
99,405
Latest member
Dave in Colombia
Recent bookmarks
0

silvertab

Member
Joined
Dec 31, 2021
Messages
43
Location
Canada
Format
Multi Format
Hi everyone!
I bought an "as is" Yashica 12 off ebay in pristine condition, however it has some shutter issues.
Here is the original thread I posted: https://www.photrio.com/forum/threads/shutter-issue-with-yashica-12.188833/

To make a long story short; when I received it, the shutter was "stuck" it wouldn't fire at all. I unscrewed the front part of the taking lens, and dropped a tiny amount of lighter fluid on the shutter and it immediate got unstuck, however now it looks like there's another issue with it: The shutter only has 2 speed: Bulb (which works fine) and "very fast". That is; any speed that I pick on the shutter speed knob results in the same _very_ fast shutter speed, and as I said, Bulb work just fine.

I've looked at a bunch of videos on youtube, as well as the exploded diagram of the 124, as well as this page: http://ratfactor.com/yashica/
Which were all tremendously useful, but I was wondering if anyone had an idea of what exactly I should watch out for if I attempted to open the camera and repair it myself (considering the price I got it for, and the lack of options to get it repair in my area, I might attempt it!). I've read of someone that had the exact same issue with it and was able to repair it but couldn't find more info.

tldr; shutter only has 2 speed, very fast, and bulb... If I'd like to attempt to fix it myself, what exactly could be wrong with it? What should I look for exactly in the shutter that could be wrong/gummed up/broken/etc.?

Any help would be apprecited! :smile:
 

albada

Subscriber
Joined
Apr 10, 2008
Messages
2,171
Location
Escondido, C
Format
35mm RF
Practice on a junker camera first!
When you are comfortable working on the junker, then try repairing this nice camera.
You'll need some small tools, such as precision screwdrivers.
Without tools and experience, you are likely to do more harm than good. I have repaired many cameras that were damaged by amateur repairs; I had to fix their damage (when possible), as well as the original problem.

Mark Overton
 

shutterfinger

Member
Joined
Feb 25, 2013
Messages
5,020
Location
San Jose, Ca.
Format
4x5 Format
OP
OP

silvertab

Member
Joined
Dec 31, 2021
Messages
43
Location
Canada
Format
Multi Format
https://learncamerarepair.com/productlist.php?category=2&secondary=3
https://learncamerarepair.com/productlist.php?category=2&secondary=39
The delay timer is not running. Post a picture of the shutter with the front lens element and front cover removed. The delay timer can be removed as an assembly in most cases but can be complex to disassemble/reassemble.

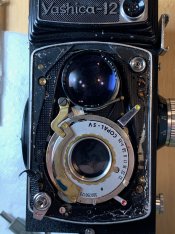
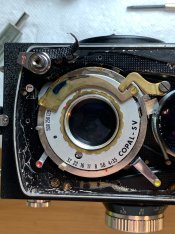
Here you go. Let me know if this is what you had in mind:

IMG_3418.jpeg IMG_3417.jpeg
 

shutterfinger

Member
Joined
Feb 25, 2013
Messages
5,020
Location
San Jose, Ca.
Format
4x5 Format
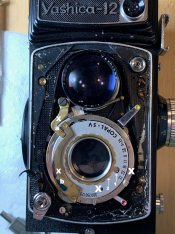
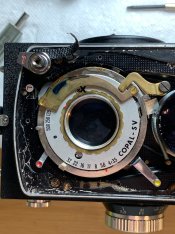
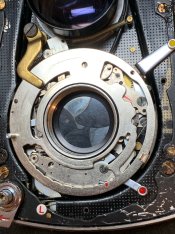
Remove brass levers at X a and X b. Remove screw at arrow 1 , its very small! Mark a starting point and unscrew brass ring at arrow 2 counting and recording the number of turns it takes for the ring to come off.
Remove plate with the speeds (larger X) then the speed ring (red dot, big X) then post a picture of the shutter.
IMG_3418.jpeg
 
OP
OP

silvertab

Member
Joined
Dec 31, 2021
Messages
43
Location
Canada
Format
Multi Format
Remove screw at arrow 1 , its very small!

hmmm I see a pin there, but no screw :unsure: You did mention it was small so I looked real hard... but I swear all I see is a pin! (Just want to take the opportunity to add how much I appreciate you taking the time to help me out with this!)
 

btaylor

Subscriber
Joined
Dec 28, 2010
Messages
2,223
Location
Los Angeles
Format
Large Format
Would it not be worth it to send it to a qualified repair person and get a guaranteed repair so your Yashica can work as well as it looks? Then you can take it out and take great photographs. If you are not an experienced camera repair person the chances of something going terribly wrong are pretty high I think. Anyway, carry on- just some thoughts for you to ponder.
 
OP
OP

silvertab

Member
Joined
Dec 31, 2021
Messages
43
Location
Canada
Format
Multi Format
Would it not be worth it to send it to a qualified repair person and get a guaranteed repair so your Yashica can work as well as it looks? Then you can take it out and take great photographs. If you are not an experienced camera repair person the chances of something going terribly wrong are pretty high I think. Anyway, carry on- just some thoughts for you to ponder.

Perhaps... I don't plan on doing more than I am comfortable doing. So far it's only been removing the leatherette and a couple of screws. I've disassembled watches, small electronics and built computers before so I'm not totally unfamiliar with the exercise. If it reaches a point where I'm not comfortable going forward, I'll definitely put it back together and do just that!
 

shutterfinger

Member
Joined
Feb 25, 2013
Messages
5,020
Location
San Jose, Ca.
Format
4x5 Format
Well if you've put any of those watches back together and have them work you can fix this camera. I would remove the shutter from the camera and do a full teardown cla on it.
A trace of oil goes on pivots, a trace of grease goes where metal parts rub together. Take good pictures as you go for reassembly reference.

That center notched brass ring holds the face plate in place. The underside of the face plate has machined notches and slots in it. Too loose and levers slip out of their slots, too tight and they do not move.
 
OP
OP

silvertab

Member
Joined
Dec 31, 2021
Messages
43
Location
Canada
Format
Multi Format
OP
OP

silvertab

Member
Joined
Dec 31, 2021
Messages
43
Location
Canada
Format
Multi Format
hmm ok so, this bulb & time lever seem to work as expected; if I place it on one side, and fire the shutter, it's in bulb mode, as expected, if I flip it to the other side, then it fires at 1/500... I'm not seeing the speed timer do anything :\
 

shutterfinger

Member
Joined
Feb 25, 2013
Messages
5,020
Location
San Jose, Ca.
Format
4x5 Format
This shutter is very similar or a copy of the Prontor SV shutter.
https://learncamerarepair.com/downloads/pdf/PRONTOR-S-SV-SVS1-Repair-Manual.pdf
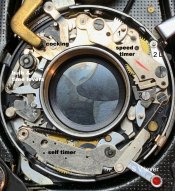
With the S V lever at S the shutter operates as set by the speed dial. With the S V lever set to V tripping the shutter starts the self timer running then after 7 to 10 seconds the shutter fires according to the selected speed.
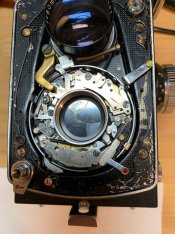
1 is the speed delay gear engaging travel, 2 is the pallet, and 2L is the pallet tension. The gear travel coupled with the pallet tension regulates the delay speed.
Cocking the shutter applies spring tension to the mechanism and locks the shutter blades from moving.
Releasing the shutter frees the shutter blades and a weak spring flips them to full open in .00003 seconds; the delay timer (aka speed timer) blocks the shutter blades from closing for the selected time up to 1/125 then spring tension closes the shutter blades. Additional spring tension is applied for speeds above 1/125
. Copal SV shutter.jpg
 
OP
OP

silvertab

Member
Joined
Dec 31, 2021
Messages
43
Location
Canada
Format
Multi Format
Thanks a lot for all the help shutterfinger! I spent a bit more time in there and I'm completely baffled as to what might be wrong with it... I think it might not help that I've never seen a properly working one so I have a hard time figuring out what I'm looking for exactly in the speed timer that could be wrong.

I've taken 3 brief video that perhaps will help demonstrate the issue:

Here's me firing the shutter at Bulb mode (works fine):
https://drive.google.com/file/d/1wvDUdLNq1eq-OxmIvVkwK_mJTWNc-t7p/view

Here, first I place it to bulb mode, then I'm moving it 2 notches, to 1/2s. Here's firing it at 1/2 (half a second), as you'll see, it fires really fast:
https://drive.google.com/file/d/1ewS9EDkEa8jlAF6YpMNAN-OMtJixtY5a/view

and here I am firing it at 1/15, again, the speed looks to be the same as with 1/2... and I don't see anything happening in the speed timer:
https://drive.google.com/file/d/1z4qyxBVqCV7IibXZEjXigq_sm34Kw6DB/view

I've taken another video at 1/500 but... really it looks the same as 1/2 and 1/30.
 
Last edited:
OP
OP

silvertab

Member
Joined
Dec 31, 2021
Messages
43
Location
Canada
Format
Multi Format
Well, to my own amazement, I managed to fix it...all I did was add tiny drops of sewing machine oil to the speed delay gear, wherever it made sense, and move all the gears/levers a bit to distribute it. However, while the fast shutter speed (1/500 to 1/8) appear to be pretty accurate, as soon as the slow speed escapement kick in, they're all on average 2x too slow (i.e. 1/4 is 1/2, 1/2 is about a second, and 1s is close to 2 seconds). Still... progress!
 
OP
OP

silvertab

Member
Joined
Dec 31, 2021
Messages
43
Location
Canada
Format
Multi Format
Its simple, the delay timer is not running. The gear lever at 1 in the previous photo should fall to the bottom of the slot at 1 second, partway in at other speeds.

Yup, that's what I realized while playing with it... I moved it around a bit and added a bit of oil and it seems fine now! (Other than the slow speeds being way off). Can't thank you enough for all the help!
 
OP
OP

silvertab

Member
Joined
Dec 31, 2021
Messages
43
Location
Canada
Format
Multi Format
The sewing machine oil will gum up after a few months. Disassemble the delay timing, clean all the parts, oil the pivot ends with a trace of lightweight oil and reassemblw.
TriFlow https://www.amazon.com/Tri-Flow-Squeeze-Bottle-Lubricant-Teflon/dp/B00GC54OC2/ref=sr_1_3?crid=2V892CRPNGJK1&keywords=triflow+superior+lubricant&qid=1641156502&sprefix=triflow,aps,153&sr=8-3 or clock oil.
Triflow is available at hardware stores and bike shops.

Ok thanks for the tip! Ordered some Triflow as you suggested, and now that I'm a bit more comfortable with all the pieces in the shutter, I'll try to do a proper CLA of the shutter next! Thanks again!
 
Joined
Feb 17, 2024
Messages
42
Location
Colorado Springs, CO
Format
Multi Format
Hi, bumping this thread instead of starting a new one. I recently got a Yashica-12 that was in pretty good working condition, only apparent issue was a missing M/X lever (no big deal as long as I set it to X and leave it), and a non-cocking self-timer. The blocking lever that prevents setting the self-timer in M mode was stuck in the up position. Upon disassembly, I discovered that it was bent (maybe from someone trying to force it), carefully reestablishing the original shape got the lever and self-timer working properly again.

I measured the shutter speeds and found that they were quite good, some spot on and a couple with ~10% error, up to about 1/60 of a second. However they were running increasingly slow between1/60 and 1/500 (~1/50, 1/80, 1/125ms, 1/200). 1/60 error I can live with, but fastest two speeds being a full stop off is too much. After removing the escapement assembly, ultrasonic cleaning, and applying Horace Whitlock clock oil (with an oil pin), the results were basically the same.

I understand that at 1/125 and faster the pallet is disengaged, and from @shutterfinger's post above that spring tension sets the shutter speeds - it would certainly appear that the spring tension may be too low; any insight on increasing tension or any other way to improve the fastest shutter speed performance?
 
Joined
Feb 17, 2024
Messages
42
Location
Colorado Springs, CO
Format
Multi Format
@Mikey Antonakakis how are you measuring the speeds?

Photoresistor circuit, 12V across a resistor divider circuit, measuring with oscilloscope. The photoresistor isn't super fast response, but the trace on the 'scope makes it very clear when the shutter starts opening and starts closing. For example, here's the 1/500 setting, which gives the least-clear curve. Still, very easy to see each event.

53596834000_8b42a0ed33_c.jpg
 

OAPOli

Member
Joined
Sep 26, 2022
Messages
624
Location
Toronto
Format
Medium Format
Nice setup. It looks like the taper after closing is long which may affect accuracy? I think the timing is usually measured at the 50% point between on/off. And the plateau is lower at smaller f/stops, which widens the delta between 50% points. My experience is with a laser Arduino setup so I'm not sure.

Just be sure it's broken before fixing it. 1 stop off at 1/500 is pretty usual.
 
Joined
Feb 17, 2024
Messages
42
Location
Colorado Springs, CO
Format
Multi Format
Nice setup. It looks like the taper after closing is long which may affect accuracy? I think the timing is usually measured at the 50% point between on/off. And the plateau is lower at smaller f/stops, which widens the delta between 50% points. My experience is with a laser Arduino setup so I'm not sure.

Just be sure it's broken before fixing it. 1 stop off at 1/500 is pretty usual.

Yes, usually the 50% point is used, but in this case I am using the start of each event (you can see the vertical cursors lined up where I was measuring). There’s effectively some capacitance in the circuit that causes the long tail after the shutter closes. In any case using “start to start” is pretty similar to “50% to 50%” (a somewhat equal shift on both events).

As for waiting to fix it, too late lol. I already tore down the escapement completely to do a deeper cleaning, got it back together and it’s working the same as before (although I started a little light on oil and it actually slowed down a bit! Added a tiny bit more and now it’s running quite smooth, but a little fast at the slowest settings, spot on in the middle range, and increasingly slow from 1/125-1/500.

I started reading a Compur MXV repair manual, it seems that at least for one of the models they set slow speed by escapement assembly position, mid speed I didn’t quite grasp, and 1/125 and faster by another method I couldn’t quite decipher (I was in a hurry but will read more later). Obviously not the same shutter but hopefully close enough in principle?
 
Photrio.com contains affiliate links to products. We may receive a commission for purchases made through these links.
To read our full affiliate disclosure statement please click Here.

PHOTRIO PARTNERS EQUALLY FUNDING OUR COMMUNITY:


Ilford ADOX Freestyle Photographic Stearman Press Weldon Color Lab Blue Moon Camera & Machine
Top Bottom