Recreating a Real Photo Postcard - a diary

Relaxing in the Vondelpark

A
Relaxing in the Vondelpark

  • 6
  • 3
  • 131
Mark's Workshop

H
Mark's Workshop

  • 0
  • 1
  • 79
Yosemite Valley.jpg

H
Yosemite Valley.jpg

  • 3
  • 1
  • 88
Three pillars.

D
Three pillars.

  • 4
  • 4
  • 89
Water from the Mountain

A
Water from the Mountain

  • 4
  • 0
  • 110

Forum statistics

Threads
197,545
Messages
2,760,824
Members
99,399
Latest member
fabianoliver
Recent bookmarks
0

bud007

Member
Joined
Sep 23, 2024
Messages
62
Location
Chicago
Format
Medium Format
I thought I’d start a kind of a diary thread for a project I’m undertaking to recreate some real photo postcards (contact printed from a giant 3.25 x 5.5 inch negative), which will certainly be a multi-disciplinary effort. I’ll post progress and setbacks as the journey unfolds. Figured some people might get a kick out of the journey, and I might get some good advice along the way.

My motivation… I’m part of a local not-for-profit historical society and many of the oldest photos in our collection are 1908-1930 “real photo postcards”. We would use the resulting “reproduced” cards as thank you notes or perhaps even membership reminders/solicitations. The text side of the cards would have a link, maybe even a QR code (wow, wouldn’t that look out of place in 1908) , that would tell the story of what a real photo postcard was, something about our collection of them, and how we recreated the process of producing them to produce the card in your hand. So… it’s important to me to try and respect the process and materials that would have been used circa 1908… well, as much as is reasonable. I'm also not trying to recreate the same pictures, though maybe that would be fun for a couple of the cards we have where the subject still exists... the subject of the cards would be more like "this is our town today and what it's highlights are", which will be different than what the highlights were in 1908. As background, I have a darkroom where I’ve done BW and Color before, and I have a 3D printer and CAD experience. Here’s my first stab at scope, issues and approach:

1) Camera – Kodak 3A – these are very available used on ebay, so that should be straight forward enough.

2) 122 Black and White Roll Film – I understand last produced in like 1970 or so, occasionally available on ebay. My instinct is to test the camera with 120 film (obviously would need an adapter), sort any issues out, then go for a full size shot. I have concerns about the cost and limited amount of trial and error possible with actual 122 film, to say nothing about how viable an obviously expired roll of 50+ year old film. So… I have on hand a box of large format 8x10 Black and White film, and am thinking about cutting that down to a 122 frame (3.25 x 5.5) and coming up with a way of loading a cut negative into the camera (so each shot would have to be loaded in a changing bag).

2a) 120 roll adapter – I see there are CAD models of these, and I have a 3D printer, so that should be straight forward enough. Just need this to conveniently test out the camera and work out any issues.

2b) 3.25 x 5.5 sheet film – Assuming I go down this path, I’ll have to figure out a mechanism to cut down an 8x10 sheet. I guess worst case I’ll do it with a paper cutter in the darkroom. Don’t know why, but I’m always kinda leary of handling unexposed film outside a changing bag, so if I could craft some sort of slitter I could use in the changing bag, I might prefer that. And to be honest, my darkroom currently needs a little TLC to be perfectly dark.

2c) Film type – as this is a contact print, I’m thinking it’s not really gonna matter much whether I’m using Delta 3200 or TMAX 400.

3) Film Processing – I have a Jobo CPE2 that I typically use for BW film with 1500 series tanks. I see some CAD out there where people have 3D printed 4x5 cut film Jobo inserts as well as inserts for 122 film, so I’ll do something similar – e.g. I’ll 3D print a Jobo 1500 reel to match the film I end up with.

4) Contact printing frame – I’ll have to dig it out, but I’m pretty sure I have an 8x10 contact printing frame, so figure I should be able to use that somehow. I have a Beseler 67 XL enlarger in the dark room, so it’ll be the light source, unless the “gaslight paper” needs something different/special. Oh, once I get this working, maybe I should do one using a lantern or candle or something… that might be kinda fun.

5) Print titling – many of the real photo postcards we have are titled/labeled on the bottom left. I asked in another thread about how this was done, and it seems likely it was a modification of the negative using some kind of letter press equipment. I’ll probably first try pressing some lettering into clear plastic and overlaying it on the negative… if that looks more or less correct then maybe commit and apply ink to the negative.

6) Print paper – Some of the cards we have are AZO and some are Velox and some are unknown. For my purposes, I think any of those would suffice. I’m going to assume that it will be easier/cheaper to make my own postcard printing paper than to find old Velox/AZO stock. I have a “gaslight paper” coating recipe that I assume is kinda sorta close to what Velox/AZO would have been, so want to give that a go. Worst case I guess I could use some Liquid Light – I think I might even have some somewhere, but it’s been ages since I used it.

6a) paper stock – I’ll guess it’ll be some kind of art paper I’ll need to coat with the gaslight soup. If that’s not the right thickness for the post card, I’ll just glue it onto something that makes it the right thickness post processing.

6b) text side of post card – I gather the AZO/Velox paper came with a side to be exposed and a side already printed with postcard trappings. I could just run these through a laser or inkjet, post exposure, I guess. I see there are some low end approaches to a printing press (3D printed, or even using a pasta press) which might be kinda fun. I think I’ll start with just laser or ink jet printing it and then save the old school printing for extra credit.

7) Print processing – I assume this will be pretty straight forward. I have trays in the darkroom, or I can use the Jobo. I don’t think the chemistry is all that complicated to process the print.

Comments or suggestions are welcome. And, as I said above, I'll post updates back to this thread as I proceed.
 
OP
OP

bud007

Member
Joined
Sep 23, 2024
Messages
62
Location
Chicago
Format
Medium Format
Update #1 – Camera Acquired – Picked up a Model C of this camera for $30 and it actually appears to be in pretty good shape. I gather it dates around 1915, give or take. Shutter speeds surprisingly tested more or less accurate. Bellows look like they are light tight. Only issue I see is the little red “frame number” window is cracking and probably not light tight – I threw some black tape over that on both sides to remedy any issue.

Kodak-3A-Model-C.jpg


I have an old expired roll of Agfa APX 100 that I’ll sacrifice to testing the camera out. I 3D printed out a couple of the 120 to 122 adapters I found on the net and they were a little tall – had to sand them off. Running some backing paper through as a test… it looks like 3 and ½ wind revolutions moves one frame, so I’ll use that to advance between frames… since I covered up with tape the frame view window and since the Agfa film isn’t marked for 122 frames anyway.

Kodak-3a-120.jpg


So I loaded up some 120 film and took it out for a spin. Surprisingly light and not that bad to shoot with. The viewfinder is kinda like a primitive TLR – you look down into a mirror for the framing. Shutter is a hoot since you don’t have to cock it. Limited shutter speeds of course – 100, 50, 25… but my shots will all be outside so no biggie. With the sunny weather today, I bounced around between f8 and f16 at speed 100. The remote shutter is pneumatic, so gonna have to get me some plastic tubing and a turkey baster bulb or something... maybe I'll just blow into the tube - ha, I kiinda like that idea. Shutter is easy enough to trigger with your finger on the lens also, which is what I did today. I’m assuming lens flare could happen pretty easily, so tried to be mindful of where the sun was. Setting shutter speed and fstop is pretty standard, but focus is a little wild. There’s a side scale on the bellows track that’s marked for distance (no rangefinder, estimate the number of feet). You set a stop at the distance you’re shooting and then slide the bellows out to that stop. That’s the only real shooting issue I had – I would remember to set the focus scale on the track, but then forget to adjust the belows to that stop. Pretty sure I made that mistake at least once.

Wow, only got 5 or 6 shots on that roll of 120… I guess that makes sense given the 5.5 inch width of the negative. No issues winding the 120 film… we’ll see what kind of weird frame spacing I created with my 3.5 turns per pic. Bigger gaps at the end of the roll when the take-up spool was thicker probably.

I know the shutter speeds are accurate enough cause I tested them with a meter, and I can see looking at the lens that the fstop accuracy is reasonable, so the real questions the test roll is answering is light leaks and focus scale accuracy. Bellows looked good, but you never know about the side seals and such. I probably should have took a shot or two with a set objects at known distances to better judge focus. I guess I could probably also do this with ground glass pressed onto the film plane.

Oh well, I didn’t overthink it too much – we’ll see what comes out when I develop the negatives tomorrow.
 

BrianShaw

Member
Joined
Nov 30, 2005
Messages
16,346
Location
La-la-land
Format
Multi Format


mshchem

Subscriber
Joined
Nov 26, 2007
Messages
14,272
Location
Iowa City, Iowa USA
Format
Medium Format
Theres a combination back for the 3A that used holders for cut film. Very rare. Easiest way to get RPPC sized negatives is with a 5x7 camera. Cut down the negative and use a vintage Kodak print frame.
 

BrianShaw

Member
Joined
Nov 30, 2005
Messages
16,346
Location
La-la-land
Format
Multi Format
Regarding a bulb, a baby nasal aspirator and some rubber or plastic tubing works.
 

Bill Burk

Subscriber
Joined
Feb 9, 2010
Messages
9,152
Format
4x5 Format
You can get some old Kodabromide F postcard paper. Or a double weight Fiber paper and cut it down to the same size.

You can write on the negative in black Faber Castell fine point pen.

You will want a ferrotype plate, and those are tricky to use but part of the appeal.
 

Vaughn

Subscriber
Joined
Dec 13, 2006
Messages
10,027
Location
Humboldt Co.
Format
Large Format
A quick check on USPS postcard sizes on their website:
  • Not less than 3-1/2 inches high or 5-1/2 inches long or 0.007 inch thick.
  • Not more than 4-1/4 inches high or 6 inches long or 0.016 inch thick.
Good luck on this project! Granted, the more efficient the process is, the more fun it will be.

The dates of your project (1908 to 1930) also corresponds to the creation and usage of panochromatic film (various dates I have read are around 1904 to 1906, with a slow change over as panochromatic was 2 or 3 times as expensive. Mostly Pan film was used after 1920. I mention this as x-ray film and other available ortho fi;m can be used and handled under red safe light.

This makes handling (cutting down to size and processing) of the film much easier, and the "look" of the ortho film might even better match the older of the postcards.
 

koraks

Moderator
Moderator
Joined
Nov 29, 2018
Messages
20,888
Location
Europe
Format
Multi Format
Some of the cards we have are AZO and some are Velox and some are unknown.

The unknowns might be something like collotypes. That would be exciting to try your hand at....

I’m going to assume that it will be easier/cheaper to make my own postcard printing paper than to find old Velox/AZO stock.

Don't underestimate the challenge of creating and coating a functional silver halide emulsion.
Frankly, in your whole list of activities/items/aspects, you mention this bit passingly as if it's a step similar in complexity to developing the print or the negative. It's not!! Creating a quality printing paper from scratch, even something as 'simple' as a plain silver chloride print-out emulsion, is really challenging. An AZO type paper is already a significant step upwards in complexity from a POP paper (although the coating process can essentially be the same).

It'll be a whole lot easier to just buy a pack of Adox Lupex, which is basically an AZO-type paper and really every bit as 'period correct' as something you would cook up in your own kitchen.

I’ll just glue it onto something

What's the glue going to do with the silver image? This may sound silly, but especially if you're working with a sensitive DIY emulsion, you'll find that pretty much *anything* that seeps into the paper will affect the image. And the effect is generally not good.

2c) Film type – as this is a contact print, I’m thinking it’s not really gonna matter much whether I’m using Delta 3200 or TMAX 400.

For a 'period correct' image I'd go with something like Fomapan 100, not one of the high-tech emulsions you're mentioning above. Fomapan 100 is a fairly simple film (still more advanced than what someone would typically use in 1930) and its S-shaped curve will be more similar to most of the negative materials you would find back in that day.
And there's a HUGE difference between Delta 3200 and TMAX400. The latter is probably the most straight-line emulsion known to mankind. The former is a deliberately self-compensating emulsion that prevents highlights from blowing out with extended development. They render totally differently. Both render totally differently from virtually anything you would find around 1930.
Also, good news: Fomapan 100 is cheap, even in 8x10 (relatively speaking). Delta 3200 is not even available in sheet film format, so you'll be stuck with 120 and that will make a very small postcard, even for early 20th century standards. TMAX400 can be bought as sheet film but I assume you haven't checked the price of a box of 8x10, otherwise you would have alluded to having a millionaire backing this project.

Good luck with your project; it sounds really nice and all these little details make it an interesting endeavor - especially if you're not in a hurry.

1728722305966.png

Funny, that. I'm more a starters kind of guy, myself, although I don't pass up on a well-made tiramisu.
 

Don_ih

Member
Joined
Jan 24, 2021
Messages
7,398
Location
Ontario
Format
35mm RF
For one of the rounds of the Postcard Exchange here on Photrio, I used a postcard camera with 5x7 Ansco Commercial Ortho film from 1966 (roughly iso25 - I developed the film to quite high contrast) and contact printed the images onto 4x6 Ilford Postcard paper (so, a black border around the image). 5x7 film is a very near fit inside the camera, actually, but you only get one shot (unless you bring a changing bag with you).

What @Bill Burk said about Kodabromide postcards is worth checking out - if you can find a sealed box. Unsealed boxes have likely been exposed to light by now. You may even have decent luck ferrotyping the cards, since they're small.
 
OP
OP

bud007

Member
Joined
Sep 23, 2024
Messages
62
Location
Chicago
Format
Medium Format
Wow, thanks for all the feedback.

I really like the ortho film idea - it seems cheap and available enough. I went ahead and ordered some.

And the ADOX double weight paper also seems cheap and available enough - might as well start there, as it avoids the whole complexities that were pointed out about "make your own paper". I can always circle back and take a crack at some custom paper, for a different look or for a deeper historical dive.

Good catch on the postal dimensions... kinda ironic that the post office, which kinda helped start this whole thing originally, no longer allows it... :smile: So I think the way I'll handle it is to keep the negative true to the original, but go with a larger card that is "USPS postcard appropriate" and try to border the negative appropriately when I print. Or, I could stick to the original size and figure we'll mail them in an outer envelope. Or some of both.
I looked around for a cut film holder, and actually, I think I saw a post in the past week or so where someone else was also looking for them, and they seem like a rare bird. I even looked at Premo cartridges trying to figure out if that could somehow be adapted. In the end, I just thought I'd start by trying to find/fabricate a way of holding a single sheet, one shot at a time, put in place in a changing bag.

I'm still sorting through and absorbing the suggestions, so more comments later - and I'll post something from whatever I get out of the test roll later today. Thanks all!
 

Bill Burk

Subscriber
Joined
Feb 9, 2010
Messages
9,152
Format
4x5 Format
3 1/2 x 5 7/16 is the size of the Kodak Postcard paper.

Before I found the postcard paper, I used Ilford Galerie which is doubleweight paper.

I had these up in the postcard rack at Pierpoint Springs when I lived in the mountains. I enlarged from 35mm. The ratio fits well.

I soon regretted putting the year on my rubber stamp.

A local photographer had a studio in Porterville, I collect Hammond Studios RPPC. His son was my boss’ best friend.
 

Gato Diablo

Subscriber
Joined
May 21, 2019
Messages
18
Location
Thousand Islands, NY
Format
Hybrid
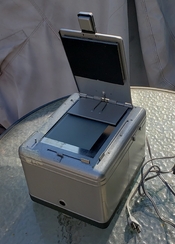
I'm interested in RPPCs also. I have a couple of Kodak Amateur Printers - a contact printing device that was apparently widely used for making RPPCs.

I've located the various patents for it, but as yet no printed instructions (though it won't be hard to figure out). I've got to replace the power cords before firing them up.

Dan

KAP2.jpg


KAP3.jpg


KAP1.jpg
 
OP
OP

bud007

Member
Joined
Sep 23, 2024
Messages
62
Location
Chicago
Format
Medium Format
Well, there's images and the film and I don't see anything that would indicate light leakage. So that's all good. I just looked at the roll briefly as I hung it up to dry. As I suspected, I goofed the focus on a couple of that shots, so only 1 or 2 look like they're in crisp focus. One looks good and sharp, so not sure if that was just by accident or because I remember to adjust the bellows and not just the stop. So I'll either run another roll through just to test focus (with some things set out at known distances), or try to check it with ground glass. Lots of big old caps on the roll - I simply did 7 half revolutions between the shots. Earlier today I took a crack at the math and came out with a pattern that was more like load until arrow is entering frame, close back, 6 half-revs til first exposure, then 5 half-revs for 2nd, then 5 half-revs for third, then 4 half-revs for fourth exposure, then 4 half-revs for fifth. Figuring there's only 32 inches of actual film on there (I think that's correct?), probably only get 5 shots anyway, so maybe just 6 initially, then just always do 5 and not worry about it so much.

Kodak-3A-First-Roll.jpg

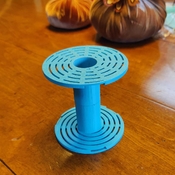
I did get around to knocking out a "122 cut sheet" Jobo 1500 reel. It'll have to go into an extension tank, same size as I would use to do two 120 reels. It's a "pull the sheet onto the reel" concept, same as Jobo's 4x5 cut sheet reel. I allowed for three sheets, because there was room, but I'm not sure I would be able to load then 2nd or the 3rd sheet anyway as the first sheet might block me being able to pull the 2nd/3rd. So might just be developing one sheet at a time. Figure I'll have to sacrifice a sheet and load it in daylight to figure out the technique.

3-25-Cut-Film-Jobo.jpg


Film is drying overnight. I'll pick one of the images and scan the negative and upload it tomorrow.
 
OP
OP

bud007

Member
Joined
Sep 23, 2024
Messages
62
Location
Chicago
Format
Medium Format
I'm interested in RPPCs also. I have a couple of Kodak Amateur Printers - a contact printing device that was apparently widely used for making RPPCs.

I've located the various patents for it, but as yet no printed instructions (though it won't be hard to figure out). I've got to replace the power cords before firing them up.

Dan

Wow - those contact printers are really cool!
 

Don_ih

Member
Joined
Jan 24, 2021
Messages
7,398
Location
Ontario
Format
35mm RF
I've got to replace the power cords before firing them up.

May want to replace all the wiring - there's not much.

those contact printers are really cool!

If your intent was to make more than a few of these cards, and to do it regularly, you would probably want something similar. But a frame that you set under an enlarger works very well and allows you to use contrast filters in the light. Not relevant with fixed grade paper, of course.

Most people in the postcard exchange print the information and address on a sticker put on the back of the card, which makes the card more substantial.
 
OP
OP

bud007

Member
Joined
Sep 23, 2024
Messages
62
Location
Chicago
Format
Medium Format
May want to replace all the wiring - there's not much.


If your intent was to make more than a few of these cards, and to do it regularly, you would probably want something similar. But a frame that you set under an enlarger works very well and allows you to use contrast filters in the light. Not relevant with fixed grade paper, of course.

Most people in the postcard exchange print the information and address on a sticker put on the back of the card, which makes the card more substantial.

For my purposes, it makes a really nice visual "artifact/prop" to go along with the story of how these were made.
 

Bill Burk

Subscriber
Joined
Feb 9, 2010
Messages
9,152
Format
4x5 Format
I'm interested in RPPCs also. I have a couple of Kodak Amateur Printers - a contact printing device that was apparently widely used for making RPPCs.

I've located the various patents for it, but as yet no printed instructions (though it won't be hard to figure out). I've got to replace the power cords before firing them up.

Dan

View attachment 380709


View attachment 380710

View attachment 380708

Those look like the right gadget for the job. You need nothing else, it gives you the safelight and printer in one box
 

MattKing

Moderator
Moderator
Joined
Apr 24, 2005
Messages
51,974
Location
Delta, BC Canada
Format
Medium Format
I started out with a 616 camera (2.5" x 4.5" negatives) and a contact printer similar to this one (image borrowed from a post on photonet):
1728847930102.png

Amazingly, mine wasn't badged with a Kodak name. 😉
But it was metal, and it was big enough for a 4x5 negative.
 
OP
OP

bud007

Member
Joined
Sep 23, 2024
Messages
62
Location
Chicago
Format
Medium Format
I set up focus targets and shot a second roll to test focus, which is currently hanging to dry...

Then I had a chance to look at yesterday's "first test roll"... this second roll was Kodak Plus-X, also expired twenty years ago (working my way through my old leftover film. Here's a shot from that roll:

Kodak-3A-FirstPic.jpg


Scanned as three 6x6 negatives on a Nikon Coolscan 8000 and then joined in photoshop. No post processing other than minor tweaks to exposure to equalize the three different images. As I recall, I focused on the shop sign, shot at f8, and kinda hoped depth of field would pick up the door details.

Issues...

1) This first roll was 20+ year old Agfa APX 100, stored in a drawer. Well, I kinda thought the film stock was a little dark when I pulled them from the tank yesterday, and now that I can inspect them, it seems the film is pretty clearly fogged. You can see transfer from the backing paper (the number 3, midway up on the left side). I assume this issue might be more the age of the film rather than the camera? I already have a second roll drying, and glad it wasn't another of the same... so will see if it exhibits similar fogging.

2) I see a general light leak all across the bottom of the image. Or something happened to that end of the roll out of the camera.

3) I see a couple of linear scratches (top left corner is most obvious, but there's a couple of others also). I recall thinking the film rollers were stiff - they may need to be loosened up a bit and cleaned.

Focus seems reasonable. I need to figure out what the heck depth of field is on this thing - it's not marked anywhere on the camera.

So I'm really glad I went ahead and shot that second test roll, as it should either have the same symptoms or not. It's drying now... I probably can look at it tonight (I typically dry overnight, but it's just focus targets)

Also interesting to me how much barrel distortion this lens has... especially considering this is only the center strip of the frame(because of the 120 vs 122 film). I was also thinking... oh I didn't frame it this way, the finder must be off... until I remembered the center strip limit.

Back to the drawing board on the number of winds between shot - I can already tell on the second roll I was way off (a bit of overlap on the frames, though not enough to affect my focus test). Will have to double check my math on that.
 

AnselMortensen

Subscriber
Joined
Jun 9, 2020
Messages
2,274
Location
SFBayArea
Format
Traditional
I'm following this thread with interest.
I have an old Airequipt contact printer and a deckle-edge cutter, litho film and India ink!
 

Attachments

  • 20241013_152032~2.jpg
    20241013_152032~2.jpg
    670.5 KB · Views: 20
OP
OP

bud007

Member
Joined
Sep 23, 2024
Messages
62
Location
Chicago
Format
Medium Format
Ok, second test roll had no fogging or bottom edge light leaking, so gonna chalk those two issues to that old roll of film is used in the first test roll. I did have some more linear scratches, thought not as many, so I'm thinking that's the film rollers. If I end up using cut film, it might not matter as much, though it depends on if I try and stretch the cut film over the rollers, or press it against the bellows frame. The rollers sit 1mm higher than the bellows frame.

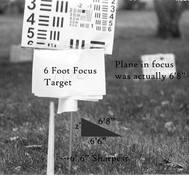
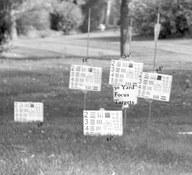
So what did I learn about focus? Umm... well... I would judge the camera's 6' plane to be more like 6'8". I would judge the camera's 25' plane to be about right. I would judge the camera's 50' plane to be more like 42'. So not sure there's any any adjustment to be made really. Now the interesting thing would have been to have me judge my eyes on what 6', 25' and 50' are, because that's typically how I focus on this sort of camera. The camera may be more accurate than my estimate, in other words. I usually rely on depth of field to make up for my lack of estimating accuracy... so I'll need to figure what depth of field is. I shot all these focus targets at F4 to try and create a narrow focus plane for evaluation. Given the limited number of pictures I'll be doing, I could use an external rangefinder. But good to know that what's marked as 50 is really 42. Another dynamic here, is that you have to stretch the bellows to the focus you've set, and that's not a super precise positioning mechanism either..

Here's the focus test shots, I left the images large in case anybody wanted to really dive into them:


Kodak-3A-6FootTarget.jpg Kodak-3A-25FootTarget.jpg Kodak-3A-50FootTarget.jpg
:
 
OP
OP

bud007

Member
Joined
Sep 23, 2024
Messages
62
Location
Chicago
Format
Medium Format
Doh.... I had forgotten that this lens aperture is marked in "American" scale or some such thing, not the "European" fstop system I'm used to. So... I thought I shot those focus shots with F4, since it was a 4 on the lens... but no... a 4 on this cam is really F8. So I'm gonna have to tape a little cheat sheet somewhere on the camera to remember how to convert those.
 

AnselMortensen

Subscriber
Joined
Jun 9, 2020
Messages
2,274
Location
SFBayArea
Format
Traditional
Ah... The "U.S." system...
US 16 = f/16, use that as a basis for determining the other aperture settings, since they are marked in one f-stop increments.
For example: US 16 = f/16, open up one marked stop = f/11, and you can ignore the US number.
 
Photrio.com contains affiliate links to products. We may receive a commission for purchases made through these links.
To read our full affiliate disclosure statement please click Here.

PHOTRIO PARTNERS EQUALLY FUNDING OUR COMMUNITY:


Ilford ADOX Freestyle Photographic Stearman Press Weldon Color Lab Blue Moon Camera & Machine
Top Bottom