I thought I’d start a kind of a diary thread for a project I’m undertaking to recreate some real photo postcards (contact printed from a giant 3.25 x 5.5 inch negative), which will certainly be a multi-disciplinary effort. I’ll post progress and setbacks as the journey unfolds. Figured some people might get a kick out of the journey, and I might get some good advice along the way.
My motivation… I’m part of a local not-for-profit historical society and many of the oldest photos in our collection are 1908-1930 “real photo postcards”. We would use the resulting “reproduced” cards as thank you notes or perhaps even membership reminders/solicitations. The text side of the cards would have a link, maybe even a QR code (wow, wouldn’t that look out of place in 1908) , that would tell the story of what a real photo postcard was, something about our collection of them, and how we recreated the process of producing them to produce the card in your hand. So… it’s important to me to try and respect the process and materials that would have been used circa 1908… well, as much as is reasonable. I'm also not trying to recreate the same pictures, though maybe that would be fun for a couple of the cards we have where the subject still exists... the subject of the cards would be more like "this is our town today and what it's highlights are", which will be different than what the highlights were in 1908. As background, I have a darkroom where I’ve done BW and Color before, and I have a 3D printer and CAD experience. Here’s my first stab at scope, issues and approach:
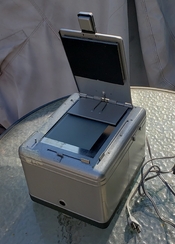
1) Camera – Kodak 3A – these are very available used on ebay, so that should be straight forward enough.
2) 122 Black and White Roll Film – I understand last produced in like 1970 or so, occasionally available on ebay. My instinct is to test the camera with 120 film (obviously would need an adapter), sort any issues out, then go for a full size shot. I have concerns about the cost and limited amount of trial and error possible with actual 122 film, to say nothing about how viable an obviously expired roll of 50+ year old film. So… I have on hand a box of large format 8x10 Black and White film, and am thinking about cutting that down to a 122 frame (3.25 x 5.5) and coming up with a way of loading a cut negative into the camera (so each shot would have to be loaded in a changing bag).
2a) 120 roll adapter – I see there are CAD models of these, and I have a 3D printer, so that should be straight forward enough. Just need this to conveniently test out the camera and work out any issues.
2b) 3.25 x 5.5 sheet film – Assuming I go down this path, I’ll have to figure out a mechanism to cut down an 8x10 sheet. I guess worst case I’ll do it with a paper cutter in the darkroom. Don’t know why, but I’m always kinda leary of handling unexposed film outside a changing bag, so if I could craft some sort of slitter I could use in the changing bag, I might prefer that. And to be honest, my darkroom currently needs a little TLC to be perfectly dark.
2c) Film type – as this is a contact print, I’m thinking it’s not really gonna matter much whether I’m using Delta 3200 or TMAX 400.
3) Film Processing – I have a Jobo CPE2 that I typically use for BW film with 1500 series tanks. I see some CAD out there where people have 3D printed 4x5 cut film Jobo inserts as well as inserts for 122 film, so I’ll do something similar – e.g. I’ll 3D print a Jobo 1500 reel to match the film I end up with.
4) Contact printing frame – I’ll have to dig it out, but I’m pretty sure I have an 8x10 contact printing frame, so figure I should be able to use that somehow. I have a Beseler 67 XL enlarger in the dark room, so it’ll be the light source, unless the “gaslight paper” needs something different/special. Oh, once I get this working, maybe I should do one using a lantern or candle or something… that might be kinda fun.
5) Print titling – many of the real photo postcards we have are titled/labeled on the bottom left. I asked in another thread about how this was done, and it seems likely it was a modification of the negative using some kind of letter press equipment. I’ll probably first try pressing some lettering into clear plastic and overlaying it on the negative… if that looks more or less correct then maybe commit and apply ink to the negative.
6) Print paper – Some of the cards we have are AZO and some are Velox and some are unknown. For my purposes, I think any of those would suffice. I’m going to assume that it will be easier/cheaper to make my own postcard printing paper than to find old Velox/AZO stock. I have a “gaslight paper” coating recipe that I assume is kinda sorta close to what Velox/AZO would have been, so want to give that a go. Worst case I guess I could use some Liquid Light – I think I might even have some somewhere, but it’s been ages since I used it.
6a) paper stock – I’ll guess it’ll be some kind of art paper I’ll need to coat with the gaslight soup. If that’s not the right thickness for the post card, I’ll just glue it onto something that makes it the right thickness post processing.
6b) text side of post card – I gather the AZO/Velox paper came with a side to be exposed and a side already printed with postcard trappings. I could just run these through a laser or inkjet, post exposure, I guess. I see there are some low end approaches to a printing press (3D printed, or even using a pasta press) which might be kinda fun. I think I’ll start with just laser or ink jet printing it and then save the old school printing for extra credit.
7) Print processing – I assume this will be pretty straight forward. I have trays in the darkroom, or I can use the Jobo. I don’t think the chemistry is all that complicated to process the print.
Comments or suggestions are welcome. And, as I said above, I'll post updates back to this thread as I proceed.
My motivation… I’m part of a local not-for-profit historical society and many of the oldest photos in our collection are 1908-1930 “real photo postcards”. We would use the resulting “reproduced” cards as thank you notes or perhaps even membership reminders/solicitations. The text side of the cards would have a link, maybe even a QR code (wow, wouldn’t that look out of place in 1908) , that would tell the story of what a real photo postcard was, something about our collection of them, and how we recreated the process of producing them to produce the card in your hand. So… it’s important to me to try and respect the process and materials that would have been used circa 1908… well, as much as is reasonable. I'm also not trying to recreate the same pictures, though maybe that would be fun for a couple of the cards we have where the subject still exists... the subject of the cards would be more like "this is our town today and what it's highlights are", which will be different than what the highlights were in 1908. As background, I have a darkroom where I’ve done BW and Color before, and I have a 3D printer and CAD experience. Here’s my first stab at scope, issues and approach:
1) Camera – Kodak 3A – these are very available used on ebay, so that should be straight forward enough.
2) 122 Black and White Roll Film – I understand last produced in like 1970 or so, occasionally available on ebay. My instinct is to test the camera with 120 film (obviously would need an adapter), sort any issues out, then go for a full size shot. I have concerns about the cost and limited amount of trial and error possible with actual 122 film, to say nothing about how viable an obviously expired roll of 50+ year old film. So… I have on hand a box of large format 8x10 Black and White film, and am thinking about cutting that down to a 122 frame (3.25 x 5.5) and coming up with a way of loading a cut negative into the camera (so each shot would have to be loaded in a changing bag).
2a) 120 roll adapter – I see there are CAD models of these, and I have a 3D printer, so that should be straight forward enough. Just need this to conveniently test out the camera and work out any issues.
2b) 3.25 x 5.5 sheet film – Assuming I go down this path, I’ll have to figure out a mechanism to cut down an 8x10 sheet. I guess worst case I’ll do it with a paper cutter in the darkroom. Don’t know why, but I’m always kinda leary of handling unexposed film outside a changing bag, so if I could craft some sort of slitter I could use in the changing bag, I might prefer that. And to be honest, my darkroom currently needs a little TLC to be perfectly dark.
2c) Film type – as this is a contact print, I’m thinking it’s not really gonna matter much whether I’m using Delta 3200 or TMAX 400.
3) Film Processing – I have a Jobo CPE2 that I typically use for BW film with 1500 series tanks. I see some CAD out there where people have 3D printed 4x5 cut film Jobo inserts as well as inserts for 122 film, so I’ll do something similar – e.g. I’ll 3D print a Jobo 1500 reel to match the film I end up with.
4) Contact printing frame – I’ll have to dig it out, but I’m pretty sure I have an 8x10 contact printing frame, so figure I should be able to use that somehow. I have a Beseler 67 XL enlarger in the dark room, so it’ll be the light source, unless the “gaslight paper” needs something different/special. Oh, once I get this working, maybe I should do one using a lantern or candle or something… that might be kinda fun.
5) Print titling – many of the real photo postcards we have are titled/labeled on the bottom left. I asked in another thread about how this was done, and it seems likely it was a modification of the negative using some kind of letter press equipment. I’ll probably first try pressing some lettering into clear plastic and overlaying it on the negative… if that looks more or less correct then maybe commit and apply ink to the negative.
6) Print paper – Some of the cards we have are AZO and some are Velox and some are unknown. For my purposes, I think any of those would suffice. I’m going to assume that it will be easier/cheaper to make my own postcard printing paper than to find old Velox/AZO stock. I have a “gaslight paper” coating recipe that I assume is kinda sorta close to what Velox/AZO would have been, so want to give that a go. Worst case I guess I could use some Liquid Light – I think I might even have some somewhere, but it’s been ages since I used it.
6a) paper stock – I’ll guess it’ll be some kind of art paper I’ll need to coat with the gaslight soup. If that’s not the right thickness for the post card, I’ll just glue it onto something that makes it the right thickness post processing.
6b) text side of post card – I gather the AZO/Velox paper came with a side to be exposed and a side already printed with postcard trappings. I could just run these through a laser or inkjet, post exposure, I guess. I see there are some low end approaches to a printing press (3D printed, or even using a pasta press) which might be kinda fun. I think I’ll start with just laser or ink jet printing it and then save the old school printing for extra credit.
7) Print processing – I assume this will be pretty straight forward. I have trays in the darkroom, or I can use the Jobo. I don’t think the chemistry is all that complicated to process the print.
Comments or suggestions are welcome. And, as I said above, I'll post updates back to this thread as I proceed.


 So I think the way I'll handle it is to keep the negative true to the original, but go with a larger card that is "USPS postcard appropriate" and try to border the negative appropriately when I print. Or, I could stick to the original size and figure we'll mail them in an outer envelope. Or some of both.