Multiple Layer Gum Printing

Fantasyland!

D
Fantasyland!

  • 8
  • 2
  • 81
perfect cirkel

D
perfect cirkel

  • 2
  • 1
  • 119
Thomas J Walls cafe.

A
Thomas J Walls cafe.

  • 4
  • 6
  • 259

Recent Classifieds

Forum statistics

Threads
198,745
Messages
2,780,245
Members
99,692
Latest member
jglong
Recent bookmarks
0

ced

Member
Joined
Oct 10, 2011
Messages
866
Location
Belgica
Format
Multi Format
Dug this up from a previous post of mine for register pin/punch DIY:
I would try the easiest(I think) get hold of 2 of these office punches, they don't need to be new but of the same make...
https://discountoffice.be/p/perforator-leitz-5180-inleg-64mm-zilver/
Keep one to punch your negs and papers, the other strip out one of the punches and cut it down to about 4-5mm height 2 bits(obviously) and punch a very thin strip of flexible plastic/metal on the working punch.
and glue these bits into the strip. Now you have a punch system. The strip can be taped or glued to your contact frame making sure the pins go into a recess in the wood side of the contact frame or the glass will break.
Just a thought, you might not need two punches just take one of the intended sheet binders an cut the bits from the ring clips in the binder(normally 2 in there).
 
OP
OP
Bob Carnie

Bob Carnie

Subscriber
Joined
Apr 18, 2004
Messages
7,735
Location
toronto
Format
Med. Format RF
Dug this up from a previous post of mine for register pin/punch DIY:
I would try the easiest(I think) get hold of 2 of these office punches, they don't need to be new but of the same make...
https://discountoffice.be/p/perforator-leitz-5180-inleg-64mm-zilver/
Keep one to punch your negs and papers, the other strip out one of the punches and cut it down to about 4-5mm height 2 bits(obviously) and punch a very thin strip of flexible plastic/metal on the working punch.
and glue these bits into the strip. Now you have a punch system. The strip can be taped or glued to your contact frame making sure the pins go into a recess in the wood side of the contact frame or the glass will break.
Just a thought, you might not need two punches just take one of the intended sheet binders an cut the bits from the ring clips in the binder(normally 2 in there).
What pins go with this system and will they fit in a vacumn frame?/
 

ced

Member
Joined
Oct 10, 2011
Messages
866
Location
Belgica
Format
Multi Format
You have to make the pins as explained and if after glueing them to a strip of thin metal or plastic fixed/lose as you like the pins face to the vacuum blanket away from the glass...
This is not a pro system it is diy for guys like myself.
 

TattyJJ

Member
Joined
Dec 30, 2016
Messages
153
Location
Hampshire, UK
Format
35mm
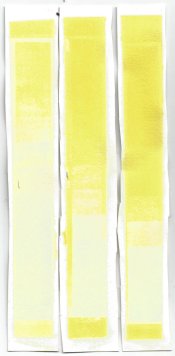
So today i thought i'd start working towards a multiple layer print, but it seems things didn't want to go my way.
I did a few of test strips to try and figure out an exposure time, the gum/pigment/dichromate mix i used was the same as what Bob mentioned, but in a smaller amount. The only difference was i used 13% potassium dichromate rather than 10% ammonium dichromate. I assumed (possibly incorrectly) the only impact this was likely to have was on the exposure time.

I printed a clear to black in 10% steps scale on OHP film and did 3 exposures, 30, 60 and 90 seconds.
As you can see, there is a very narrow range of tones and a lot of flaking on the mid tones.
You'll have to forgive the horrific quality on my scanner, i've no idea where it got the blue tinge from!
 

Attachments

  • Stef1.jpg
    Stef1.jpg
    131.5 KB · Views: 202

nmp

Member
Joined
Jan 20, 2005
Messages
2,014
Location
Maryland USA
Format
35mm
You have to make the pins as explained and if after glueing them to a strip of thin metal or plastic fixed/lose as you like the pins face to the vacuum blanket away from the glass...
This is not a pro system it is diy for guys like myself.

I bought these recently.

Dead Link Removed

Not tried them yet. The method is described here for print-making.

http://www.handprinted.co.uk/ramblings/registering-a-print-with-ternes-burton-pins

Seems adaptable for alternative processing (or so thought, we shall see.)
 
Last edited:
OP
OP
Bob Carnie

Bob Carnie

Subscriber
Joined
Apr 18, 2004
Messages
7,735
Location
toronto
Format
Med. Format RF
I bought these recently.

Dead Link Removed

Not tried them yet. The method is described here for print-making.

http://www.handprinted.co.uk/ramblings/registering-a-print-with-ternes-burton-pins

Seems adaptable for alternative processing (or so thought, we shall see.)
These pins look quite good and the tabs are correct.
the system I use punches all three holes at once
oblong circular oblong and the center circular pin fits tight but the two outside oblong pins have room to move.
This allow for the film to settle properly on the pins and find its correct place . (Hard to explain , I did a lot of complicated
registration work in a large lab, in the 80's and this setup was much more accurate than the kodak pin register system for dyetransfer that had to
thin circular pegs and you would lay glass over top.

one thing to remember is to have the registration as close as possible to the image to have stable register.
 
Joined
Jan 9, 2011
Messages
154
Location
Kehl/Strasbo
Format
Multi Format
I bought these recently.

Dead Link Removed

Not tried them yet. The method is described here for print-making.

http://www.handprinted.co.uk/ramblings/registering-a-print-with-ternes-burton-pins

Seems adaptable for alternative processing (or so thought, we shall see.)

I use the Ternes Burton system. It works quite well form me by scotching the “stripping tabs” to the film. (not that easy in total darkness for panchromatic film, but it works)

The pins can be attached anywhere (easel, printing frame etc) with scotch.
 
OP
OP
Bob Carnie

Bob Carnie

Subscriber
Joined
Apr 18, 2004
Messages
7,735
Location
toronto
Format
Med. Format RF
So today i thought i'd start working towards a multiple layer print, but it seems things didn't want to go my way.
I did a few of test strips to try and figure out an exposure time, the gum/pigment/dichromate mix i used was the same as what Bob mentioned, but in a smaller amount. The only difference was i used 13% potassium dichromate rather than 10% ammonium dichromate. I assumed (possibly incorrectly) the only impact this was likely to have was on the exposure time.

I printed a clear to black in 10% steps scale on OHP film and did 3 exposures, 30, 60 and 90 seconds.
As you can see, there is a very narrow range of tones and a lot of flaking on the mid tones.
You'll have to forgive the horrific quality on my scanner, i've no idea where it got the blue tinge from!


I am not a good person to trouble shoot someone else work in a different darkroom, but I can give you some guidance on how I trouble shoot gum. I learned a lot of this
the hard way by wasting a lot of paper and time, but the single most important thing is don't give up.

First off I bought Christina Anderson's book , and I downloaded Stephen Livik manual on gum.
I read both of these items twice.
I tried to use pigments that were recommended, Keith Taylor another gum printer recommended three pigments in the Daniel Smith line and I used them with success.
In their writings they give starting points and recommendations which are only that starting points for you to print from.
They also will give trouble shooting guides, but be warned language is a funny thing and you could be interpreting their words wrong and spending a lot of time .. Flacking - Fisheyes- Round density
are three that gave me particular problems.
As you can see from your test strips the exposure latitude with gum is wide , and the number of step tablets you can see is much less than silver or pt pd, and you should use this to your advantage and pick originals
that will compliment rag paper and muted tones- as compared to ink jets... remember if I want perfect colour density and contrast I would not waste my time with gum but do ink jets and be done with it.

P Dichromate vs A Dichromate - I found a big difference when I tested so I use A Dichromate.
Water - I find this to be very important and I switched to Distilled for the first bath.
Process time, I found different pigment loads and end results will cause different times
Pigment load , I found more pigment = stain
More Gum= quicker wash off
PVA - had no effect
Sizing paper had no effect
Pre Shrinking had incredible effect on future registration
Fast Even coating had better effect rather than painfully slow coating
Face down Development did not create fish eyes-
Incredible agitation when mixing coating did not create fish eyes
Incredible agitation when mixing speed up the process
Incredible agitation when mixing gave a weaker colour density , but by increasing pigment and A Dichromate over came this a bit.
Many papers work very well... Arches Platine-Hannamuhle Platinum Rag-Cot 320- Reverre - all work equally well in my darkroom for pt pd and gum.
Last water bath is most critical and should be careful and light the tray - have your brushes here and a slow stream of water , this is where the magic can happen.
You must agitate the print when first in distilled water a bit so there are no air pockets which will cause plus density.
Turn off lights while paper is drying , seems to work for me
Potassuium MetaBisulfate in my darkroom does not give the magic last cleansing both Christina A and Stephen L talk about.
Water quality is top on my list as potential problems , mineral content
temperature should be room and never change this unless you have a specific reason
Humidity for gum seems to work well at around 40%

re read you books every third month, it will be funny how things start making sense.
Do not change a bunch of factors at once - change only one thing so you actually can narrow down.

You should understand all you can about the pigment line and Daniel Smith offers a chart that tells you what each pigment # exhibits and funny each other line of Manufacturers have the same #
for example I have used Thaylo Blue green shade in both Daniel Smith and Windsor Newton with no difference.
Understanding that some pigments are opaque or semi transparent will make a big decision on when the get laid down.
Figure a way to see how all the pigments look and pick the ones you like and stick with them.... your step tablet is a good idea but personally I prefer to see images.
Gum can be liberating for an artist as you can coat , walk away, expose, walk away, process , walk away - this allows you to have a meal , play with the dogs, or in my case
type on the computer to knobs about Gum Printing.

I have also found that unless you prepare a full presentation matt and put it under light the real power of gum is not obvious. In bad light the coatings , brush marks, low contrast can be off-putting.
 

nmp

Member
Joined
Jan 20, 2005
Messages
2,014
Location
Maryland USA
Format
35mm
These pins look quite good and the tabs are correct.
the system I use punches all three holes at once
oblong circular oblong and the center circular pin fits tight but the two outside oblong pins have room to move.
This allow for the film to settle properly on the pins and find its correct place . (Hard to explain , I did a lot of complicated
registration work in a large lab, in the 80's and this setup was much more accurate than the kodak pin register system for dyetransfer that had to
thin circular pegs and you would lay glass over top.

one thing to remember is to have the registration as close as possible to the image to have stable register.

I got those oblong ones too. Wasn't sure if I was going to use them individually or in combination with the round ones. You are doing the latter, which makes sense. I would think the oblong ones restrict the freedom of movement. Perhaps because of that you have to have some play in the other two, otherwise a small shrinkage/warpage can make it very difficult to push into all three pins. The round ones in a way might be splitting the difference in error so you don't get one side very accurate and other not so.

If I can ask you about the carrier substrate: I take it you use some form of reversible adhesive. I have one of those low temperature dry mount films - I wonder if that will do the job. Also, when you use a substrate, do the kinetics of wet process become more favorable or less (considering there is only one way the stuff gets in or out.) In other words, do you change your process when using a substrate.

Again, thanks for sharing the knowledge.

:Niranjan.
 

NedL

Subscriber
Joined
Aug 23, 2012
Messages
3,388
Location
Sonoma County, California
Format
Multi Format
I bought these recently.
...

Niranjan, when you to try it, would you please post your expericience with it here in this thread or (there was a url link here which no longer exists)? Also check that thread... Bob and others posted some great info there.

I have not moved forward because I didn't want to modify my printing frame to make recessed holes (like Ced mentioned above) -- I'm going to make a purpose-built frame with thick glass and pin registration instead. Amazing that 2 years have gone by already. I'm still planning to try it but went on a ( still going! :smile: )detour with a different process. For the substrate I am going to try mounting with 3% gelatin, which can be released with warm water -- but nothing more to add because I haven't tried it yet.
 

nmp

Member
Joined
Jan 20, 2005
Messages
2,014
Location
Maryland USA
Format
35mm
Niranjan, when you to try it, would you please post your expericience with it here in this thread or (there was a url link here which no longer exists)? Also check that thread... Bob and others posted some great info there.

I have not moved forward because I didn't want to modify my printing frame to make recessed holes (like Ced mentioned above) -- I'm going to make a purpose-built frame with thick glass and pin registration instead. Amazing that 2 years have gone by already. I'm still planning to try it but went on a ( still going! :smile: )detour with a different process. For the substrate I am going to try mounting with 3% gelatin, which can be released with warm water -- but nothing more to add because I haven't tried it yet.

Gelatin probably more holistic way to do the bonding. Thanks for that idea. Speaking of time, I am not sure when I will get to this stage. First I need to get my salt print single layer process flow worked out. Ultimately I want to combine it with cyanotype, pigment printing (blasphemous kind) and gum. That's the grand scheme. Let's see how far I can go before another detour comes along (the one lasted 10 years!) I will be sure to keep all posted of any progress.
 

ced

Member
Joined
Oct 10, 2011
Messages
866
Location
Belgica
Format
Multi Format
Bob, That is quite a bit of work you've put down there and am sure others will benefit from your experience. Thanks for taking the time out!
 
OP
OP
Bob Carnie

Bob Carnie

Subscriber
Joined
Apr 18, 2004
Messages
7,735
Location
toronto
Format
Med. Format RF
post 34..... otherwise a small shrinkage/warpage can make it very difficult to push into all three pins. The round ones in a way might be splitting the difference in error so you don't get one side very accurate and other not so.....

the stoesser system is designed that the center pin round fits snug, the two oblongs on either side the punch is slightly larger so the pins sit in the middle , they are needed to keep the film level and by being loose on either side the film paper ect has a area to move.

post 34.....If I can ask you about the carrier substrate: I take it you use some form of reversible adhesive. I have one of those low temperature dry mount films - I wonder if that will do the job. Also, when you use a substrate, do the kinetics of wet process become more favorable or less (considering there is only one way the stuff gets in or out.) In other words, do you change your process when using a substrate.........

I have used hot tissue and I have used cold adhesive both work well for at least two complete wettings , I find the paper releases from the aluminum in a third or fourth wetting.. I have purchased a more agressive
cold tissue and will try to see if that will work for me better with aluminium mounts.

post 36.......Gelatin probably more holistic way to do the bonding. Thanks for that idea. Speaking of time, I am not sure when I will get to this stage. First I need to get my salt print single layer process flow worked out. Ultimately I want to combine it with cyanotype, pigment printing (blasphemous kind) and gum. That's the grand scheme. Let's see how far I can go before another detour comes along (the one lasted 10 years!) I will be sure to keep all posted of any progress........

I have considered this as well and will give it a try for sure..

post 38.......REGISTRATION of prints: oddly, printmakers in schools have used the miracle of clear plastic tape + pushpins to register their 6 layer, 20 count editions for years......

I would love to see some gums done by yourself or others that can do register at 16 x20 size - it would be a miracle cure for my darkroom - please post some images.
 

removed account4

Subscriber
Joined
Jun 21, 2003
Messages
29,832
Format
Hybrid
bob
this thread has been a source of inspiration for me. yesterday i was contacted by a friend who is moving
and today he found a home for his dichromate and gum arabic ( and some more classic cyanotype chemistry ) ...
i'll have to get some pipettes and find the sun .. thanks for starting this thread !
john
 

pdeeh

Member
Joined
Jun 8, 2012
Messages
4,765
Location
UK
Format
Multi Format
Wow John you must be keen if you're willing to handle dichromate :wink:

Fwiw I buy 1ml disposable polyethylene pipettes in bulk lots from China on eBay. Very cheap $2 or $3 a hundred delivered.

For non critical stuff I wash and reuse em, but for anything silver or toxic I use them one time and dump in the recycling bin after. Saves me worrying about cross contamination.


Anyhoo, i bought a toob of black watercolour today. Just sayin'.
 

removed account4

Subscriber
Joined
Jun 21, 2003
Messages
29,832
Format
Hybrid
thanks for the suggestion pdeeh !
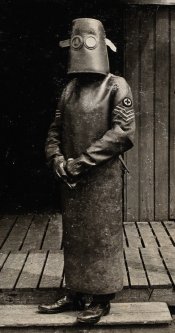
and yeah i gearing up :smile: i've got to get
a full body hazmat suit though, this stuff
scares the living ...
 

pdeeh

Member
Joined
Jun 8, 2012
Messages
4,765
Location
UK
Format
Multi Format
Hazmat_suit_c1918.jpg
 

pdeeh

Member
Joined
Jun 8, 2012
Messages
4,765
Location
UK
Format
Multi Format
P Dichromate vs A Dichromate - I found a big difference when I tested so I use A Dichromate.
I know from my reading that the different salts exhibit different speed/sensitivity but I get the feeling you don't mean that?

Is it about stain or contrast or what, that you see a difference?

Dichromates are hard enough to get hold of over here for the hamateur and I've no idea where I'd go for the Ammonium. Though fortunately I do have a kilo or so of Potassium lurking in my danger box.
 

Richard Man

Member
Joined
Sep 24, 2005
Messages
1,301
Format
Multi Format
I visited Bob in his workshop a couple months ago, and his work is exquisite. He makes the process looks simple but he is a master artist and craftsman.
 
OP
OP
Bob Carnie

Bob Carnie

Subscriber
Joined
Apr 18, 2004
Messages
7,735
Location
toronto
Format
Med. Format RF
I know from my reading that the different salts exhibit different speed/sensitivity but I get the feeling you don't mean that?

Is it about stain or contrast or what, that you see a difference?

Dichromates are hard enough to get hold of over here for the hamateur and I've no idea where I'd go for the Ammonium. Though fortunately I do have a kilo or so of Potassium lurking in my danger box.
When I swithced to PD I found a complete lack of contrast in my setup so I immediatelly went back to AD...

I was not willing to keep testing to see if it could work when I already had a good relationship with AD.
 

pdeeh

Member
Joined
Jun 8, 2012
Messages
4,765
Location
UK
Format
Multi Format
Thanks bob. That's interesting.
 
OP
OP
Bob Carnie

Bob Carnie

Subscriber
Joined
Apr 18, 2004
Messages
7,735
Location
toronto
Format
Med. Format RF
Thank you Richard... It was quite a pleasure meeting you and your wife and both Carissa and I were very impressed with the work you showed us and I more importantly
am very grateful to you for the solid connection you made for us in the San Fran location, I can say that your people were extremely receptive to us and we have now booked a show
for one of our artists and will be heading out that way next March.

This simple gesture is what I think makes being part of APUG so great
thanks

Bob
 

ced

Member
Joined
Oct 10, 2011
Messages
866
Location
Belgica
Format
Multi Format
Hi all! I wonder how you feel about whether the gum has any major role when it comes down to it's SG (degrees Baume)?
Also could it be one of the contributing factors regarding flaking?
 
Photrio.com contains affiliate links to products. We may receive a commission for purchases made through these links.
To read our full affiliate disclosure statement please click Here.

PHOTRIO PARTNERS EQUALLY FUNDING OUR COMMUNITY:


Ilford ADOX Freestyle Photographic Stearman Press Weldon Color Lab Blue Moon Camera & Machine
Top Bottom