Andreas Thaler
Subscriber
Today I would like to take a closer look at the mirror box and shutter of the X-700. To do this, the camera must be partially dismantled.
It's a bit of work, but if you are familiar with a screwdriver and soldering iron, it can be done without any problems.
Tutorial bei Gene Pate, Learn Camera Repair
For this I follow Gene Pate's excellent tutorial on Learn Camera Repair:

If you are interested in the individual steps involved in disassembling, you will find all the necessary information there with pictures and explanations, presented in an understandable and clear manner.
Here I would just like to give an impression of what the modules of the X-700 look like and how much effort is required to get to the mirror box and shutter. This may become necessary if there are problems with the mechanics or the magnets need to be cleaned or replaced.
And what about assembly?
Assembly shouldn't cause any problems either, all previous steps are carried out in reverse order.
It is important to have a detailed photo documentation, which you should do in addition to Gene's tutorial. In particular, there are some cables that need to be soldered and of course you have to put them in the right places. All of this is listed with Gene, but I took additional shots just to be sure.
Although it would be good practice for me, I will not be assembling the X-700. I would like to study the shutter and mirror box dissasembled in order to understand more.
Quality and workmanship, repairability
I like the quality of the materials and the workmanship of the parts.
Where necessary, the modules are solidly made of metal; there are some plastic gears in the shutter mechanism.
The many X-700s that are still in use today prove that everything is designed to work reliably for a long time. and work without any problems.
If something still needs to be repaired, you can exchange individual parts from an abandoned X-700. Either individually or entire modules such as the mirror box, the shutter or the complete electronics.
We have already discussed the well-known problem with defective electrolytic capacitors several times in the forum. Please check the relevant threads.

The candidate for disassembly. The image counter on the left was already removed earlier. Upper and lower housing covers are already removed.

Removing the leatherette.
Here you should be careful not to pull on the parts too hard so that they don't tear. The adhesive does not need to be dissolved beforehand. Fresh adhesive is then required for gluing, e.g. Pliobond.

The bayonet cover is held in place by a screw.


Desoldering cables

Unscrewing the circuit board for the silicone cell of the exposure measuring system. This also allows the eyepiece to be removed.

Unscrew the trigger unit.

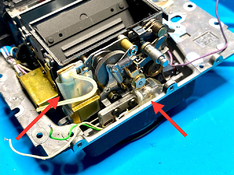
Removing the plate with battery chamber and tripod connection, which is held in place by six screws. Two connections to the lower circuit board as well as the positive connection with the power supply must be unsoldered and a spring underneath must be unhooked.

All cables on the lower circuit board are unsoldered.


After loosening four screws, the mirror box with shutter can be carefully lifted out of the holder with film window.
It's a bit of work, but if you are familiar with a screwdriver and soldering iron, it can be done without any problems.
Tutorial bei Gene Pate, Learn Camera Repair
For this I follow Gene Pate's excellent tutorial on Learn Camera Repair:
If you are interested in the individual steps involved in disassembling, you will find all the necessary information there with pictures and explanations, presented in an understandable and clear manner.
Here I would just like to give an impression of what the modules of the X-700 look like and how much effort is required to get to the mirror box and shutter. This may become necessary if there are problems with the mechanics or the magnets need to be cleaned or replaced.
And what about assembly?
Assembly shouldn't cause any problems either, all previous steps are carried out in reverse order.
It is important to have a detailed photo documentation, which you should do in addition to Gene's tutorial. In particular, there are some cables that need to be soldered and of course you have to put them in the right places. All of this is listed with Gene, but I took additional shots just to be sure.
Although it would be good practice for me, I will not be assembling the X-700. I would like to study the shutter and mirror box dissasembled in order to understand more.
Quality and workmanship, repairability
I like the quality of the materials and the workmanship of the parts.
Where necessary, the modules are solidly made of metal; there are some plastic gears in the shutter mechanism.
The many X-700s that are still in use today prove that everything is designed to work reliably for a long time. and work without any problems.
If something still needs to be repaired, you can exchange individual parts from an abandoned X-700. Either individually or entire modules such as the mirror box, the shutter or the complete electronics.
We have already discussed the well-known problem with defective electrolytic capacitors several times in the forum. Please check the relevant threads.
The candidate for disassembly. The image counter on the left was already removed earlier. Upper and lower housing covers are already removed.
Removing the leatherette.
Here you should be careful not to pull on the parts too hard so that they don't tear. The adhesive does not need to be dissolved beforehand. Fresh adhesive is then required for gluing, e.g. Pliobond.
The bayonet cover is held in place by a screw.
Desoldering cables
Unscrewing the circuit board for the silicone cell of the exposure measuring system. This also allows the eyepiece to be removed.
Unscrew the trigger unit.
Removing the plate with battery chamber and tripod connection, which is held in place by six screws. Two connections to the lower circuit board as well as the positive connection with the power supply must be unsoldered and a spring underneath must be unhooked.
All cables on the lower circuit board are unsoldered.
After loosening four screws, the mirror box with shutter can be carefully lifted out of the holder with film window.
Last edited: