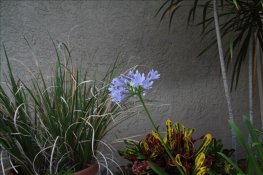
Metering to create a black background

The Kildare Track

A
The Kildare Track

  • 3
  • 1
  • 38
Stranger Things.

A
Stranger Things.

  • 0
  • 0
  • 26
Centre Lawn

A
Centre Lawn

  • 2
  • 2
  • 41

Recent Classifieds

Forum statistics

Threads
198,906
Messages
2,782,903
Members
99,744
Latest member
NMSS_2
Recent bookmarks
0

Toffle

Member
Joined
Mar 27, 2007
Messages
1,930
Location
Point Pelee,
Format
Multi Format
I typed a long reply to this earlier, and deleted it before posting. (as I usually do... )
Essentially, my post was in regards to John Hedgecoe's approach, as shown in the Third Edition of The Photographer's Handbook. (Pages 100-101) The essential difference between Hedgecoe and some of the methods here is that he meters for the subject rather than the ambient. Unfortunately, his explanation leaves out the actual details of the metering, or he assumes that it is implicit in his process. His example, a wizened old gardener, equates to four stops, and agrees quite closely to the tests Kirk posted. His mid-morning shots appear as full night-time, with just a hint of the subdued background.
 

KenS

Member
Joined
Jan 2, 2005
Messages
941
Location
Lethbridge, S. Alberta ,
Format
Multi Format
When I was 'working' as a photographer in a 'biological research' facility, I had to make photographs of both live and recently deceased plant 'samples'. Over many years, thousands of fungal/bacterial petri-dish cultures and/or diseased plant 'parts' were recorded to film in the studio with black velvet velvet as a background for both B/W negatives and 35mm colour slides. 'Wet' biological subjects were placed on 'textured' glass slightly raised over the black velvet. Lighting both electronic and tungsten was nearly always polarised and partially cross-polarised with a polarising filter on the lens. On a some occasions I was required to photograph a 'single subject' (among many) out in the field.... and sometimes a 'smaller' piece of black velvet would be used to remove or at least try and 'reduce' visible background 'clutter'.
I might also recommend that you first try with a 'high quality' velvet, since the 'cheapy stuff' does not work quite so readily.... or so nicely.

Ken
 

markbarendt

Member
Joined
May 18, 2008
Messages
9,422
Location
Beaverton, OR
Format
Multi Format
I shot a whole roll to try this, and what I did was measured the ambient using 1/60 as my base, and then dropped 4 stops. IIRC, the base was f/8 or f/11. I didn't want to go to f/32 on the lens, so I went to f/22, and then compensated with my flash output, using the flash meter to get the reading to f/22 and whatever shutter it said. I also played around with different apertures and flash settings, but got the best results (the two pictured) by doing the above.

So it looks like to get the black background, the steps are:

1) meter ambient at sync speed
2) drop 4-5 stops via aperture
3) adjust flash power to give you a flash meter reading of the f/stop selected
4) take picture
Yep. Sync speed is the hard limit. Certain cameras will allow high speed sync mode but even there the same pattern remains.

Yes, if 1/60 at f/8 was the base measurement then the theory dictates you should have used 1/60 at f/32 to get black, f/22 allowed "too much" exposure on the back ground. This assumes a fixed film speed, a straight to positive situation. Instax film or slides for example.

I'm going to assume you are shooting negatives for a moment. My fix for this situation is to change my EI. This can be done two ways: the first is a less sensitive film (Tmax 100 instead of Tri-X); the second is to use the films latitude and set the black point when printing.

The second method simply requires resetting your meters ISO setting. You still use TriX you just shoot as if you are using Tmax 100. Doing this changes the base to 1/60 at f/4 and the camera setting becomes f/16. The flash is set using ISO 100 at f/16.

The difference on the film (either switching films or EI change) is that the background is separated further from the main subject so in the print if you place the main subject properly, the background is darker.

The thing that people have a hard time getting here, because it is counter intuitive, is that more camera exposure allows you to get better blacks in the print. The relative distance between tones is what matters, the absolute exposure is (to a point) irrelevant.
 
Last edited:

cuthbert

Member
Joined
Nov 16, 2014
Messages
822
Format
35mm
Are you saying you did this without a flash? Was the background dark or in shadow?

Yes this was taken in natural light, no flash whatsoever...both subject and background were in the shadow (no direct sunlight as you notice) and the background itself was grass (you can't see it because it's bokeh'd)...lightning conditions were similar to this shot:

25ggg3b.jpg
[/IMG]
25ggg3b.jpg
[/IMG]
25ggg3b.jpg


Just in this case the difference in brightness between background and subject was smaller and I also metered for the background.

I shot at F1.4, 1/2000s with IS0 400.

In the book "the world of Canon New F1" there is a similar example of a white horse metered with a spotmeter screen in a forest, it came out perfectly while the rest of the forest resulted dark like the shot was taken at night and the subject lighted by a white screen, just more natural.
 

RalphLambrecht

Subscriber
Joined
Sep 19, 2003
Messages
14,655
Location
K,Germany
Format
Medium Format
I totally understand what you're saying there, but part of the reason for wanting to figure it out with a digiroid is I also don't want to carry two cameras when I want to do this.

One tool I always forget about is ND filters. I have them, but always forget to consider them when thinking flash. No matter how I do it, I will still need a flash strong enough to overpower the sun. I didn't mention it earlier, but I also have a Quantum Q-Flash T2, which may be the one I use.

I was doing some more over-thinking, and came up with some ideas. I'll burn a few rolls on Monday to test out some of my ideas, and see how they go.
control ambient lighting with shutter speed and flash with aperture to balance ambient and flash.
 

cuthbert

Member
Joined
Nov 16, 2014
Messages
822
Format
35mm
I'm going to give this a try!

Thanks for bringing it up.

If you are talking about my "descovery" you'll need:

1) A very pale looking flower: white is ideal, but also yellow or pink

2) Moderately dark green background

3) A spotmeter (alternatively underexpose)

4) Shoot at wide aperture to bokeh the background.

5) Possibly B&W so the dark would look like black.

Good look and good hunt...this has not come out as well as the other example because there was something bright in the background, and of course more than one flower:

xpve6b.jpg


This disaster happened while I was metering an ice cream.

10mrnly.jpg


It was a VERY sunny day.

a146l2.jpg
 

ic-racer

Member
Joined
Feb 25, 2007
Messages
16,549
Location
USA
Format
Multi Format
In the world of B&W negative film, a black background is the result of lighting the subject or burning during printing. Negative exposure will little or no effect on the relative values of foreground and background. (For the technically minded, under exposure can make the foreground and background values slightly closer until they both reach zero).
 
OP
OP
Kirks518

Kirks518

Member
Joined
Oct 5, 2013
Messages
1,494
Location
Flori-DUH
Format
Multi Format
True, an under-exposed negative (as cuthbert is doing) isn't going to give the results I was going for. Just dropping the exposure values for the background so they go dark (ie, Zone I or II) under-exposes the subject, unless it's in zone VIII or IX (I think).

What I'm going for, and have achieved is learning the basic 'formula' for getting a truly black background. Drop 4 stops from metered ambient, and bring the subject back to Zone V with lighting. I have no darkroom, other than digital, so I prefer to do it all (or as much as possible) in camera.
 

cuthbert

Member
Joined
Nov 16, 2014
Messages
822
Format
35mm
True, an under-exposed negative (as cuthbert is doing) isn't going to give the results I was going for.

Well, in the previous page you wrote that you thought I was using a flash...however I don't underexpose the subject, the result of the black background is derived by the underexposure of it to expose correctly a much brighter subject, and in order to do that it's better to have a spotmeter or at least a partial metering area.

Here:

http://satnam.ca/cameras/Canonf1worldbook1.pdf

In page 17 there is an excellent example of the technique.
 
OP
OP
Kirks518

Kirks518

Member
Joined
Oct 5, 2013
Messages
1,494
Location
Flori-DUH
Format
Multi Format
Just for my own understanding.........how are you metering?

What I did was metered the ambient at my sync speed (1/60 on this camera), then set the aperture on the lens 4 stops under the ambient. So if the meter said 1/60 & f/5.6, I set the aperture on the lens to 4 stops under, or to f/22. Then I took a separate flash reading, and adjusted my flash output until it read f/22 at 1/60. Metering for the flash is done with the lumisphere (white dome) up, and aimed at the camera, held at the subject. So what you have done is set the background, which is being lit by the ambient light, to 4 stops under, rendering it (pretty close to) black. At the same time, the flash is giving you the 'proper' exposure on the subject.

This is how I did it for both of the shots above. Ironically, they were both the first shot taken at those angles. After the first show, I played around with different settings, just to see what would come out. These were the only two that gave me what I was going for.
 

markbarendt

Member
Joined
May 18, 2008
Messages
9,422
Location
Beaverton, OR
Format
Multi Format
Negatives Kirk?
 
OP
OP
Kirks518

Kirks518

Member
Joined
Oct 5, 2013
Messages
1,494
Location
Flori-DUH
Format
Multi Format
Well, in the previous page you wrote that you thought I was using a flash...however I don't underexpose the subject, the result of the black background is derived by the underexposure of it to expose correctly a much brighter subject, and in order to do that it's better to have a spotmeter or at least a partial metering area.

Here:

http://satnam.ca/cameras/Canonf1worldbook1.pdf

In page 17 there is an excellent example of the technique.


The first shot you posted had close to the look I was going for; very dark background, with good light on the subject. The rest of the shots you posted, while very nice shots, did not give that look. The first shot's natural background was probably very dark, so metering on the flower, and not the whole scene, gave you that dark background. But if you look at the peachy rose shot, the background is very much there. Because of the lighter color of the background, it shows up pretty clearly in that shot (not talking about the bokeh, just saying how you can see stuff in the background).

In my shots, the background is a light tan (the side of my house), and the flower is a cornflower blue color. Not much difference in luminescence between my flower and background.

Between what each us were doing, we had very different goals. I'm not concerned at all in this situation with 'blowing out' the background by use of aperture blur/depth of field/bokeh, but trying to eliminate the background so it's just not there. In your step by step post, step "4) Shoot at wide aperture to bokeh the background" is a different approach for a different end result. Using a wide aperture is not going to darken a background (wide aperture brings in more light). Although your step "3) A spotmeter (alternatively underexpose)" is similar in that I'm underexposing only the background completely to black, and lighting the foreground subject with flash to bring it to the proper exposure. A spot meter on just the flower may get you close, but it still results in a different look.

There's nothing wrong with what you or I are doing, we're just using different methods to get different results.

Oh, and pg 17 of the link is a pic of the F-1 with numbers pointing to different parts of the camera?
 
Joined
Feb 10, 2010
Messages
2,844
Location
Flintstone MD
Format
35mm
What I did was metered the ambient at my sync speed (1/60 on this camera), then set the aperture on the lens 4 stops under the ambient. So if the meter said 1/60 & f/5.6, I set the aperture on the lens to 4 stops under, or to f/22. Then I took a separate flash reading, and adjusted my flash output until it read f/22 at 1/60. Metering for the flash is done with the lumisphere (white dome) up, and aimed at the camera, held at the subject. So what you have done is set the background, which is being lit by the ambient light, to 4 stops under, rendering it (pretty close to) black. At the same time, the flash is giving you the 'proper' exposure on the subject.

This is how I did it for both of the shots above. Ironically, they were both the first shot taken at those angles. After the first show, I played around with different settings, just to see what would come out. These were the only two that gave me what I was going for.


Thank you.
 

rpavich

Member
Joined
Aug 24, 2015
Messages
1,520
Location
West virginia, USA
Format
35mm
One thing to note is that falloff has a lot to do with this.
Getting just the flowers exposed correctly while not spilling light onto the background is important, so the closer the light source is to the subject, the better the separation will be. Additionally, the closer the light source is, the less power has to be used to get the exposure desired so spillage is minimized.

I've done the "instant black background" frequently in the digi world, I'd like to give it a shot with film now.
Glyn Dewis has a youtube video about it, though it's not film based the same principle applies.
 

cuthbert

Member
Joined
Nov 16, 2014
Messages
822
Format
35mm
The first shot you posted had close to the look I was going for; very dark background, with good light on the subject.

I see your point but I disagree with your conclusions: in the second B&W I wasn't metering JUST the central flower, there are more than one flower and I was using a Praktica MTL50 that I assume has a centre weighted lightmeter so it has read also the other subjects and made the average...if it were just the central flower you would have had the same effect as the first shot.

Same thing for the second colour pic, average of more than light flower and I was composing more than subject, my opinion is that in order to obtain your effect you need to have to spotmeter a single bright object on a darker background.

In the F1 book at page 17 there is a pic of a white horse in a black forest and it is stated it was possible to obtain that effect (the forest looks at night time but it is not) because they had used the SJ screen(that gives you spot metering, 2 degrees angle) on the highligths of the mane...I think this is the best and professional example of what you are looking for.

Perhaps in the weekend I'll try to other pics like my first one, even if all the cameras I have available don't have a spot lightmeter.
 
OP
OP
Kirks518

Kirks518

Member
Joined
Oct 5, 2013
Messages
1,494
Location
Flori-DUH
Format
Multi Format
I see your point but I disagree with your conclusions: in the second B&W I wasn't metering JUST the central flower, there are more than one flower and I was using a Praktica MTL50 that I assume has a centre weighted lightmeter so it has read also the other subjects and made the average...if it were just the central flower you would have had the same effect as the first shot.

Same thing for the second colour pic, average of more than light flower and I was composing more than subject, my opinion is that in order to obtain your effect you need to have to spotmeter a single bright object on a darker background.

I really don't think you're understanding what my initial post was about. I don't want a visible background to any degree. You're first image came close, and was similar to some of my test shots, but any high contrast scene will give you those results no matter how you frame, meter, or expose. Your last 3 photos are completely unrelated to what I'm going for, and IMO, by posting those as representations of black backgrounds, really makes me think you were not getting the point of the thread.

If you spot meter any subject that is naturally lighter then the background, you will get a much darker background, only because your meter is bringing what it metered (the lighter colored subject) down to Zone V, which would drop a darker background down into Zones I-IV, so it will of course be much darker then the subject.

What I'm trying to do for example, is take a white background, with a dark foreground subject, and turn the white background black, while exposing for the dark subject properly. Unless I'm mistaken, there is no possible way to do that without artificial light over-powering the ambient light.

In the F1 book at page 17 there is a pic of a white horse in a black forest and it is stated it was possible to obtain that effect (the forest looks at night time but it is not) because they had used the SJ screen(that gives you spot metering, 2 degrees angle) on the highligths of the mane...I think this is the best and professional example of what you are looking for.

In the pdf link you provided above, page 17 is a picture of the camera with parts numbered. No horse, no forest. But I can envision what you're referencing, and of course a white horse in front of a dark forest is going to look like the background is (close to) black. If it was fully black, you wouldn't know it was a forest. That example is a very high contrast scene that will always result in a very dark background, unless the horse is over exposed, or you metered for the forest. That's similar to taking a photo of chalk on a blackboard and saying 'Look, I made the background black'.

Perhaps in the weekend I'll try to other pics like my first one, even if all the cameras I have available don't have a spot lightmeter.

I'm not using a spot meter to do this. It's not about spot metered subjects, it's about over powering the ambient light with artificial light. That's what makes the background disappear, not under exposing the whole image to bring the subject to Zone V, and let the background fall where it may, which is what will happen without artificial light.
 

rpavich

Member
Joined
Aug 24, 2015
Messages
1,520
Location
West virginia, USA
Format
35mm
it's about over powering the ambient light with artificial light. That's what makes the background disappear, not under exposing the whole image to bring the subject to Zone V, and let the background fall where it may, which is what will happen without artificial light.

This is the crux of the whole thing; the distance from the main exposure to the ambient exposure. Not how over or underexposed they are but the distance between them
 
Photrio.com contains affiliate links to products. We may receive a commission for purchases made through these links.
To read our full affiliate disclosure statement please click Here.

PHOTRIO PARTNERS EQUALLY FUNDING OUR COMMUNITY:


Ilford ADOX Freestyle Photographic Stearman Press Weldon Color Lab Blue Moon Camera & Machine
Top Bottom