• Welcome to Photrio!
    Registration is fast and free. Join today to unlock search, see fewer ads, and access all forum features.
    Click here to sign up

Let's All Print (or Maybe Scan) One Negative 2025

Sacred

A
Sacred

  • 1
  • 0
  • 43
San Miguel Arcangel

H
San Miguel Arcangel

  • 0
  • 0
  • 41

Recent Classifieds

Forum statistics

Threads
201,963
Messages
2,832,764
Members
101,032
Latest member
Hazel2025
Recent bookmarks
0
OP
OP
Don_ih

Don_ih

Member
Allowing Ads
Joined
Jan 24, 2021
Messages
8,625
Location
Ontario
Format
35mm RF

I use Instant Mytol 1:1, mixed up just before developing. I also aim for 21 degrees (on my thermometer, which I think is Jobo-branded, so probably decently accurate). I also have a habit of not using a meter. And, in this instance, I took a guess (based on the current version of FP4+, by my FP4 expired in 1987) as to how long I should develop. I sometimes try to stick to some kind of strict methodology. Sometimes.

I look forward to seeing your result!
 

Reginald S

Member
Joined
Feb 12, 2022
Messages
69
Location
Germany
Format
Large Format
I will visit my darkroom in nearly 12 hours. Hard conditions. Have to drive 60 kilometers and entering a cold house then (-1 degrees in the night at the moment).

I will come back with something of course, but hopefully with some success.
 
OP
OP
Don_ih

Don_ih

Member
Allowing Ads
Joined
Jan 24, 2021
Messages
8,625
Location
Ontario
Format
35mm RF
Well, folks, it's great so many have posted a result but remember there's no deadline for this activity. It's totally fine to post whenever you manage to get something - no matter how much time passes. So no one is actually "late".
 

tezzasmall

Member
Allowing Ads
Joined
Dec 29, 2013
Messages
1,181
Location
Southend on Sea Essex UK
Format
Plastic Cameras
And finally here is my effort.

The top image is a straight print to see what the image was.

For the one directly underneath, I raised the easel on the bottom edge to try and give a slight out of focus look, but I don't think that this worked well enough.

I had an idea after seeing the initial image, that the photographer was at a distance and was taking the image surreptitiously, hidden in some bushes whilst using a basic Holga or a Diana type of camera, hence the heavy vignetting. To do this I used a dodge tool and gave the vignetted area an extra two f-stops of exposure, after giving the overall image the same exposure as the initial print.

It's not perfect in my eyes, but on the other hand it's not supposed to be I suppose. It was all good fun though!

And thanks again to the OP who organised it all. :smile:

Terry S
 

Attachments

  • Photrio Negative printed by many Sat 11 November 2025.JPG
    Photrio Negative printed by many Sat 11 November 2025.JPG
    107.9 KB · Views: 84
OP
OP
Don_ih

Don_ih

Member
Allowing Ads
Joined
Jan 24, 2021
Messages
8,625
Location
Ontario
Format
35mm RF
Very cool result and idea. Although I was not in the bushes 🙂
 

Reginald S

Member
Joined
Feb 12, 2022
Messages
69
Location
Germany
Format
Large Format
Ok Don - Sunday /yesterday I managed to get something :smile:


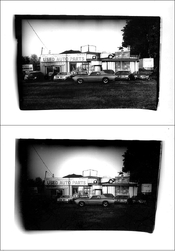
It took me 1,5 days to approximatively realize my initial idea, which came immediately after seeing Don's negative first time: I wanted to experiment with lithprinting followed by something blue-ish a try, so I bought Moersch's MT7 kit (7 ingredients to mix!)
I also wanted some mudd, a well "used" if not ancient appearing print.

I wanted to boost the negative up to 12x16", my favourite printing size.
I then wanted to do recopy by contact printing negs and positives; wanted to dodge and to burn with hand colouring, with pencils, like I love to do with paper negatives.

DSC02081b Kopie.jpg


Saturday morning I had to start with a room temperature of 13 degrees C and so got troubles with cold stuff.
Very late in the evening, meanwhile having 19 degrees, the whole thing started to go as wanted.
I didnt't have a third day for doing the boost and contact printing stuff. But I'm very happy with my results.

DSC02076a Kopie.jpg


Thanks to Don for his wonderful event, and thanks to the folks showing great commitments and great results!
 

Reginald S

Member
Joined
Feb 12, 2022
Messages
69
Location
Germany
Format
Large Format
Done so far:

Both:
Paper Fomatone 532, the non-Baryta/paper and emulsion only WT paper.
Building up gritty Lithprints without getting enough dense to the highlights, so lithprinting further up to loosing the gritty blacks > again no succsess to the dense; >> Acid stop bath to stop the very active lith dev.

Both:
Call it handcolourizing or retouching unready prints, I then brought in my dense to the almost whitish areas (all signs, the car on the roof etc) with used Eco4812 developer and a little sponge. Both stopped, fixed and thoroughly washed.

Both:
Scratching and destroying the smooth emulsion with the rough side of the sponge.
Overdoner a bit? I can add dense to the scratches if wanted, will it do with my next darkroom session..

Warmtone print:
Nothing further; this is a less coloured 532 Lithprint with less highlitht dense but added cool tones coming from another developer..

Cooltone print:
Not really representing here the original contrast and the shiny lights ( central car as an example), it's a Lithprint followed by a potassium bromide bleach, then brought back to a slightly blue tone. Next step with Blei-Acetat (can I say Plumbum acetate in english??) and a bit of Ammonium chloride shiftet the blue to a slightly greyish blue tone. Final rinse in Moersch's clearbad which should clear the paper whites. Fomatone 532 has no paper whites, I didn't see much affect at the wet stage..
 
Last edited:

Reginald S

Member
Joined
Feb 12, 2022
Messages
69
Location
Germany
Format
Large Format
Thanks a lot Terry, will carry it to my lithprinting with sorrows thread, too! :smile:
 
Last edited:

Reginald S

Member
Joined
Feb 12, 2022
Messages
69
Location
Germany
Format
Large Format
Hi Don,
I appreciate your comments, thanks a lot!
I love to do this things, so to me the effort has been to struggle first with room temperature issues, and then to learn a bit of handling with MT7.

From here I will continue my personal task as described above: enlarging your negative to a large one, and starting from there with contact printing.
My remaining last sheet of sensationel Fomatone 532 should get the best I can do.
 

tezzasmall

Member
Allowing Ads
Joined
Dec 29, 2013
Messages
1,181
Location
Southend on Sea Essex UK
Format
Plastic Cameras
Reginald, I meant to say when I first made a quick comment. That being how much I like the coppery colour you have managed to get with the main car and the grass area. They look lovely on my screen!! :smile:

And rereading your process, it includes a lot of things. But, is there anything in particular that you used or did to get this copper colour on the paper?

Terry S
 

Reginald S

Member
Joined
Feb 12, 2022
Messages
69
Location
Germany
Format
Large Format
Thanks, Terry.
The "copperey" colour exclusively comes from the Fomatone 532, from which I know you still have some sheets :smile:

532, a pure paper with emulsion only (no baryta)today being out of production. It liths like hell, with up to fire-like colours.
If Fomatone 131/132 is slow in comparism to Fomabrom, then you can't imagine Fomatone 532 being such a sloth - to reach at least some colour I finally exposed the 532 with 480 seconds. Which wasn't enough to bring in highlight dense, but I run out of my last sheets, so less opportunities to calibrate the Easy Lith dilution nor to slow down shadow's development with my chemicals..
That's all. The other "things" haven't had any impact to the central/copperlike colours. It's just the 532. :smile:
 
Last edited:
OP
OP
Don_ih

Don_ih

Member
Allowing Ads
Joined
Jan 24, 2021
Messages
8,625
Location
Ontario
Format
35mm RF
The coppery colour is close to what the car actually looked like.
 

MattKing

Moderator
Moderator
Joined
Apr 24, 2005
Messages
55,284
Location
Delta, BC Canada
Format
Medium Format
So I've finally got to the point when I can share something.
Here is a single scan of two 5x7 prints on Ilford MGIV RC paper - Satin surface:
01-All shoot one-2025.jpg


The top print incorporates a few burns and dodges, using some split grade contrast controls.
The bottom print is more of a straight initial print.
Both prints are split-toned in sepia first, followed by selenium - because that is how I envisioned the final result, right from the start.
The scans of the prints don't quite do full justice to the actual prints, but they are close.
I am most frustrated with my mostly unsuccessful attempt to bring out more in the text on the "MUSCLE CAR VINTAGE" sign above the central Dodge Charger (I think) - I think the only thing that would permit that would require a larger print.
I'd be tempted to title the results "Downtown in Ontario", but that would merely reveal my tongue-in-cheek response to the BC vs. Ontario rivalry :smile:.
 

MattKing

Moderator
Moderator
Joined
Apr 24, 2005
Messages
55,284
Location
Delta, BC Canada
Format
Medium Format
I would like to thank Don again for organizing this.
For anyone considering doing a project like this, I have some practical suggestions that reflect my experience from the time I organized something similar for my Darkroom Group, as well as some of the challenges Don encountered when he did this.
Here are the suggestions:
1) choose a static subject and take your photo on a dry and wind-free day, with even lighting;
2) if you have a power-winder equipped 35mm camera, use it, mounted on a tripod;
3) if the camera offers auto-exposure, use it;
4) take two frames for every participant;
5) let the auto-exposure adjust for any changes in light;
6) after you have developed the film, cut each participant's negatives so as to provide half a frame of "leader" before the negative they are going to print plus half a frame of "trailer" after the frame they are going to print;
7) either make paper sleeves for each result, or access continuous clear plastic sleeving.
8) send everyone their negative accompanied by a great letter - just like Don did!

Step 6) will result in 12 usable negatives from a 24 exposure roll or 18 usable negatives from a 36 exposure roll, if you start your cuts in the middle of the "O" frame and if you have a bit of unexposed film at the end of the exposures. The reasons for cutting the negatives this way are:
a) they make the cutting less critical as to placement;
b) they make handling the negatives much easier; and
c) they make using the negatives in glassless carriers a lot easier!

These suggestions are merely refinements - the way Don organized this was great!
 
OP
OP
Don_ih

Don_ih

Member
Allowing Ads
Joined
Jan 24, 2021
Messages
8,625
Location
Ontario
Format
35mm RF
Excellent result, Matt! I really like the toning as well.

Your suggestions are good. I did actually address one of them by buying small glassine envelopes but they arrived too late (about a week after I sent the negatives). The single exposure is quite irritating, I know. I taped it to the negative holder in my Focomat. I don't know about looking for a day with even lighting, etc., since I think part of the variety in results here stemmed from the challenging nature of the negative. That doesn't mean I advocate using 40-year-expired film and overdeveloping it but it did all work out.

And I don't trust autoexposure, but that's just me. 🙂
 

MattKing

Moderator
Moderator
Joined
Apr 24, 2005
Messages
55,284
Location
Delta, BC Canada
Format
Medium Format
And I don't trust autoexposure, but that's just me. 🙂

I understand where you are coming from Don.
The approach I take for this is to adjust the camera so that the exposure chosen by the camera matches the exposure I would choose manually - perhaps by using the exposure adjustment (+/- 1/3 stop dial) - and then let the auto-exposure respond to any small change in the light during the period of time when all the shots are taken.

The even light suggestion doesn't exclude contrasty and directional light - just issues with moving intervening clouds and other sources of unwanted light variation. I wouldn't, for example, choose to do this just before sunset.

FWIW, I seriously considered this cropping option when I printed - and might actually mat the image accordingly if I were to frame it:

01-All shoot one-2025_cr.jpg
 
OP
OP
Don_ih

Don_ih

Member
Allowing Ads
Joined
Jan 24, 2021
Messages
8,625
Location
Ontario
Format
35mm RF
That would be a good crop. I set the camera to get more of the scene than I would generally get if I was just taking a photo for myself. I wanted at least some people to crop.

I went back and took a photo that I used in the latest Postcard Exchange (well, for a few cards)

1765371475454.png
 
OP
OP
Don_ih

Don_ih

Member
Allowing Ads
Joined
Jan 24, 2021
Messages
8,625
Location
Ontario
Format
35mm RF
Also, as a reminder, anyone who has not emailed me their result, I'd appreciate it if you did. Consult the private message I sent months ago for details.

Also, stragglers are welcome to post their result when they get one. I will likely assemble the pdf (using what people email me) by the end of the month (if I get enough time).
 
OP
OP
Don_ih

Don_ih

Member
Allowing Ads
Joined
Jan 24, 2021
Messages
8,625
Location
Ontario
Format
35mm RF
Ok, folks. I finally got over enough inertia to assemble a pdf of our adventure here. You can find a higher-resolution version at this link:

High-Res Version

it's about 45mb. You can find a lower-resolution version here:

Low-Res Version

The layout is 8"x8" facing pages, which you may be able to get printed out somewhere, if you were so inclined. (If you really want to, I could probably figure out how to make a more easily-printed file - contact me if you want such a thing.) At the very least, it's a perusable record of the activity.

Please let me know if you have any comments about what I've included or failed to include.

And thanks to @Sean for hosting the files.

Special thanks to @koraks for major input into this, including scanning service and consultation on everything right up to and including the production of this pfd.

It was a great activity. I think everyone did wonderful work.

Thanks for participating.

1769287118544.png
 

MattKing

Moderator
Moderator
Joined
Apr 24, 2005
Messages
55,284
Location
Delta, BC Canada
Format
Medium Format
Thank you for a great job well done!
 
Photrio.com contains affiliate links to products. We may receive a commission for purchases made through these links.
To read our full affiliate disclosure statement please click Here.

PHOTRIO PARTNERS EQUALLY FUNDING OUR COMMUNITY:


Ilford ADOX Freestyle Photographic Stearman Press Weldon Color Lab Blue Moon Camera & Machine
Top Bottom