• Welcome to Photrio!
    Registration is fast and free. Join today to unlock search, see fewer ads, and access all forum features.
    Click here to sign up

Is pre-exposing negs a useful tool or a complete waste of time?

High Street

A
High Street

  • 0
  • 0
  • 19
Plato's Philosophy.

A
Plato's Philosophy.

  • 2
  • 2
  • 87

Recent Classifieds

Forum statistics

Threads
201,869
Messages
2,831,461
Members
100,993
Latest member
DIY123
Recent bookmarks
0

markbarendt

Member
Allowing Ads
Joined
May 18, 2008
Messages
9,422
Location
Beaverton, OR
Format
Multi Format
Noel,

Go back to stephen's charts, on the one that shows 1 stop of flare and 1 stop of flashing it is essentially showing the toe is completely buried in "the fog".

This is what Mark is suggesting.

View attachment 107896

The top example has one stop flare. The bottom has one stop pre-exposure and one stop flare. The changes are in the camera image curve and the exposure is superimposed upon a fixed film curve.

Mark, I think the situation is basically how the testing is conducted and semantics. If it's like the above or if there's an extra quadrant added for the pre-exposure curve, then you will have a fixed film curved derived from the standard sensitometric exposure. If the film is flashed before making the sensitometric exposure so that the test incorporates the low intensity reciprocity failure that will be experienced in practice (which also has the option of being another quadrant), then the curve will have changed in relation to the standard sensitometric exposure; however, the primary exposure will still be superimposed upon the film curve.
 
Last edited by a moderator:
Joined
Jan 7, 2005
Messages
2,739
Location
Los Angeles
Format
4x5 Format
Besides ISO 6:1993 (Black-and-white), this thread might find insightful the ISO 2240:2003 (Colour reversal) & ISO 5800:1987 (Colour negative)

Determining speed for B&W is similar to colour negative film but the later involves blue, green, red curves.
For color reversal film the ISO speed is determined from the middle rather than the threshold of the curve;

ISO 18928:2013 might be of value for critical test as well.


For more information on how films can have different speed points and still be able to use a single exposure meter, see the website of sensitometric papers, Connelly, "Calibration Levels of Films and Exposure Devices." Two things to look for, the value of P, and the relationship between the metered exposure, Hg, and the speed point HM for b&w, and HR for reversal.
 
Last edited by a moderator:

Xmas

Member
Allowing Ads
Joined
Sep 4, 2006
Messages
6,398
Location
UK
Format
35mm RF
Noel,

A) The film isn't really losing toe speed, the film's toe just gets buried in the fog age or exposure or... You could think of a film's curve a bit like a road leading up a hill out of a valley, the road is there, whether there is fog in the valley or not; the fog doesn't change the path of the road.

Hi Mark

You are correct I should not have said toe speed I should have said ISO speed, alas I treated them as the same, and I know the ISO uses a 'mid point' as well. I apologize for the 'clarity'.

But the film does lose speed in all practical senses if/when the fog level increases, unless the image speed goes up faster.

Noel
 

Xmas

Member
Allowing Ads
Joined
Sep 4, 2006
Messages
6,398
Location
UK
Format
35mm RF
The ISO standard for b&w film speed hasn't used a standard developer since before 1993.
Hi Stephen
I was aware they changed in '93, but I did not know that, sorry.
Seems a strange change.


Now there's nothing wrong with combining multiple variables into a single curve, but there are down sides.

RobC's three silver atoms is known as the Gurney-Mott Hypothesis of Latent Image Formation. What many people don't know is that low intensity reciprocity failure is factored into the ISO standard as hold time. The 1993 standard defines it as "The processing shall be completed in not less than 5 days and not more than 10 days after exposure for general purpose films, and not less than 4 hours and not more than 7 days after exposure for professional films." Reciprocity failure is part of the ISO standard and should be considered whenever doing any test. It's just another variable. Considering this, I don't see how the characteristic curve falls apart.

Athirils test would seem to show the effective speed increases a few stops with no real loss in quality, so the preflash did sentisitise the emulsion given the before and after on same strip of film, that means the characteristic curve changed?

To recap...

I was only attempting to warn that the model of flare and preflash adding on the normal characteristic did not seem 'complete'.

e.g. When I preflashed on to a contact step wedge for 'no' (almost no) detectable fog increase i.e to find the maxium preflash level) and then did an real exposure (which had flare) I got a significant increase in fog in areas with 'no exposure' eventually I realised (I was told) the flare and the preflash were integrating and I needed instead to reduce the preflash. But I did get a reduction in contrast in the toe region even after I reduced the preflash.

This meant to me that I was still in the toe, rather than up the curve

If you are going to do your own experiments Id suggest you may need to contact step wedge (before and after) the flashed film, at the very least because not all the films may have the same effects.

Or repeat Athirils technique.

That may be a problem with preflashing, and Id note that Athirils pictures did not seem to be of a high contrast subject, with significant flare, but in any case his results are a lot better then mine...

I did not have the benefits of Wikipedia at the time.
see 2nd paragraph of section 'Preflashing and latensification'
http://en.wikipedia.org/wiki/Photographic_hypersensitization

Noel
 

markbarendt

Member
Allowing Ads
Joined
May 18, 2008
Messages
9,422
Location
Beaverton, OR
Format
Multi Format
so the preflash did sentisitise the emulsion given the before and after on same strip of film, that means the characteristic curve changed?

It means that the flashing squished the subject matter to the right on the characteristic curve. Subject placement on the curve changed.
 

johnnywalker

Member
Allowing Ads
Joined
Sep 23, 2002
Messages
2,323
Location
British Colu
Format
Multi Format
I took a workshop in Vancouver some years ago from Per Volquartz. In his opinion it was a very worthwhile tool to have in your bag of tricks.
 
Joined
Jan 7, 2005
Messages
2,739
Location
Los Angeles
Format
4x5 Format
I was aware they changed in '93, but I did not know that, sorry.
Seems a strange change.

Kodak discovered the T-grain films didn't do too well in the ISO standard's standard developer. The results they obtained with it didn't reflect those from real world use with such developers as D-76. If I remember correctly, when TMX and TMY was first released, it didn't have an ISO speed. Kodak used an EI speed as they decided not to use the standard's developer for speed testing. The standards come up for review every five years. The 1993 ISO b&w film speed standard included a number of changes that were more in keeping with real world use, such as a change in the hold time.

Athirils test would seem to show the effective speed increases a few stops with no real loss in quality, so the preflash did sentisitise the emulsion given the before and after on same strip of film, that means the characteristic curve changed?

This has more to do with perception, semantics, and correctly attributing the various influences. You are absolutely correct that a sensitometrically exposed and developed curve will look different than a sensitometrically exposed, flashed, and then developed curve. In general, when one is referring to the film's characteristic curve, it is only the one from a sensitometric exposure. This is where the semantics come in. It shows how the film responds to exposure under given development. Now there's nothing wrong with creating a combined film curve that includes pre-exposure for which the camera exposure is then superimposed onto it. Are the two curves different? Yes. Does this mean the flashing changes the film's characteristic curve? It depends on how you look at it, but consider how film speed testing that doesn't include all the ISO parameters can't have an ISO speed. Does pre-exposure change how the film responds to a set amount of exposure or does it simply break up the total exposure into two parts? Will a combined total of X lxs create the same density as a single exposure of X lxs? If this is the case, has the film's characteristic curve changed?

A common shortcut is to combine flare with the film curve. This is from Henry's book. It shows what the resulting densities a given exposure will produce under different flare conditions, but it doesn't represent how flare and the camera image actually interacts with the characteristic curve. If you draw a line from the tip of the shadow in the flare curve to the right, where it intersects with the no flare film curve is where the actual flare exposure would fall on the X-axis.

flare film curve combo.jpg

To correctly identify the various factors you need to isolate them. Flashing is non image forming exposure, but it is exposure never-the-less. Together with flare, and the subject illuminance we can determine the camera aerial image. With pre-exposure, you actually have two camera exposures. For the life of me I can't figure out how to graph a single point of exposure that will then influence the entire range of exposure (remember the flare curve is flare in addition to the subject illuminace range). One way is to combine the influence from all exposures (subject illuminance, flare, pre-exposure) onto the camera/aerial curve. Please refer to the two quadrant curves from previous posts. Quadrant 1 is the camera/flare image.

I was only attempting to warn that the model of flare and preflash adding on the normal characteristic did not seem 'complete'

e.g. When I preflashed on to a contact step wedge for 'no' (almost no) detectable fog increase i.e to find the maxium preflash level) and then did an real exposure (which had flare) I got a significant increase in fog in areas with 'no exposure' eventually I realised (I was told) the flare and the preflash were integrating and I needed instead to reduce the preflash. But I did get a reduction in contrast in the toe region even after I reduced the preflash.

Mark beat me to this point. The relationship between the subject luminance range and the subject luminance range in the camera has changed. One stop of flare doesn't push everything up a stop. What it means is the shadow exposure has been doubled. This amount of additional exposure has a reduced affect as the exposure increases. Here's an example of a Zone scale from a no flare camera image curve and one with flare. The no flare curve would be a perfect 1:1 reproduction of the original subject.

Zone Scale - no flare vs flare.jpg

Noticed how the lower Zones are compressed. One stop flare turns a scene with a luminance range of 7 1/3 stops into an illuminance range of 6 1/3 stops and that is what strikes the film. Technically, Normal processing is for a 6 1/3 stop camera illuminance range and not for a 7 1/3 stop subject luminance range. In the two quadrant examples, you will notice a straight line at a 45 degree angle in Quad 1. That is the no flare reference curve. Flare makes the bottom of this curve curl up. That is where the reduce contrast you are noticing comes from.

This meant to me that I was still in the toe, rather than up the curve

The graph's X-axis is exposure. Any increase in exposure will fall towards the right. The pre-exposure compressed the lower exposure values. This is what reduced the contrast.

Just in case you haven't seen it in other posts, here is a complete four quadrant tone reproduction diagram.

Exposure and Luminance.jpg
 
Last edited by a moderator:

Bill Burk

Subscriber
Allowing Ads
Joined
Feb 9, 2010
Messages
9,471
Format
4x5 Format
I took a workshop in Vancouver some years ago from Per Volquartz. In his opinion it was a very worthwhile tool to have in your bag of tricks.

I imagine where Per Volquartz used it, he used preflashing to reduce contrast, not for its hyper-sensitizing behavior.
 

Bill Burk

Subscriber
Allowing Ads
Joined
Feb 9, 2010
Messages
9,471
Format
4x5 Format
I think if we are going to attempt to model preflashing sensitometrically to describe its hyper-sensitizing behavior, then we should preflash, and then apply a sensitometer exposure.

Graph the results as-is, not accounting in the graph results that the preflash added exposure.

With this kind of test I would expect the curve to shift to the left... similar to the way a higher-speed emulsion would graph to the left of a slower film.
 

markbarendt

Member
Allowing Ads
Joined
May 18, 2008
Messages
9,422
Location
Beaverton, OR
Format
Multi Format
I imagine where Per Volquartz used it, he used preflashing to reduce contrast, not for its hyper-sensitizing behavior.

I remember a bit of both being part of the conversation, but yes, it was mostly about fitting more stuff onto the paper.

Per is also the guy that seeded my interest in RolloPyro.
 

europanorama

Member
Allowing Ads
Joined
Aug 10, 2004
Messages
381
Location
Basel-CH
Format
Large Format Pan
Prefogging increases speed

Prefogging-around minus 3 stops with milkglass-filter(maybe best aiming against 18% greycard-like environment(street). it will increase also speed-maybe 2/3 stops if i dont err. one could try a bit of push-processing. tried it out with rotapan-images and C/N films. worked fantastically. Slide is delicate.
Apparatus to prefog in-camera(searched in google with no success, maybe i will once upload sometime a scan)
Bob Schwalberg reported in popular photograpy june 1976 page 61:
"a new way to shoot Tri-x at E.I. 1600 and get top-quality results"
the apparatus was CPA-concurrent photon amplifier. two flashes in the mirror-box and module like winder under the camera. pity i didnt buy for 750 usd. The process was called CPA lamp irradiation
kodak tungsten 125 iso exposed and livefogged at iso500 also looks promising.
the company was in danvers MA. Mel Cole the inventor. First tried out in a Speed Graphic.
 
Last edited by a moderator:

europanorama

Member
Allowing Ads
Joined
Aug 10, 2004
Messages
381
Location
Basel-CH
Format
Large Format Pan
I also tried preflash by underexposing 3stops /double-exposure second image normal exposure or a bit 2/3? underexposed I didnt see a difference. only for static subject. rotapancamera used. sunny day b+w.
2. Prefog with milkglasfilter(we made for roundshot 58mm and noblex special filter made by noblex and widelux 1500 34mm) 1.5stops + 1-1.5 stops underexpose= 2.5- 3 stops against real exposure. prefogging increased speed by 0.5 stops= increasing iso/DIN by 2 DIN(how is it calculated with iso? from 100 to 160. (100,125,160,200).
camera aimed to 18% greycard similar subject or greycard. subject blurry.
 
Last edited by a moderator:

markbarendt

Member
Allowing Ads
Joined
May 18, 2008
Messages
9,422
Location
Beaverton, OR
Format
Multi Format
But the film does lose speed in all practical senses if/when the fog level increases, unless the image speed goes up faster.

Noel

It loses contrast, not speed in the main exposure, in a practical sense.

In a practical, classical zone system sense, the EI (exposure index) one uses to meter the scene and shoot a film that has been pre-flashed doesn't necessarily change from what one might use otherwise.

Adams and Per Voquartz and ... typically used pre-flashing as Bill Burk suggested, to "control contrast". Controlling contrast is a code for fitting the subject matter they wanted from the scene onto the paper print with less work, less burn and dodge.

Those guys weren't really trying to help Athiril shoot 5-stops under box speed, BUT, they were trying to "increase the speed" of the film's low end a little.
 
Last edited by a moderator:

markbarendt

Member
Allowing Ads
Joined
May 18, 2008
Messages
9,422
Location
Beaverton, OR
Format
Multi Format
In that case, I would probably argue against it as a control.

I can understand why Adams and his buddies used it. I've seen it work as advertised.

That said, it does not fit my shooting style.
 

Rudeofus

Member
Joined
Aug 13, 2009
Messages
5,119
Location
EU
Format
Medium Format
If weak light shines onto a silver halide grain, it doesn't arrive as continuous flow of light, but as series of distinct photon impacts. While time and location of individual photon impacts can not be predicted, statistical models exist which describe the likelihood of a certain number of photons hitting the crystal. We also know, that each photon impact typically creates one silver atom, and that at least three silver atoms need to be together on one silver halide crystal in order to make it developable. We also know that clusters of two atoms are stable over time, but do not facilitate selective development of the silver halide crystal they are on.

This model makes a lot of assumptions, to the point that it won't predict actual film sensitivity or the full characteristic curve. I will attempt, though, to formulate it in a way that the bottom toe region is properly shown and that differences caused by preflash become apparent.

First of all, let's look at the distribution of light: if we assume silver halide crystals of constant size covering about 30% of the film's area without overlap, and also assume a certain amount of light (power flux density multiplied by exposure time) which creates on average m photon impacts per silver halide crystal, then the probability P(n) of n photons hitting some crystal is calculated as P(n) = mn / n! * e-m. Absent a preflash the probability of three photons or more hitting a particular crystal is P(n>2) = m3 / 3! * e-m + m4 / 4! * e-m + m5 / 5! * e-m + ....

Because we know that P(0) + P(1) + P(2) + P(n>2) = 1, we can rewrite this ugly sum as P(n>2) = 1 - e-m * (m0 / 0! + m1 / 1! + m2 / 2!) = 1 - e-m * (1 + m + m2 / 2).

Now what happens of we preflash this puppy? Photons coming from preflash are distributed just like those from actual exposure, therefore we can use the same formula, assuming a preflash intensity which creates on average mp photons per crystal. There are three distinct situations which create a developable silver halide grain:
  1. Preflash creates three or more photon impacts. Probability P3+ = 1 - e^-mp * (1 + mp + mp^2 / 2).
  2. Preflash creates exactly two photon impacts, actual exposure creates at least one photon impact. Probability P2 = (mp^2 / 2 * e^-mp) * (1 - e-m).
  3. Preflash creates zero or one photon impacts, actual exposure creates at least three photon impacts. Probability P01 = (1 + mp) * e^-mp * (1 - e-m * (1 + m + m2 / 2)).
Probability of a silver halide crystal becoming developable after preflash mp and exposure m is P(mp, m) = P3+ + P2 + P01. With a decent math program it is trivial to evaluate this formula and draw conclusions about the effectiveness of preflashing at different light levels. Before I throw curves and graphs at you, we need to draw the connection between P(mp, m) and observed density. Remember, silver halide crystals are tiny, and most densitometers average over lots and lots of grains. If we assume these crystals cover only fraction c of the film area, we can calculate density D = -log10(1-c * P(mp, m)). The fraction c will not be all that high, since film consists of crystals of different sizes, but only the largest ones will be affected by the low light intensity we are interested in here. The outcome of this simulation will depend on c, but the general conclusions remain mostly the same. Without giving up any generality, we can continue this model with c=0.3.

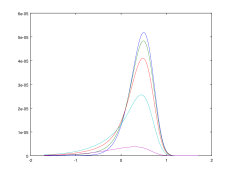
One more thing: density is nice, but what we are really after is contrast, which is dD/dm. Also, since m (the average number of photons hitting the crystal) is a linear measure of light intensity, whereas all these graphs thrown around in this thread used log10(light intensity) as abscissa, we shall follow suit here and plot density D(mp, log10(m)) and gradient G(mp, log10(m)) = dD(mp, log10(m)) / dlog10(m) for different values of mp.

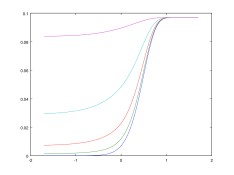
I have run and plotted these formulas with octave, a free matlab clone, resulting curves are attached to this posting. Each graph contains five curves, which represent different values for mp, starting with mp = 0 (dark blue), going through mp = 0.5 (green), mp = 1.0 (red), mp = 2.0 (cyan) to mp = 5 (purple). Remember, that mp = 3 would be the exposure which gives each grain on average 3 photons, which would be about the lightlevel which creates just barely visible density.

The gradient curves show what we already know from other people's experiences here: preflashing lowers shadow contrast, but provides some contrast in exposure regions where film without preflash gives no contrast at all. This very simplistic model would predict about a half to full stop of additional usable shadow detail.

One more quick note: modern emulsions use two electron sensitization, which creates two silver atoms per photon impact. Such an emulsion should create developable grains with two photons, and this model presented here doesn't cover these emulsions.
 

Attachments

  • preflash_density.png
    preflash_density.png
    34.1 KB · Views: 98
  • preflash_gradient.png
    preflash_gradient.png
    43.2 KB · Views: 85

DREW WILEY

Member
Allowing Ads
Joined
Jul 14, 2011
Messages
14,875
Format
8x10 Format
Cute. Now work up a precise mathematical model for every distinct film/developer combination out there (be sure you include every hypothetical dilution of HC-110, every different agitation method etc), then publish a 500 page book (which will of course be instantly obsolete
because somebody will come out with yet another film and developer, and every flashing device is a little different, since differences in color
do affect low-density thresholds - maybe a super-computer would help), and then conclude the book with a single sentence stating exactly
what we've been saying all along: muddy shadows.
 

Xmas

Member
Allowing Ads
Joined
Sep 4, 2006
Messages
6,398
Location
UK
Format
35mm RF
The OP only wanted to know if it was a waste of time for negs.

There are three applications

a) duping slides
b) increasing ISO in neg
c) reducing contrast in wet prints

a) is easy even I could do it

b) Athirils results way better than any of mine

c) the prints are difficult

a) relies on an exposure to pushing the exposure up the curve, you get a reasonable slide
b) needs a low contrast subject - I think, but it is not easy
c) is difficult but possible as you need to keep the fog level down in presence of flare, one day I'll try again

Noel
 

DREW WILEY

Member
Allowing Ads
Joined
Jul 14, 2011
Messages
14,875
Format
8x10 Format
If you have a low-contrast subject to begin with, Noel, why would you even need to flash? The whole point of flashing is to bring up the shadows a bit. It doesn't change the film speed relative to the midtone reading at all, unless you overdo it. No harder to print than anything
else; but whether or not you like the result all depends. I cannot recommend it for shooting color slides at all (and I've sure tested that comment). Slide DUPLICATION in a lab with controlled equipment and special film was a different kind of application completely.
 

Rudeofus

Member
Joined
Aug 13, 2009
Messages
5,119
Location
EU
Format
Medium Format
A quick afterword to my simulation: As you can see from the curves, the main issue with preflash is the decrease in toe contrast which comes with increased speed. It therefore comes as little surprise that Athiril recommends "push the film as hard as you can if you preflash", as this increases contrast and thereby increases usable toe exposure range. If you do this, my simulation suggests that you can increase effective film speed by more than two stops.
 

RobC

Member
Allowing Ads
Joined
Nov 5, 2007
Messages
3,880
Location
UK
Format
Multi Format
I don't think Athiril has shown anything except how his scanner responds to pushed film using auto exposure by virtue of auto selection of white and black points. i.e. it doesn't relate to producing prints on paper direct from film.
 
Last edited by a moderator:

Rudeofus

Member
Joined
Aug 13, 2009
Messages
5,119
Location
EU
Format
Medium Format
I don't think Athiril has shown anything except how his scanner responds to pushed film using auto exposure by virtue of auto selection of white and black points. i.e. it doesn't relate to producing prints on paper direct from film.

This is what I thought (and posted :sad:) before Athiril (there was a url link here which no longer exists) (see bottom half of his posting).
 

Bill Burk

Subscriber
Allowing Ads
Joined
Feb 9, 2010
Messages
9,471
Format
4x5 Format
I reread the thread and also the initial blog posting.

Firstly, for paper negatives you really do need some kind of contrast reducing technique... So preflashing is perfectly suited to the task.

Regarding Bruce Barnbaum: I know he places his shadows on Zone IV. Therefore he would be already "above" any benefit from flashing. He is right that it "decreases separation" in the shadows. He points out an important point: Ansel Adams used Polaroid type 55 to demonstrate! (Since Per Volquartz used type 55 too, I'd be interested more in finding out... did Per also recommend using flashing for film?).

Drew is also right. It only produces a long toe. You can get film with a long toe. So why not just get the film that has the long toe already?

I'll play devil's advocate: Suppose I am out with one camera, one film. The lens is coated. I have TMY-2 that has a (relatively-speaking) straight line toe. My camera has a simple manual leaf shutter that I can easily double-expose. To keep my backpack weight under 35 pounds, that's all I bring (OK I'll bring the Minox too).

Now I find myself in a situation where I want a long toe film... I can use preflashing to turn TMY-2 into a long toe film.

Or maybe I want to simulate the look of an uncoated lens... Again, I can use preflashing to simulate a single-coated lens... Thus saving weight on my back.

I still think the easiest way to prepare for field use of preflashing is to do a sensitometry series. I frequently expose three test strips on one sheet of film so I can average three sets of densitometer readings from the same sheet. It would be no trouble for me to superimpose a preflash on a third of the sheet, turn it and preflash the other side with a different preflash exposure on that third of the sheet... And then put three sensitometric strips on the sheet (the exposure in the middle third of the sheet would be on fresh film with no preflash).

Develop the sheets thus prepared for different times...

Now I need some reason... Why does someone need a long toe again?
 

Rudeofus

Member
Joined
Aug 13, 2009
Messages
5,119
Location
EU
Format
Medium Format
Doesn't underdeveloped film have a long toe?
 
Photrio.com contains affiliate links to products. We may receive a commission for purchases made through these links.
To read our full affiliate disclosure statement please click Here.

PHOTRIO PARTNERS EQUALLY FUNDING OUR COMMUNITY:


Ilford ADOX Freestyle Photographic Stearman Press Weldon Color Lab Blue Moon Camera & Machine
Top Bottom