Interpretations of a negative

Ticket Window

A
Ticket Window

  • 0
  • 0
  • 27
Northbound

A
Northbound

  • 0
  • 0
  • 21

Recent Classifieds

Forum statistics

Threads
200,477
Messages
2,808,587
Members
100,274
Latest member
CharlesKlassy
Recent bookmarks
1

dlin

Member
Joined
Mar 21, 2003
Messages
2,634
Location
Illinois
Format
Multi Format
I've found great value in seeing how photographers work up a print from a negative. I thought a thread showing a raw scanned negative paired with an interpreted print (or possibly multiple interpretations) would be informative. A brief description of materials and printing steps might also be of interest.

To start things off, here is a recent example taken along one of my favorite places to photograph, Eagle Creek.

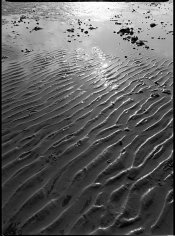
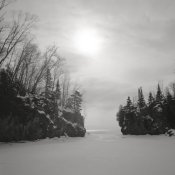
Full frame square negative on the left: Ilford Delta 100 developed in Pyrocat HD. The brownish cast to the scanned negative is typical of film developed in Pyrocat HD, a staining developer.

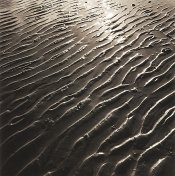
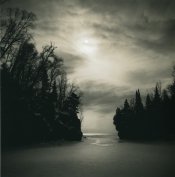
The print was made on 8x10 Kodak Polymax FA paper using a #2 contrast filter (Zone VI cold light head with V54 bulb).

  • The negative was cropped from the top to remove the dark triangular portion of a branch that didn't belong in the print.
  • After the main exposure, the highlights along the top LH edge were burned in for 1/3 stop using a card with a hole. This was to balance the left and right hand sides of the top edge.
  • The lighter portions of the water on the LH side around to the bottom middle of the frame were burned in for 1/4 stop using the same card, again to balance the water across the frame.
  • The water was burned in 1/8 stop to deepen the tones slightly in contrast to the brilliant ice.
  • The processed print was toned for 2 minutes in selenium 1:9
  • After thorough washing, the print was lightly bleached and then toned in thiocarbamide.

Print on the right

I hope others will share some of their examples.

All the best,
Daniel
 

Attachments

  • Ice Chandelier neg scan.jpg
    Ice Chandelier neg scan.jpg
    84.5 KB · Views: 2,499
  • Ice Chandelier print.jpg
    Ice Chandelier print.jpg
    103.9 KB · Views: 2,515
Last edited by a moderator:

Iwagoshi

Member
Joined
Nov 23, 2007
Messages
455
Location
NorCal
Format
Medium Format
Danial,

Thank you for starting this thread. I found it to be most informative, especially to this B/W noob whom is caught up in an internal debate over scanning vs. contact proof printing. After seeing this post I think the $30 contact printer is winning over the $500 scanner.

Terry
 

PVia

Member
Joined
Oct 3, 2006
Messages
1,057
Location
Pasadena, CA
Format
Multi Format
It's kind of hard to see with this negative, which is mostly abstract in nature. Another image might be easier to envision...
 

ajmiller

Member
Joined
Apr 1, 2007
Messages
642
Location
North Yorkshire, UK
Format
Multi Format
This is great - thanks Daniel.
I'm a relative darkroom noob also, basically over the last year just finding my way around and producing flat prints. I'm now wanting to move into using burning/ dodging etc.
If I may ask, what do you mean when you use the term burned in for a 1/4 stop or an 1/8 stop? The little I have done I've usually worked in seconds on different parts of the print.
Apologies for such a basic question, but I feel I'm missing something here and can't quite get my head around it.
thanks

Tony
 

jgjbowen

Member
Joined
Oct 13, 2003
Messages
879
Location
Richmond, VA
Format
Large Format
Tony,

If the basic exposure is 24 seconds, then 1/4 stop would be 6 seconds and 1/8 stop would be 3 seconds.

Hope this helps,
 
OP
OP
dlin

dlin

Member
Joined
Mar 21, 2003
Messages
2,634
Location
Illinois
Format
Multi Format
Hi Terry,
I use both negative scanning and contact proof printing in my work flow, so it's not an either/or proposition. In fact, negative scans can be very useful for experimenting with manipulations I might want to use during the actual printing stage.

I don't have a particularly fancy scanner, since my final work product is a wet darkroom print.

PVia,
I hope other photographers here will contribute examples to the thread so we can all learn from different types of images and personal work and interpretive processes.

Tony,
The F.stop exposure system is a way of determining times for dodging and burning based on the main exposure time. For example, if the main exposure is 16 seconds, a burning-in exposure of 1/2 stop would be approximately 6.6 seconds (1/4 stop=3 seconds; 1 stop=16 seconds). Dodging an area of the print during the main exposure would work the same way; a -1/4 stop dodge would be approximately 3 seconds.

Note that I don't work so precisely with my burning and dodging times so the times are simply approximate proportions of the main exposure. I hope this helps.

All the best,
Daniel
 

ajmiller

Member
Joined
Apr 1, 2007
Messages
642
Location
North Yorkshire, UK
Format
Multi Format
Daniel, once John put me right on this, and from your further comments, I can see how it makes sense to work in stops rather than time based measurement.
I'm at a stage where I want my prints to be more than flat/ workprints, and I think one of the hardest parts is working out where to apply dodging/ burning and how to apply it.
Your thread here, which I also hope others will contribute to, is a definite aid to seeing how negatives are "worked up" into a final print.
Thanks
Tony
 

Dietmar Wolf

Member
Joined
Mar 21, 2006
Messages
633
Location
switzerland
Format
Multi Format
Hi.

The prints are in my gallery: (there was a url link here which no longer exists)

Its a good study of how burning the sky(background), higher grade and toning can change a pic.

I missed burning the edges slightly. I then toned them longer than the rest:wink:

I have no negscan anymore. Sorry. Anyhow, the negscan has not much in common with the end result. I do not make contact prints.
 
OP
OP
dlin

dlin

Member
Joined
Mar 21, 2003
Messages
2,634
Location
Illinois
Format
Multi Format
Hi Dietmar,

I think the print you posted is quite beautiful. Your point that the negative scan may not look at all like the final print scan gets at the purpose for starting this thread. By providing visual reference points from the beginning (i.e. negative) to the final print, one can gain insights into the interpretive process. Understanding the steps taken in interpreting a negative and the reasoning behind them can be informative for both beginning and advanced printers. However, if one only has the finished product to refer to, then some of the potential educational value is missing.

All the best,
Daniel
 

Dietmar Wolf

Member
Joined
Mar 21, 2006
Messages
633
Location
switzerland
Format
Multi Format
Thank you Daniel. Your are right, of course. So I rescanned the neg right now.

So here is the neg.-scan.

Dead Link Removed


1. I drew a blue line. Above that line I burned 1 stop. That means exact the same time as the base exposure of the entire print. 5 seconds. I cut out a mask and held it in the middle to burn.

2. In the gallery, the right pic is printed at grade 2.5 ( (there was a url link here which no longer exists) ), the middle one at grade 3 ( (there was a url link here which no longer exists) ).

3. toning is done just via inspection/appearance.

Overall: I find it remarkable how much you can make out of a "boring" sky. I think it helped me that I do develop ID11 1+2, which gives greater grain. It is also remarkable how much sharpness the print gains just through increasing the grade.


A very good thread! I hope to see some more.

Best regards, Dietmar
 
Last edited by a moderator:
Joined
Dec 15, 2005
Messages
1,237
Location
Hertfordshir
Format
Medium Format
Late Afternoon Sun ~ Sand patterns

Hi Daniel

Great Idea for a thread. Here is my contribution.

The Negative

Made with my Pentax 645n2 and a 75mm lens. The film was Delta 100 and it was developed in Pyrocat M. Most of my images are already made in my head. I then wander in the landscape looking for them. This negative was made on the August APUG weekend. It was about 4pm and the sun was low in the sky. I remember being quite excited by the sand patterns as I walked the beach with Ailsa McWinnie. The composition I was looking for would not come easy as you can see in the neg scan that the beach is dotted with ugly stones. In this situation I usually find that it is a good idea to step back a few yards and take a wider view. The rest of the visulisation can then be done after the negatives have been developed.(Post visualisation) I new from past experience that by exposing for the shadows, the sunlight glinting in the wet sand would burn out, and be paper white in the final print.

The Print

I was not disappointed with the negatives, though it was quite hard work looking for the final print in them, as at the time I did not have a negative scanner. It involved carefully studying them on a light box, which can be quite tedious. Once I had made my choice of negative to use. I made a full frame print. It was then just a case of using some lengths of mount board to mask of the print untill I saw the composition that I would finally go with. It should be noted that this is a process thet should not be rushed. Every ripple in the sand is exactly where I want it to be and I go to great pains to replicate them when I reprint this photograph.

The negative was printed at grade 3 as I wanted the print to be quite High in contrast. It was important to me for the shadows to be right on their limit when it came to detail, and the highlights to 'SING'


  • The top of the print needed to be burnt in for 1/2 stop at grade 3

    The top right corner was burnt in for 1/2 a stop and the bottom left corner was burnt in for 3/4 stop, both at grade 3. This was to naturally frame the sunlight that travelled through the frame from top left to the bottom right corner.

    The final print was lightly bleached and then toned in a home made theo toner. This was heated up to about 35 degrees as I find it gives me a warmer sepia than at room temperature. After a short wash the print was then toned in selenium at 1-9 for about 1 1/2 mins.

I am really happy with the final print and I know it sounds corny, but it is exactly as I saw it before I found it (in my minds eye)

Best

Stoo

P.S The final print shown is a scan of the final print, not a manipulated neg scan. The tone is quite faithfull to the print.
 

Attachments

  • lateafternoonsun_negscan.jpg
    lateafternoonsun_negscan.jpg
    123.5 KB · Views: 1,230
  • late_afternoon_sun,sand_pat.jpg
    late_afternoon_sun,sand_pat.jpg
    180.5 KB · Views: 1,284
Last edited by a moderator:
OP
OP
dlin

dlin

Member
Joined
Mar 21, 2003
Messages
2,634
Location
Illinois
Format
Multi Format
Stoo,

This is a beautiful print. Thanks for posting. I think it's a wonderful example of "post-visualization". It also demonstrates the importance of not allowing the dimensions of the format to constrain your vision.

All the best,
Daniel
 
OP
OP
dlin

dlin

Member
Joined
Mar 21, 2003
Messages
2,634
Location
Illinois
Format
Multi Format
Here is an example of an interpretation that is quite a departure from the straight negative. This scene was photographed in the morning at Lilly Pond in Eagle Creek Park, which is close to where I live in Indiana. I often drive through here on the way to work and get out for a quick walk if the light is interesting. What caught my attention were the swirling patterns in the duckweeds growing on the surface of the pond.

Looking at the negative scan and playing around with levels allowed me to explore different possible interpretations. For me, this is one of the most powerful and time-saving aspects of working with a scanned negative image on the computer. I can play around with cropping and manipulate tonal representations, even with my most primitive computer skills, which can save an enormous amount of time, not to mention expensive paper, in the darkroom. It also allows me to visualize extreme changes that I might not consider otherwise.

Negative: Fuji Acros developed in Pyrocat HD
Paper: Ilford Galerie Grade 3 developed in ID-62

For this print, I've flipped the image vertically and cropped from the square to remove extraneous elements.
• The image was printed down quite drastically to create a more somber mysterious mood.
• "Foreground" swirls were dodged during the main exposure
• Top, left and right hand edges burned down after the main exposure
• Processed and washed print toned in thiocarbamide using a presulfiding step, i.e. brief soak in the thiocarbamide toner bath prior to bleaching.
 

Attachments

  • Lilly-Pond-Eagle-Creek.jpg
    Lilly-Pond-Eagle-Creek.jpg
    26.2 KB · Views: 1,236
  • Lilly-Pond-Eagle-Creek-2.jpg
    Lilly-Pond-Eagle-Creek-2.jpg
    43.7 KB · Views: 1,202

DannL

Member
Joined
Jan 11, 2006
Messages
586
Location
Oklahoma
Format
Multi Format
Here's my most recent attempt at printing. A refreshing change as compared to anything I have printed previous. I think my final interpretation ended with little to no changes in actual composition. My inital framing of the scene was very tight. When I made this exposure I never expected the final print to look better than the original scene. For me this is a very rare occurrence. Warning: I would not suggest making this type of exposure unless you are completely aware of the potential dangers to man and camera.

- First image: the scan of the negative.
- Second image: my computer version of what I invisioned it might be prior to actual printing.
- Third image: a scan of the final print.
- And lastly an explanation of my burn sequence. When I mention "a graduated burn", that means the effect you would expect from using a graduated filter, but creating it with a blocking device such as cardboard.

Lake Hefner, Oklahoma City, April 2008,
5:30 PM, pointed into the sun.

Camera: Voigtländer Avus 9x12cm + Zeiss orange filter
Film: Efke PL 100 M
Exposure: 1/50 sec @ F/11
Dev: D-76 1:1

Omega D2 + 135mm Rodenstock
Paper: Fotokemika Varycon Matt FB 8x10
Dev: Dektol 1:1
Filter: #4 Kodak Polycontrast for entire print.

I would really like to see the water less dense in the final print. I'm still working on it.
 
Last edited by a moderator:
Joined
Dec 15, 2005
Messages
1,237
Location
Hertfordshir
Format
Medium Format
Daniel

That is quite an amazing transformation from the original. I have recently adopted the use of a neg scan to see if i can take a print that little bit further. I have to admit though that I have never moved as far away from the original as you have here, though, knowing your skills in the darkroom, I am quite sure that you had this final vision of the print long before you opened the negative up in photoshop.

I used to be quite sceptical of people who posted neg scans in the galleries, but since adopting this way of working I was very supprised to find that there is not anything I can do in photoshop that I can't do, and probably better, in the darkroom (with a printable negative)

Thanks for sharing this beautiful image.

Stoo

Here is an example of an interpretation that is quite a departure from the straight negative. This scene was photographed in the morning at Lilly Pond in Eagle Creek Park, which is close to where I live in Indiana. I often drive through here on the way to work and get out for a quick walk if the light is interesting. What caught my attention were the swirling patterns in the duckweeds growing on the surface of the pond.

Looking at the negative scan and playing around with levels allowed me to explore different possible interpretations. For me, this is one of the most powerful and time-saving aspects of working with a scanned negative image on the computer. I can play around with cropping and manipulate tonal representations, even with my most primitive computer skills, which can save an enormous amount of time, not to mention expensive paper, in the darkroom. It also allows me to visualize extreme changes that I might not consider otherwise.

Negative: Fuji Acros developed in Pyrocat HD
Paper: Ilford Galerie Grade 3 developed in ID-62

For this print, I've flipped the image vertically and cropped from the square to remove extraneous elements.
• The image was printed down quite drastically to create a more somber mysterious mood.
• "Foreground" swirls were dodged during the main exposure
• Top, left and right hand edges burned down after the main exposure
• Processed and washed print toned in thiocarbamide using a presulfiding step, i.e. brief soak in the thiocarbamide toner bath prior to bleaching.
 
Joined
Dec 15, 2005
Messages
1,237
Location
Hertfordshir
Format
Medium Format
Great image Dan. You must be well pleased with what you have so far. Will the final print be toned?

Stoo


Here's my most recent attempt at printing. A refreshing change as compared to anything I have printed previous. I think my final interpretation ended with little to no changes in actual composition. My inital framing of the scene was very tight. When I made this exposure I never expected the final print to look better than the original scene. For me this is a very rare occurrence. Warning: I would not suggest making this type of exposure unless you are completely aware of the potential dangers to man and camera.

- First image: the scan of the negative.
- Second image: my computer version of what I invisioned it might be prior to actual printing.
- Third image: a scan of the final print.
- And lastly an explanation of my burn sequence. When I mention "a graduated burn", that means the effect you would expect from using a graduated filter, but creating it with a blocking device such as cardboard.

Lake Hefner, Oklahoma City, April 2008,
5:30 PM, pointed into the sun.

Camera: Voigtländer Avus 9x12cm + Zeiss orange filter
Film: Efke PL 100 M
Exposure: 1/50 sec @ F/11
Dev: D-76 1:1

Omega D2 + 135mm Rodenstock
Paper: Fotokemika Varycon Matt FB 8x10
Dev: Dektol 1:1
Filter: #4 Kodak Polycontrast for entire print.

I would really like to see the water less dense in the final print. I'm still working on it.
 

DannL

Member
Joined
Jan 11, 2006
Messages
586
Location
Oklahoma
Format
Multi Format
Great image Dan. You must be well pleased with what you have so far. Will the final print be toned?

Stoo

Yes, it's a completely new path for me. In my first run I made some 5 prints. Several prints I made specifically to practice retouching and spotting, and I toned one print as a test in selenium. I am very pleased with that test. It's a very subtle purple tint using this paper.
 
Last edited by a moderator:

Seabird

Member
Joined
Jun 13, 2008
Messages
112
Location
Sydney, Aust
Format
4x5 Format
Thanks for an interesting thread Daniel. I've enjoyed others' contribution so lets try and reactivate things...

Here's a fairly simple example of some selective burning. The first image is a straight print from the negative. The second image is the finished (manipulated) print - well, as it presently stands anyway... :wink:

The grain of the rocks on the river bank was what initially caught my attention, and I've attempted to emphasise them by significant burning of the bush above the rock, and a bit of burning of the flowing water in front of the rock. I didn't want to completely loose the bush although that could easily be done. Corner burns and burns down the left and right edges complete the current printing strategy (although I'm still working on it).

Never Never Creek, NSW Australia
150 Apo-Symmar on my Technika with APX100 in the DDS
Dev Rodinal 1:50 for 10mins
Both prints on MG IV

The bush and water burns are both 1 stop.

Cheers

Carey Bird
 

Attachments

  • Straight_C.jpg
    Straight_C.jpg
    92.5 KB · Views: 1,013
  • Interp_c.jpg
    Interp_c.jpg
    92.2 KB · Views: 1,040
OP
OP
dlin

dlin

Member
Joined
Mar 21, 2003
Messages
2,634
Location
Illinois
Format
Multi Format
Carey,

Thanks for posting your examples. It's quite a lovely scene.

I had a couple questions regarding the burning sequence you've described. Are you using the same contrast filter as the main exposure for the burns? It looks like the foreground water was burned in using a lower contrast filter to bring down the highlights without pushing the tones in water down too far. Retaining detail in the background, which works here without competing with bright rock textures, can be achieved this way too.

All the best,
Daniel
 

bill schwab

Advertiser
Advertiser
Joined
Jun 16, 2003
Messages
3,751
Location
Meeshagin
Format
Multi Format
Great thread Daniel! Don't know how I missed it first time around.

Thought I'd add one I was working on recently. Shot was made mid-morning, shooting southeast over the lake I believe. Sun was very bright with me shooting directly into it. Made with a 50mm lens covered by a 10 stop reducing ND filter. The scene looked nothing like I envisioned it in my head and I was unsure I could actually pull it off in the darkroom. Certainly not my favorite to print due to all the manipulation it takes, but I was very pleased with the final result. What is it they say about the pain going away on payday? :smile:

Left is raw neg scan, right is from an 8x8 inch print on Ilford Multigrade FB with a matt surface. Print is subsequently toned in a selenium / sepia split.
 

Attachments

  • temperance_neg.jpg
    temperance_neg.jpg
    241.3 KB · Views: 1,057
  • temperance_print.jpg
    temperance_print.jpg
    218 KB · Views: 1,053

Seabird

Member
Joined
Jun 13, 2008
Messages
112
Location
Sydney, Aust
Format
4x5 Format
Carey,

Thanks for posting your examples. It's quite a lovely scene.

Thanks Daniel. I like it too. :tongue:

I had a couple questions regarding the burning sequence you've described. Are you using the same contrast filter as the main exposure for the burns? It looks like the foreground water was burned in using a lower contrast filter to bring down the highlights without pushing the tones in water down too far. Retaining detail in the background, which works here without competing with bright rock textures, can be achieved this way too.

All exposures were with the same contrast filter. I use an old D2V with condensor head so the filters go in the condensor "drawer". I've always been paranoid about changing filters for fear of moving the head/inducing vibrations etc... But thanks for the tip, I may have to get over my fear and try your suggestion next time round.

And thanks again for starting a great thread.:tongue:

Cheers
 

Gim

Member
Joined
Dec 26, 2003
Messages
401
Location
Michigan
Thanks Daniel for this thread. I was out of town when this thread started and seen it for the first time today. Really nice to see how good printers work. What a difference in the print it makes when good print making skills come into play.

Best, Jim
 

MurrayMinchin

Membership Council
Subscriber
Joined
Jan 9, 2005
Messages
5,511
Location
North Coast BC Canada
Format
Hybrid
Maybe we should rename this thread something like, "Proof Print - Fine Print" and make it sticky?

Murray
 
Photrio.com contains affiliate links to products. We may receive a commission for purchases made through these links.
To read our full affiliate disclosure statement please click Here.

PHOTRIO PARTNERS EQUALLY FUNDING OUR COMMUNITY:


Ilford ADOX Freestyle Photographic Stearman Press Weldon Color Lab Blue Moon Camera & Machine
Top Bottom