Maybe we should rename this thread something like, "Proof Print - Fine Print" and make it sticky?
Murray
Murray,
That would be useful. People may be more likely to see the thread and hopefully continue to contribute.
Thanks,
Daniel


Maybe we should rename this thread something like, "Proof Print - Fine Print" and make it sticky?
Murray
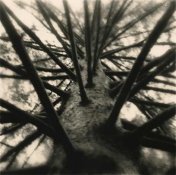
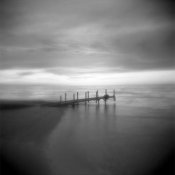
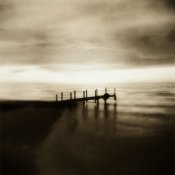
Thought I'd add one I was working on recently. Shot was made mid-morning, shooting southeast over the lake I believe. Sun was very bright with me shooting directly into it. Made with a 50mm lens covered by a 10 stop reducing ND filter. The scene looked nothing like I envisioned it in my head and I was unsure I could actually pull it off in the darkroom. Certainly not my favorite to print due to all the manipulation it takes, but I was very pleased with the final result. What is it they say about the pain going away on payday?
Left is raw neg scan, right is from an 8x8 inch print on Ilford Multigrade FB with a matt surface. Print is subsequently toned in a selenium / sepia split.
I only have a scanner, no darkroom available. To be honest, I have never really tried to print for real. Life was easy and I was reasonable happy. Now, this thread is making it tougher.
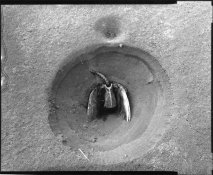
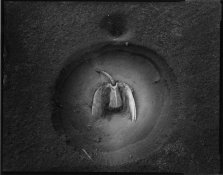
Jason, the potholes where you live are very handsome! Ours look like Godzilla had a visit.
Your interpretation fits the subject very well. I'm a fan!
Contrary, my immediate goal is to try and make a print as good as the scan. I don't mean to mock this thread, because this is a great topic, it's just that I am not (yet) an "accomplished" printer, but would like to participate anyway (...must learn to walk before I can run, and all that.)
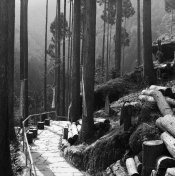
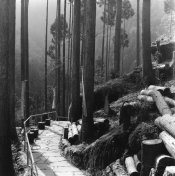
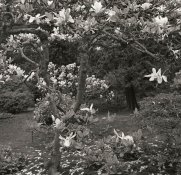
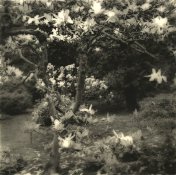
First image: the scan, then the print. The print I exposed to get detail in the walkway and dodged the trees by 20%. As noted by dlin, I need to burn the right corner/edge in the next iteration.
Terry
Michael, by "computer" and "the easy way out" I am assuming that you are referring to the use of the scanner. The scanner shows me an unbiased image of my negative, what its supposed to look like. Without it I would be chasing my tail, no way to tell me what I'm doing wrong. Eventually I hope to move beyond this stage, to be able to read and interpret the negative, and print accordingly. But I'm not there, I'm still painting by the numbers. Michael, check out post number 2 of this thread, six months ago I did not even have a scanner.
Taking the easy way out? Not when it has taken up to 15 work prints just to get it to look like the scan, that's at 45-minutes per print.
If you ask me, I say you are doing it the hard way, without realizing it. Your scanner does not show an unbiased image. What your scanner will teach you is to make thin, low contrast negatives, that do not print well, but scan fine. It's great to know that if you are shooting for a scan, but in general, the best negative for a print won't scan well, and vice versa.
This is great - thanks Daniel.
I'm a relative darkroom noob also, basically over the last year just finding my way around and producing flat prints. I'm now wanting to move into using burning/ dodging etc.
If I may ask, what do you mean when you use the term burned in for a 1/4 stop or an 1/8 stop? The little I have done I've usually worked in seconds on different parts of the print.
Apologies for such a basic question, but I feel I'm missing something here and can't quite get my head around it.
thanks
Tony
Great thread Daniel! Don't know how I missed it first time around.
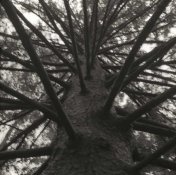
Thought I'd add one I was working on recently. Shot was made mid-morning, shooting southeast over the lake I believe. Sun was very bright with me shooting directly into it. Made with a 50mm lens covered by a 10 stop reducing ND filter. The scene looked nothing like I envisioned it in my head and I was unsure I could actually pull it off in the darkroom. Certainly not my favorite to print due to all the manipulation it takes, but I was very pleased with the final result. What is it they say about the pain going away on payday?
Left is raw neg scan, right is from an 8x8 inch print on Ilford Multigrade FB with a matt surface. Print is subsequently toned in a selenium / sepia split.
Are people using other techniques to create diffusion effects? Would love to see examples.
All the best,
Daniel
| Photrio.com contains affiliate links to products. We may receive a commission for purchases made through these links. To read our full affiliate disclosure statement please click Here. |
PHOTRIO PARTNERS EQUALLY FUNDING OUR COMMUNITY:  |