HOW TO build a simple Point & Shoot 4x5" Camera (P&S) ?

Junkyard

D
Junkyard

  • 1
  • 2
  • 59
Double exposure.jpg

H
Double exposure.jpg

  • 5
  • 3
  • 183
RIP

D
RIP

  • 0
  • 2
  • 219
Sonatas XII-28 (Homes)

A
Sonatas XII-28 (Homes)

  • 1
  • 2
  • 198
Street with Construction

H
Street with Construction

  • 1
  • 0
  • 187

Recent Classifieds

Forum statistics

Threads
199,340
Messages
2,789,935
Members
99,877
Latest member
Duggbug
Recent bookmarks
0

jakyamuni

Member
Joined
Dec 27, 2010
Messages
24
Format
Multi Format
I built one such camera from a discarded Kodak that had a film opening almost the size of 4x5 film... I replaced the bellows with a fixed cone, the 170mm lens with a 90mm extra wide angle lens in a self-cocking shutter, and replaced the rollfilm back with a brass pocket lined with felt to accept a film holder. It is, quite literally, just point and shoot, and let the depth of field take care of the rest.
 
OP
OP
TheToadMen

TheToadMen

Subscriber
Joined
Sep 18, 2012
Messages
3,570
Location
Netherlands, EU
Format
Pinhole
Hi Jkayamuni,
How did you decide what size (focal length) the cone shoot be?
Bert
 
Last edited by a moderator:

jakyamuni

Member
Joined
Dec 27, 2010
Messages
24
Format
Multi Format
Bert,

Before I made the cone, I slipped a piece of white printer paper into my film holder and slid it into the pocket on the back... then I opened the lens and went into a dark room with a tiny window open. I moved the front standard back and forth until the image was in focus and then taped it down. That's how big I made the cone. The key is, don't make it more complicated than it is.
 
OP
OP
TheToadMen

TheToadMen

Subscriber
Joined
Sep 18, 2012
Messages
3,570
Location
Netherlands, EU
Format
Pinhole
As I said before, I'm gonna use my “Schneider-Kreuznach Super-Angulon 1:8/121 #7481057 in working shutter” lens.
I just found out that this lens is made in February 1961 !!
See: http://www.schneiderkreuznach.com/service/serie.htm
It is much older than I thought. Even six years older than I am: I'm born on February 14th, 1967.
This lens was originally designed for 18x24 cm (about 7x9.5 inch) but I have seen reports from people stating they could get coverage for 8x10 inch without vignetted corners (stopped down and without movement I guess).
I'm gonna try to find a lens board to fit it in and test it. Haven't done that before (I'm new to this kind of LF lenses). I also need some kind of ring to lock the lens onto the board, I guess ....
 

removed account4

Subscriber
Joined
Jun 21, 2003
Messages
29,832
Format
Hybrid
hi toadmen

have you considered just setting the lens up for hyperfocal exposures
from what i remember, schneider lists the distance + fstop on theirwebsite
so you can just use it as a fixed focus camera ...
have 2 backs .. one with ground glass ( or whatever it is you are going to view through )
and have it the same distance from the rear element as your film / paper plane...
you have 4 pegs and 2 large elastics to secure the back on it, you remove the back
slide the paper holder / film holder, secure it with elastics and you are good to go .
if you can deal with longish exposures since hyperfocal is usually stopped down a bit
that might be another option.

have fun !

john
 
OP
OP
TheToadMen

TheToadMen

Subscriber
Joined
Sep 18, 2012
Messages
3,570
Location
Netherlands, EU
Format
Pinhole
Hi John,
It will probably something like that. The only thing is I don't have a 2nd back with a ground glass. I was thinking of getting a cheap ground glass and making a simple wooden frame for it with the dimensions of a film holder.
I was wondering: over here they sell photo frames with a mate type glass. Would this suffice for a very simple ground glass?
Or has anyone a spare one to donate to this experiment? ;-)
 

mgb74

Subscriber
Joined
Jan 24, 2005
Messages
4,774
Location
MN and MA US
Format
Multi Format
Very easy to do a passable ground glass. Instructions are elsewhere on this site. I used rock polishing grit since that's what I had handy.
 

Ian C

Member
Joined
Feb 8, 2009
Messages
1,261
Format
Large Format
There’s a good article here on making a ground glass.

(there was a url link here which no longer exists)
 

NedL

Subscriber
Joined
Aug 23, 2012
Messages
3,390
Location
Sonoma County, California
Format
Multi Format
Hi Bert and All,

I'm also planning to construct a simple fixed focus camera for 5x7 paper negatives. I can see that ground glass isn't too hard, but I wonder if I can use a piece of vellum or something like that just for one time setting the focus? My idea was to try to set the focus just before I build the back onto the camera ( mine will not take film holders, but will use a clever "storage" compartment that I saw Joe use on F295. I've picked out a lens that might work, but perhaps something simple like this could also be used to check coverage. Anyhow, I'm going to give that a try. Mine will be extremely simple.

P.S. Bert, I was born the same year your Schneider-Kreuznach Super-Angulon was made!
 

Sirius Glass

Subscriber
Joined
Jan 18, 2007
Messages
50,417
Location
Southern California
Format
Multi Format
What you want is called a 4"x5" Pacemaker Speed Graphic.
 
OP
OP
TheToadMen

TheToadMen

Subscriber
Joined
Sep 18, 2012
Messages
3,570
Location
Netherlands, EU
Format
Pinhole
What you want is called a 4"x5" Pacemaker Speed Graphic.

Hi Sirius,
Thanks for the tip. I looked it up and it is a nice camera. See: http://www.graflex.org/speed-graphic/pacemaker-speed-graphic.html.
I would like to use one of these. It was a journalist point-and-shoot camera.
My project will be even simpeler, though: no bellows, no raise and fall.

BTW: I liked this rermark on Wikipedia:
The Speed Graphic was a slow camera. Each exposure required the photographer to change the film sheet, focus the camera, cock the shutter, and press the shutter. Faster shooting can be achieved with the Grafmatic film holder, which is a six sheet film "changer" that holds each sheet in a septum.[2] Photographers had to be conservative and anticipate when the action was about to take place to take the right picture. The cry, "Just one more!" if a shot was missed was common. President Harry Truman introduced the White House photographers as the "Just One More Club".
(Source: http://en.wikipedia.org/wiki/Speed_Graphic)
That's me: just one more camera, just one more project, just one more alternate photo technique, just one more ...
 

pen s

Member
Joined
Sep 24, 2011
Messages
240
Location
Olympia, wa.
Format
35mm
I have built something similar out of 1/8in. hobby plywood. Next time I'd use 3/16in. My lens is a Kodak 130mm f7.7 with front cell focusing to 6 ft. It came from an old Kodak folder gifted to me that was in really bad shape, broken strut, lots of holes in the bellows. The lens was clean and the shutter worked so I decided to use the lens. I determined the distance from the film plane by attaching it to a bellows with tape. I measured the bellows extension in mm with the lens moved to infinity. I added that value to the flange distance of the camera body and that was the distance to the film plane at infinity. I cut the wood as close as I could, very slightly shallow, and then brought the final assembly to infinity with paper shims behind the lens. I used RC glossy paper in the film holders just to test if I'd got it right. Now a lot of these old 2.5 X 4.5 inch format Kodak folders moved the entire front standard to focus, but some of them had front cell focusing. If looking for one to salvage the lens then check carefully how the focusing works.
 

removed account4

Subscriber
Joined
Jun 21, 2003
Messages
29,832
Format
Hybrid
you CAN use waxed paper instead of ground glass
but glass won't rip and is well ... solid :smile:

btw toadman
you can make / use a box camera
they make / made them for 4x5 ...
all you would need to do is put a lensboard on it
to recess it to the sweet spot of your lens.

have fun !
john
 

darinwc

Subscriber
Joined
Dec 14, 2003
Messages
3,153
Location
Sacramento,
Format
Multi Format
Suggestions:
If you are going to use positive paper, I would reccomend going straight to a 5x7 with your super angulon 121. The 4x5 positive is a little small for display. The 5x7 is very nice. Also, your 121 super angulon will easily cover 5x7. And you will get much better depth of field using it on 5x7.
 

Joe VanCleave

Member
Joined
Jan 20, 2004
Messages
677
Location
Albuquerque,
Format
Pinhole
Hi Bert and All,

I'm also planning to construct a simple fixed focus camera for 5x7 paper negatives. I can see that ground glass isn't too hard, but I wonder if I can use a piece of vellum or something like that just for one time setting the focus? My idea was to try to set the focus just before I build the back onto the camera ( mine will not take film holders, but will use a clever "storage" compartment that I saw Joe use on F295. I've picked out a lens that might work, but perhaps something simple like this could also be used to check coverage. Anyhow, I'm going to give that a try. Mine will be extremely simple.

P.S. Bert, I was born the same year your Schneider-Kreuznach Super-Angulon was made!

Hi Ned, I'm glad to see that someone remembers my old foam core sliding box binocular lens camera. For something like a hyper focal camera, just a bit of sliding action of the rear box into the front can ensure accurate focus from a few feet to infinity, without needing much bellows draw, especially when the aperture is already stopped down to a reasonably small aperture. This means you can build a shallow sliding box camera without an excessively long base board, affording (relatively) compact size while still being able to focus the camera.

My bino lens camera used a 150mm f.l. lens stopped down to around a 3mm aperture, giving an f/50 focal ratio for good DOF and also correcting many of the off-axis aberrations of such lenses seen when operated wide open, so the pictures were surprisingly sharp, corner to corner.

Another benefit of such a small aperture was slow enough shutter speeds as to dispense with a mechanical shutter for paper negatives and instead using a lens cap shutter hand operated.

For a ground glass, vellum can work fine in terms of seeing a projected image, though the flexibility of the material means the screen can flex and cause focus errors, especially when the box is drawn in or out and the air pressure pulls or pushes on the screen. Better to use a thin, stiff piece of clear acrylic plastic, from the hardware store, and grind one side down with very fine emory paper in a random orbital sander. Another thing that works even better are these large, sheet sized plastic fresnel magnifiers, available at Staples office supply store in 8.5 x11inch size, you grind down the flat, non-ridged side the same way, with that side facing the lens and the fresnel facing toward the rear, and you have a ground glass with fresnel built in.

The way I manage the ground glass screen with film holders is to make a frame for the ground glass that positions it at the same distance as the film would be in a film holder, the frame being very similar in size. You compose and focus on the screen, then remove it and install the film holder. The rear surface of the box camera is an opening where you can see the glass to compose and focus, while still having enough of a frame to hold the film holder and provide a light tight seal.

You don't even have to use commercial film holders, just make one out of a 4 layer sandwich of thin plywood or even foam core board, with the dark slide not able to be completely removed, like a plate holder uses. Vey simple, doesn't require the complex double felt light trap of the commercial holders.

You'd be surprised at how nice of an image can result from such seemingly primitive designs, which is part of their charm.

~Joe

PS: use a removable aperture stop in front of the lens, affording a bright image to compose and focus, then stop down to take the picture. If you make the sliding box (or bellows) long enough to afford close up focusing, measure your aperture stops diameter in millimeters, then use a tape measure to measure the distance from lens to film when focused close up, divide the one into the other, and you have your working aperture already compensated for bellows extension. One of my cameras has such a distance scale affixed to the base board of the camera, where I can quickly reference the focal length and divide it by the aperture diameter to quickly determine focal ratio in a snap.
 
Last edited by a moderator:

NedL

Subscriber
Joined
Aug 23, 2012
Messages
3,390
Location
Sonoma County, California
Format
Multi Format
Hi Joe,

Wow. Thanks for taking the time to type in so much great information!

Yes I pored over many of your posts over on F295, they form an impressive amount of practical information and advice! The foam core sliding box camera really caught my eye and is what eventually made me decide to start down the "camera making" path!

This all started for me when I found my wife's grandmother's old Kodak 1A in our garage. I knew people used paper negatives in pinhole cameras, so I thought to myself, why not cut a paper negative to fit right into this camera. At that time, I didn't know that lots of other people have already gone down the path of paper negatives in lensed cameras. Some searching around on the internet led me to F295, and from there to reading probably 90% of your posts in the forums! Fortunately this was before the site switchover, so the links in your posts still worked.

It was a huge advantage to read about pre-flashing and other tips and tricks before I ever even started. Thank you for taking the time and effort of documenting and sharing so many of your experiments and explorations over the years. I started having fun results almost immediately. I really like paper negatives for themselves and not just as a stepping stone to using film.

I'm going to start with something very very simple, and then progress through your many good suggestions. One of the big attractions of your original foam core camera was the simplicity of the back. The little compartment to store paper will make it quick to swap paper ( the magnets were extremely clever ). I always have trouble in my changing bag fussing with the unexposed paper in one envelope and trying to open up whatever camera I'm using and get swapped without scratching or mixing up the exposed and unexposed sheets. Your design is made for easy changing. That means I can "focus" on the front of the camera and how the aperture stops will work and how the "lensboard" will work. I want to be able to swap lens and pinhole, and I want to make the front interchangeable so that I can increase the focal length without having to rebuild the back of the camera. The lens I decided to use has scale focus, so I think I can get close and then adjust for hyperfocal with that. Also, I think I mentioned in another thread, it projects a bright image onto the interior surface of the back of the box. I think I'll be able to set the focus point quite well by looking at that. It's going to be fun!

Definitely simple steps first before I start trying to do things like making film holders or a view screen!

Thanks again, I'm really happy to hear from you here! This thread is bookmarked for future reference!

Ned

Edit: P.S. Your PS is very clever and makes perfect sense. When I get to a focusing camera, that is a great approach. There is also something "basic" about using interchangeable known apertures and measuring the focal length to compute f-value. Very nice!
 
Last edited by a moderator:

Paul_T

Member
Joined
May 30, 2012
Messages
6
Location
USA
Format
Multi Format
Just a little note --- Clyde's P&S 4x5 also has a front rise and fall heh. He also made a 5x7 as well.
 

NedL

Subscriber
Joined
Aug 23, 2012
Messages
3,390
Location
Sonoma County, California
Format
Multi Format
Funny to see that post of mine from 3 and a half years ago. I did go on and build a 5x7 fixed focus camera ( the lens I had didn't cover well enough ) that never got much use. After that a fixed focus foamcore camera that uses dollar store 8.5x11 inch picture frames as holders. With different window mats, the camera can accommodate 8x10, 7x11 or 8.5x11 paper, with "viewing dots" to compose for those three sizes. I still have and like and occasionally use that camera. I used scotch tape on a sheet of glass in the holder as a "ground glass" and cut a hole in the back of the camera to view it and set the focus, sealing the hole again when it was set. The dimensions of the camera have drifted a little bit from being carried around and if I was building it again I would put something inside to fix the distance from the lens to the back more rigidly. It's a fun camera to use.
 

gone

Member
Joined
Jun 14, 2009
Messages
5,504
Location
gone
Format
Medium Format
I think everyone is just trying to reinvent the wheel here. As stated, simply buy a nice old Speed Graphic and be done w/ it. It will be all set up for you, costs small money, folds into a very compact package, has a ton of interchangeable accessories and lenses and shutters available for it, and you can immediately focus on the photography instead of all the low tech, jury rigged camera "building". I am someone that loves to build things myself if I have to, but when something is available that is inexpensive, well made, and proven technology, why build something is the question I am asking myself?
 
OP
OP
TheToadMen

TheToadMen

Subscriber
Joined
Sep 18, 2012
Messages
3,570
Location
Netherlands, EU
Format
Pinhole
... but when something is available that is inexpensive, well made, and proven technology, why build something is the question I am asking myself?

Just because we can ...

It's not the goal that is important, but the road we travel in pursuit of that goal.
 
Joined
Dec 10, 2009
Messages
6,297
Format
Multi Format

Paul_T

Member
Joined
May 30, 2012
Messages
6
Location
USA
Format
Multi Format
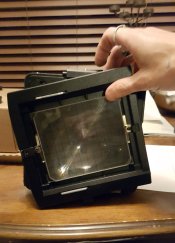
Here is one I made last night ---- still need to make a handle but it's quite sexy IMO. I've worked for Clyde for the past 8 years and am obviously inspired immensely by his abilities and innovations.
cam.jpg
 
Joined
Dec 10, 2009
Messages
6,297
Format
Multi Format
Nice!
 

Paul_T

Member
Joined
May 30, 2012
Messages
6
Location
USA
Format
Multi Format
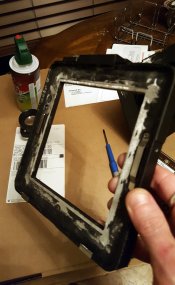
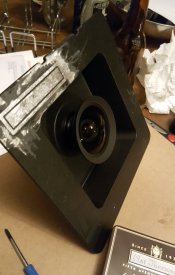
PS ALL the parts are from a Cambo monorail 4x5 -- ground glass, rear standard, and a recessed lensboard put on the "wrong" way. The lens is a 47mm Super Angulon XL fixed focus @ about 10ft [no spacers required for focus -- did Cambo know I was going to do this??!?!?] Took me about 2 hours to grind off the Cambo logo on the lensboard (it stuck out too much to be able to put the lensboard on backwards) and also grind off one side of the metal lip inside the rear standard previously used to align with the valley of a recessed lensboard. Have fun! Nice thing about it is the back from a Cambo swivels so I can easily switch from vertical to horizontal orientation in a second.
Then all you need to do is make a handle... minute investment IMO [If you have a Super Angulon XL 47 --- a Cambo mono 4x5 is cheap if you don't have one..]. I was never going to use the monorail as I have plenty of other cameras, though if I decided to it will all go back together and function fine, it'll just look a little haggard.

Thank me by shooting more film
! cam2.jpg cam3.jpg cam4.jpg
 

Paul_T

Member
Joined
May 30, 2012
Messages
6
Location
USA
Format
Multi Format
PS I haven't gotten to test it yet but it all appears exquisite.
I'll test it soon and update you all with the results before anybody
else would like to take a plunge. Also obviously it has full coverage --
I have yet to show Clyde but I'm sure he'll say "oh nice" and then pull
out another insane camera he's made bahahaha --- I think he's made
about 3 point and shoot large format camera's but I wouldn't be surprised
if he has more.
 
Photrio.com contains affiliate links to products. We may receive a commission for purchases made through these links.
To read our full affiliate disclosure statement please click Here.

PHOTRIO PARTNERS EQUALLY FUNDING OUR COMMUNITY:


Ilford ADOX Freestyle Photographic Stearman Press Weldon Color Lab Blue Moon Camera & Machine
Top Bottom