How do you use an incident light meter?

Cole Run Falls

A
Cole Run Falls

  • 0
  • 0
  • 1
Clay Pike

A
Clay Pike

  • 2
  • 1
  • 9
Barbara

A
Barbara

  • 2
  • 2
  • 114
The nights are dark and empty

A
The nights are dark and empty

  • 12
  • 5
  • 160

Forum statistics

Threads
198,936
Messages
2,783,455
Members
99,751
Latest member
lyrarapax
Recent bookmarks
0

foc

Subscriber
Joined
Jun 30, 2010
Messages
2,520
Location
Sligo, Ireland
Format
35mm
The following is from page 23 of "Beyond Basic Photography, a Technical Manual" by Henry Horenstein. We used this book as the text book in a medium format photography class at university.

"Incident light is the light that falls on the subject. It is measured by a light meter with a white diffusing material covering its cell. ... The diffuser is made to absorb just enough light to produce a an exposure reading similar to a gray card reading (or to a general reading of a normal-contrast subject).

To make a reading, hold the incident meter at the subject position and point it back at the camera position. Use the indicated reading without correction. Like a gray card, an incident meter avoids specific subject tones and provides an average reading.
"​

+1, this sums it all up.
I must admit when I shot professionally I mostly used incident readings for transparency film. For colour C41 and B&W I used reflective readings, sometimes a spot reading.

Like any tool it is important to know which one to choose and when to use it.
 

Bill Burk

Subscriber
Joined
Feb 9, 2010
Messages
9,316
Format
4x5 Format
At a meter where you can change the dome/flat diffusor for direct metering you will see that the diffusor itself has 18% transmission.

Thus when metering directly off an 18% grey-card and then doing with same meter an incident metering, you will get same result.

Well wouldn’t you want it to let 18% of the light through, rather than have it block 18%? Anyway you can safely say the dome absorbs the right amount of light to make the meter suitable for the purpose of incident metering. But I wouldn’t try to say what that is in percentage terms. I’d check this with a densitometer but my dome is out on loan.

I would suggest a flat disk for flat copy work. With flat copy the subject can’t have much more than 5 stops of subject luminance range (except where there’s texture) so it’s ok to expose less than you would in the same light for a 3-D subject. A 3-D subject might benefit from the little more exposure the meter would indicate with a dome (the little bit of shade on the away side of the dome would send less light to the meter cell).
 

MattKing

Moderator
Moderator
Joined
Apr 24, 2005
Messages
53,030
Location
Delta, BC Canada
Format
Medium Format
An incident meter doesn't give you camera settings for "the correct exposure", it gives you camera settings for placing the light you measured at middle gray. If you meter in bright sunlight, the settings it gives you will consider that sunlight to be middle gray (and your shadows and midtones will be darker/underexposed) and if you meter in a dark shadow, it will consider the shadow to be middle gray (and your shadows will be brighter).
This is incorrect.
If you are metering from the subject's position, and the light hitting the meter is the same light as the light hitting your subject, an incident meter reading will give you an exposure that:
1) renders an 18% grey as an 18% grey;
2) renders a dark shadow as a dark shadow; and
3) renders a highlight as a highlight.
In many (most?) situations, this will give you a "correct" exposure.
The problems arise when:
a) the light hitting the subject varies considerably over the subject - e.g. the shadows are receiving much less light than the highlights; or
b) a "correct" exposure will result in a negative or slide which fails in capturing the subject luminance range - scenes in the woods are a good example of a difficult scene that presents this sort of problem.
Problem a) - a variation of light over the subject - is at least partially dealt with if your incident meter uses a hemi-spherical dome. Those domes tend to capture light from more than one direction, and thus help the meter integrate the results into a single reading.
Problem b) is dealt with by knowing the range of your film, knowing how to adjust exposure and development in order to control contrast (where appropriate), being able to employ either darkroom techniques at the time of printing or post production techniques at the digital processing stage and, in the most challenging circumstances, knowing when and how to compromise to protect one end of the luminance range, at the expense of the other. That compromise is usually effected by taking an incident meter reading that records only the light that strikes the shadow (or highlight) areas, comparing that result with the overall incident reading, and using experience to choose where between the two you want to end up.
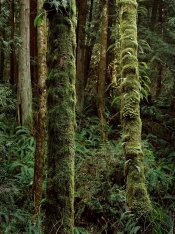
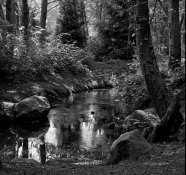
I photograph a lot in the woods. I use an incident meter regularly.
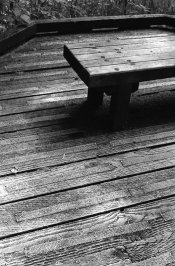
Here is an example or two (apologies for any dust):
08c-2014-06-22-res.jpg 14a-2014-06-10.jpg Image10f-2012-03-13-res.jpg
 

Bill Burk

Subscriber
Joined
Feb 9, 2010
Messages
9,316
Format
4x5 Format
An incident meter doesn't give you camera settings for "the correct exposure", it gives you camera settings for placing the light you measured at middle gray. If you meter in bright sunlight, the settings it gives you will consider that sunlight to be middle gray (and your shadows and midtones will be darker/underexposed) and if you meter in a dark shadow, it will consider the shadow to be middle gray (and your shadows will be brighter).

On black and white or color negative film, you want to "meter for the shadows", so take your reading from a relatively shady (but not extremely dark) part of the scene. This is because negative film is good at keeping detail in the highlights when there is a lot of light, but not good at keeping detail in the shadows when there isn't enough light. Slide film and digital cameras are not as good at holding detail in highlights when there is a lot of light.

Try metering in a shady part of the scene. Think about whether you want that shady part to be middle gray, lighter, or darker, and how that will affect the other parts of the scene, then put in your camera settings.
Your first sentence is awkward but the rest makes sense.

In Beyond The Zone System, Phil Davis gives advice to meter in the shade but double the Exposure Index. I internalize that by thinking... yes use incident meter in the shadow, but then make that shadow area look dark (like it’s supposed to look) by closing down one stop.
 

MattKing

Moderator
Moderator
Joined
Apr 24, 2005
Messages
53,030
Location
Delta, BC Canada
Format
Medium Format
Your first sentence is awkward but the rest makes sense.

In Beyond The Zone System, Phil Davis gives advice to meter in the shade but double the Exposure Index. I internalize that by thinking... yes use incident meter in the shadow, but then make that shadow area look dark (like it’s supposed to look) by closing down one stop.
This is correct, if your major concern is shadow detail, and you are prepared to let the other tones fall where they may.
Sometimes, "If you go to the woods today", and you want a photo that nicely captures the highlights in the scene, using this technique may mean you are "in for a big surprise".
:whistling:
 

villagephotog

Subscriber
Joined
Jun 1, 2019
Messages
100
Location
USA
Format
Medium Format
This is incorrect.
If you are metering from the subject's position, and the light hitting the meter is the same light as the light hitting your subject, an incident meter reading will give you an exposure that:
1) renders an 18% grey as an 18% grey;
2) renders a dark shadow as a dark shadow; and
3) renders a highlight as a highlight.

To the OP:

As seems to be his usual habit, MattKing is entirely correct here, and his answer is quite useful and complete. Study it. :smile:

If using an incident meter correctly, there is no need to compensate the reading in any way based on the black, white, or gray tone of the subject, as long as a nominally correct technical exposure is your goal. (For me, most of the time, this is in fact the goal.) This is the opposite of a reflected meter reading, which must always be compensated based on the black, white, or gray tone of the subject (more specifically, the reflectance of the subject), if a nominally correct exposure is your goal.

An incident reading is equal to a reflected reading of an 18% gray object (but only of an 18% gray object) and also to the Sunny 16 rule (extended to all the non-sunny conditions). All three would give the same exposure.

As Matt said, however, there are still all kinds of ways an incident meter reading can lead you astray. I sometimes find incident readings tricky in scenes with a very wide brightness range, even if I'm able to hold the meter in the same light as one part of the scene (forest, for example.) Folks new to incident metering also sometimes don't get the meter in the same light as the most important subject of the photograph. (This need—to be able to get the meter in the same light as the subject—can make incident metering impractical in many situations.)

But it's also true that if you have some artistic or technical reason to deviate from a nominally correct exposure, you must make the appropriate correction to the incident reading. I might do this when I'm interested in creating a silhouette, for example. But again, this is different than compensating for the subject's deviance from 18% gray, which you do not need to do with a properly executed incident reading.
 
Last edited:
Joined
Aug 29, 2017
Messages
9,475
Location
New Jersey formerly NYC
Format
Multi Format
+1, this sums it all up.
I must admit when I shot professionally I mostly used incident readings for transparency film. For colour C41 and B&W I used reflective readings, sometimes a spot reading.

Like any tool it is important to know which one to choose and when to use it.
Why did you use different meters for each circumstance?
 

foc

Subscriber
Joined
Jun 30, 2010
Messages
2,520
Location
Sligo, Ireland
Format
35mm
Why did you use different meters for each circumstance?

The colour C41 and B&W that I shot, I also processed and printed myself so I had a lot of control over my shots from start to finish. Since colour print film has very good exposure latitude I felt I could get good exposure and prints with reflected readings. The camera I used for most of my work was an Olympus OM4ti which had a very good light meter and a built-in spot meter.

E6 transparency film had a smaller exposure latitude that C41 films and I sent those out for processing. I had shot some transparencies with reflective and then I tested incident and I prefered the incident shots, so I used it on all transparency shoots.


My dome can be taken off so the meter can be use for certain "flat disk" circumstances. What are they and how does this work?

I have never used the flat disks, just the dome. The flat disk would suggest to me that it is used for a more directional reading. The dome is taking in almost 180 degrees of light falling on your subject. Since you put the incident meter in front of your subject with the dome pointing towards the camera, you get a good average reading of the light falling on the subject, regardless of the subject's reflectance.

The flat disk would take in a much smaller angle, a bit like a reflective spot meter reading. You could use the disks for taking readings if the subject had strong directional lighting and /or deep shadows.

I am sure someone with experience using disks can give you more details.
 

MattKing

Moderator
Moderator
Joined
Apr 24, 2005
Messages
53,030
Location
Delta, BC Canada
Format
Medium Format
Why did you use different meters for each circumstance?
I'm not foc, but the reason you might use the reflected light reading with a negative material is because a workflow that separates the process into separate film exposure and later "printing" allows you to incorporate your later printing manipulations into your exposure (and development) calculations.
As an example, a negative with generous shadow exposure and overly dense highlights can still, with the aid of dodging and burning, result in an excellent print. In comparison, a transparency with blown out highlights is almost certainly a lost cause.
 

MattKing

Moderator
Moderator
Joined
Apr 24, 2005
Messages
53,030
Location
Delta, BC Canada
Format
Medium Format
The flat disks are used primarily for document copy work, but they also permit careful analysis of the directional components of lighting - e.g. separate readings of the main and fill light.
 

MattKing

Moderator
Moderator
Joined
Apr 24, 2005
Messages
53,030
Location
Delta, BC Canada
Format
Medium Format
Joined
Aug 29, 2017
Messages
9,475
Location
New Jersey formerly NYC
Format
Multi Format
The flat disks are used primarily for document copy work, but they also permit careful analysis of the directional components of lighting - e.g. separate readings of the main and fill light.
When reading the fill and main lights, with the flat disc, do you have to apply offsets to the readings? Or do you use the displayed readings off the meter?
 

MattKing

Moderator
Moderator
Joined
Apr 24, 2005
Messages
53,030
Location
Delta, BC Canada
Format
Medium Format
When reading the fill and main lights, with the flat disc, do you have to apply offsets to the readings? Or do you use the displayed readings off the meter?
You don't just apply the readings.
You use them to evaluate things like lighting ratios.
And you make decisions on exposure based on your intended results - if you are trying for a dramatic portrait that is mostly shadow your decision will be different than if you are trying for a portrait with bright highlights but luminous shadows.
 

Mr Bill

Member
Joined
Aug 22, 2006
Messages
1,481
Format
Multi Format
My dome can be taken off so the meter can be use for certain "flat disk" circumstances. What are they and how does this work?

Consider the situation of a person holding a gray card. And say that you have a light mounted on a curved track such that you can move it in an arc around the person, always equidistant. So you know that you can have it directly in front of the person, or swing it to a 45 degree angle, or whatever. And since the light-to-subject distance stays constant, so should the exposure (based on flesh highlight areas). But... the gray card exposure will fall off as the light is moved to the side (it is equivalent to tilting the card away from the light). So there are two different exposure effects, depending on whether the subject is 3D vs flat.

An incident meter with a dome will give a pretty close reading for proper exposure of the face. But the gray card will vary. If you want to keep a constant exposure on the gray card the flat diffuser is better - it is effectively tilted away from the light source same as the gray card, so it will give a better gray card exposure than the dome. Of course you probably don't care that much about the gray card, but the point is that flat artwork behaves like the gray card. So for flat objects the flat diffuser is better.

It is sometimes suggested to use a flat diffuser when checking light ratios in your studio. (You can point the flat face towards the light you are measuring; other lights can't hit the flat diffuser as well as they could hit a dome.) Personally, I would just stay with the dome and block the other lights with my body or something opaque.
 

Pieter12

Member
Joined
Aug 20, 2017
Messages
7,619
Location
Magrathean's computer
Format
Super8
I just turn off or turn away the light that I am not reading. Obviously, in studio, not outdoors.

BTW, I recall reading that proper use of an 18% gray card is to hold it at a 45º angle to the light source, not flat to camera.
 

Sirius Glass

Subscriber
Joined
Jan 18, 2007
Messages
50,380
Location
Southern California
Format
Multi Format
The colour C41 and B&W that I shot, I also processed and printed myself so I had a lot of control over my shots from start to finish. Since colour print film has very good exposure latitude I felt I could get good exposure and prints with reflected readings. The camera I used for most of my work was an Olympus OM4ti which had a very good light meter and a built-in spot meter.

E6 transparency film had a smaller exposure latitude that C41 films and I sent those out for processing. I had shot some transparencies with reflective and then I tested incident and I prefered the incident shots, so I used it on all transparency shoots.


I have never used the flat disks, just the dome. The flat disk would suggest to me that it is used for a more directional reading. The dome is taking in almost 180 degrees of light falling on your subject. Since you put the incident meter in front of your subject with the dome pointing towards the camera, you get a good average reading of the light falling on the subject, regardless of the subject's reflectance.

The flat disk would take in a much smaller angle, a bit like a reflective spot meter reading. You could use the disks for taking readings if the subject had strong directional lighting and /or deep shadows.

I am sure someone with experience using disks can give you more details.

+1

It is really nice that there are still some here that really understand what is factual going on.
 

Kino

Subscriber
Joined
Jan 20, 2006
Messages
7,764
Location
Orange, Virginia
Format
Multi Format
The flat discs are also used in cinematography, but typically to directly read foot candles to, as MattKing says, determine key to fill light ratios.

It's a lot faster to work that way; establish your key light exposure in a set foot candle reading and then everything else is a ratio of that reading...

Its also a way to keep the exposure constant from shot to shot, day to day on a set. If the key is 50 foot candles today, it should be 50 foot candles tomorrow regardless; that is what grips and a lighting director are for...
 
Last edited:

John Koehrer

Subscriber
Joined
Apr 3, 2004
Messages
8,277
Location
Aurora, Il
Format
Multi Format
Anyhow a flat disk is used to measure for even lighting on flat copy or artwork. When the art is lit, you
then measure the eveness of light by moving the meter to different areas of you subject.. Different
readings shows a brighter or dimmer lighted area. The goal is the same reading over the entire work.
 

Kino

Subscriber
Joined
Jan 20, 2006
Messages
7,764
Location
Orange, Virginia
Format
Multi Format
Anyhow a flat disk is used to measure for even lighting on flat copy or artwork. When the art is lit, you
then measure the eveness of light by moving the meter to different areas of you subject.. Different
readings shows a brighter or dimmer lighted area. The goal is the same reading over the entire work.

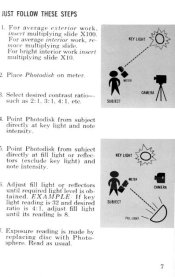
Anyhow, it just isn't for copying...

combi_1.JPG combi_2.JPG
 

wiltw

Subscriber
Joined
Oct 4, 2008
Messages
6,452
Location
SF Bay area
Format
Multi Format
My dome can be taken off so the meter can be use for certain "flat disk" circumstances. What are they and how does this work?

Some early meters referred to measuring light ratios with the flat disk.
The flat disk was also provided for photography of flat art (drawings, charcoal etchings).
 
Last edited:

AndyH

Member
Joined
Aug 16, 2004
Messages
451
Location
New England
Format
Medium Format
The flat disk was provided for photograpy of flat art (drawings, charcoal etchings)

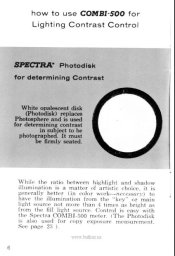
Copy work is certainly one reason for the photodisk cover, but I don't think that's accurate. My ancient Norwood and modern Sekonic both describe its use for measuring contrast on a three dimensional subject by pointing at each of several light sources. A page from an original Norwood manual is shown just above your post.

Andy
 

Bill Burk

Subscriber
Joined
Feb 9, 2010
Messages
9,316
Format
4x5 Format
My dome can be taken off so the meter can be use for certain "flat disk" circumstances. What are they and how does this work?
My vintage Sekonic actually has a flat disk to use instead of the dome. My modern Sekonic has a 'retractable' disk which simulates the flat disk. With no disk the meter acts as a regular averaging reflected light meter that you point at the subject from the camera.

With flat copy, a piece of art on an easel for instance, you really only have 5 stops give or take of subject luminance range (assuming a matte surface, no texture creating shadows or gloss/mirror surface that causes direct reflections of the light source). This is where you use the flat disk.

With 3-D pictorial subjects, you assume a different setup. You assume there is some part of the picture which is shaded from the main light, and it might be a couple stops darker because of the shade. But it also has about 5 stops that it can reflect.... so typically about 7 stops subject luminance range (from the brightest part in main light, to the darkest part in 2 stops darker shade). This is where you use the dome.
 
Photrio.com contains affiliate links to products. We may receive a commission for purchases made through these links.
To read our full affiliate disclosure statement please click Here.

PHOTRIO PARTNERS EQUALLY FUNDING OUR COMMUNITY:


Ilford ADOX Freestyle Photographic Stearman Press Weldon Color Lab Blue Moon Camera & Machine
Top Bottom