FP-100C - Successes with retrieving COLOR negs.

evancanoe.JPG

A
evancanoe.JPG

  • 4
  • 0
  • 61
Ilya

A
Ilya

  • 3
  • 1
  • 61
Caboose

A
Caboose

  • 4
  • 2
  • 72
Flowers

A
Flowers

  • 7
  • 1
  • 68

Recent Classifieds

Forum statistics

Threads
197,675
Messages
2,762,796
Members
99,437
Latest member
fabripav
Recent bookmarks
0

StoneNYC

Member
Joined
Aug 5, 2012
Messages
8,345
Location
Antarctica
Format
8x10 Format
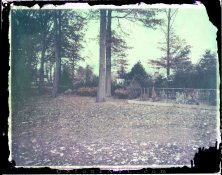
So I've been meaning to experiment with that whole bleaching the negative of the peel apart films to get a B&W negative to scan.

I didn't have the gelatin bleach that everyone talks about but I had normal liquid clorox bleach, so I used that, I coated the back side to take off the black backing, and washed the negative, I decided to scrape off the edge where some of the paper was still suck, and scratched some of the emulsion, so I figured I would do it all around just to give it an interesting look, and then I noticed that it seemed like there were 2 layers, a thick purple, and a lighter purple layer, so I scratched the corner to see if the lighter purple had any image information on it, it doesn't appear to, so I didn't scratch further.

The pink line across the image is just refraction from the ANR glass i had put on top to keep it flat, I don't have a 4x5 ANR glass piece yet unfortunately...

Anyway I was told specifically that the image would come out as a B&W negative, and that color couldn't be made from these, but to me the image looked like it had color in it, so I scanned it in color and definitely there are colors... so I wanted to share.

I did have to dial in the tones, but mostly because the ANR pink refraction caused the auto-color settings to go haywire... cut I didn't add color, simply took it to the beat white balance I could given the film itself is pretty dense with a very pink mask (the term mask could be wrong but I mean as in a base color layer that is all pink, like a Color Negative has an orange base color).

Have a look.
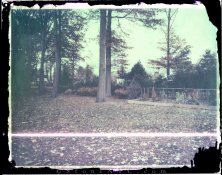
FP100Cneg-ClroxBlch-2400001.jpg

And a crop to show some of the colors...
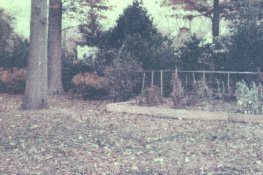
FP100Cneg-ClroxBlch-2400001-crop.jpg

Now a few points about this image, for one, this was dusk, it was a 15 SECOND exposure at f/16 with my toyo45a. I was GOING to shoot a sheet of Provia100f after this, so this was a test image, but decided the scene was lame, and also the sky had lost it's colors. (yes I know you can do even longer exposures to get the sky to be even more colorful but at the time I was going for a balance of the scene and sky, by the time the test was done and checked, the land was too dark, and a properly exposed sky would have only given a silhouette of the treeline).

The point in telling you all that, is that, it's possible MORE color might pop on a scene that is more intense, this one was very bland, dim, even, non-contrasty light scene, which would have been fine for maybe Velvia50 to saturate the color over time, but not for the fuji stuff.

Anyway when I have more time I'll try with a negative that's more colorful if I can find one.

Just looking for thoughts etc. and wanted to share.
 

ctsundevil

Member
Joined
Mar 31, 2008
Messages
57
Location
Connecticut
Format
Med. Format RF
I've saved a bunch of these negatives. I peel off as much of the paper as I can around the edges before the negative dries. When I have a few saved up, I clean the back with bleach and then wash them to remove all of the goo around the edges. They don't print real well in the darkroom. It's difficult to get the colors correct and the contrast is low. I imagine that it might be easier to scan them.
 

jcoldslabs

Member
Joined
Aug 31, 2009
Messages
177
Format
8x10 Format
Stone,

As you've discovered, the FP-100C film does produce color negatives, but the color is usually a bit muted compared to the positive. Below are two shots that used the negative bleaching method.

Personally, I would recommend the bleach gel. It is much easier to control and is less likely to get onto the emulsion side than the regular Clorox liquid which is the consistency of water and gets all over the place.


FP-100C-NEGATIVE-06.jpg


NEG---Amaryllis-II.jpg


Jonathan
 

NedL

Subscriber
Joined
Aug 23, 2012
Messages
3,372
Location
Sonoma County, California
Format
Multi Format
I came here from your gallery post...

Wow! Yes Stone, I thought they were supposed to be color negatives from FP-100C and B/W from the discontinued FP-100B. I've been saving mine too, but don't have a scanner. I hadn't heard that the colors are more muted, but I had heard that it is easier to pull out shadow details from the negative.

Johnathan those are gorgeous.
 

winger

Subscriber
Joined
Jan 13, 2005
Messages
3,975
Location
southwest PA
Format
Multi Format
I've always gotten color from color ones, too. Great job getting it from the regular, not gel.
(It isn't the emulsion I'd ruin, I can pretty much guarantee my clothes would look like I had time-traveled from the acid wash 80s.)

I have a couple sitting around I need to do, but other projects keep getting in the way.

Jonathan - those are fantastic.
 
OP
OP
StoneNYC

StoneNYC

Member
Joined
Aug 5, 2012
Messages
8,345
Location
Antarctica
Format
8x10 Format
Jonathan those ARE fantastic, really beautiful!

I wonder what my flower images will look like... excited!

Ned, the B&W ones are FP3000B ... that's three thousand. And I'm told you couldn't do this method with those, not sure why yet but I'm going to try, however I suspect it's because the negative gets totally burnt out from trying to expose at such a high ASA...

Bethe, I could have sworn you were the one who said that the color ones' negative was going to end up B&W ... but perhaps that was a misunderstanding and you were saying that you could only PRINT them in B&W because the color was too hard to print?

Curious what the negatives that I over or under exposed would look like, this one was done at the proper exposure (relatively) and seemed to scan OK after some tweaking though, my scanner software always auto-does it and with anything that's abnormal (like the pink streak from light refraction off the ANR glass) it totally throws it off. This was fun!
 
OP
OP
StoneNYC

StoneNYC

Member
Joined
Aug 5, 2012
Messages
8,345
Location
Antarctica
Format
8x10 Format
OK that stupid pink line was driving me crazy, so I opened up phtoshop for the first time in ... oh God .... 8 months? and then had to figure out all over again how to do anything... and I got rid of the pink line.... poorly at that... hah! and now the blurriness bugs me, but at least the pink isn't there...

FP100Cneg-ClroxBlch-2400001-2.jpg
 

jcoldslabs

Member
Joined
Aug 31, 2009
Messages
177
Format
8x10 Format
Thanks all for the kind words.

I learned the hard way that this process seems to work best when performed shortly after exposure. Last year I shot some FP-100C and somehow misplaced the negatives before I could bleach and rinse them. When I found them after a few months bleaching off the black backing was no problem, but the emulsion side was covered in white flaky dots that I could not remove either by rinsing or re-soaking the negatives. I assume this was the developing reagent goop that had dried up on the surface. Sadly, there was no rescuing these negs. (See example below.) Has this been true for anyone else, that waiting too long before rinsing results in emulsion damage?


FP-100C-%28NEG%29--Kitchen.jpg


Jonathan
 

analoguey

Member
Joined
Jul 24, 2013
Messages
1,103
Location
Bangalore, I
Format
Multi Format
I have saved up a few to get the negatives out later - I was just gonna use regular bleach that is used for washing - I presume that's not a good one anymore? Jonathan - that looks bad! Wondering if my negatives are toast too!

Sent from my LT26i using Tapatalk
 

Daire Quinlan

Subscriber
Joined
Sep 8, 2008
Messages
281
Format
Multi Format
I did it before a while back. From what I remember I washed off the gloop immediately on the emulsion side, using cold water. I'd say all right leaving it to dry on the negative it'd be very difficult to clean it afterward.
One thing I noticed was that the negative seems quite overexposed or washed out, I subsequently tried shooting at 200 and 400, underexposing the print to try and get a nice dense negative. Mixed results :-D

Both of these are scanned...
This was shot at 100
4938747391_9dc598c6ff.jpg

This one at 400
4987302044_5c41f3c50c.jpg

I taped them to a plate, emulsion side down, after removing the gloop, and then used Milton Fluid to clear off the black backing.
 

Wayne

Member
Joined
Jul 8, 2005
Messages
3,583
Location
USA
Format
Large Format
This is interesting. I've been wondering about the negatives on my FP100c. But I want to see some prints. If they can't be printed this would be a hybrid process, no?
 

EdSawyer

Member
Joined
Sep 3, 2008
Messages
1,793
Format
Multi Format
I save these and bleach them with regular bleach. I have a bunch saved up, will try and see if I get the dried emulsion issue. They have no mask so printing in the darkroom is tricky but should be doable. The film base is rather thin and the emulsion is super fragile so it's hard to preserve the edges without some damage.
 

winger

Subscriber
Joined
Jan 13, 2005
Messages
3,975
Location
southwest PA
Format
Multi Format
Stone, if I gave you the impression they'd be B&W, I'm sorry. If it was me, I likely said mine would end up as B&W because that's all I can print in my darkroom.

I haven't gotten streaks across mine like that one Jonathan, but I've done some that had been sitting for a few weeks at least. I have a couple sitting here that have been sitting for maybe a month or two that I haven't done, yet. I think the age at processing might be a part of it as well as time between initial processing and recovery. I've mostly used non-expired stuff for these.
 

NedL

Subscriber
Joined
Aug 23, 2012
Messages
3,372
Location
Sonoma County, California
Format
Multi Format
Oops. I'm sure some of mine have been sitting in a box for more than a year. Oh well... they are not super important. One reason I delayed trying it is that I'm not sure whether the wash should really go into my septic tank...
 

cramej

Member
Joined
Dec 29, 2009
Messages
1,235
Format
Multi Format
Ned, the B&W ones are FP3000B ... that's three thousand. And I'm told you couldn't do this method with those, not sure why yet but I'm going to try, however I suspect it's because the negative gets totally burnt out from trying to expose at such a high ASA...

The FP3000B negatives are on a white base so you don't need to clear them with bleach. They scan just like a negative image on paper. I liked the real positives from the 3000B better, but the negs did have an interesting texture and higher contrast.

FYI, you can use regular bleach on a cotton ball to remove the backing from color negs.
 
Last edited by a moderator:

winger

Subscriber
Joined
Jan 13, 2005
Messages
3,975
Location
southwest PA
Format
Multi Format
Oops. I'm sure some of mine have been sitting in a box for more than a year. Oh well... they are not super important. One reason I delayed trying it is that I'm not sure whether the wash should really go into my septic tank...

When you or another in your house cleans the toilets, do they use a cleaning product and flush it into the septic system? 'Cause all that's going down the drain in this is diluted bleach. The chemical residue left on the neg by the original processing is an extremely small amount.
 

NedL

Subscriber
Joined
Aug 23, 2012
Messages
3,372
Location
Sonoma County, California
Format
Multi Format
When you or another in your house cleans the toilets, do they use a cleaning product and flush it into the septic system? 'Cause all that's going down the drain in this is diluted bleach. The chemical residue left on the neg by the original processing is an extremely small amount.
We tend to be careful about it and use a non-chlorine bleach for laundry, but yes small amounts of bleach do go into the septic from normal cleaning. I was not worried about that and was thinking of the color development residue, since I don't know what it is or how much might wash off in this process. I was thinking I'd try the process at a friend's house attached to the sewer first, to see how much goop comes off... sounds like it might not be enough to worry about....:smile:
 
OP
OP
StoneNYC

StoneNYC

Member
Joined
Aug 5, 2012
Messages
8,345
Location
Antarctica
Format
8x10 Format
I save these and bleach them with regular bleach. I have a bunch saved up, will try and see if I get the dried emulsion issue. They have no mask so printing in the darkroom is tricky but should be doable. The film base is rather thin and the emulsion is super fragile so it's hard to preserve the edges without some damage.

I was on another thread that was talking about masks, and so I am going to use the term mask again just to indicate a colortone on the background of the image on the negative, so for example a regular 35 mm color negative has an orange mask, these ones seem to have a pink mask, so you may have trouble when printing when it comes to getting accurate colortone because you won't be used to the pink mask instead of having the orange mask. But I don't print yet, I only scanned, so I can't really tell you what it will look like for you.

As far as the dots are concerned, I'm not sure if these natives actually have silver in them or not, but if they do, there's something about how the silver dries on Polaroid type films that causes them to look like that over time they come together, I'm not sure exactly what caused it other then humidity, and I'm told that if you keep them with some silica gel for a few months that that won't happen. At least it appears to be the same as the TIP films, the TIP films also especially in particular the black and whites get the same kind of clumping, if you don't leave them in a silica gel environment for about a month, if for any reason you take them out of this a look at gel it within the first month, then you end up with a black and white Polaroid that has clumping just like that.

Either way it's good to know that it's a great idea to wash off of the goop before putting them away for storage if you're not going to use them right away for bleaching, I think it's really neat how clear and beautiful the flowers are, way way better and more accurate of a colortone than mine, so now I want to shoot some normal ones and see what happens. I did a photo shoot today however that you test shots were nudes, very bad ones, because the model was moving around because I wasn't really shooting her to shoot her, and they look really silly and bad lol.

I'll have to try an older one.

I also shot a bunch of the black-and-white stuff, I was curious as to why people said that you can't use these negatives, and now I know why, they aren't clear they are a white bass, so I can see why it probably wouldn't work to scan them and definitely would work to print them, however I may try scanning them on the glass and see if I can then reverse them in Photoshop and if that image is better considering that I over blew the actual shots :sad:

They were for fun anyway, but it's always nice to be able to actually have something usable even from fun shots.
 
OP
OP
StoneNYC

StoneNYC

Member
Joined
Aug 5, 2012
Messages
8,345
Location
Antarctica
Format
8x10 Format
Since I have everybody here I've a question, okay so you know how you're supposed to keep the Polaroid film flat and not stand it up because the goo will slide to one side and get ruined and not expose properly, is that a permanent thing or just like an hour before the shoot kind of rule?

I can keeping my phone flat forever, however the ones that I transport in both my RZ67 and my Toyo 45a are a pain, because the way that they sit in my boxes are used pelican cases that is when I'm traveling with them in the car they are normally flat ready to be opened, but it home I would like to store them by storing them up right however the way that I have things configured especially with the RZ67 I can't really get it to go flat it would be on its side if I store it upwards which is how I'd like to store them for space-saving and ease of access reasons.

I've just reconfigured my toyo 45a so that I can easily open the lid switch the position assuming I don't have too many sheet holders in there, and then store it the proper way so at least there's that but I'd rather not have to bother doing any of that if it's possible to store them and not really have to think about all that which direction is it facing thing.

For the RZ67 I use them for fun artistic purposes for model shooting that's really the only thing I use them for and so I don't always need to store them because often I will use an entire pack for one shoot, however because they are so expensive, if the model isn't that great but I want to give her something to take home I'll shoot one or two, and have some left over. With the toyo45a I use them when I'm testing a shot that I'm going to shoot on transparency, which isn't very often, so I tend to store them for long periods of time maybe over the course of six months I'll go through a single pack.

Anyway what are you guys thoughts on this, is it possible to not have to pay attention so much to how my box is stored or is it really critical to do that I don't really want to test it out and then end up having a whole pack ruined so I just figured I ask first.
 

analoguey

Member
Joined
Jul 24, 2013
Messages
1,103
Location
Bangalore, I
Format
Multi Format
I just saw some of the stored negatives -and they'd turned spotty :-(
But only the ones stored in ambient temperature, not the ones in the fridge.
Haven't bleached them though!

Sent from my LT26i using Tapatalk
 
OP
OP
StoneNYC

StoneNYC

Member
Joined
Aug 5, 2012
Messages
8,345
Location
Antarctica
Format
8x10 Format
I just saw some of the stored negatives -and they'd turned spotty :-(
But only the ones stored in ambient temperature, not the ones in the fridge.
Haven't bleached them though!

Sent from my LT26i using Tapatalk

Mine had a crystal type stuff on them, but after I washed them they seemed fine.
 
Photrio.com contains affiliate links to products. We may receive a commission for purchases made through these links.
To read our full affiliate disclosure statement please click Here.

PHOTRIO PARTNERS EQUALLY FUNDING OUR COMMUNITY:


Ilford ADOX Freestyle Photographic Stearman Press Weldon Color Lab Blue Moon Camera & Machine
Top Bottom