• Welcome to Photrio!
    Registration is fast and free. Join today to unlock search, see fewer ads, and access all forum features.
    Click here to sign up

Focomat 1c questions.

Recent Classifieds

Forum statistics

Threads
203,289
Messages
2,852,441
Members
101,766
Latest member
Onetrick
Recent bookmarks
1
While back on the topic of easels.. I'd actually love to get one of those "amateur" easels (as I only do small-ish prints these days), they're hard to find in good condion though..

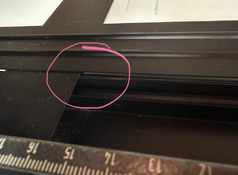
I did find one of the four-bladed ones as shown below - quickly bought it, as the price was good and it looked alright from the pictures..
..unfortunately, upon closer inspection the blades are hovering above the base board quite a bit 🫤

screenshot 180.pngscreenshot 181.pngscreenshot 182.pngscreenshot 183.png

I read that it's close to impossible to bend those back in shape due to the way they are made (somebody please correct me if I'm wrong).

Also I wonder if it's even realistic to find one of those easels, today, that's still in perfect shape -
so I suppose my question is what would you do - just live with it? Sell it and try to find something better? Tape down the upper blade (in the upper left corner)?
 
The point that you are missing...

You can't make an 8x10 enlargement on the 18x24 easel.

Also I wonder if it's even realistic to find one of those easels, today, that's still in perfect shape -
so I suppose my question is what would you do - just live with it? Sell it and try to find something better? Tape down the upper blade (in the upper left corner)?

I have one of the smaller easels in perfect condition. But people want a lot of money for them. The one you have looks fine. Try it out and see how troublesome that is. You would be able to bend it back a little if you tried. That blade is above the other blades so it would be above the paper at least a little even if perfect.
 
I have one of the smaller easels in perfect condition.

..nice! Would you consider selling it (as you don't seem to like them)? 🙃

Thank you for the feedback on the four blade Leitz - I managed to slightly bend it / managed to slightly improve the situation.

By the way is there a dedicated restauration / "easel care" thread on here? I searched, but couldn't find one..

..I managed to clean the blades (which were full of decade-old tape / residue from the previous owner) quite nicely, and was wondering what I could do to further care for the thing - the blades move in quite a stiff way, and I'm not sure what would be best to clean (and re-grease) those white friction-knobs.

Also can't seem to figure out how to make that slim clamp (which holds the very top edge of the paper down) clamp nicely again (it goes down / "clamps" on the very left end, but kinda lags (stays above the baseboard / paper, doesn't clamp at all) the rest of the way 🤔
 
Not strictly a Focomat Ic question, but related - as it concearns the late (large front element) version of the 50mm Focotar (...)

I noticed that the aperture numbers on the outer lens barrel are not aligning with the index mark -
- if the aperture is fully opened it's not straight at 4.5 where it should be, but close to 5.6 instead.
- when the aperture is fully closed the index dot is way beyond 16.
- also there's quite a bit of play / wiggle room at both ends (the aperture ring goes past the detent - and the aperture also further opens / closes a bit


So basically my question is: can this be resolved (as AI is telling me), by loosening the one (very) small screw which is on the outside of the lens barrel -

..answering my own question here / in case anybody stumbles upon the same problem in the future -

yes, with the (late, large front element) 50mm f4.5 Focotar you can indeed align the aperture numbers with the index dot, by simply
  • fully opening the aperture
  • then loosening the one very little screw on the outside of the lens barrel slightly (1/2 to 1 turn)
  • turning the lens barrel (with the printed aperture numbers on it) so it aligns with the dot again
  • tightening the screw again carefully without moving the lens barrel
Be careful with that little screw as it's easily damaged, you probably need a very tightly fitting screwdriver (I needed to carefully file down on of mine with a steel nail file to make it thin / sharp enough).

Unfortunately this does not resolve the "wiggle room" / play (aperture blades still open a tad more when turning beyond 4.5 and close a bit further when turning the ring beyond f16), solving this involves further disassembly of the lens which I did not dare to try as I was afraid to mess up the lens alignment.
 
Would you consider selling it (as you don't seem to like them)?

I like the small one - it's very well-made. I use it all the time for anything smaller than 8x10. The larger one is the one that makes no sense - but it clamps to the baseboard, which I like. I'm also used to using it, now.

Many people would advise against using any oil on any part of an easel, but they'd be wrong. You can clean the metal parts using oil but make sure it's fully rubbed off. Some residual amount will remain behind and that will help keep it from rusting. Very stiff suggests something is corroded or dirty. The groove these things:

1770900137541.png

slide in may have had some small amount of grease in it - which has likely turned to mud. At any rate, dirt would accumulate in there and gum things up.
 
Thanks again for your feedback @Don_ih - it's appreciated!

I did indeed clean the sticky residue on the blades using oil (after trying with isopropyl, which did not work).

And as you say, the groove where the white "friction sliders" ride in are gummed up and dirty, it would probably be worthwhile to thoroughly clean them and re-grease them, was wondering what to use for this. The sliders have bent metal bands facing the inside of the easel (under the mm-scales), which I think were greased at one time (now just dried up gunk), the other side (under the inch-scales) is just plastic, also somewhat greasy / gummy / dirty).

Also I have realised now that the slim clamp along the top edge not clamping (not lowering down completely, but staying a bit above the baseboard, on it's right half at least) is actually what is keeping the blades themselves from lowering down completely 💁‍♂️
Thus the horizontal top blade is "lifted up" and not able to lay down nicely.

IMG_5997.jpg
 

Attachments

  • IMG_5996.jpg
    IMG_5996.jpg
    698.7 KB · Views: 45
I think practically everything Leitz made can be completely taken apart and serviced, if that's what you want to dive into. That little clamp may need to be bent or there might be something preventing it from going down on that side. It's possible it got bent if something got stuck in there when the easel was closed. Who knows what's been done with that in its lifetime.

Lithium grease (in a tube, not a spray) is a good choice, since it doesn't break down easily.
 
My (late, "grey version") Focomat does not have this, but out of interest -

what is this apparatus on the left side of the enlarger column that I see in photos of some of the older Focomats?
 

Attachments

  • screenshot 124.png
    screenshot 124.png
    990.3 KB · Views: 56
  • screenshot 125.jpg
    screenshot 125.jpg
    635.9 KB · Views: 55
My (late, "grey version") Focomat does not have this, but out of interest -

what is this apparatus on the left side of the enlarger column that I see in photos of some of the older Focomats?

Internally illuminated enlargement indicator.
 
The bulb started going out sometimes on my (late, grey model) Focomat, when I was moving the enlarger head up and down - so I decided to re-do the wiring from the top of the column to the lamp housing.
This took me a lot longer than I expected, partly because using AI for figuring out how to disassemble the top of the lamp house led to much confusion (apparently there are quite a few different versions of the Focomat Ic lamp housing's top part : )

Anyways, here's some pictures - pretty self-explanatory when you look at them, yet I figured this might save somebody else some time 🙂

IMG_6020.jpegIMG_6021.jpegIMG_6022.jpegIMG_6042.jpeg

The silver reflector in the upper part of the lamp housing is easily removed (just sort-of grip-pull it out with two fingers from the middle).
It's not necessary to remove the snap ring (in the third picture), you can unscrew the little dome on top of the lamp house (where the three centering-screws go into), while holding the black tube (around the lamp socket) inside the housing, then pull the socket- assembly through the 🔝


IMG_6023.jpegIMG_6024.jpegIMG_6043.jpegIMG_6044.jpeg

Some detail pics of the socket etc. - as you can see the brass part unscrews, you might need some thick rubber bands or something to get a proper grip though 👍


IMG_6045.jpegIMG_6046.jpeg

The other end / the other plug is very straightforward.
The small screws inside were super tight though - ideally get a proper, perfect-fitting screwdriver.
 
Last edited:
The bulb started going out sometimes on my (late, grey model) Focomat

Good job. That's what mine was doing, but the cord from the top of the column to the lamp was actually fine. Every other piece of wire in the thing had the insulation crumbling off.
 
Photrio.com contains affiliate links to products. We may receive a commission for purchases made through these links.
To read our full affiliate disclosure statement please click Here.

PHOTRIO PARTNERS EQUALLY FUNDING OUR COMMUNITY:


Ilford ADOX Freestyle Photographic Stearman Press Weldon Color Lab Blue Moon Camera & Machine
Top Bottom