First Negatives: washed out?

Forum statistics

Threads
198,720
Messages
2,779,880
Members
99,691
Latest member
Vlad @ausgeknipst
Recent bookmarks
0

Curtis Miller

Member
Joined
Feb 13, 2019
Messages
21
Location
Milford, MI
Format
Medium Format
Hi everyone. I am returning to film after a long absence. I have a new (old) Mamiya RB67 and have just shot and developed my first rolls. After scanning, using a mirrorless camera and copy stand of my own design, I find the scans to be pretty dark, or light after inversion. Here's a link to the images:
filmtests
filmtests


There is a spread of values, but they don't reach either the blacks or whites. I can create decent looking images, but I had expected a more full range of values from the negatives. I don't know if this is just the way a negative should look, or if there's something wrong.

I shot Ultrafine Extreme 400, overexposing by a stop. Development was with Xtol 1 + 1 for 12 minutes at 68 degrees, per the massive dev chart. I used TF4 for six minutes for a fixer. Rinsed for a minute with water before fixing, then ten minutes after fixing.

I replaced the film back light seals prior to shooting and see no evidence of light leaks.

Any advice as to whether this is normal, or if there's a problem with exposure or development, or even scanning?
 
Last edited:
OP
OP

Curtis Miller

Member
Joined
Feb 13, 2019
Messages
21
Location
Milford, MI
Format
Medium Format
Oops. Tried to insert link, but it didn't work. They are at chm.photos/filmtests

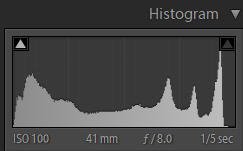
I posted histogram too. It actually looks about right, but I'd still like some input on this.
 

MattKing

Moderator
Moderator
Joined
Apr 24, 2005
Messages
52,848
Location
Delta, BC Canada
Format
Medium Format
Welcome to Photrio.
It isn't a big problem, but this thread is actually in the wrong sub-forum. It should be in a "scanning" sub-forum - "Digital Negatives" refers to inkjet printed negatives, usually used for contact printing and traditional processes like cyanotypes.
Here is the scanning sub-forum: https://www.photrio.com/forum/forums/scanning-and-scanners.361/
Don't be concerned - the moderators will probably move the thread to where it belongs.
We would find it easier to help with film negative part of your question if we could see a backlit photo of the negatives themselves. No matter what system you use for scanning them, it adds variables that make it hard to evaluate the negatives themselves.
If you are going to upload anything to this site, it works best if you resize the file to no more than 800 pixels on the long side.
Hope we can help.
 
OP
OP

Curtis Miller

Member
Joined
Feb 13, 2019
Messages
21
Location
Milford, MI
Format
Medium Format
The straight image looks better than the manipulated one. The highlights are lost. If you pull the black point over, it looks nice. How will you be printing the negatives?
I agree that I may have overdone the contrast on the edited image, but I think the unedited one looks very flat. At the very least, the exposure needs to come down, but then it just looks darker and flat. Here's the histogram of the inverted scan:
Histogram.jpg


It's a full tonal range, just no blacks or whites.
 
OP
OP

Curtis Miller

Member
Joined
Feb 13, 2019
Messages
21
Location
Milford, MI
Format
Medium Format
All my research confirms my development time, so I guess that leaves exposure, unless of course you all see no problem in the image as it is. _SNY3530-Pano-Edit-4.jpg

I intentionally overexposed one stop to be sure of a dense negative and I guess I got that, but the shadows are not blocked up, just dark (on the negative). I put the shadows on Zone III, and the highlights on Zone 6 or 7. These were all shot indoors in flat light too, so maybe there just wasn't much tonal range. It does look overexposed, so maybe I just needed to pull down the exposure and leave it at that. But I'm used to seeing images with much more tonal range.
 

MattKing

Moderator
Moderator
Joined
Apr 24, 2005
Messages
52,848
Location
Delta, BC Canada
Format
Medium Format
I agree that I may have overdone the contrast on the edited image, but I think the unedited one looks very flat. At the very least, the exposure needs to come down, but then it just looks darker and flat. Here's the histogram of the inverted scan: View attachment 217021

It's a full tonal range, just no blacks or whites.
It is reasonably likely that these concerns arise at the scanning stage, not the film exposure or development stage.
 
OP
OP

Curtis Miller

Member
Joined
Feb 13, 2019
Messages
21
Location
Milford, MI
Format
Medium Format
It is reasonably likely that these concerns arise at the scanning stage, not the film exposure or development stage.
I shot the negative with a Sony A7III with a strong backlight behind the negative. The image was strong and looked properly exposed. No clipping of black or white point. Not sure what would effect the scan other than exposure.

Do you all always expect to see a full tonal range in your negatives, regardless of lighting conditions?
 
OP
OP

Curtis Miller

Member
Joined
Feb 13, 2019
Messages
21
Location
Milford, MI
Format
Medium Format
I revisited my edit. Cut down the contrast, dropped the exposure, and reduced the local contrast. Looks better, and more natural. _SNY3530-Pano-Edit-5.jpg Histogram After Edit.jpg
 

MattKing

Moderator
Moderator
Joined
Apr 24, 2005
Messages
52,848
Location
Delta, BC Canada
Format
Medium Format
What kind of problems?
The digital camera's processor and firmware and/or your jpeg or tiff or raw converter software makes millions of decisions when it converts the sensor output to a usable file. In this case, it made choices that resulted in a file with a limited range of tones.
Whether or not the original negative has a limited range of tones isn't something that you can reliably tell from someone else's scans. I can't even normally tell that from my own scans, but I can usually tell by looking at the negative.
May we see a photo of the negatives?
By the way, well I don't always expect to see a full tonal range in my negatives, I can see in your uploads a subject and lighting conditions that would normally permit a full tonal range negative.
 
OP
OP

Curtis Miller

Member
Joined
Feb 13, 2019
Messages
21
Location
Milford, MI
Format
Medium Format
Here's a picture of a sheet of the negatives from this roll. Of course, the "scan" in this case is just a picture of the negative to begin with. Anyway, here's what they look like against a bright back light. Ignore the banding. It was caused by the led lights in the house.
_SNY3531.jpg
 

nmp

Member
Joined
Jan 20, 2005
Messages
2,014
Location
Maryland USA
Format
35mm
I agree that I may have overdone the contrast on the edited image, but I think the unedited one looks very flat. At the very least, the exposure needs to come down, but then it just looks darker and flat. Here's the histogram of the inverted scan: View attachment 217021

It's a full tonal range, just no blacks or whites.

Regarding the straight histogram in your first link, it looks truncated - is it from the way you cropped the picture (can't see the ends) or it is the way it looks i.e. there is real clipping of shadows and the highlights. If the latter then your inverted histogram does not compute because then there should be clipping on both sides of that histogram as well. So I am assuming it is the former. In any case, after inversion the histogram looks pretty normal (in fact, perfect) to me - all you have to do is move the two outer sliders to the respective ends of the histogram. That would be the first thing to do before anything. That will give you the full 0-255 populated histogram from the blackest black and the whitest white. From there you can do other adjustments (to optimize the middle of the histogram) if necessary.

The DR of your camera should match or exceed that of the film (as far as I know, if you believe Sony's claims of 15 stops of DR for that camera) so I would have expected the histogram to be contained within the two edges (similar to the histogram of the inverted image above.) At first glance it looks like as if there are no dark shadows or the nice bright highlights that one is used to in silver printing. The first scan is just the raw material from which to build on. For digital processing, it is better to start with such a scan that has no shadows or highlights which can be brought out with all the details than blocked out ones which are impossible to unblock.

To take the advantage of all the details the camera captures, it is also better to shoot in raw. I am not sure if you did or not.


:Niranjan.
 
Last edited:
OP
OP

Curtis Miller

Member
Joined
Feb 13, 2019
Messages
21
Location
Milford, MI
Format
Medium Format
Here's a picture of a sheet of the negatives from this roll. Of course, the "scan" in this case is just a picture of the negative to begin with. Anyway, here's what they look like again View attachment 217047 View attachment 217047 st a bright back light. View attachment 217047
Regarding the straight histogram in your first link, it looks truncated - is it from the way you cropped the picture (can't see the ends) or it is the way it looks i.e. there is real clipping of shadows and the highlights. If the latter then your inverted histogram does not compute because then there should be clipping on both sides of that histogram as well. So I am assuming it is the former. In any case, after inversion the histogram looks pretty normal (in fact, perfect) to me - all you have to do is move the two outer sliders to the respective ends of the histogram. That would be the first thing to do before anything. That will give you the full 0-255 populated histogram from the blackest black and the whitest white. From there you can do other adjustments (to optimize the middle of the histogram) if necessary.

The DR of your camera should match or exceed that of the film (as far as I know, if you believe Sony's claims of 15 stops of DR for that camera) so I would have expected the histogram to be contained within the two edges (similar to the histogram of the inverted image above.) At first glance it looks like as if there are no dark shadows or the nice bright highlights that one is used to in silver printing. The first scan is just the raw material from which to build on. For digital processing, it is better to start with such a scan that has no shadows or highlights as they can be brought out with all its details than blocked out ones which are impossible to unblock to reveal the details.

To take the advantage of all the details the camera captures, it is also better to shoot in raw. I am not sure if you did or not.


:Niranjan.

Thanks for your thoughtful comments. I posted two histograms. The first one is of the unedited inverted scan. It has room on the histogram at both the shadows and highlights. Just as I would have wanted. The other histogram is of the adjusted image. I mostly pulled down the shadows and lowered the exposure to darken the image. I left some room at the highlight end of the spectrum. I did shoot in raw, as you suggest. It may be simply as you suggest that the camera's dynamic range exceeds that of the film or the film image. I think my next roll of film will include a range of exposures of the same image, just to be sure that I'm not over-exposing the pictures and creating that washed out look.
 

nmp

Member
Joined
Jan 20, 2005
Messages
2,014
Location
Maryland USA
Format
35mm
Here's a picture of a sheet of the negatives from this roll. Of course, the "scan" in this case is just a picture of the negative to begin with. Anyway, here's what they look like again View attachment 217047 View attachment 217047 st a bright back light. View attachment 217047


Thanks for your thoughtful comments. I posted two histograms. The first one is of the unedited inverted scan. It has room on the histogram at both the shadows and highlights. Just as I would have wanted. The other histogram is of the adjusted image. I mostly pulled down the shadows and lowered the exposure to darken the image. I left some room at the highlight end of the spectrum. I did shoot in raw, as you suggest. It may be simply as you suggest that the camera's dynamic range exceeds that of the film or the film image. I think my next roll of film will include a range of exposures of the same image, just to be sure that I'm not over-exposing the pictures and creating that washed out look.

Sounds good. I think I was confused by the histogram in this link:

https://chm.photos/filmtests

Good luck!


:Niranjan.
 
Last edited:

MattKing

Moderator
Moderator
Joined
Apr 24, 2005
Messages
52,848
Location
Delta, BC Canada
Format
Medium Format
To my mind, those negatives look to be extremely over-developed. They may also be over-exposed.
I'm reluctant to come to a definitive conclusion, because the process of photographing them for the purpose of this thread can add some of the same distortions as scanning them for other purposes.
Here is a link to a website article about assessing negatives. While the illustrations in it aren't perfect, they give a reasonably good indication of what good negatives look like: https://www.ephotozine.com/article/assessing-negatives-4682
It may be that the OP's negatives look better in real life.
EDIT: I realize I should probably take some photos of negatives that print and/or scan well, for use in threads like this.
 

nmp

Member
Joined
Jan 20, 2005
Messages
2,014
Location
Maryland USA
Format
35mm
I am an all-digital person so I looked at first strictly from the point of view of scanning or reproduction. I thought some more about whether the OP needs to adjust the film exposure and/or development. FWIW considering last film I shot or developed or printed was eons ago, I think based on the histogram I would surmise that the film is exposed/developed fine. If it was either overexposed/developed or underexpose/develop, then it would show up in the histograms. In the former case, for example, the unedited inverted histogram should abruptly end at some value on the right side (clipped highlights.) Similarly for under- case on the left side of the histogram (blocked shadows.) Neither seems to be true in OP's case.

:Niranjan.

Addendum: I went back and checked some of the individual frames from the picture posted in #18. They all have "toes" in the highlight areas.
 
Last edited:
OP
OP

Curtis Miller

Member
Joined
Feb 13, 2019
Messages
21
Location
Milford, MI
Format
Medium Format
If the negatives are over-developed and I reduce development time, would that not just move the entire range of tones to the left on the histogram? Or does development effect one end of the tonal range more than the other, thus changing the spread of tones and increasing contrast?

Looking at the article quoted above, my negatives look to me to be over-exposed and about correct in development. I've been overexposing a stop intentionally. I'm accustomed to the digital approach where you want to "expose to the right" to maximize highlights, as long as you don't clip. Maybe that doesn't work with film.

I followed development times in the massive dev chart; 12 minutes in 1 + 1 dilution of Xtol. Don't know how reliable they are. I've seen others say that they use more diluted Xtol and shorter development times, but it was with different film.
 
Last edited:
Photrio.com contains affiliate links to products. We may receive a commission for purchases made through these links.
To read our full affiliate disclosure statement please click Here.

PHOTRIO PARTNERS EQUALLY FUNDING OUR COMMUNITY:


Ilford ADOX Freestyle Photographic Stearman Press Weldon Color Lab Blue Moon Camera & Machine
Top Bottom