Epson V700/V750 focus height...finding the sweet spot.

No Hall

No Hall

  • 0
  • 0
  • 5
Brentwood Kebab!

A
Brentwood Kebab!

  • 1
  • 1
  • 87
Summer Lady

A
Summer Lady

  • 2
  • 1
  • 119
DINO Acting Up !

A
DINO Acting Up !

  • 2
  • 0
  • 69
What Have They Seen?

A
What Have They Seen?

  • 0
  • 0
  • 82

Recent Classifieds

Forum statistics

Threads
198,782
Messages
2,780,779
Members
99,703
Latest member
heartlesstwyla
Recent bookmarks
0
Joined
Aug 29, 2017
Messages
9,446
Location
New Jersey formerly NYC
Format
Multi Format
I have a V850 and scanned a negative, not the razor blade jig described above, at the different heights set into each of the holders. Make sure all four adjustments on each holder are set to the same height position for each scan.

It was pretty obvious which stop was the best. I was very surprised that there was such a difference between settings. You can see it by eye. No need for a jig. Does anyone know what height difference there are between each stop? There are five total from top to bottom. The holders have an arrow next to the second from the bottom stop. Is that supposed to be 3mm or something else?
 

grat

Member
Joined
May 8, 2020
Messages
2,044
Location
Gainesville, FL
Format
Multi Format
Yeah-- Manual says the arrow is for default height of 0.12" or 3mm. Ranges from 2.5mm to 4.5mm in 0.5mm increments.
 

JokerNZ

Member
Joined
Aug 20, 2024
Messages
6
Location
Wellington, New Zealand
Format
Digital
@alanrockwood , @gmikol
Forgive me for resurrecting an old thread. I was looking for ways to check the focus of my Epson V800. I believe its pretty good, but I Googled to see what ways of checking focus there might be, other than checking by eye.

And I found this thread about the slanted edge MTF technique.

I found the info about ImageJ, and a possible slant edge MTF plugin.

But when I went to ImageJ, I can't find any mention of a slant edge MFT plugin. Nor any variation of the parts of the names.

Could I ask your help for a link to the relevant ImageJ plugin?

Or if there is something for Octave, then a relevant plugin or similar for that?

I did find this for Matlab, and I'm trying running it in Octave.


But its very... awkward. And so far I haven't managed to get any results out.

Thanks for any help.
 

JokerNZ

Member
Joined
Aug 20, 2024
Messages
6
Location
Wellington, New Zealand
Format
Digital
Thank you.

I have no idea how you found that...

This is the extensions page:


And no combination of searches I could come up with would find it.
 

George Collier

Subscriber
Joined
Feb 23, 2005
Messages
1,363
Location
Richmond, VA
Format
Multi Format
I’ve been scanning for 25 years or so, with all kinds of scanners, some professionally, and arrived at the feeling that I might not be getting the best scan sharpness. The film holders are inconsistent and kind of tinkertoy. I bought a piece of glass 8x10 and decided to shim it up from the scanner glass and reach the height of best sharpness.

I did this with 2 feeler gauge sets I bought on line, cheap. I took them apart, cleaned off the oil, and started at just under 3mm in height (approximately where the film sits with a holder), using the various gauges in combinations, two equal stacks, one on either edge of the glass, with the neg (a good grain-sturdy tri-x and rodinal neg from the 70s) with the neg in between the stacks.

The neg is taped base side to the anr glass in the rebate areas. The natural curve keeps it flat to the glass. (This also works with 4x5 and 6x6mm)
I found the height of 3.25mm was best (all feeler gauge thicknesses were confirmed with a micrometer, purchased with the feeler gauges), and that from 3.15 - 3.35 was a decent range, but 3.25 is the sharpest. It is also sharper than scanning on the glass itself. And, what’s nice - the height is the same for all formats, vs possible variation in the film holders. I made permanent spacers using 3/4” wide .0625” thick extruded aluminum strips from a hardware store, 10” long, binding up and shimming with pieces of a high quality dense digital paper stock, reaching the right thickness, including the blue painters’ tape that binds it all together. (the same tape used to hold the neg to the glass - no residue.) I place a spacer on either side of the scanner glass, 8” apart, so I can scan anything in between, format is irrelevant, and I can mount 2 4x5 negs for scanning (holder holds only one), and 4 6x6cm negs.

My approach to scanning is one image at a time, like printing in the darkroom, so I’m not looking for rapid multi frame scanning of rolls of film, but rather the best scan I can get. (Everything is black and white). I scan to tiffs, 16 bit, open in Raw from the bridge (I like the way Raw sharpens, much more sophisticated than in PShop), open and work in PShop the rest of the way. On extreme dynamic range images, I can do a second scan of highlight or shadow areas, paste in over the other scan in PShop and mask out what I don’t want from the second, although the Silverfast double scan feature for shadow areas does a great job most of the time.
Opening the tiff scan in Raw allows me to tweak the ends of the range by opening up the shadows or compressing the highlights before opening in PShop for final editing.
 

jeffreyg

Subscriber
Joined
Jun 12, 2008
Messages
2,640
Location
florida
Format
Medium Format
An interesting discussion and while it is above me I feel that I am getting very good scans with my 850. Some images enlarged to as much as 5feet. My question is once you have determined the optimal height it seems that some films fit better than others in the very lacking Epson holders and what role does the printer play as each one no doubt has some differences in holding the paper etc ?
 
Joined
Aug 29, 2017
Messages
9,446
Location
New Jersey formerly NYC
Format
Multi Format
I’ve been scanning for 25 years or so, with all kinds of scanners, some professionally, and arrived at the feeling that I might not be getting the best scan sharpness. The film holders are inconsistent and kind of tinkertoy. I bought a piece of glass 8x10 and decided to shim it up from the scanner glass and reach the height of best sharpness.

I did this with 2 feeler gauge sets I bought on line, cheap. I took them apart, cleaned off the oil, and started at just under 3mm in height (approximately where the film sits with a holder), using the various gauges in combinations, two equal stacks, one on either edge of the glass, with the neg (a good grain-sturdy tri-x and rodinal neg from the 70s) with the neg in between the stacks.

The neg is taped base side to the anr glass in the rebate areas. The natural curve keeps it flat to the glass. (This also works with 4x5 and 6x6mm)
I found the height of 3.25mm was best (all feeler gauge thicknesses were confirmed with a micrometer, purchased with the feeler gauges), and that from 3.15 - 3.35 was a decent range, but 3.25 is the sharpest. It is also sharper than scanning on the glass itself. And, what’s nice - the height is the same for all formats, vs possible variation in the film holders. I made permanent spacers using 3/4” wide .0625” thick extruded aluminum strips from a hardware store, 10” long, binding up and shimming with pieces of a high quality dense digital paper stock, reaching the right thickness, including the blue painters’ tape that binds it all together. (the same tape used to hold the neg to the glass - no residue.) I place a spacer on either side of the scanner glass, 8” apart, so I can scan anything in between, format is irrelevant, and I can mount 2 4x5 negs for scanning (holder holds only one), and 4 6x6cm negs.

My approach to scanning is one image at a time, like printing in the darkroom, so I’m not looking for rapid multi frame scanning of rolls of film, but rather the best scan I can get. (Everything is black and white). I scan to tiffs, 16 bit, open in Raw from the bridge (I like the way Raw sharpens, much more sophisticated than in PShop), open and work in PShop the rest of the way. On extreme dynamic range images, I can do a second scan of highlight or shadow areas, paste in over the other scan in PShop and mask out what I don’t want from the second, although the Silverfast double scan feature for shadow areas does a great job most of the time.
Opening the tiff scan in Raw allows me to tweak the ends of the range by opening up the shadows or compressing the highlights before opening in PShop for final editing.

One has to be careful when scanning with the Epson V850. It has two scanner lenses, one better than the other. When the film holder is used, the scanner automatically selects the better lens. The film holder has little index light holes that tell the scanner what film format and holder you're using and will always use the better lens. If you just place the film on the glass platen, it selects the poorer lens. Of course, if you;re scanning 8x10 film, it always uises the poorer lens. But because of the large size of the film, the results is supposedly very good in any case according to other users of this scanner.

I shoot 35mm, 120, and 4x5 and always use the format holders at the height previously determined which is best. 3mm is the nominal setting of all the V850 holders and so marked with an arrow next to the slide setting. I used a magic marker to highlight my best-calculated focus setting on each film holder. I think there were only one maybe two holders on all the format holders that had a different setting than the nominal 3mm factory-marked setting.
 

George Collier

Subscriber
Joined
Feb 23, 2005
Messages
1,363
Location
Richmond, VA
Format
Multi Format
Alan - please notice that I'm not "just placing the film on the glass platen" but mounting it to ANR glass and elevating it to the best height by empirical testing. But you mention something I didn't know - can you be more descriptive about the "little index light holes"? I would like to check that out.
 
Joined
Aug 29, 2017
Messages
9,446
Location
New Jersey formerly NYC
Format
Multi Format
Alan - please notice that I'm not "just placing the film on the glass platen" but mounting it to ANR glass and elevating it to the best height by empirical testing. But you mention something I didn't know - can you be more descriptive about the "little index light holes"? I would like to check that out.

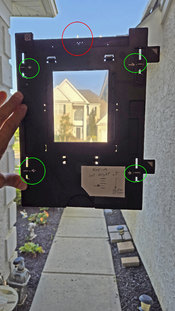
George. The red circle shows the little holes that tell the Epson which film holder you're using. It also tells the machine to select the better quality scanning sensor lens or higher bit rate (not sure if there are two sensors or just two limited settings). Check the other format holders and you'll see there are other combination. of holes

The green circles items show where I Magic marked the settings after I determined which was the best focus height for each holder. In this case it turns out it';s the same 3mm factory default setting which has an engraved arrow there as well.

Here are the specs on the sensors:
Scanning resolution 4800 dpi (main scan; optical resolution by 6 line CCD with 122,400
pixels) (for photos and film area guide)
6400 dpi (main scan; optical resolution by 6 line CCD with 113,280
pixels) (for film in film holders)
9600 dpi with Micro Step

See pg 99 of the manual.
chrome-extension://efaidnbmnnnibpcajpcglclefindmkaj/https://files.support.epson.com/docid/cpd4/cpd41530.pdf

Regarding using the platen instead of holders, here is the description in the manual. I:m not sure if the mean the 4800bpi is because of a second sensor or just the 4800 limit imposed by the machine but uses a single sensor.

Placing Film in the Film Area Guide (pg 30=31)
You can scan oversized film up to 8 × 10 inch (203 × 254 mm) using the film area guide. Scan using
Epson Scan Professional Mode and select Film (with Film Area Guide) as the Document Type.
Caution: Hold only the edges of the film strips or use gloves, or you may damage the film.
Note: You cannot use DIGITAL ICE Technology when using the film area guide. You cannot use Full
Auto Mode or Home Mode when scanning film with the film area guide. If you scan 8 × 10 inch (203 ×
254 mm) film at 4800 dpi resolution and 24 bit color as the Image Type, do not save it in BMP, Tiff, or
JPEG format.

1. Open the scanner cover.
2. Remove the document mat from the scanner cover, if necessary.
3. Place the film area guide on the scanner glass and align it as shown.
 

Attachments

  • 4x5 film holder for V850 adj.jpg
    4x5 film holder for V850 adj.jpg
    1.8 MB · Views: 42

brbo

Member
Joined
Dec 28, 2011
Messages
2,101
Location
EU
Format
Multi Format
I don't know about Epson Scan, but using a more flexible scanning software (like Vuescan), you can control which lens get used without the stupid holes in the holder. So you can still mount your film to ANR glass and put it at the optimum height above the glass bed.
 
Photrio.com contains affiliate links to products. We may receive a commission for purchases made through these links.
To read our full affiliate disclosure statement please click Here.

PHOTRIO PARTNERS EQUALLY FUNDING OUR COMMUNITY:


Ilford ADOX Freestyle Photographic Stearman Press Weldon Color Lab Blue Moon Camera & Machine
Top Bottom