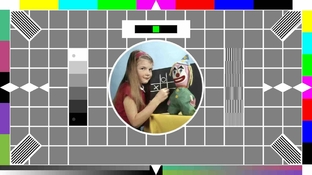
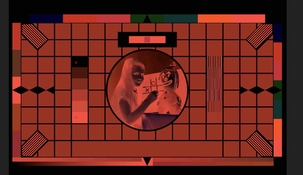
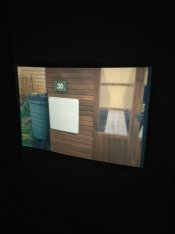
I'm using a non OLED monitor so the blacks have some white in them, I'm guessing that is why all my greys are yellowish.
Maybe. I'd expect the backlight bleed to produce an overall cast alright. However, in mid-grey, this should be mostly correctable, so I'd expect it to mostly affect the black point. It creates a bit of a nightmare since the color cast induced by this effect is non-linear, so you're effectively battling a fairly severe case of crossover.
Looking at the yellow mid-grey, it's really mostly a matter of color balancing still being pretty far off the mark. Apparently there's still too much blue being thrown onto the film, so you need to dial that channel down a lot further. You'll then notice that mid-grey will end up being too light, so overall exposure may have to be increased somewhat.
One concern I have with using a computer monitor this way is the matching (or lack thereof) of the subpixel wavelengths of the monitor with the spectral sensitivity of the color layers of the film. It's quite conceivable that there's no way to get pure colors due to the monitor's colors not being a good match for the film. E.g. the green channel of your monitor may also affecting the red/cyan and/or the blue/yellow film layer, etc. To an extent, you can correct for this within the center of the gamut, but depending on how bad the problem is, you'll sacrifice in terms of pure/saturated hues. Effectively, the gamut becomes very small and images remain muddy, regardless of how saturated the original is.
The OLED screen may work better; see how that goes. Many smartphones have OLEDs, especially the higher end ones. Might be worth a try.
Edit: to expand on the above, I looked up the spectral sensitivity of Kodak 2383 print film:
Note two things in particular. One, the green/magenta curve in the middle overlaps with the other channels at either end. In order to keep away from this cross-contamination, green exposure needs to happen around 550nm or so. You may find that exposure with 525nm green (which is the common wavelength for green LEDs) results in formation of yellow dye along with magenta (i.e. if you try to print pure magenta, it always becomes red instead of pure magenta).
The second issue is the vertical lines to the left, around the 400nm mark. This is UV sensitivity of all three layers. Going back in this thread you can see Ron Mowrey/PhotoEngineer mentioning the need for a UV filter. This might be true for a computer monitor, especially a regular IPS/TN with a CFL or white LED backlight, just the same. There may/will be some side-band emission of the backlight into the 400nm region and possibly even below this (esp. with CFL backlight). Ideally you would include a hard-cut high-pass filter with an edge at 420nm or so in your filter pack to lop off this unwanted sensitivity. UV exposure would affect all layers, but since this is a tungsten-balanced film, it will primarily result in formation of yellow dye as also evidenced by the plot shown above. UV exposure will add an overall cast that leans towards yellow/orange, it'll be pronounced especially in highlight areas (so it'll induce crossover) and it'll overall reduce contrast and gamut.


 .
.

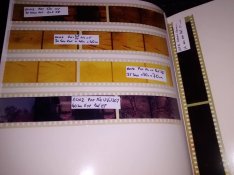
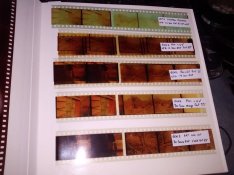
 and thanks again for your insights above, they got me producing some passable images.