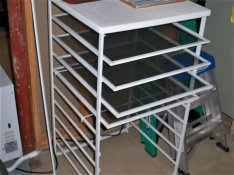
Drying rack materials and build

Roses

A
Roses

  • 1
  • 0
  • 2
Rebel

A
Rebel

  • 0
  • 0
  • 25
Watch That First Step

A
Watch That First Step

  • 0
  • 0
  • 30
Barn Curves

A
Barn Curves

  • 0
  • 0
  • 24
Columbus Architectural Detail

A
Columbus Architectural Detail

  • 1
  • 1
  • 26

Forum statistics

Threads
197,484
Messages
2,759,793
Members
99,514
Latest member
cukon
Recent bookmarks
0

mexipike

Member
Joined
Feb 12, 2007
Messages
377
Location
Los Angeles, CA
Format
Med. Format RF
I've been using a pretty lame setup for drying racks using two saw horses and an old window screen lying around. It works ok but I would like to build a nice rack that I can dry everything on. What material do people use for the screen? Ideally I could source it fairly easily at the local Home Depot etc.
Any tips would be greatly appreciated. I have searched here but didn't quite find what I was looking for.


Thanks,

John
 

sandholm

Member
Joined
Nov 17, 2009
Messages
236
Location
Switzerland
Format
Multi Format
Hi,

I dont use rack drying anymore because of 3 reasons, space, curl and time, instead i build a fiber based dryer designed by a fellow apug member; Reinhold

Have a look at: http://www.classicbwphoto.com/classicBWphoto/Print_Drier.html
The print drys in 1 hour and comes out very flat. I am using an archive blotting paper (which you have to change rather often but its very cheep). Have a look at the the build.

Cheers
Anders
 
OP
OP

mexipike

Member
Joined
Feb 12, 2007
Messages
377
Location
Los Angeles, CA
Format
Med. Format RF
Hi,

I dont use rack drying anymore because of 3 reasons, space, curl and time, instead i build a fiber based dryer designed by a fellow apug member; Reinhold

Have a look at: http://www.classicbwphoto.com/classicBWphoto/Print_Drier.html
The print drys in 1 hour and comes out very flat. I am using an archive blotting paper (which you have to change rather often but its very cheep). Have a look at the the build.

Cheers
Anders

I saw that a while ago and forgot about it, looks like a pretty good idea. I wish he had more pictures explaining the construction. Does the heater just blow on the top? I have a heater and plenty of mdf and cardboard so may give it a shot.
 

Bill Burk

Subscriber
Joined
Feb 9, 2010
Messages
9,156
Format
4x5 Format
I made a set of screens, I think any plastic windowscreen material would be fine. Actually just made them up like screens. Cost a fortune though, I think you could get them from a professional glazier for less than I made them from local hardware store materials.

The screens just sit in a frame of fingers that holds them out...

I place my prints face-up because I want NO screen pattern, a phobia of mine. As soon as I put the prints on the screen I lean them vertically for a few minutes to drain the majority of water off. Leaves a few rivulets of droplets but no real water puddles... Then I set them in the fingers and let them dry a day or two.

I have a dry mount press that I use to flatten them after.
 

nsurit

Subscriber
Joined
Jan 27, 2005
Messages
1,807
Location
Texas Hill Country
Format
Multi Format
Nylon/plastic window screens should work. I have a set of Zone VI screens and that is what they are made from. I have a rack they mount in (it holds 15) that I could send you a picture of if you want. The rack mounts to the wall and has a foot print of one screen. I would require some amount of wood working skills and tools to construct. Bill Barber
 

removed account4

Subscriber
Joined
Jun 21, 2003
Messages
29,844
Format
Hybrid
i built a rack years ago and it works like a charm.
what i did was make a box out of plywood ..
it is open in the front, and about 3" down from the top
and the sides do not go all the way to the floor.
and i put frame-molding inside as a track.
i got cheap lathe and made my frames ... and i didn't
45º cut them just attached them ... i used a staple gun
then i got window screen and stapled that onto the top of the
rectangular frames ...
they slide in and out of the track, i can dry 20x24 or 2x3 or smaller prints on
3 or 4 screens without any issue and the only real cost was the plywood, 2x4's and angle irons
(to make the box ) for the top i put a large sheet of 1/4" plywood and cheap countertop and use it as
a workspace too.

took about 1/hr to make the screens and less time to make the box ...
the box takes up space but that's ok i have a ton of junk on top of it ..

have fun!
john
a
 

gone

Member
Joined
Jun 14, 2009
Messages
5,509
Location
gone
Format
Medium Format
You might want to have a few more looks at that drier Reinhold built to puzzle it out. It looks very simple and easy to build. Quite ingenious. And if it can dry eight 16x20 prints in less than an hour, wow, that's just great.
 

sandholm

Member
Joined
Nov 17, 2009
Messages
236
Location
Switzerland
Format
Multi Format
I saw that a while ago and forgot about it, looks like a pretty good idea. I wish he had more pictures explaining the construction. Does the heater just blow on the top? I have a heater and plenty of mdf and cardboard so may give it a shot.

Its a really cool system and its fast and makes an excellent result. I am traveling so I can take any images but its a really easy build.

How I build it.

You can see the build as two stages, one box containing the fan ( i will call it the fan box) and a tray holding your print, blotting paper and corrugated board.

Build:

First I made the box holding the fan. Its a MUST that you can turn of the heat on the fan and only run air.
See the fan box as a box with a missing side (the side that connects to the print tray) and a hole at the top where the fan sits and blow down. Personal i mounted the fan on the top because I didnt want it too blow at the prints but I am not sure if its a must, it cant hurt having the air not hitting the prints direct.
The fan box has the same height and width as the print tray.

Next is the tray that holds your prints, it contains of a base and two sides, the width of the base is the same as the fan box and the height of the sides should be the same height as your fan box height.

This is it, now either connect your fan box with the print tray or keep them as two units.

Usage:

Usage, when I have wet prints ( I have two, one for 11x14 and my new one for 20x24) I start by completely squeegee them as dry as I dare, I don't want a single drop of water on them (it leaves spots)

At the bottom of the "print tray" I place a corrugated board of the size of the print tray with the "air holes" in the paper going in the direction of the air flow ( so they channel the air from the fan box to the front).
then I place one blotting paper ( replace them often ) and then a print, then a blotting paper, then a corrugated board, a blotting paper, a print, a blotting paper, a corrugated board.....

When you have stacked all your prints you want to dray you place a board on top. If the print tray is not filled up to the top, so there is a space at the back where air can escape then I place another MDF board at the back that close this gap.
Do not place any weights on top of your stack, if you do your prints will glue together, also do not leave wet paper in the tray without rotating them.

Now I run the heat on low heat for 3-4 min, then no heat for another 3-4 min. The air will now flow from the fan box through the air channels in the corrugated board and exit on the front of the print tray. Now you unstack your prints and replace the blotting paper with dray once and do the process over again. I do this (it takes 20-30 min max) until the prints are almost dry and then I run cold air through the system for another 20-30 min. I dont change the blotting paper ( if they not are wet but then I run some more warm air through the pack) but I do unstack the prints and re-stack them, just to make sure they dont stick to the blotting paper.

Now you prints are dry and flat :wink:

Its a very very simple build and procedure. The best feature is that your prints will be dry in 1 hour and flat. Screens works also perfect but they do need more space, and take longer time.

PM me if you have any question (or just write in the forum)

Cheers
Anders
 

Jim Jones

Subscriber
Joined
Jan 16, 2006
Messages
3,745
Location
Chillicothe MO
Format
Multi Format
In the Navy I wiped surface water from fiber prints, laid them out on my bunk, and covered them with a sheet and blanket. The weight of the blanket kept them fairly flat while drying. Drying took longer than the methods in the above posts.
 

Mark_S

Subscriber
Joined
Oct 20, 2004
Messages
562
Location
Portland, OR
Format
4x5 Format
I have a large dry mount press (Seal 500), and I built a bench for that which is ~36"x36" and about 30" high, beneath the table that holds the press, I have slots where I can slide screens for print drying under the dry mount press. My screens are 30" x 30" each, and I have 6. They were made from the aluminum frame material that Home Depot sells, and fiberglass screen material. I don't think that they were expensive to build.
 

ROL

Member
Joined
Oct 27, 2005
Messages
796
Location
California
Format
Multi Format
It can be pretty simple, the main multiplier being the number and size of screens:

Techniques –> A Darkroom Portrait –> Drying Racks


I would caution against the indiscriminate use of heat and/or forced air in drying, particularly in the case of fiber based papers, unless heavy turn around times are required. Fiber papers dry best and most evenly in ambient conditions with no less than moderate relative humidity. In other words, slower drying will go along way to preventing prints from becoming curly fries and crispy critters, the apparent bane of many. As far as RC papers go, just throw 'em in the dryer with the rest of your wet wash. :laugh:
 
OP
OP

mexipike

Member
Joined
Feb 12, 2007
Messages
377
Location
Los Angeles, CA
Format
Med. Format RF
I like the heater device idea, but I think for my needs a drying rack may still be best. I typically print at night right up until I go to bed, so I like to just get the water off then throw it on a screen and go to sleep. With the box it seems like I have to wait a half an hour and shuffle.

I guess one of my main questions is exactly what type of screen material to use? What material and texture and where can I source it?
 

sandholm

Member
Joined
Nov 17, 2009
Messages
236
Location
Switzerland
Format
Multi Format
It can be pretty simple, the main multiplier being the number and size of screens:
[/I][/B]I would caution against the indiscriminate use of heat and/or forced air in drying, particularly in the case of fiber based papers, unless heavy turn around times are required. Fiber papers dry best and most evenly in ambient conditions with no less than moderate relative humidity. In other words, slower drying will go along way to preventing prints from becoming curly fries and crispy critters, the apparent bane of many. As far as RC papers go, just throw 'em in the dryer with the rest of your wet wash. :laugh:


This is very important, this should not be used to rush or heat the prints in any way during the drying. The idea with the hot air is to take moist out of the blotting paper which can be used to dry prints without the fan. So the print should not be warm to touch when doing the drying. For archive purpose I have spoken with photo paper archivist experts at the Elysee museum in Lausanne and they all concluded that as long as the print is washed properly (most important for them), is rotated regular and the fan is not heating the print for a long period then this method is a very good method to reach paper stability. They even said that drying with blotting paper in a humid environment is better for the print due to some kind of paper oxidation that happen if the paper stay moist for a long time....... ( I am not a chemist so blacked out a bit when they went technical).
They also pointed out that you apply much much more heat in a dry mounting press then this method.

So it just come down to your way of working, print rack takes time and space but you can put them down and walk away. Using a blotting paper and fan takes less space and less time, but will require that you hang around for another 30 min.
 

grahamp

Subscriber
Joined
Mar 2, 2004
Messages
1,685
Location
Vallejo (SF Bay Area)
Format
Multi Format
Some of my screens are sash-window inserts from the hardware store (California), separated into two parts. These units normally have two sliding screen sections to accommodate different widow widths. I have a couple of Kostiner ones, and a few others that I picked up used locally.

I have a small darkroom, so I put in a couple of slats just under the ceiling and above the sink. The screens sit on that. Prints are surface wiped with an old Paterson print wiper, and dried face up. I can work while prints are drying, but I usually do it overnight.
 

John Koehrer

Subscriber
Joined
Apr 3, 2004
Messages
8,280
Location
Aurora, Il
Format
Multi Format
For material all you need is fiberglass screen from a hardware store.
Also materials for making custom sized frames.
 

ic-racer

Member
Joined
Feb 25, 2007
Messages
16,484
Location
USA
Format
Multi Format
I found this at Home Depot. It was supposed to take sliding drawers, but instead I made up some screen to put in the slots.
dryingrack.jpg
 

polyglot

Member
Joined
Jun 12, 2009
Messages
3,467
Location
South Australia
Format
Medium Format
Can someone who is using drying screens post a crappy photo of what the print looks like in terms of curl after drying on the screen? Do you need to hot-press it afterwards? If you're screen-drying, how do you mount your prints for framing if you're not using a hot press?
 

markbarendt

Member
Joined
May 18, 2008
Messages
9,422
Location
Beaverton, OR
Format
Multi Format
Can someone who is using drying screens post a crappy photo of what the print looks like in terms of curl after drying on the screen? Do you need to hot-press it afterwards? If you're screen-drying, how do you mount your prints for framing if you're not using a hot press?

Don't have a shot and am not the most experienced with fiber papers but I will say that after a few hundred tries the only way I've ever gotten fiber prints truly flat is to have them mounted.
 

jp80874

Member
Joined
Jul 28, 2004
Messages
3,488
Location
Bath, OH 442
Format
ULarge Format
I found this at Home Depot. It was supposed to take sliding drawers, but instead I made up some screen to put in the slots.
View attachment 90602

I bought a darkroom years ago that included a Zone VI print drying rack/box. When I take the paper out of the washer I squeegee off the running water then put the print face down on the screen. I bought a second set of screens. I put a second screen on top of the print. There is still some room for movement in that the screens match frame to frame, not screening material to screening material. Still the semi confinement greatly reduces curl.

The print dryer has a hair dryer attachment. I use Kentmere Fineprint paper. If I use the heat of the hair dryer I get curl, fine heavily rumpled curl. The paper dries too fast. If I use the fresh cool air, I get less curl. If I just let the paper dry over night in my basement darkroom I get very little curl. I take that out with a Seal 16x20 dry mount press.

I think if you did what ic-racer did and added a second set of screens you would have all the advantages of a Zone VI dryer. Of course if you can't locate the frame he uses, you could copy it in wood or metal for much less than the $600 Calumet used to charge for the box I have.

John Powers
 
OP
OP

mexipike

Member
Joined
Feb 12, 2007
Messages
377
Location
Los Angeles, CA
Format
Med. Format RF
Can someone who is using drying screens post a crappy photo of what the print looks like in terms of curl after drying on the screen? Do you need to hot-press it afterwards? If you're screen-drying, how do you mount your prints for framing if you're not using a hot press?

2ebuvy3y.jpg


Here's one I just pulled off my crappy screen and saw horse set up. They're definitely curvy but if you put the, under some books for a bit they come out pretty flat. It's best if you do it right after they're dry.
 

ROL

Member
Joined
Oct 27, 2005
Messages
796
Location
California
Format
Multi Format
I guess one of my main questions is exactly what type of screen material to use? What material and texture and where can I source it?

Well, it was in my link.:whistling: Standard fiberglass. Any screen maker. The vaunted and unnecessarily expensive ZVI screens are just those – nothing more exotic.
 

polyglot

Member
Joined
Jun 12, 2009
Messages
3,467
Location
South Australia
Format
Medium Format
Here's one I just pulled off my crappy screen and saw horse set up. They're definitely curvy but if you put the, under some books for a bit they come out pretty flat. It's best if you do it right after they're dry.

thanks! That's not too bad.

I had a thought that pertains to the fan-forced stacked-blotting-paper dryer. What happens if you squeegee a print emulsion-down onto glass and let it dry? Will it stick? If not, then maybe layering the fan-forced dryer as follows might be an easy set-and-forget means to obtain a flat print: glass, print, blotter, corrugations, glass, etc.
 
Photrio.com contains affiliate links to products. We may receive a commission for purchases made through these links.
To read our full affiliate disclosure statement please click Here.

PHOTRIO PARTNERS EQUALLY FUNDING OUR COMMUNITY:


Ilford ADOX Freestyle Photographic Stearman Press Weldon Color Lab Blue Moon Camera & Machine
Top Bottom