- Joined
- Feb 9, 2010
- Messages
- 9,546
- Format
- 4x5 Format
cluttered,
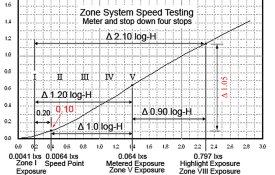
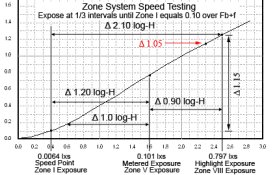
Take a close look at Stephen Benskin's post, he has provided the solution to the riddle but left some of the numbers unlabeled. You should try to "label" them in your own mind, because I think that's not a difficult exercise. I think his answer is right.
I have always wondered about why some books recommend what looks like a 1.3 negative density range when the paper needs a 1.05 negative density range.
The test you are doing (wherever you found it is still a big mystery) is testing "correctly" in terms of the result.
But in reality you are aiming for a 1.05 negative density range with your test, and the explanation is in Stephen Benskin's post.
Now I am going to look at where my idea of what's happening is just slightly different than Stephen's, I think he'd agree with this minor revision
Stephen's explanation
1.05 negative density range of Zone I to probably Zone VII / 2.10 exposure range Zone I to Zone VIII - 0.30 flare
My explanation
1.05 negative density range of probably Zone II to Zone VIII / 2.10 exposure range Zone I to Zone VIII - 0.30 flare
Reason for this slightly different explanation:
Flare raises the shadow density and leaves highlight density pretty much alone.
Flare is what takes a shadow density that you placed on Zone I up higher... So what you placed on Zone I actually arrived at Zone II.
cluttered, even if you didn't test for Zone II, you might have a negative with the density for Zone II on one of your other test frames. If you had an exposure index test shot for Zone I that happened to be shot at one stop more exposure than the "winner" (the one that measured 0.10) of the exposure index Zone I test.
Due to flare, this is what will really turn up on your pictures: deep, unmeasured shadows that you thought should fall on Zone I, will really land on Zone II which might probably be around 0.25 density.
Then the model for your negative density range (NDR) is 1.3 (your Zone VIII density) minus 0.25 (Zone I fell on Zone II where flare took your shadow density) = 1.05 NDR
Take a close look at Stephen Benskin's post, he has provided the solution to the riddle but left some of the numbers unlabeled. You should try to "label" them in your own mind, because I think that's not a difficult exercise. I think his answer is right.
I have always wondered about why some books recommend what looks like a 1.3 negative density range when the paper needs a 1.05 negative density range.
The test you are doing (wherever you found it is still a big mystery) is testing "correctly" in terms of the result.
But in reality you are aiming for a 1.05 negative density range with your test, and the explanation is in Stephen Benskin's post.
Now I am going to look at where my idea of what's happening is just slightly different than Stephen's, I think he'd agree with this minor revision
Instead of counting to the right 2.10 log units from 0.10 on the film's characteristic curve, then searching for the density at that point. Subtract 0.30 for flare from 2.10 and count only 1.90 log units. Now find the density at that point. Chances it will be around 1.15. 1.15 minus 0.10 = 1.05 which is the aim we are looking for. These values for the variables reflect reality. An aim negative density range of 1.05, and a log-H range of 2.10 - 0.30 = 1.90.
1.05 / 2.10 - 0.30 = 0.58
Stephen's explanation
1.05 negative density range of Zone I to probably Zone VII / 2.10 exposure range Zone I to Zone VIII - 0.30 flare
My explanation
1.05 negative density range of probably Zone II to Zone VIII / 2.10 exposure range Zone I to Zone VIII - 0.30 flare
Reason for this slightly different explanation:
Flare raises the shadow density and leaves highlight density pretty much alone.
Flare is what takes a shadow density that you placed on Zone I up higher... So what you placed on Zone I actually arrived at Zone II.
cluttered, even if you didn't test for Zone II, you might have a negative with the density for Zone II on one of your other test frames. If you had an exposure index test shot for Zone I that happened to be shot at one stop more exposure than the "winner" (the one that measured 0.10) of the exposure index Zone I test.
Due to flare, this is what will really turn up on your pictures: deep, unmeasured shadows that you thought should fall on Zone I, will really land on Zone II which might probably be around 0.25 density.
Then the model for your negative density range (NDR) is 1.3 (your Zone VIII density) minus 0.25 (Zone I fell on Zone II where flare took your shadow density) = 1.05 NDR


