DIY Color RA4 Processor "RePrinto" A "Modern" Durst Printo clone

TEXTURES

A
TEXTURES

  • 1
  • 0
  • 16
Small Craft Club

A
Small Craft Club

  • 0
  • 0
  • 18
RED FILTER

A
RED FILTER

  • 0
  • 0
  • 17
The Small Craft Club

A
The Small Craft Club

  • 0
  • 0
  • 16
Tide Out !

A
Tide Out !

  • 0
  • 0
  • 10

Recent Classifieds

Forum statistics

Threads
198,893
Messages
2,782,677
Members
99,741
Latest member
likes_life
Recent bookmarks
0

calebarchie

Member
Joined
Jul 25, 2014
Messages
682
Location
Australia 2680
Format
Hybrid
Thanks. That's exactly what I have ordered to make all the assembly RA4 resitant, but I use it inverted. The tubing is stainless steel and the rods POM or PETG. I want to avoid to cut, file and/or mill steel, as you need dedicated and clean cutting blades. The 316 steel tubes come pre cutted. If you cut 316 steel with contaminated (if used to cut carbon or machine steel) blades it can set rust in RA4 environement.

I'm not quite sure I follow or something may be getting lost in translation. You are inserting plastic rods inside a stainless tube (as axels)? While I kind of understand the logic, there is plenty of SS316 in various dias and lengths including pre-cut (usually 300mm) same for silicone tubing if you are needing to retain a 20mm dia. I'm just not sure how well the thin heatshrinking will hold up in use over time.

I suppose just use what you can and have available on your side of the world and keep us updated!
 

Mick Fagan

Subscriber
Joined
Sep 13, 2005
Messages
4,421
Location
Melbourne Au
Format
Multi Format
One issue with leaving the machine either running, or turned off, is tar deposits on the rollers happening. Using RA4 chemistry and doing a printing session of a couple of hours, I would then go inside for lunch, or at least a break, for around an hour, then return. I tried turning the machine off, and other times I just left the machine running, and a couple of times I turned the machine off for 30 minutes, then switched on for 10 minutes, with another 30+ minute break.

I would then return to finish my printing session, sometimes I would notice tar deposits happening on the paper, which with hand washing and usually running my fingers over the print in a tray of water, the deposits would easily remove.

As the 2.5 litre volume is good for approximately 40 20cm x 250cm prints (8"x10") if I was anywhere near that level of usage, I would discard the developing bath.

If I was going to keep the developer for another session, either the next day or at the most, in three days time, I would always drop the developer with a hot machine into large glass bottles, use glass marbles to eliminate air, then store for re-use.

In general I found that as the developer is not replenished, the tarring of things sort of escalates if one isn't running paper through the machine. I have no idea why, but it is something I understood was just part of the way it is. In another life I worked in a lab where we had a 1.9m wide RA4 paper processor, which was replenished. Tarring of rollers and prints usually didn't happen as the replenishment system seemed to keep things clean.

These days I use my Printo for B&W RC paper, it works wonderfully, same times as RA4 but around 34ºC.
 
OP
OP
elgatosuizo

elgatosuizo

Member
Joined
Jun 4, 2025
Messages
13
Location
Switzerland (Tuggen, SZ)
Format
4x5 Format
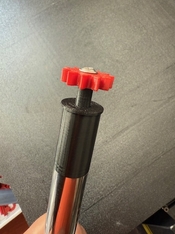
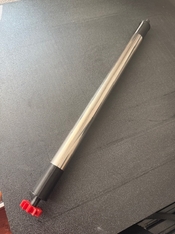
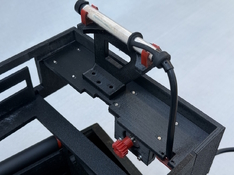
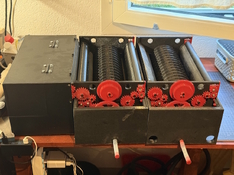
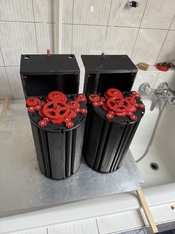
An update here. One of my current approaches for the new transport rollers: I'm using 20 × 0.5 mm stainless steel tubing (type 304), with PETG end caps and PETG axles reinforced by an internal M4 core for added strength. The photos still show the assembly without the shrink tubing applied.

IMG_6531.jpg IMG_6530.jpg
Finding 300 mm tubes with such thin walls was nearly impossible, so I went for 250 mm instead. Cutting stainless tubing this thin is always a bit tricky—and needs very clean and dedicated tools. I’ll now test if I can apply the shrink tubing up to the PETG ends using heat, or if I should simply limit myself to the 250 mm effective roller width. However, I believe the shorter active width won’t be an issue in practice, even if it’s missing 2.5–3 cm per side compared to the original.

Now comes one of the potential controversies: budget constraints. For now, I went with 304 stainless steel, which is significantly cheaper than 316 (around 6–7× less expensive here). And yes—304 is not ideal for use in Blix. Exposed, it can develop surface rust spots after a few weeks. However, I consider the risk negligible, for three reasons:
  1. Anyone who wants to can always upgrade to 316 stainless.
  2. The tube is fully enclosed in shrink tubing, which protects it from direct contact.
  3. Even if the tubing gets exposed due to damage or wear on the shrink wrap, the parts can be cleaned and the tubing re-wrapped. I will also test POM rods for the axis as this material is more wwar resistant than PETG.
Additionally, one could treat the outer tube surface with rust-inhibiting primer or epoxy spray (we often use Brunox here in Switzerland), which further improves protection.

Lastly, I just received a more powerful heater for the bath. The previous one was simply too weak, so I’ll be testing this upgrade soon. Anyway it takes quiet long time going from 18-20°C to 34°C with this heaters, so that a bit of pre-tempering will help.
 
OP
OP
elgatosuizo

elgatosuizo

Member
Joined
Jun 4, 2025
Messages
13
Location
Switzerland (Tuggen, SZ)
Format
4x5 Format
I little update:
The “POM” ball bearings are the best solution for the rotation axes of the rollers. They are really dirt-cheap and are mainly made from POM, glass and a little PA66 nylon. And yes: PA66 is not quite optimal, but it's just the spacers of the balls that might only get brittle after days of Blix continuous exposure. The 304 SS tubes are also a valid solution. The PETG of the end pieces of the transport rollers withstands the heat application well when the heat shrink tubing is applied (just don't apply it directly, but radiate the heat onto it from the moth of the tube). What I have noticed: It is imperative to have a hard core in the PETG axles. In my case I use M4 stainless steel screws. I had the glorious idea to try without and the axles broke during assembly (admittedly, I had used a lot of force). Cheap POM rods have miserable tolerances, so I'm sticking with PETG Axes at the moment as I still have to watch the budget.
I have made the guides fuller to have about 800-900ml more displacement so that I can get to nominal level. This makes the internal frame assempbly heavier and somehow different from the original Printo. You could try to design built-in protuberances in the hull/tray and have them printed to have a similar effect as from the original Printo mold. But that would require a new design that I will (continue to) draw and enhance in 3D.
I tested also the new heaters. They can hold 34.6-34.8 °C, more that ok for RA4. They are made of glass and silicon and should be RA4 dev/blix resistant.
At the moment I still have a “hybrid” setup with some old elements, the new RA resistant transport rollers, the guides with displacement and a few other details for fixing the gears. But everything shoould be RA compatible now. The original exit rollers are still with aluminum axles, but they are over the liquid level and I have coated them with epoxy. This version is a kind of version 1.1 which will probably be applicable for RA4 tests. Based on my findings, I am drawing a new version (2.0) that has all the new features. This will then be set up for a second module so that I can slowly move towards the RA4 test. In between is the construction of the light-tight housing and cover. And of course the entry module.

I will post some more pictures of the actual version soon...
 
OP
OP
elgatosuizo

elgatosuizo

Member
Joined
Jun 4, 2025
Messages
13
Location
Switzerland (Tuggen, SZ)
Format
4x5 Format
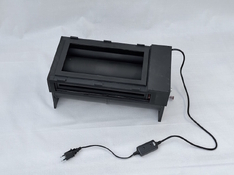
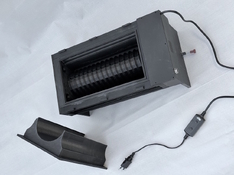
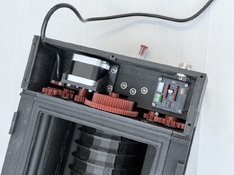
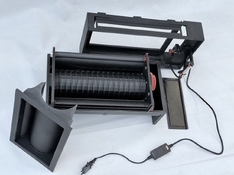
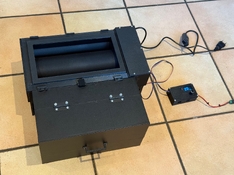
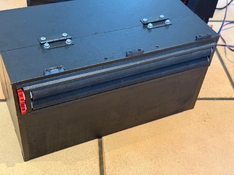
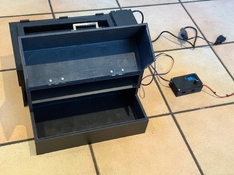
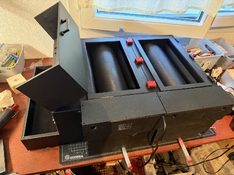
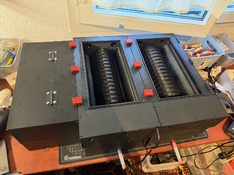
The first module (v1.1) is now mechanically complete – including the full light-blocking top cover and the rear motor housing.

2025-07-10 18.48.38.jpg 2025-07-10 18.49.23.jpg 2025-07-10 18.49.56.jpg 2025-07-10 18.50.26.jpg 2025-07-10 18.50.54.jpg

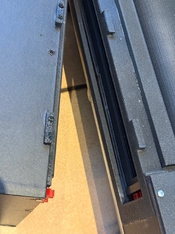
The cover sits securely and follows a step-in design to help reduce light leaks, considering the tolerances of 3D-printed parts. Since I had to deviate from the original Printo mold-based construction I have another design for the interconnection from module to module.

The motor compartment is now more compact as initially plannedand uses a 7-pin daisy-chain system for power and control signals. Each module contains its own A4988 stepper driver, and the controller (Arduino) is external. This allows easy scaling and keeps the logic out of the heated/chemical zone.

From this point, I’ll do a round of functional tests (timing, fluid stability, thermal hold, transport smoothness) and then lock in the mechanical details for version 2.0. The next steps will be building the second module (v2.0) and prototyping the “Intro” entry module. I may switch to partially using flat PVC sheets there to save print time and reduce complexity.

Will share test results and maybe a demo video once it’s up and running.
 
OP
OP
elgatosuizo

elgatosuizo

Member
Joined
Jun 4, 2025
Messages
13
Location
Switzerland (Tuggen, SZ)
Format
4x5 Format
Here’s a quick but substantial update on my DIY RA4 Durst Printo clone print processor project – an attempt to recreate the functionality of the classic Durst Printo in a home-buildable form. For those who missed the original post with early concepts and 3D versions, you can find it here: "RePrinto" A "Modern" Durst Printo clone

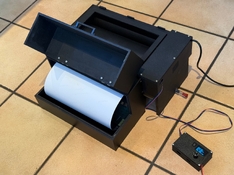
This update is all about the Intro Module, which is now fully built and tested. I'm happy to report that the paper feed-in works flawlessly up to 30.5x40cm/12x16" format – the rollers align perfectly, and the paper tracks cleanly into the system.

IMG_6621.jpg IMG_6617.jpg IMG_6619.jpg IMG_6620.jpg IMG_6618.jpg

Initially, I designed three PETG 3D-printed versions. Since this part doesn’t come into contact with chemistry, I even considered PLA. But at some point I thought – why 3D print everything? It's mostly flat walls and a light-tight flap.
So I went with a hybrid design using 6 mm plywood for the structural box and 4 mm panels for the overlapping light-trap lips. I laser-cut the parts with a small desktop machine, but they can easily be cut by hand with basic tools. After gluing it together, the frame fit the rollers perfectly. The result is a mainly wood-based module with a few PETG elements.
For finishing, I used matte self-adhesive chalkboard foil, fixed it in place with a medium-heat iron – works great and looks quite elegant. The interior was coated with deep matte black acrylic primer from the art store.
Two hinges later – and it’s done! The only technical issue remaining is gear meshing: the 21-tooth drive gear barely grips the intro roller gear. I’ll likely shift the axle by about 0.5–0.7 mm to improve engagement. For now, I'm using slightly oversized gear teeth as a workaround. As always, some tolerances only show up in the real-world build – no matter how accurate the CAD model.
The PETG version will be shared as well, although I may not print it myself immediately. Basically and kind of light tight box can be build around the intro-rollers frame (this is the interface). Next will be the log lasting printing and assembly of the second module and integration of the fimal control and signal and power interconnectors.... and then first RA-4 prints I hope.
 

btaylor

Subscriber
Joined
Dec 28, 2010
Messages
2,254
Location
Los Angeles
Format
Large Format
Amazing that you’re doing this! The Printo was such an elegantly simple design, glad you are resurrecting it. Roller transport RA4 processors make the process so easy- feed it in one side, 90 seconds later a print pops out.
 
Photrio.com contains affiliate links to products. We may receive a commission for purchases made through these links.
To read our full affiliate disclosure statement please click Here.

PHOTRIO PARTNERS EQUALLY FUNDING OUR COMMUNITY:


Ilford ADOX Freestyle Photographic Stearman Press Weldon Color Lab Blue Moon Camera & Machine
Top Bottom