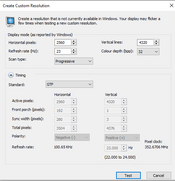
I have this configuration. Will try in a bit.
Someone posted their config.txt here:
https://www.photrio.com/forum/threads/diy-31-megapixel-enlarger.197305/post-2751103 I think I found how to interpret the hdmi_timings line (didn't save where)
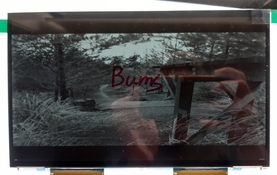
[I realised that the edid data I posted in this message is probably useless. I never to my knowledge wrote EDID info to my card, I just made the custom resolution I posted earlier. the initial display I got when I first brought it up was either not working at all or not syncing or shifted over into the flyback portion. I forget which. I was afraid of the EDID path]
My nvidia control panel didn't have a Workstation pane so I asked chatgpt to make me something
I used
https://base64.guru/converter/encode with the default settings to encode the file produced. I have a nvidia rtx3050 card and and 8k 10.1" display. think my exact model is posted earlier.
I haven't tested this at all beyond giving it a cursory glance and running it
Shared via ChatGPT

chatgpt.com
<#
.SYNOPSIS
Exports EDID blobs for all connected monitors to .bin files.
.DESCRIPTION
This script enumerates the registry under HKLM:\SYSTEM\CurrentControlSet\Enum\DISPLAY,
reads the EDID REG_BINARY value under each instance's Device Parameters subkey,
and writes the bytes to a file named <VendorProduct>-<InstanceID>.bin.
.EXAMPLE
PS C:\> .\Export-EdidToBin.ps1
Saved EDID for ACR056B_4&3968765c&0&UID50531072 → ACR056B_4&3968765c&0&UID50531072.bin
#>
# Define the base registry path where monitor entries live
$baseKey = 'HKLM:\SYSTEM\CurrentControlSet\Enum\DISPLAY'
# Enumerate each monitor vendor/product key
Get-ChildItem -Path $baseKey | ForEach-Object {
$vendorKey = $_
# Enumerate each instance under that key
Get-ChildItem -Path $vendorKey.PSPath | ForEach-Object {
$instanceKey = $_
# Construct the Device Parameters path
$paramsPath = Join-Path $instanceKey.PSPath 'Device Parameters'
try {
# Attempt to read the EDID binary value
$edidBytes = (Get-ItemProperty -Path $paramsPath -Name EDID -ErrorAction Stop).EDID
if ($edidBytes -is [byte[]] -and $edidBytes.Length -gt 0) {
# Create a filename from the registry key names
$fileName = "{0}_{1}.bin" -f $vendorKey.PSChildName, $instanceKey.PSChildName
# Write the byte array to disk
[System.IO.File]::WriteAllBytes($fileName, $edidBytes)
Write-Host "Saved EDID for $($vendorKey.PSChildName)\$($instanceKey.PSChildName) → $fileName"
}
} catch {
# Skip keys without an EDID value
}
}
}
--
AP///////wANrgFjAAAAAAAfAQOAIRJ4AgAAAAAAAAAAAAAAAAABAQEBAQEBAQEBAQEBAQEBAAAA/gBMQ0QKICAgICAgICAgAAAADwAAAAAAAAAAAAAAAAAAAAAADwAKICAgICAgICAgICAgAAAA/gAgWkUwOTlEQi0wM0EKASM=
--