• Welcome to Photrio!
    Registration is fast and free. Join today to unlock search, see fewer ads, and access all forum features.
    Click here to sign up

Direct carbon on glass process

Old Chairs

A
Old Chairs

  • sly
  • Feb 9, 2026
  • 10
  • 3
  • 68
Overlook

H
Overlook

  • 1
  • 0
  • 84

Recent Classifieds

Forum statistics

Threads
202,262
Messages
2,837,279
Members
101,185
Latest member
minolta101
Recent bookmarks
0
OP
OP

AndrewBurns

Member
Allowing Ads
Joined
Jul 12, 2019
Messages
306
Location
Auckland, New Zealand
Format
Multi Format
FYI here's two exposure tests, one with cyan pigment and the other magenta. For fun I flipped and stacked the two glass plates so that the gradients overlapped and blended together.

20260128_051543.jpg


The colour plates are pretty vibrant, happy with the results so far. I plan to expose and develop the yellow plate tonight.
 

AntonKL

Member
Allowing Ads
Joined
Jun 23, 2025
Messages
24
Location
Europe
Format
35mm
If you replace acetic acid by tartaric acid, you will have the system Poitevin introduced around 1860.
At a ~ 4 : 1 (ferric chloride : tartaric acid) weight ratio the warm gelatin solution will not coagulate and can be used for coating.
They used to use this as a positive process, by toning the unexposed parts with gallic acid. The exposed parts became more soluble which aids clearing, to amplify this they let the gelatin/ferric/TA mix hydrolyze for a couple days before coating. See e.g. ch. 8 in Die Lichtpausverfahren, die Platinotypie und verschiedene Kopierverfahren ohne Silbersalze (not sure if that link works from outside of Germany).

Perhaps fructose would work - it also forms a light sensitive complex with FeCl3 and its thermolysis products are effective crosslinkers (sadly also effective at staining).
 
OP
OP

AndrewBurns

Member
Allowing Ads
Joined
Jul 12, 2019
Messages
306
Location
Auckland, New Zealand
Format
Multi Format
Thanks!

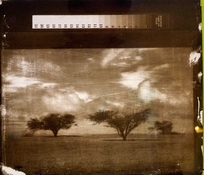
The yellow plate was a bit of a mess, still worked but there was a lot of pigment staining, even with very tenacious development. On a positive note the gelatin is really well adhered to the glass because I was spraying and pouring hot water onto the print from a reasonable height and none of it budged.

I think the staining and overall kinda crappy print is a result of the heroic pigment load Calvin recommends for his yellow colour paste carbon glop, about 60% of the dry gelatin weight! Vs. 16% for magenta and 5% for cyan. I think I might try again with a much lower pigment load, the yellow pigment is already quite opaque so I don't think I need that much pigment to get a strong colour out of it.

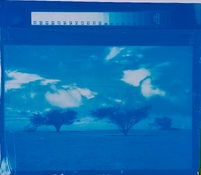
The magenta also stained a bit and it also has a fairly high pigment load. I was happy with how that plate turned out, but it was also quite a solid colour in the high-density areas so I feel like it could benefit from a lower loading too.
 

Hologram

Member
Allowing Ads
Joined
Oct 17, 2006
Messages
158
Location
Switzerland
Format
Traditional
They used to use this as a positive process, by toning the unexposed parts with gallic acid. The exposed parts became more soluble which aids clearing, to amplify this they let the gelatin/ferric/TA mix hydrolyze for a couple days before coating. See e.g. ch. 8 in Die Lichtpausverfahren, die Platinotypie und verschiedene Kopierverfahren ohne Silbersalze (not sure if that link works from outside of Germany).

Perhaps fructose would work - it also forms a light sensitive complex with FeCl3 and its thermolysis products are effective crosslinkers (sadly also effective at staining).

Thanks very much for the link. It has been a while I have been reading Eder. It is definitely worth a second look!


Fructose looks like something try - pectin might be another candidate.
 
OP
OP

AndrewBurns

Member
Allowing Ads
Joined
Jul 12, 2019
Messages
306
Location
Auckland, New Zealand
Format
Multi Format
A few more pics of the colour plates overlapping. I'm going to try again with lower pigment loads on magenta and yellow, but happy with cyan at this point.

20260129_064459.jpg

20260129_064534.jpg

20260129_064657.jpg

20260129_065126.jpg


On the fence about backlight vs. place them on a very reflective white backing. Putting them on a white backing works quite well for one or two plates but once you get to 3 or 4 the slight colour of the cheap float glass adds up and the highlights look a little grey. Backlighting works quite well for 4 plates as collectively they have enough density for a reasonable black but it would be a bit more work to figure out how to integrate the backlight and present it in a nice way (don't want to have cables all over the wall etc.).
 

PGum

Subscriber
Joined
Mar 26, 2009
Messages
68
Location
Toronto
Format
Multi Format
Here are a couple of PVOH- SbQ ( zerochrome) images on glass - back exposed. The biggest challenge is getting an even coat. Phthalo pigment developed well but my carbon black thickened up the PVOH and clotted, and it had to be brush developed. These were laid on a white sheet of paper for light transmission through the back, and photographed.

Also note the contrast difference. The C-blk has more.
 

Attachments

  • IMG_1277.jpeg
    IMG_1277.jpeg
    1.2 MB · Views: 22
  • IMG_1282.jpeg
    IMG_1282.jpeg
    1.8 MB · Views: 20
Last edited:

PGum

Subscriber
Joined
Mar 26, 2009
Messages
68
Location
Toronto
Format
Multi Format
Another SbQ emulsion test on glass. Not bad resolution even with the negative sitting 1.5 mm above the emulsion surface (again, back projected through the glass thickness of such). UV Led is a projection config 80 cm above. It is a 25 mm square COB with collimating lens, running at 225 W. Line pairs resolving to 350 lpi., which is pretty good. Exposure 17s. There is bleed. It may be light travelling horizontally through the emulsion as SbQ is not much of a light blocker. I will try with cblk to see if that changes.
 

Attachments

  • PVA-SbQ-phthalo blue + cblk by magic eraser foam 15 s exp UV 170- light through glass.jpg
    PVA-SbQ-phthalo blue + cblk by magic eraser foam 15 s exp UV 170- light through glass.jpg
    1.2 MB · Views: 6
  • IMG_8670.jpeg
    IMG_8670.jpeg
    587.2 KB · Views: 6
OP
OP

AndrewBurns

Member
Allowing Ads
Joined
Jul 12, 2019
Messages
306
Location
Auckland, New Zealand
Format
Multi Format
Another SbQ emulsion test on glass. Not bad resolution even with the negative sitting 1.5 mm above the emulsion surface (again, back projected through the glass thickness of such). UV Led is a projection config 80 cm above. It is a 25 mm square COB with collimating lens, running at 225 W. Line pairs resolving to 350 lpi., which is pretty good. Exposure 17s. There is bleed. It may be light travelling horizontally through the emulsion as SbQ is not much of a light blocker. I will try with cblk to see if that changes.

Nice results, what's the dilution of the SbQ you're using? And are you brushing it onto the glass or pouring?

I've tried 1+2 dilution and pouring the layers on but my results were quite variable, I got some good results but on larger pieces of glass there were significant variations in density across the sheet. I suspect it's because as the layer dries unevenly it 'pulls' pigment from other areas.
 
Photrio.com contains affiliate links to products. We may receive a commission for purchases made through these links.
To read our full affiliate disclosure statement please click Here.

PHOTRIO PARTNERS EQUALLY FUNDING OUR COMMUNITY:


Ilford ADOX Freestyle Photographic Stearman Press Weldon Color Lab Blue Moon Camera & Machine
Top Bottom