ah ok. I have missed that one then.
-
Welcome to Photrio!Registration is fast and free. Join today to unlock search, see fewer ads, and access all forum features.Click here to sign up
You are using an out of date browser. It may not display this or other websites correctly.
You should upgrade or use an alternative browser.
You should upgrade or use an alternative browser.
Darkroom portraits
-
A
- Thread starter argentic
- Start date


Recent Classifieds
-
For Sale Sinar Norma 4x5 5x7 set and some Sinar accessories.
- Started by Jammoh
-
Free 3 enlarging lenses
- Started by jvo
-
For Sale Pentax 67 body with metered prism and grip
- Started by Guivd
-
For Sale Lens boards:Toyo, Canham, cambo, grafle
- Started by darinwc
Forum statistics
- Status
- Not open for further replies.
Finally finished the darkroom sink!
Took me all of 13 months of on again off again work building a sink from scratch. Finished it this weekend and as an added measure I framed in the walls as well. Since this is in the basement and I only have time to print well after dark and the kids are in bed I never have to worry about stray light. Even still it will be nice to have finished walls and a door.
Big thanks to everyone here for tons of examples and all the discussions. I'm trying to soak it all in.
Alan.
Attachments
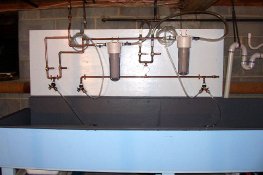
Nicely done, Alan! You might keep an eye out for an Intellifaucet that will control temperature automatically. They show up cheap on eBay and Craigslist like other darkroom equipment occasionally. It's not absolutely necessary, but since you've got a filtration system in place and have access to all the relevant plumbing, it wouldn't be hard to install.
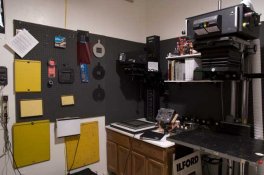
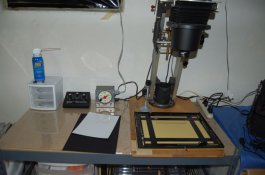
My new modest darkroom, on its maiden run
On the left a nova print pod under a ventilation unit, next to it rinse water, since I do not have running water and therefore refresh the water from time to time. The prints are washed in the kitchen. The enlarger on the right, although with a colour head is used to print exclusively black and white. Out of the picture on the right is the rest of my work surface. Behind is a storage cupboard which is fully light tight for loading spirals for negative development, as the rest of the room is dark enough for printing but certainly not enough to load spirals!
Regards
Charles
Very nice!!! I like the "in action" shot!
Just out of curiosity, have you had any issues with fogging with that big safelight pointed right at your paper easel?
-Dan
Very nice!!! I like the "in action" shot!
Just out of curiosity, have you had any issues with fogging with that big safelight pointed right at your paper easel?
-Dan
Thank you, Dan. I was worried about that too, so my first "exposure" was one of 10 minutes or so of a sheet of paper placed in the easel with just a coin in the center, the idea being should there be any interference by the safe light I would see some grey about the edge of the coin - and see a white border too. After processing the sheet was pure white. Phew!
Regards
Charles
If you flash or fog the paper first then the test will be more sensitive.
If you flash or fog the paper first then the test will be more sensitive.
Hi Dan,
Good suggestion, I'll give it a try!
- Joined
- Sep 14, 2005
- Messages
- 294
- Format
- Multi Format
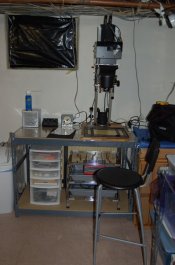
Thought I'd do an update with a few changes that have come about. Changed to a jobo atl and added a durst 184 w/ omega f color head. Have a few more things to get situated but should be done for a while, maybe.
Attachments
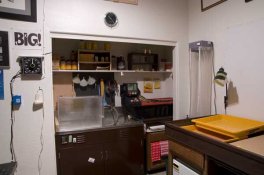
Have a few more things to get situated but should be done for a while, maybe.
Pegboard! A clever idea I may have to borrow for my darkroom. Thank you for sharing.
There have been several updates since last time.
HOLY SHOIT!! Several updates indeed.
David... regarding your EARLY setup. OMG... those were the days. I remember COUNTLESS hours painfully holding my water while trying to concentrate on my printing. But that was when I was just a young lad between the ages of 13 and 18. Later, I didn't have the room in my little apartment and after that the wife (wicked witch of the west) never put up with any of my hobbies but now that I'm alone I have all the room I need and, as Mel Gibson put it, "FREEDOM!!!". 
Hey... maybe I'll have the 120 ft2 storage shed plumbed and convert that into a DR. No wicked witch to say "no".
Hey... maybe I'll have the 120 ft2 storage shed plumbed and convert that into a DR. No wicked witch to say "no".
Last edited by a moderator:
OP
OP
argentic
Member
A few months ago I started converting an old granite stone barn into a teaching darkroom. Is anybody interested in following this process online here, giving suggestions going along? Or should I start a new thread here? Or a blog elsewhere?
I started a blog on my barn conversion into a state of the art darkroom here.
Nice darkrooms!
I have just started preparing our guest toilet for use as a darkroom. First, I will use it to develop film and some contact printing, but aim at getting my old enlarger working again...It's really small (10 sq.feet / 1 sq. metre, but will work out ok I hope. One good thing is that it is well ventilated.
I have just started preparing our guest toilet for use as a darkroom. First, I will use it to develop film and some contact printing, but aim at getting my old enlarger working again...It's really small (10 sq.feet / 1 sq. metre, but will work out ok I hope. One good thing is that it is well ventilated.
Robert Hall, what is that the ATL-2300?
I have that as well. "Ain't it Cool?"
I have that as well. "Ain't it Cool?"
- Joined
- Oct 24, 2007
- Messages
- 16
- Format
- 35mm
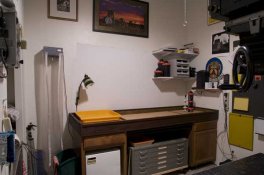
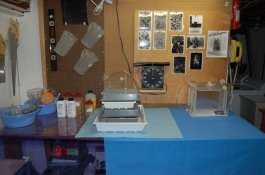
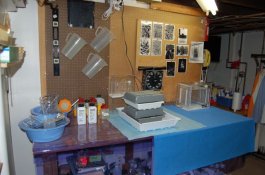
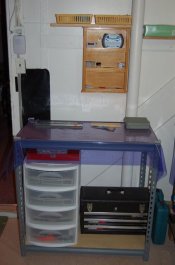
Basement Darkroom
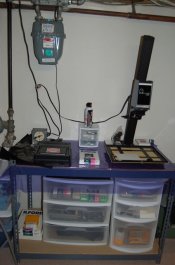
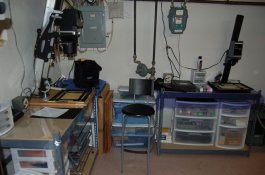
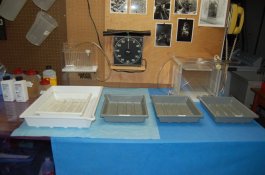
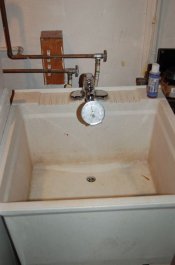
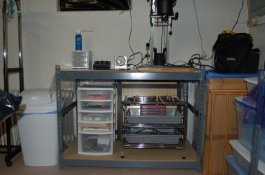
Some photos of my darkroom. In the basement-advantages-stable temp, 68 in winter and 70 in summer!. Very dark. Disadvantages-also part of the laundry room as seen, no finished ceiling, although I have not had big dust problems yet. 4X5 and 35mm enlargers. I have my trays on the workbench with a slop sink around the corner. Storage in bins underneath. I just wish I had more time to use it!
Some photos of my darkroom. In the basement-advantages-stable temp, 68 in winter and 70 in summer!. Very dark. Disadvantages-also part of the laundry room as seen, no finished ceiling, although I have not had big dust problems yet. 4X5 and 35mm enlargers. I have my trays on the workbench with a slop sink around the corner. Storage in bins underneath. I just wish I had more time to use it!
Attachments
-
 Darkroom 1.jpg48.3 KB · Views: 628
 -
 Darkroom 2.jpg54.6 KB · Views: 600
 -
 Darkroom 3.jpg38.1 KB · Views: 575
 -
 Darkroom 6.jpg40.9 KB · Views: 531
 -
 Darkroom 5.jpg39.9 KB · Views: 552
 -
 Darkroom 4.jpg44.6 KB · Views: 594
 -
 Darkroom 7.jpg37.9 KB · Views: 514
 -
 Darkroom 8.jpg47.9 KB · Views: 494
 -
 Darkroom 9.jpg47.1 KB · Views: 506
 -
 Darkroom 11.jpg30.7 KB · Views: 485
Does any one have too much darkroom time? Looks functional and adaptable.
Tools are an often overlooked darkroom necessity. Though if you are using the saws to cut negatives you may have too much hardener in your fix
Tools are an often overlooked darkroom necessity. Though if you are using the saws to cut negatives you may have too much hardener in your fix
- Joined
- Feb 27, 2007
- Messages
- 44
- Format
- Medium Format
Some photos of my darkroom. In the basement-advantages-stable temp, 68 in winter and 70 in summer!. Very dark. Disadvantages-also part of the laundry room as seen, no finished ceiling, although I have not had big dust problems yet. 4X5 and 35mm enlargers. I have my trays on the workbench with a slop sink around the corner. Storage in bins underneath. I just wish I had more time to use it!
What a funny coincidence, I was just about to *finally* post on this thread (and yes, I've gone through the whole thing...) when I saw your pics. Came home from a really ridiculous day at work and my husband called me down to the basement (I was sure there was some sort of disaster) but NO -- apparently he had a corner of the basement completely cleared out for me, it used to house an old bathroom so a fair amount of work had to be done. What a great surprise, I finally get to set up my Saunders enlarger!
He found me some huge stainless sink (8 ft!) for a song, so that will take up one wall. I just need to install a table -- Mike, I like yours, where did you get them?
I will post before and after pics -- I am very stoked. Sure will be better than the attic bathroom I took over -- with the slanted roof and extreme heat. Boo!
JT
- Joined
- Sep 14, 2005
- Messages
- 294
- Format
- Multi Format
I'd bet there heavy duty garage shelves but I'm sure he'll chime in later.
- Joined
- Feb 27, 2007
- Messages
- 44
- Format
- Medium Format
Thanks Mike-- They are exactly what I am looking for, I'll drop my the local Home Depot and take a look.
I don't have a ton of room, so I have to make everything as functional as possible.
But at least I can now stand up when I use an enlarger .
.
JT
I don't have a ton of room, so I have to make everything as functional as possible.
But at least I can now stand up when I use an enlarger
.JT
Right now, my bedroom is my darkroom. I have a fairly comfortable dry side setup with a 4X5 enlarger and another 6x7 enlarger. My wet processing is done in the attached bathroom, which is a little cramped, but works well enough for the moment.
Dead Link Removed
Dead Link Removed
Dead Link Removed
Dead Link Removed
mike c
Subscriber
3e8,that's a nice enlarging box for the omega.If you ever move it looks portable.
Mike
Mike
- Status
- Not open for further replies.
| Photrio.com contains affiliate links to products. We may receive a commission for purchases made through these links. To read our full affiliate disclosure statement please click Here. |
PHOTRIO PARTNERS EQUALLY FUNDING OUR COMMUNITY:  |