D76

Shadow 2

A
Shadow 2

  • 0
  • 0
  • 22
Shadow 1

A
Shadow 1

  • 2
  • 0
  • 21
Darkroom c1972

A
Darkroom c1972

  • 1
  • 2
  • 35
Tōrō

H
Tōrō

  • 4
  • 0
  • 40

Recent Classifieds

Forum statistics

Threads
198,826
Messages
2,781,492
Members
99,718
Latest member
nesunoio
Recent bookmarks
0

baachitraka

Member
Joined
Apr 6, 2011
Messages
3,553
Location
Bremen, Germany.
Format
Multi Format
For portraits it will be very simple if you consider Incident metering the subject with meter dome facing the camera.

Nevertheless, if you have spot meter I personally take one reading of the face and place it on Zone VI and develop normally considering you have tested and found what your normal dev times are.
 

Pioneer

Member
Joined
May 29, 2010
Messages
3,879
Location
Elko, Nevada
Format
Multi Format
I love following these threads, I learn so much.

I think your negative looks pretty good Raffay, and your exposure method was exactly what I would have done. I usually use EI200 indoors with my Graflex when shooting ISO400 film but that is for that camera and shutter. It may be different for you.

It will be interesting to see what Bill's graph shows.
 

Bill Burk

Subscriber
Joined
Feb 9, 2010
Messages
9,310
Format
4x5 Format
Hi Raffay,

I was surprised how this graphed. Actually looks like you might have developed the film longer than I thought. Did you use D76 straight?

The solid horizontal red lines are your measured densities (I subtracted 0.20 because it "felt" like that might be your Base+Fog... is that a good guess for your density of the totally clear area of film?).

I guess that the curve is steep, so I placed black dots where your actual densities cross this steepest curve. If I'm wrong about which curve, then the dots might belong at the intersection of the red horizontal lines on another curve... Your meter readings would give clues to the horizontal position. The meter readings you gave are a little hard to place, so I didn't draw vertical lines to finish the illustration.

The highlighted yellow is about the highest density you would normally want for Silver Gelatin (darkroom) printing. So your highlights are higher than you want. But your shadows are still too low in density (barely and debatably).

curve-with-densities.JPG
 
OP
OP

Raffay

Member
Joined
Oct 22, 2013
Messages
157
Location
Islamabad, P
Format
4x5 Format
Hello Bill,

Yes I used D76 straight @ 20 deg C for 9 minutes. Also, I think my developer might be a little stronger than normal due to the fact that the overall volume after mixing was left to 3 litres rather than 3.8 as recommended, I am not sure what happened (maybe some water got evaporated during boiling) although I did use 3 litres to start with and then added 0.8.

When you ask "I subtracted 0.20 because it "felt" like that might be your Base+Fog... is that a good guess for your density of the totally clear area of film?". To be honest I have no idea what you are talking about. I have read these things base+fog but never understood it. Maybe it will be a good idea if you could refer me to some text, and when I understand these things I will be in a better position to discuss this with you :smile: What is base+fog and how does one know, how much is it.

The meter readings I sent are from the following meter and they were positive values with a dash before every value to separate from text:
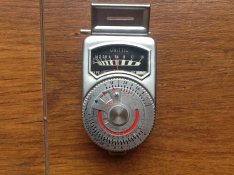
meter.JPG

A few simple questions, what does it mean to have high or low density values.

I feel that you could do a great favour to me and to all who want to learn if rather than discussing a picture I already took (with some lost information), we can start fresh and you give a few simple assignments to grab the basics. It can be something like this:

Assignments:

1. Understanding your film/chemistry/development process - I am not sure how to do it but from your questions I guess the homework could look something
like this. You could tell me to develop/fix an unexposed negative, in D76stock/ fixer - depending on what needs to be done, then see the results. Tell me how to
test the results, maybe scan and see what the density is (I think that would be the base+fog density you are talking about). You also need to see the negative or
guide me if it can be done in VueScan through density readings or whatever we can do to learn about the negative alone (properly fixed, base+fog density etc.)
Now that I/we would know the basics of film/chemistry and development, we can now proceed to the reading the exposure part.

2. For exposure - you can give an assignment like take a picture of something with some characteristics, and then tell me how should I meter and expose, later
scan and share with you all the required meter readings and density values. Then plot and teach what are you reading and how, maybe it will be easier to grasp. I
think if we could do this simple exercise over the coming weekend, I am quite sure it will save a lot of time and energy on both sides and we can then embark on
actual photography rather then discussing things that people like me half understand and that way we waste your time.

Also, please have a look at my meter, and teach me how to read it. There are a lot of things on it, such as light value in red etc. The above suggestion is my humble request to an already very patient teacher, however, if you feel that it would not be possible for you then I would totally understand - you have been an outstanding help already.

Cheers

Raffay
 

Pioneer

Member
Joined
May 29, 2010
Messages
3,879
Location
Elko, Nevada
Format
Multi Format
Raffay,
I am curious. You mentioned "boiling" the D-76 when you mixed it. Why did you do that?

I mix my D-76 in 3 liters of hot water, about 125F, but I certainly do not boil it. Once it is fully mixed in (the hot water starts turning clear again) then I top off the water with fresh cold water to make up the full US gallon (this is what my packets make total). Then I mix again for a bit to mix everything in. After it cools I pour it into a 5 liter jug.
 
OP
OP

Raffay

Member
Joined
Oct 22, 2013
Messages
157
Location
Islamabad, P
Format
4x5 Format
Sorry my bad, I did not boil just warmed it till it reached the required temp 50 dec C.
 

fotch

Member
Joined
Mar 16, 2005
Messages
4,774
Location
SE WI- USA
Format
Multi Format
...................Also, I think my developer might be a little stronger than normal due to the fact that the overall volume after mixing was left to 3 litres rather than 3.8 as recommended, I am not sure what happened (maybe some water got evaporated during boiling) although I did use 3 litres to start with and then added 0.8. ...........................

Raffay

I don't understand how you could have lost 20% of the water during mixing? You corrected your "boiling" statement, OK, but, if anything, after adding the chemicals, you should have slightly more than 3.8 L (128.49us fl oz). So yes, your developer is stronger.
 

Pioneer

Member
Joined
May 29, 2010
Messages
3,879
Location
Elko, Nevada
Format
Multi Format
Sorry my bad, I did not boil just warmed it till it reached the required temp 50 dec C.

Not bad, just curious. Next time you mix up a batch, and it comes up short like that, add in enough fresh water (cold is fine) to bring it back up to the total volume recommended by the manufacturer. Right now your D76 is stronger than it needs to be because you are about 20% short of the additional water normally part of the solution.

My first thought would be to mix in a bit of water to what you have left. I would suggest measuring what you have and then adding in about 15% more water, but someone on the forum with a bit more experience may want to jump in here on this one. Either that or shorten up your developing time, but I don't know how much would be needed. Maybe instead of 9 minutes you could try 7.5 or 8. This would take a bit of experimenting.
 

Bill Burk

Subscriber
Joined
Feb 9, 2010
Messages
9,310
Format
4x5 Format
Base is just the film material itself, it's sometimes a little gray just to keep light from bouncing off the back and exposing the film twice causing haloes. Fog is an overall gray that happens when you develop film. Some unexposed particles of the film get developed just randomly. You can measure any part of the film that is as clear as it gets - like between frames - that will be Base + Fog.

Assignment: Photo test target project.

After reading Minor White's booklet about the Zone System, I created a test target he specified that meters one full f/stop different from medium gray to light gray. You could do the same. Or make a target where your light meter reads more - maybe two or three stops different from darker to lighter gray. (You can't expect to get more than 5 f/stops difference from black to white). I asked the hardware store for a small amount of black pigment to go with the white paint I bought. I made the quart a light gray. Painted half the board. Then added more black pigment, painted, checked, added more black, painted, checked etc. until I had the board so after it dried the meter reads one f/stop difference from side to side...

This is what mine looks like...

zoneboard.JPG


Then anytime you feel like it, take one picture of the board. Then finish the roll of film with portraits or any other photography. Just don't waste the whole roll on tests. I very often mix film tests with real photography this way.

The difference between dark and light will show up when you check it with your "Densitometer" and it will tell pretty well what contrast you developed the film to.
 

BradS

Member
Joined
Sep 28, 2004
Messages
8,120
Location
Soulsbyville, California
Format
35mm
Bill,
This exercise is brilliant in its simplicity and powerful in effect. Thank you for sharing.
 
Last edited by a moderator:

baachitraka

Member
Joined
Apr 6, 2011
Messages
3,553
Location
Bremen, Germany.
Format
Multi Format
Why not a simple incident meter?
 

Bill Burk

Subscriber
Joined
Feb 9, 2010
Messages
9,310
Format
4x5 Format
baachitraka,

You are welcome to explain exposure to Raffay. My test target is best for contrast tests.

Raffay, The specific gray values do not matter. But if you make the lighter tone about the same meter reading as the palm of your hand... Then it will be a nice agreement with "Zone VI" that will make it easier to see things on the graphs.
 

baachitraka

Member
Joined
Apr 6, 2011
Messages
3,553
Location
Bremen, Germany.
Format
Multi Format
For Portraits
=========
I may recommend to start with simple incident meter reading. Meter placed below the chin and dome facing the camera.

Rest is based on manufacturer's recommendations. Like temperature, agitation, time and E.I(I must be careful here).

Print the negative and if not scan them.

Let us see how it goes and see what adjustments you may require to get it right.

* I may also recommend Minor White/Ansel Adam books for reading.
 
Last edited by a moderator:

baachitraka

Member
Joined
Apr 6, 2011
Messages
3,553
Location
Bremen, Germany.
Format
Multi Format
(there was a url link here which no longer exists)
 

Bill Burk

Subscriber
Joined
Feb 9, 2010
Messages
9,310
Format
4x5 Format
Bill,
This exercise is brilliant in its simplicity and powerful in effect. Thank you for sharing.

Thanks BradS,

Raffay,
You don't need to do the project with paint and wood - but it is more durable than paper or cardboard which can work just as well.

As far as an "incident meter" is concerned... You already have one in the palm of your hand. When you meter the palm of your hand and "open up" one stop, that is just about the same as using an incident meter.
 
Photrio.com contains affiliate links to products. We may receive a commission for purchases made through these links.
To read our full affiliate disclosure statement please click Here.

PHOTRIO PARTNERS EQUALLY FUNDING OUR COMMUNITY:


Ilford ADOX Freestyle Photographic Stearman Press Weldon Color Lab Blue Moon Camera & Machine
Top Bottom