Cyanotype sensitivity (original formula and Simple Cyanotype formula from Mike Ware)

Recent Classifieds

Forum statistics

Threads
199,073
Messages
2,785,853
Members
99,796
Latest member
Alvinabc
Recent bookmarks
0

nmp

Member
Joined
Jan 20, 2005
Messages
2,028
Location
Maryland USA
Format
35mm
Immediately after exposure and before processing you should definitely see solarization or bronzing in the form of a grey, low density image. This will disappear upon further processing and consequently drying; I think treatment with peroxide might help too.
If you don't get any bronzing/solarization, you're either giving insufficient exposure (unlikely) or there's something weird with your chemistry and/or paper that inhibits Prussian blue formation. I'm getting a feeling we might have to start looking in that direction.

In case of cyanotype, the solarization (density loss with higher exposures) is due to Prussian blue, ferric ferrocyanide, that has formed during exposure getting photo-reduced further to ferrous ferrocyanide which is Prussian white, causing the observed tone reversal. However, Prussian white is unstable and get over time oxidized in air or with action of hydrogen peroxide. For this reason, this is evident mostly on the print right after exposure.


Definitely. I always just do doubles, starting at 15 seconds. The starting point depends a bit on the process/sensitivity and the intensity of the light source. Then I take it up to a time I still find acceptable; I'm not patient enough to hang around for an hour for something to expose, so I generally stop at 8 or 16 minutes. So that would be a series of 15s, 30s, 1 min, 2m, 4m, 8m 16m. Add 32m and 64m if you're patient, but frankly, that's way beyond what should be necessary even with a relatively ill-suited light source.

You beat me to my deleting the post subsequently. Looking at the equation more closely, it does look like a f-stop like sequence, except in the particular case the step is about 1.2x - kind of small to see any major changes in the density as the Dmax gets closer. My favorite way of doubling the exposure is do a X, X, 2X, 4X etc and you end up X, 2X, 4X, 8X etc.


:Niranjan.
 

koraks

Moderator
Moderator
Joined
Nov 29, 2018
Messages
23,238
Location
Europe
Format
Multi Format
Do you see the increased graininess and slight loss of color with more exposure? That looks like an overexposed CC print to me.

I see what you mean, but to me this looks like coating technique in combination with a rather fibrous paper with relatively little sizing.

I do agree that there's a law of diminishing returns when it comes to dmax. Yet, I also acknowledge that there's a limit to what's acceptable (which is also highly subjective). So I don't think it's an unnecessary rabbit hole, although the hunt for dmax certainly is a bit of a rabbit hole.

@nmp: yes, x, x, 2x etc. makes for a nice and easy 1-stop increment step wedge!
 
Joined
Jul 31, 2012
Messages
3,361
Format
35mm RF
If you want to reduce your times get a more powerful light. I think LEDs are a game changer. I never much cared for printing cyanotype back in the day but I liked the prints. The problem for me was the exposure was just too long with fluorescent lamps and I am impatient. A few years ago I built a UV LED unit and man talk about a difference! I usually have exposures in the 3 minute range. Sometimes I can go as low as 2 though or as much as 8. That is using digital negs from a Canon pigment printer. I use the cheapo transparency stuff from Ultrafine Online. No idea who makes it but it works good enough.

You might want to try acidifying your paper. That has an effect on speed in my experience. It also has an effect on density. I use sulfamic acid for that but you can use citric acid or even vinegar. I also put citric acid in the wash to avoid too much washout but that won't affect what you are seeing with your prints.
 
OP
OP

largo

Member
Joined
Jun 22, 2009
Messages
61
Format
Medium Format
If you want to reduce your times get a more powerful light. I think LEDs are a game changer. I never much cared for printing cyanotype back in the day but I liked the prints. The problem for me was the exposure was just too long with fluorescent lamps and I am impatient. A few years ago I built a UV LED unit and man talk about a difference! I usually have exposures in the 3 minute range. Sometimes I can go as low as 2 though or as much as 8. That is using digital negs from a Canon pigment printer. I use the cheapo transparency stuff from Ultrafine Online. No idea who makes it but it works good enough.

Thanks. I really plan to build a lighter, smaller and more powerful UV unit, using LED lights strips... Mine weights a least 15 kgs (made of MDF panels and 8 UVBL tubes)
If you have any links describing such a design, I'd be very glad to read them !

You might want to try acidifying your paper. That has an effect on speed in my experience. It also has an effect on density. I use sulfamic acid for that but you can use citric acid or even vinegar. I also put citric acid in the wash to avoid too much washout but that won't affect what you are seeing with your prints.

I am just using Bergger COT 320 paper, which works very well out of the box w/o acidifcation w/ sulfamic acid.
 

koraks

Moderator
Moderator
Joined
Nov 29, 2018
Messages
23,238
Location
Europe
Format
Multi Format
If you have any links describing such a design, I'd be very glad to read them !

Here's something even simpler: https://tinker.koraks.nl/photography/beam-me-down-scotty-a-new-ultra-simple-uv-light-source/

Of course, strips are easy, too. Just tape them to any surface, solder/plug in an appropriate power supply (often sold at the same outlet as the strips) and plug it in. I wouldn't bother too much with reading 'designs' for stuff like this; it's really just a matter of buying whatever is available/cheap and plugging it in.
 
OP
OP

largo

Member
Joined
Jun 22, 2009
Messages
61
Format
Medium Format

Correct me if I'm wrong, but you don't mention in your article where you got these 2 LED panels from ?
https://tinker.koraks.nl/photography/beam-me-down-scotty-a-new-ultra-simple-uv-light-source/
Of course, strips are easy, too. Just tape them to any surface, solder/plug in an appropriate power supply (often sold at the same outlet as the strips) and plug it in. I wouldn't bother too much with reading 'designs' for stuff like this; it's really just a matter of buying whatever is available/cheap and plugging it in.

There is this nice blog post by Nejc Urankar about such a design : https://lostlightphotography.com/how-i-built-myself-affordable-uv-led-exposure-box/
 

koraks

Moderator
Moderator
Joined
Nov 29, 2018
Messages
23,238
Location
Europe
Format
Multi Format
Correct me if I'm wrong, but you don't mention in your article where you got these 2 LED panels from ?

4 panels, not 2; I got them from Aliexpress. It's in the first sentence of the blog. I could look up the specific link, but probably didn't bother to put it in because many sellers offer the exact same panels and which ones are attractive to you depends on several factors, and individual sellers often disappear or change their product offering while the product remains available from other sellers.

The link with the strips evidently works as well and illustrates what I said: it's a matter of hooking them up; there's very little "design" to this. People end up using rather arbitrary materials and construction methods, and they pretty much all end up working fine.

I guess what I'm saying is, don't overthink this.

PS: I didn't go with strips because they're a little less efficient than the panels I'm using. Strips rely on simple resistors for current limiting, which is really just a waste of power IMO.
 
OP
OP

largo

Member
Joined
Jun 22, 2009
Messages
61
Format
Medium Format
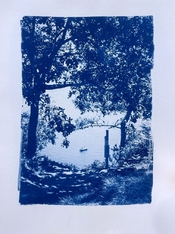
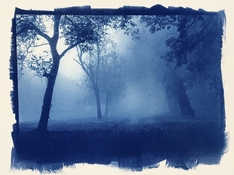
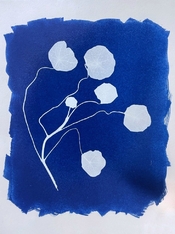
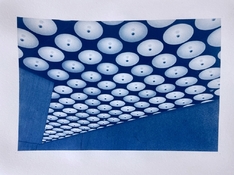
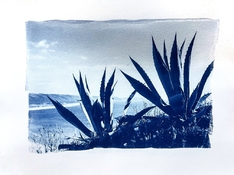
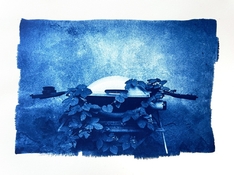
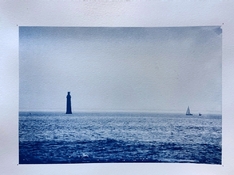
Here are some of the prints the workshop attendees made...

The print with the trees in the mist was made with Mike Ware's Simple Cyanotype, and the exposure lasted 47 minutes!

The photogram of a plant was also made with Mike Ware's Simple Cyanotype and the exposure lasted 24 minutes (because no negative)

All the other prints were made with a classic A + B formula with an exposure time of 18 minutes.

(Note #1 : these are not scans, but pics quickly took with my iPhone, so the white balance for instance is not corrected)
(Note #2 : The pic of the barbecue has a very textured wall behind)
 

Attachments

  • IMG_2620.jpg
    IMG_2620.jpg
    249.5 KB · Views: 92
  • IMG_2624.jpg
    IMG_2624.jpg
    161.3 KB · Views: 96
  • IMG_2621.jpg
    IMG_2621.jpg
    164.7 KB · Views: 93
  • IMG_2619.jpg
    IMG_2619.jpg
    190.4 KB · Views: 102
  • IMG_2617.jpg
    IMG_2617.jpg
    215 KB · Views: 84
  • IMG_2616.jpg
    IMG_2616.jpg
    246.3 KB · Views: 94
  • IMG_2618.jpg
    IMG_2618.jpg
    220.2 KB · Views: 83

nmp

Member
Joined
Jan 20, 2005
Messages
2,028
Location
Maryland USA
Format
35mm
The print with the trees in the mist was made with Mike Ware's Simple Cyanotype, and the exposure lasted 47 minutes!

Nice...seems it was worth the wait.

Rest of them are lovely too.

Did you end up changing the distance in the box?


:Niranjan.
 

nmp

Member
Joined
Jan 20, 2005
Messages
2,028
Location
Maryland USA
Format
35mm
Thanks (these are not my photos, but my chemistry and alt processes practice :smile:


Yes, I roughly halved it.
It's a bigger compliment to the teacher when students do well.

So did lessening the distance make it speedier? 18 minutes is not so bad. it is actually better than what I get for classic chemistry. I am surprised SImple is so much slower - I wonder what Mike Ware's data show.


:Niranjan.
 
OP
OP

largo

Member
Joined
Jun 22, 2009
Messages
61
Format
Medium Format
So did lessening the distance make it speedier? 18 minutes is not so bad. it is actually better than what I get for classic chemistry. I am surprised SImple is so much slower - I wonder what Mike Ware's data show.

Yes, it made it speedier. To what extend exactly I don't know...

The remaining question is why Simple Cyanotype is slower for me although :

- Mike Ware says it is faster (in https://www.mikeware.co.uk/downloads/SimpleCyan.pdf, page 02 : "The ‘one-bottle’ (simple cyanotype) sensitizer is faster than an average ‘Classic’ two-bottle formula, but still slower than ‘New’")
- in http://specialeditionartproject.com/guides/Special_Edition_Print_Processes_v1.6_(pdf).pdf, page 19, you can read "Generally, Simple Cyanotype is twice as fast as the classic A/B formulation for the papers we describe."

I'm sure my chemistry is fine, so I'd be leaning towards a problem with the spectrum of my UV lamp or a problem with the OHP transparencies I am using for the digital neg...
 

Herzeleid

Member
Joined
Oct 31, 2008
Messages
381
Location
Ankara/Turkey
Format
Multi Format
Just wanted to share my experience, since I have used all the formulas mentioned. You can make your rough estimates for your exposure workflow.
All these exposure times for unbuffered papers, 365nm BL bulbs
Traditional Cyanotype - 12 min exposure
Improved Traditional Cyanotype (with oxalic acid) - 7.5 minutes
Simple Cyanotype - 7.5 minutes
New Cyanotype - 3.5 minutes - (30secs in %60 Relative humidity 24-25C)
 
OP
OP

largo

Member
Joined
Jun 22, 2009
Messages
61
Format
Medium Format
Just wanted to share my experience, since I have used all the formulas mentioned. You can make your rough estimates for your exposure workflow.
All these exposure times for unbuffered papers, 365nm BL bulbs
Traditional Cyanotype - 12 min exposure
Improved Traditional Cyanotype (with oxalic acid) - 7.5 minutes
Simple Cyanotype - 7.5 minutes
New Cyanotype - 3.5 minutes - (30secs in %60 Relative humidity 24-25C)

This is aligned with Mike Ware results.
 

nmp

Member
Joined
Jan 20, 2005
Messages
2,028
Location
Maryland USA
Format
35mm
Ultimately though there are so many local/personal factors that go into how a particular process behaves that it is difficult to make generalizations based on experience of others and expect that to be true for your own case. Paper, humidity, temperature, even whether you brush or rod-coat, or how and how long you dry the paper before exposure (and many more that one may or may not be aware of) will likely affect the printing speed, among other properties like color, contrast, etc.

I guess the the key is to make the process repeatable (which can be a tall order) and whether or not one is happy with the final outcome.

:Niranjan.
 
Photrio.com contains affiliate links to products. We may receive a commission for purchases made through these links.
To read our full affiliate disclosure statement please click Here.

PHOTRIO PARTNERS EQUALLY FUNDING OUR COMMUNITY:


Ilford ADOX Freestyle Photographic Stearman Press Weldon Color Lab Blue Moon Camera & Machine
Top Bottom