Cyanotype sensitivity (original formula and Simple Cyanotype formula from Mike Ware)

Recent Classifieds

Forum statistics

Threads
199,073
Messages
2,785,853
Members
99,796
Latest member
Alvinabc
Recent bookmarks
0

largo

Member
Joined
Jun 22, 2009
Messages
61
Format
Medium Format
Hello !

I am returning to cyanotypes (after a decade of not doing it), so I am re-calibrating my baseline exposure time by gradually exposing a test strip...

I am testing two formulas:
- the 1842 "original" formula in two bottles A + B
- and Mike Ware's "New Cyanotype" formula of 2019 (see https://www.mikeware.co.uk/mikeware/downloads/SimpleCyan.pdf).

I am very happy with these 2 formulas, especially the Simple Cyanotype in one bottle which gives very dense and smooth blue shadows !

Nevertheless, I am very surprised by the extremely long exposure time to reach the densest blue under a digital negative, with both formulas !

After 1h20 (!!) of exposure under my UV light source (8 UV tubes), I still do not reach the maximum density (the deepest blue)

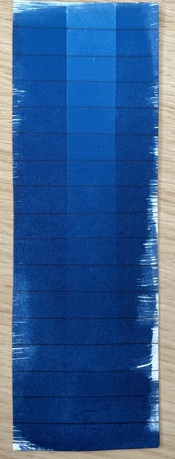
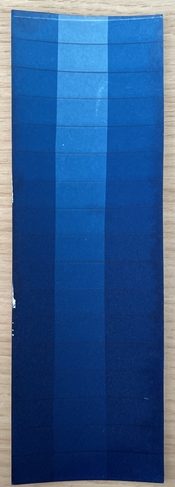
=> see the attached scans of the test strips, the lighter area in the middle is the one under a transparent OHP film strip. The darkest step has been exposed for 1h20min !

Now, you are going to tell me that it depends on my UV light source, I agree, but all other things being equal (paper, brand of OHP transparency film, exposure unit, distance source<->contact printing frame), my basic exposure time for kallitypes or platinum / palladium prints is around 12 to 15 minutes only... !

My questions are the following:

- Is it normal that cyanotype is so slow? I have the feeling that I will have to expose my cyanotype prints for 2 hours to reach the maximum densities..... !?!

- Moreover the New Cyanotype is supposed to be faster than the "classic" cyanotype, but I don't see any difference? How to explain it ?

Thank you very much in advance for your feedback, advices & tips !

Best regards,

Loïc
 

Attachments

  • original_cyano_1842.jpg
    original_cyano_1842.jpg
    1.6 MB · Views: 170
  • simple_cyano_2019.jpg
    simple_cyano_2019.jpg
    992.7 KB · Views: 187

koraks

Moderator
Moderator
Joined
Nov 29, 2018
Messages
23,238
Location
Europe
Format
Multi Format
you are going to tell me that it depends on my UV light source

Hmmm...no. UV tubes are actually a pretty decent light source for this :smile:

Is it normal that cyanotype is so slow?

No, but if I look at your test strips, the chemistry isn't very slow. The problem seems to be that your OHP film blocks a lot of UV. What kind of film are you using?

Moreover the New Cyanotype is supposed to be faster than the "classic" cyanotype, but I don't see any difference?

I have the impression you're mixing up New Cyanotype and Simple Cyanotype. They appear to be different things. I don't know about the speed of Simple Cyanotype, but I can confirm that New Cyanotype is much faster than Classic Cyanotype.
To take away any confusion:
Classic Cyanotype = the regular formula obtained by mixing solutions of potassium ferricyanide and ammonium iron citrate.
New Cyanotype = the @Mike Ware recipe using iron ammonium oxalate and potassium ferricyanide
Simple Cyanotype = a different Mike Ware solution based on citric acid, iron nitrate, ammonia and potassium ferricyanide
Ware suggests that Simple Cyanotype is faster than Classic, but as said, I never tried it, so can't comment. He mentions an exposure time of 5-10 minutes under a 365nm light source (of unspecified intensity and at unspecified distance). In my experience, I need exposures of 5-10 minutes with Classic Cyanotype under UV tubes and a little shorter under high-intensity 400nm LEDs. A LOT depends on the light source used, but anything over 15 minutes is on the long side for most light sources used - unless you're exposing with a very long distance between the light source and the print.
 
OP
OP

largo

Member
Joined
Jun 22, 2009
Messages
61
Format
Medium Format
No, but if I look at your test strips, the chemistry isn't very slow. The problem seems to be that your OHP film blocks a lot of UV. What kind of film are you using?

I am currently using Novalith NLA4/TPX25 (thickness of 165µ). I also tried Pictorico OHP Ultra Premium TPS100, but it seems to be even worse (even more milky white, but same thickness). I also used to use Pictorico OHP TPU100 for kallitypes and platinotypes, but now it is discontinued. Ten years ago, (with the same UV light source), I was using PermaJet transparent film for cyanotypes iirc.

I have the impression you're mixing up New Cyanotype and Simple Cyanotype. They appear to be different things. I don't know about the speed of Simple Cyanotype, but I can confirm that New Cyanotype is much faster than Classic Cyanotype.

Sorry, I meant Simple Cyanotype (2019 formula from Mike Ware). I am not using the New Cyanotype (1995 formula from Mike Ware) at all.

To take away any confusion:
Classic Cyanotype = the regular formula obtained by mixing solutions of potassium ferricyanide and ammonium iron citrate.
New Cyanotype = the @Mike Ware recipe using iron ammonium oxalate and potassium ferricyanide
Simple Cyanotype = a different Mike Ware solution based on citric acid, iron nitrate, ammonia and potassium ferricyanide
Ware suggests that Simple Cyanotype is faster than Classic, but as said, I never tried it, so can't comment. He mentions an exposure time of 5-10 minutes under a 365nm light source (of unspecified intensity and at unspecified distance). In my experience, I need exposures of 5-10 minutes with Classic Cyanotype under UV tubes and a little shorter under high-intensity 400nm LEDs. A LOT depends on the light source used, but anything over 15 minutes is on the long side for most light sources used - unless you're exposing with a very long distance between the light source and the print.

I have the impression that the problem comes from the transparent film (or even from the combination of transparent film + specific wavelength of my light source), because on the edges of the test strips where there is no transparent film on top, the maximum blue is reached in about 25 minutes, which seems to me quite (or at least more) normal...

Maybe I should test in full sunlight to see if it's a wavelength problem for these transparent films... The problem is that I'm teaching a cyanotype workshop this weekend with this UV sunlamp :sad:(
 

FotoD

Member
Joined
Dec 15, 2020
Messages
392
Location
EU
Format
Analog
New Cyanotype and Simple Cyanotype are not the same thing. I would expect exposure times to be similar between "Classic" and "Simple", since both are based upon ferric ammonium citrate, as opposed to ferric ammonium oxalate in "New".

I don't really understand your step wedges. Maybe all patches are overexposed? Too much exposure will give you weaker blues.

If there is any sun where you live you could make the exposure outdoors and compare.
 

koraks

Moderator
Moderator
Joined
Nov 29, 2018
Messages
23,238
Location
Europe
Format
Multi Format
Too much exposure will give you weaker blues.

Bronzing occurs, but tends to disappear in properly processed prints. There's no sign of it in these test strips, so I don't think this is the problem.

even more milky white

Did the milky white correlate with UV opacity? I'm asking because it's not entirely clear from your message if you only observed the Pictorico to be more milky white, or if you've tested UV transmission specifically.

I've had good luck in the past with an Esselte overhead transparency material that really SUCKS for anything else but cyanotypes :smile:
For other purposes I now use generic screen printing film as recently suggested to me by @Andrew O'Neill. It doesn't hold as much ink as e.g. Fixxons, but it'll be more than enough for what you're doing. I can't say how it compares in UV transmission to the films you've tried.


specific wavelength of my light source

UV tubes are generally fairly broad-spectrum. That's exactly what makes them quite attractive for alt. process printing, since you essentially always hit some sensitivity peak of the medium you happen to be working with.

this UV sunlamp

Is this one of those face tanning lamps? I once started out with one of those, but found it rather underpowered when I started doing carbon transfer. I think my cyanotype exposures were typically 8-10 minutes with it, yielding a good dense blue with the classic formula.
 
OP
OP

largo

Member
Joined
Jun 22, 2009
Messages
61
Format
Medium Format
Did the milky white correlate with UV opacity? I'm asking because it's not entirely clear from your message if you only observed the Pictorico to be more milky white, or if you've tested UV transmission specifically.

I haven't tested the UV transmission. Idk how I could test this.... I just observed the Pictorico TPS100 to look a bit more opaque. Although being often cited as one of the best transparency for alt processes, I think Pictorico TPS100 (aka Ultra) is not appropriate for cyanotype (at least from what I've read from Christina Anderson)

I've had good luck in the past with an Esselte overhead transparency material that really SUCKS for anything else but cyanotypes :smile:
For other purposes I now use generic screen printing film as recently suggested to me by @Andrew O'Neill. It doesn't hold as much ink as e.g. Fixxons, but it'll be more than enough for what you're doing. I can't say how it compares in UV transmission to the films you've tried.

I think I am going to give these low-end office transparencies a try ...

UV tubes are generally fairly broad-spectrum. That's exactly what makes them quite attractive for alt. process printing, since you essentially always hit some sensitivity peak of the medium you happen to be working with.


Is this one of those face tanning lamps? I once started out with one of those, but found it rather underpowered when I started doing carbon transfer. I think my cyanotype exposures were typically 8-10 minutes with it, yielding a good dense blue with the classic formula.
No, sorry I used the wrong word. This is not a sunlamp but a UV unit I built myself years ago, using eight UV black light G13 15w tubes.
 

koraks

Moderator
Moderator
Joined
Nov 29, 2018
Messages
23,238
Location
Europe
Format
Multi Format
Idk how I could test this....

The easiest for us photographers is make some alt. process prints :smile: Seriously though, I'd just compare the density you get with little pieces of different films you have access to and see which one works best overall.

I think I am going to give these low-end office transparencies a try ...

Handle with care...when I said they suck, I really mean it. The Esselte stuff has some kind of gelatinous coating that doesn't take inkjet ink all that well. As a consequence, it's impossible to print a solid black patch; there's always going to be some kind of reticulation. With cyanotype you can sort of get away with it because it doesn't require much density (which is not true for New Cyanotype btw).

eight UV black light G13 15w tubes.

Oh yeah, that sounds OK. Well, there's a difference between black light and BLB; I opted for BLB when I built my 'bank of tubes' light source because they were argued to be the most appropriate by Sandy King. I've now switched to 400nm LED for convenience and their inherently better collimation. https://tinker.koraks.nl/photography/beam-me-down-scotty-a-new-ultra-simple-uv-light-source/
Mind you, theoretically the UV tubes have one particular edge over my LED setup as the UV tubes should have a much broader spectrum, and processes with a peak sensitivity around 365nm should (theoretically) benefit from tubes as opposed to 400nm LEDs. However I have the distinct impression that the LEDs perform better than they 'theoretically' should; see the Van Dyke Brown example in the blog I linked to. The relationships between electrical power input, emission wavelength profile and chemical sensitivity is apparently more complex than it seems at first glance.
 

FotoD

Member
Joined
Dec 15, 2020
Messages
392
Location
EU
Format
Analog
Bronzing occurs, but tends to disappear in properly processed prints. There's no sign of it in these test strips, so I don't think this is the problem.

But why are there no light tones in the step wedge then? I think it's overexposed.
 

nmp

Member
Joined
Jan 20, 2005
Messages
2,028
Location
Maryland USA
Format
35mm
Yes, this is it ^^


No ^^

In that case, I would tend to concur with the preliminary conclusion that the transparency is the culprit here. If you look at the two strips, the areas w/o transparency seem to be getting their Dmax fairly quickly, particularly the first one where even the first step is fairly close to the rest of them. Generally, if I remember correctly, there is about 20% loss in intensity with these transparencies. There were some measurements in a report somewhere, but I can't find it.

:Niranjan.
 
Last edited:

koraks

Moderator
Moderator
Joined
Nov 29, 2018
Messages
23,238
Location
Europe
Format
Multi Format
But why are there no light tones in the step wedge then? I think it's overexposed.

Because the first step is already significantly exposed. That doesn't make anything overexposed. This was apparently a test to determine the exposure needed for dmax. As such it doesn't need light patches.
Besides, there's a distinct gradation from medium to darker patches in the center band, suggesting that there's no solarization-type effect where increased exposure results in decreased density. Nothing in these patches suggests that overexposure is part of the problem.
 

nmp

Member
Joined
Jan 20, 2005
Messages
2,028
Location
Maryland USA
Format
35mm
In that case, I would tend to concur with the preliminary conclusion that the transparency is the culprit here. If you look at the two strips, the area w/o transparency seem to be getting their Dmax fairly quickly, particularly the first one where the first step is fairly close to the rest of them. Generally, if I remember correctly, there is about 20% loss in intensity with these transparencies. There were some measurements in a report somewhere, but I can't find it.

:Niranjan.

Here it is:


Comparing Fixxons with Pictorico. The new Pictorico (TPS100) is significantly more opaque than the old one. Fixxons fair better than both. Of course, no data on OP's film but it should give a good idea.

:Niranjan.
 

koraks

Moderator
Moderator
Joined
Nov 29, 2018
Messages
23,238
Location
Europe
Format
Multi Format
Cool @nmp, that's a useful one. I'm going to give that thread a read.
One thing I can at least verify already from Christina's post:
Mark tested to see if it would hold a +50 ink load and it does not; the ink puddles.
This is also my experience with the Fixxons digital negative material. The limit is at something like +30 or +40. The cheap screen printing film takes slightly less, even. Either are still enough for nearly all carbon transfer I did and I don't doubt should allow enough ink density for New Cyanotype. Classic Cyanotype only requires a short tonal scale which should be no problem whatsoever for the Fixxons. In fact, I know it isn't because I tried...I had to resort to light black ink instead of my usual combination of black + yellow because I got too much UV blocking density otherwise to achieve decent linearization.

Not that I got very far with it because if my innate disgust of working with digital negatives. It's a personal thing and I can't seem to shake it off.
 
OP
OP

largo

Member
Joined
Jun 22, 2009
Messages
61
Format
Medium Format
Here it is:


Comparing Fixxons with Pictorico. The new Pictorico (TPS100) is significantly more opaque than the old one. Fixxons fair better than both. Of course, no data on OP's film but it should give a good idea.

:Niranjan.

Thanks ! That's very useful !

I am going to test the following tomorrow :

1. Buy some Novalith NLA4/TM100 transparency, which thickness is 100µ only (compared to the 165µ of the TPX25 from the same brand)

2. And also reduce the distance between my BLB tubes and the contact printing frame, which is >= to 20cm at the moment... Do you think I can reduce this distance to about 10 cm without fear of having the traces of the tubes on the print, because of a non-uniform illumination? The "ceiling" behind my tubes is covered with a reflective surface and my tubes are separated from each other by about 1.5cm of space. With the inverse-square law, the exposure should be 4 times faster...
 

FotoD

Member
Joined
Dec 15, 2020
Messages
392
Location
EU
Format
Analog
Because the first step is already significantly exposed. That doesn't make anything overexposed. This was apparently a test to determine the exposure needed for dmax. As such it doesn't need light patches.
Besides, there's a distinct gradation from medium to darker patches in the center band, suggesting that there's no solarization-type effect where increased exposure results in decreased density. Nothing in these patches suggests that overexposure is part of the problem.

Well we disagree then. To me there are clear signs of overexposure in the CC test (at 1:20h!).

A test with a stouffer wedge or a negative with a full range of tones would give much more information in my opinion.
 
OP
OP

largo

Member
Joined
Jun 22, 2009
Messages
61
Format
Medium Format
Well we disagree then. To me there are clear signs of overexposure in the CC test (at 1:20h!).

A test with a stouffer wedge or a negative with a full range of tones would give much more information in my opinion.

- This is a test to determine the exposure needed to reach the paper+chemistry dmax under the transparent
- I am not using a density-graded OHP strip and a single shot of 80 mins,
- I am using a clear OHP strip and varying the exposure time by using a cardboard.
- (If you do prefer math :smile: The n-th step received an exposure of En = 5*2n/4 , n in { 0, ..., 16 }. Consequently the first step received 5 minutes of exposure. And the last (n=16) 1h20.

I thought I would see signs of solarization, but apparently not.
But anyway, my problem is not a problem of over-exposure. But, of course, 1h20 is way too long for practicing cyanotypes.
 

nmp

Member
Joined
Jan 20, 2005
Messages
2,028
Location
Maryland USA
Format
35mm
Thanks ! That's very useful !

I am going to test the following tomorrow :

1. Buy some Novalith NLA4/TM100 transparency, which thickness is 100µ only (compared to the 165µ of the TPX25 from the same brand)

2. And also reduce the distance between my BLB tubes and the contact printing frame, which is >= to 20cm at the moment... Do you think I can reduce this distance to about 10 cm without fear of having the traces of the tubes on the print, because of a non-uniform illumination? The "ceiling" behind my tubes is covered with a reflective surface and my tubes are separated from each other by about 1.5cm of space. With the inverse-square law, the exposure should be 4 times faster...

I don't know. 165µ is already pretty thin. In comparison TPS100 is about 240µ. 100µ might be awfully thin to handle.

Regarding the distance, you can try but am not sure how much more intensity you will get with the tubes where the light is significantly diffuse. The inverse square rule work best for point sources.

:Niranjan.
 
OP
OP

largo

Member
Joined
Jun 22, 2009
Messages
61
Format
Medium Format
I don't know. 165µ is already pretty thin. In comparison TPS100 is about 240µ. 100µ might be awfully thin to handle.

Regarding the distance, you can try but am not sure how much more intensity you will get with the tubes where the light is significantly diffuse. The inverse square rule work best for point sources.

:Niranjan.

No, TPS100 is 140-145µ
 
  • nmp
  • Deleted
  • Reason: Never mind
OP
OP

largo

Member
Joined
Jun 22, 2009
Messages
61
Format
Medium Format
Regarding the distance, you can try but am not sure how much more intensity you will get with the tubes where the light is significantly diffuse. The inverse square rule work best for point sources.

Yes I guess you're actually right. For the UV source <--> print distance, as I work in diffuse mode, with my source being actually larger than the print to be exposed, the inverse-square law does not really apply to the whole source, but to each individual source (a tube), it is thus wise I guess to choose a distance allowing to avoid any mottling without affecting the performance.

For the uniformity of the lighting, I've read that it is necessary to have a source/print distance greater than 2 times the distance between the primary sources (tubes or leds, distance from axis to axis). Does it work as a rule of thumb ?
 

nmp

Member
Joined
Jan 20, 2005
Messages
2,028
Location
Maryland USA
Format
35mm
Yes I guess you're actually right. For the UV source <--> print distance, as I work in diffuse mode, with my source being actually larger than the print to be exposed, the inverse-square law does not really apply to the whole source, but to each individual source (a tube), it is thus wise I guess to choose a distance allowing to avoid any mottling without affecting the performance.

For the uniformity of the lighting, I've read that it is necessary to have a source/print distance greater than 2 times the distance between the primary sources (tubes or leds, distance from axis to axis). Does it work as a rule of thumb ?

I am afraid I am not too familiar these issues. I never played around with distance much as my unit runs very hot and I dare not get too close or it will burn up the negative. However, I would suggest to go ahead and reduce the distance and see what happens. Should be an easy experiment. I realize your 20cm might be slightly on the high side of normal range. So bringing it down to 10cm you are not pushing it too much. You might get some intensity benefit - may be not 4x but even 50% will being down the exposure time by half. I wouldn't worry about the non-uniformity issue as this point - if you are strictly worried about taking too long for a workshop. If there is non-unifromity, perhaps you can make that a teaching topic...🙂


:Niranjan.
 

koraks

Moderator
Moderator
Joined
Nov 29, 2018
Messages
23,238
Location
Europe
Format
Multi Format
To me there are clear signs of overexposure

Based on what visual clue(s)? Not trolling, but genuinely curious, as I just don't see it!

I thought I would see signs of solarization, but apparently not.

Immediately after exposure and before processing you should definitely see solarization or bronzing in the form of a grey, low density image. This will disappear upon further processing and consequently drying; I think treatment with peroxide might help too.
If you don't get any bronzing/solarization, you're either giving insufficient exposure (unlikely) or there's something weird with your chemistry and/or paper that inhibits Prussian blue formation. I'm getting a feeling we might have to start looking in that direction.

For the uniformity of the lighting, I've read that it is necessary to have a source/print distance greater than 2 times the distance between the primary sources (tubes or leds, distance from axis to axis). Does it work as a rule of thumb ?

Yes, pretty much. With tubes you can get pretty close; I mounted mine with about 1cm distance between them and generally expose at maybe 10cm from the tubes. You'll notice easily enough if you get banding as a result of the tubes being too close and the unevenness that results from it. Rely on what you read only insofar as it gives you a starting point for actually testing your own setup.

That's a pretty complicated formula. Why not use a simple f-stop exposure?

Definitely. I always just do doubles, starting at 15 seconds. The starting point depends a bit on the process/sensitivity and the intensity of the light source. Then I take it up to a time I still find acceptable; I'm not patient enough to hang around for an hour for something to expose, so I generally stop at 8 or 16 minutes. So that would be a series of 15s, 30s, 1 min, 2m, 4m, 8m 16m. Add 32m and 64m if you're patient, but frankly, that's way beyond what should be necessary even with a relatively ill-suited light source.
 

Andrew O'Neill

Moderator
Moderator
Joined
Jan 16, 2004
Messages
12,063
Location
Coquitlam,BC Canada
Format
Multi Format
I played around with the single solution new cyanotype, but it wasn't giving me consistent results, like the traditional formula was. I did appreciate the more intense blue, but I normally tone my cyanotypes to get rid of it, so kind of a pointless.
 

FotoD

Member
Joined
Dec 15, 2020
Messages
392
Location
EU
Format
Analog
Based on what visual clue(s)? Not trolling, but genuinely curious, as I just don't see it!

Do you see the increased graininess and slight loss of color with more exposure? That looks like an overexposed CC print to me.

Just because density is increasing doesn't necessarily mean more exposure is better. Maybe 5h will give slightly more density?

This test seems like a rabbit hole. Why not try to make a good print instead. Then if you're not happy with the maximum density when you print, maybe the paper you are using is the problem, or how you develop etc.
 
Photrio.com contains affiliate links to products. We may receive a commission for purchases made through these links.
To read our full affiliate disclosure statement please click Here.

PHOTRIO PARTNERS EQUALLY FUNDING OUR COMMUNITY:


Ilford ADOX Freestyle Photographic Stearman Press Weldon Color Lab Blue Moon Camera & Machine
Top Bottom