Computer as support in the darkroom

Sparrow.jpg

A
Sparrow.jpg

  • 0
  • 0
  • 9
Orlovka river valley

A
Orlovka river valley

  • 2
  • 0
  • 55
Norfolk coast - 2

A
Norfolk coast - 2

  • 3
  • 1
  • 56
In the Vondelpark

A
In the Vondelpark

  • 4
  • 2
  • 132
Cascade

A
Cascade

  • sly
  • May 22, 2025
  • 6
  • 6
  • 112

Recent Classifieds

Forum statistics

Threads
197,833
Messages
2,765,229
Members
99,485
Latest member
zwh166288
Recent bookmarks
0

jseidl

Member
Joined
Aug 7, 2013
Messages
20
Location
Erlangen, Ge
Format
35mm RF
Hello Forum,

After I’ve been lurking for some time now and have learnt a lot here, I’ve finally decided it’s about time for my first post.
I’ve (re-)started with analogue photography about 8 months ago, for 4 months now with an own provisional darkroom in the garage. I started using the f-stop method for calculating my exposures times from the start and experiment a lot with manual split grade printing. “Way beyond monochrome” helped me a lot with everything!
However if I don’t concentrate really hard all the time, a lot of careless mistakes like forgetting to set the proper time, use the right filter, etc. still happen. So I thought about using the old computer that is in the darkroom anyway (for Music, Forums, eBooks, etc.) to support my personal workflow. At least until I can afford one of the great RHD stopclocks or similar devices. :wink: BTW, I use a sheet of Lee Blood Red 789 gel in front of the 22’’ screen and it gives zero fogging after 15 minutes, 20 centimeters away from the monitor on MCC 110 and MG IV RC.

As I wanted to learn how to code anyway, I’ve started to develop a little C# program. Below you can see what the program can do at the moment.

The hardware to switch the enlarger on and off had to be really simple. So I chose this one:
http://www.robot-electronics.co.uk/htm/usb_rly02tech.htm
As this board has 2 relays, it can switch off the safelight while the enlarger is turned on and vice versa. All I had to do, was to screw in 3 wires from a double extension lead. That was great, as I have no idea how to solder.
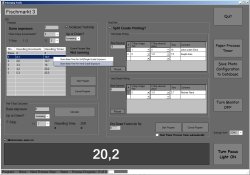
So here’s what the software can do until now:

For enlarging:
- Turn the focus light and the safelight on and off, (Hotkey ESC)
- Control the enlarger with the Timerbutton (Hotkey Space)
- Turn off monitor for exposure metering (Hotkey B)
- Large countdown display
- A metronome with 1 sec ticks during the exposure
- Teststrip programme using the F-Stop method
- Differentiate between „local“ test strips and „classic“ test strips across the picture
- Printing program with stored sequence of burn ins, including the usage of split grade method
- Application of a Dry Down factor for the final printing program
- „Quick Note“ function on F1 – F12 to access and store general information E.g. I’ve stored the filter settings for all grades on the Durst M605 under F1

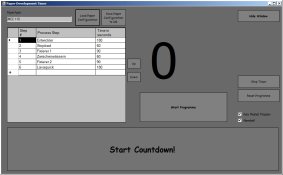
During paper development:
- A Countdown, (that also runs in the background) with alarm function to indicate that the paper has to change the station
- The sequence and times can be configured freely
- Possibility to store sequenceds and times for various paper types in the backend database

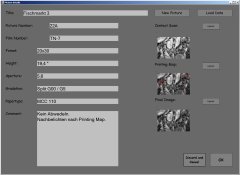
To keep documentation:
- All data for a picture can be stored in the backend database (MS SQL Express). With that data, the printing program sequence is stored as well.
- Possibility to store scans of the contact sheet, the printing map and the final picture in the database

In general my workflow with the program is something like this:
First I find the base exposures for the soft and hard grade with the test strip program. The exposures are stored in the respective fields of the printing program via right clicking it. Then I set the burn in sequence for soft and hard grade with a good description. After hitting the “start program” button, the timer button is loaded with the values in the right sequence. After hitting the timer button, the next value is automatically loaded and the status bar gives me the comment, telling me what has to be done at the current step. When the printing program is finished, the paper development timer screen starts and helps me keeping the appropriate times for each station. When the print is finished, I save all settings and data into the database. When I use the data next time e.g. with another paper type or another enlarging factor, all I have to do is find the right base exposures. The f stop calculation takes care of the rest.

I wanted to include some kind of exposure meter as I have seen in the trialux as well. As I don’t understand how to code, and know even less about electronics, I am a little stuck here. Does anyone here know of a light sensor that can be used for this kind of thing, that comes with a USB connector to read in the values to the computer? Has to be really cheap though :wink: I will only start to think about the logic (what to do with the values) once I have an idea if it’s possible to get them into the PC anyway.

Let me know what you think. Any comments helping with the exposure metering would be greatly appreciated as well.

Thanks, Josh
 

Attachments

  • EnlargerScreen.jpg
    EnlargerScreen.jpg
    198.4 KB · Views: 243
  • DevelopTimerScreen.jpg
    DevelopTimerScreen.jpg
    83.7 KB · Views: 194
  • PictureDetailsScreen.jpg
    PictureDetailsScreen.jpg
    138.9 KB · Views: 216

BMbikerider

Member
Joined
Jul 24, 2012
Messages
2,923
Location
UK
Format
35mm
That souns very complicated to me unnecessarily so. I have used the computer to aid my colour printing. I make a smallish print say 5x7 and use the colour balance given on the digital print as an aid to getting the right colour balance on a 'proper' print. Even that was a hassle so gave it up.
 

Ian Grant

Subscriber
Joined
Aug 2, 2004
Messages
23,241
Location
West Midland
Format
Multi Format
I think it needs evaluation.

I used to use Access as a database for all my info back when it came out and had a really good system, then Microsoft updated Access, no big deal but totally obsolete at the next upgrade. Since then I've reverted to memory and I can reprint from negatives made over 25 yeras ago without a problem.

The key for me are the timing parts, I do use a program at the moment for film processing, O'm not sure I'd fully use something like this but others might.

Ian
 
OP
OP

jseidl

Member
Joined
Aug 7, 2013
Messages
20
Location
Erlangen, Ge
Format
35mm RF
Thanks for your feedback. I may very well have a tendency to overcomplicate things. Leave aside the paper development timer (which is more or less just a stop watch with preset intervals) and the storing of the picture data into a database instead of a manual documentation on paper (including the 3 scans).
The test strip / printing part basically just automates f-stop calculation, note taking, writing down the printing sequence and setting the times for the enlarger. I've done this on paper before and quite often made careless mistakes like forgetting a step in the sequence or setting the wrong time etc. With the program you'd still have to do all the thinking - meaning you decide on the sequence and times yourself.

So this means my approach tin general is too complicated? What I do (no matter if manually or with the program):

Splitgrade:
1. Find the correct soft grade base exposure using the f-stop timing method via test strips
2. Find the correct hard grade base exposure using the f-stop timing method via a second set of test strips
3. Decide the print plan for soft and for hard grade separately. Note this in F-stops from base exposure
4. Execute the print plan

When I do normal Printing, I do:
1. Find the correct base exposure using the f-stop timing method via test strips
2. Find the correct contrast grade with a second set of test strips
3. Decide the print plan (again with soft and for hard grade separately). Note this in F-stops from base exposure
4. Execute the print plan

Please bear in mind I am a total beginner. So if this can be done much easier and faster, any comments are highly appreciated.

Thanks, Josh
 
OP
OP

jseidl

Member
Joined
Aug 7, 2013
Messages
20
Location
Erlangen, Ge
Format
35mm RF
Oh and just in case the question comes up: This is not meant to go commercial and was purely intended to be used for myself to help me cut paper waste and time in the darkroom and still get at least some results per session. With 3 young kids it is generous enough from my significant other to get at least 4 days a month off.. :wink: BTW, it also gives me the chance to occupy myself with my new hobby while being away from the darkroom. Most of the stuff was coded on the bus while commuting to work.

Still if someone is interested in that stuff (or even likes to participate), I'd very much like to share what I have so far. Maybe this could also inspire others to come up with a better program (I'm just learning how to code!). In the end you could get at least an f stop timer that way for as low as 35 Euro - that's the price of the relay board.
 

cliveh

Subscriber
Joined
Oct 9, 2010
Messages
7,498
Format
35mm RF
Very good, but does it have an intuitive human approach to the image?
 
OP
OP

jseidl

Member
Joined
Aug 7, 2013
Messages
20
Location
Erlangen, Ge
Format
35mm RF
Very good, but does it have an intuitive human approach to the image?

No, but neither does any other stop clock AFAIK. :wink: Or to quote myself from the post above: "With the program you'd still have to do all the thinking - meaning you decide on the sequence and times yourself."
 

Ian Grant

Subscriber
Joined
Aug 2, 2004
Messages
23,241
Location
West Midland
Format
Multi Format
For the first time in over 40 years I'm without a darkroom, short term hopefully I've just about sold my house. However a new temporary darkroom is awaiting space to be freed up by other family members. I'd be willing to try the system out.

Ian
 

dslater

Member
Joined
Dec 6, 2005
Messages
740
Location
Hollis, NH
Format
35mm
I used to use f-stop printing - I calculated the times once and wrote them down on a piece of paper - starting at 1 sec and going up further than I'd ever need to use in practice. Then I just read the times off the paper.
I don't worry about forgetting to set the timer because I use use the method described in Ansel Adam's book "The Print". I have a metronome timer set to its max time. I control exposure with a black card and by counting metronome ticks. My sequence is:
1) Put the card under the enlarger lens and turn on the timer.
2) Count off 10 ticks (10 sec) to allow the enlarger light time to come up to full power.
3) remove the card and count ticks of the metronome to expose.
4) put the card back under the lens to stop exposure, then turn off the timer/light.

This should give you more consistent exposures as the enlarger light doesn't turn on and off instantly - there is a short period of time while the light warms up/cools down where the light output is variable.

I stopped using F-stop printing because I found it wasn't really worth the effort. It didn't really save me much paper, because after a while of printing, you get to the point where you can look at the negative and get a pretty good estimate of what the exposure should be. Given that, I generally don't need more that one ( or 2 for splitgrade ) test strips. What really uses up the paper for me is coming up with all the dodges and burns necessary to turn your work print into a final fine art print.

Color printing is another whole ball of wax. There I go through a lot of paper trying to get the color balance right. One way I've found to reduce the amount of paper consumption is to use small pieces of paper in important areas to get correct color balance/ exposure. For example, if I have a photo with a person in it, I'll tear an 8x10 sheet of paper into 4 4x5 sheets, put the 4x5 sheet where the person't face is, and use that to get the color balance right - this gets me 4 adjustments per 8x10 sheet instead of 1.
 

cliveh

Subscriber
Joined
Oct 9, 2010
Messages
7,498
Format
35mm RF
No, but neither does any other stop clock AFAIK. :wink: Or to quote myself from the post above: "With the program you'd still have to do all the thinking - meaning you decide on the sequence and times yourself."

You decide yourself. What an innovative idea.
 

fotch

Member
Joined
Mar 16, 2005
Messages
4,774
Location
SE WI- USA
Format
Multi Format
Sounds like you hobby is computer code and your looking for things to do with it. What ever floats your boat I guess, have fun.
 

jp498

Member
Joined
Oct 5, 2009
Messages
1,525
Location
Owls Head ME
Format
Multi Format
You can get keyboards as cheap as dektol.

I'd like to have the computer control my enlarger and keep printing notes, etc.. I don't do f-stop method, and avoid microsoft software dependency or proprietary databases when I can. I just don't have time do cobble something together.
 

Bill Burk

Subscriber
Joined
Feb 9, 2010
Messages
9,158
Format
4x5 Format
I wanted to include some kind of exposure meter as I have seen in the trialux as well. As I don’t understand how to code, and know even less about electronics, I am a little stuck here. Does anyone here know of a light sensor that can be used for this kind of thing, that comes with a USB connector to read in the values to the computer? Has to be really cheap though :wink:


http://www.vernier.com/products/sensors/ls-bta/
 

clayne

Member
Joined
Sep 4, 2008
Messages
2,764
Location
San Francisc
Format
Multi Format

Ian Grant

Subscriber
Joined
Aug 2, 2004
Messages
23,241
Location
West Midland
Format
Multi Format
This seems quite different to the RH Designs products and could offer vastly greater potential.

I already use a small pair of programs Wlab/Dlab for my film processing and this can control the more sophisticated JOBO's, i really just use it as a tool to calculate dev time & temperature changes as well as storing some data, a notebook wood work as well but I like the timer function.

The ability to store information about each print using the program here might be very useful to many.

Ian
 

clayne

Member
Joined
Sep 4, 2008
Messages
2,764
Location
San Francisc
Format
Multi Format
First rule of Darkroom club is there is no Darkroom club.
Second rule of Darkroom club is the computer belongs outside the darkroom.
 

Ghostman

Member
Joined
Dec 5, 2011
Messages
504
Location
Switzerland
Format
Multi Format
Whatever you need to do to familiarize yourself with the process, do it. Geek out brother and good luck with both the coding and the photos. I think it's an awesome way to maximise on your passions. At some point though, you'll be able to feel your way around printing with HAL ;-)
 
OP
OP

jseidl

Member
Joined
Aug 7, 2013
Messages
20
Location
Erlangen, Ge
Format
35mm RF
Not sure why my last post from yesterday had to be approved by a moderator and never showed up here. Trying to repost below.

------
Ian: That's great! However it is not really straightforward to install. You need to install .Net Framework 4.5 and SQL Express as a prerequisite. Then you need to run a SQL script to set up the DB and the tables. As you mentioned long time experience with Access, I guess it's pretty easy for you. I hope to find time to write up a short installation guide and manual in the next week. Then I'll provide you with a download link via PN. I guess you'll do a dry run first without the relay board? Then I'll leave that pat out in the docs.

dslater: Thanks for sharing your method! I guess keeping it straight forward is the way to go if you get enough darkroom time to get "the feeling". I read "Way beyond monochrome" as it was widely recommended throughout many forums. I don't have the experience yet to judge what technique will be my way of working. For now, that book is my "bible" and I try to follow it where I can. Maybe over time I'll find my own style of working. The idea with the program was foremost to free my brain from the routine stuff and focus more on visualizing / working on the print content.
 
OP
OP

jseidl

Member
Joined
Aug 7, 2013
Messages
20
Location
Erlangen, Ge
Format
35mm RF
Regarding the RHD Stopclocks: If I could have afforded one, I'd probably never started the project. See my first post specifically mentioning them. :wink: Still would additionally use the computer to take notes and store them for later reference. The metronome and process timer for the paper is just a side benefit.

Regarding MS software: I'd rather use non proprietary software myself. However as I work in an MS dominated environment, learning C# was the obvious choice.

Regarding not using a computer in the darkroom at all: I totally understand this position and respect that opinion. My dad is the same with not using sat navigation at all, but only relying on paper maps (and my mom as the navigator). After 40 years behind the wheel, he probably reaches his destination better than I would ever be able to even with a navigation system.
 

Bill Burk

Subscriber
Joined
Feb 9, 2010
Messages
9,158
Format
4x5 Format
Thanks! I'll definitely look into this when I find the time.

Also check with Curt Palm who is a regular here. He has experience incorporating that brand of sensor into darkroom automation software.
 

E. von Hoegh

Member
Joined
Sep 14, 2011
Messages
6,197
Location
Adirondacks
Format
Multi Format
Thanks for your feedback. I may very well have a tendency to overcomplicate things. Leave aside the paper development timer (which is more or less just a stop watch with preset intervals) and the storing of the picture data into a database instead of a manual documentation on paper (including the 3 scans).
The test strip / printing part basically just automates f-stop calculation, note taking, writing down the printing sequence and setting the times for the enlarger. I've done this on paper before and quite often made careless mistakes like forgetting a step in the sequence or setting the wrong time etc. With the program you'd still have to do all the thinking - meaning you decide on the sequence and times yourself.

So this means my approach tin general is too complicated? What I do (no matter if manually or with the program):

Splitgrade:
1. Find the correct soft grade base exposure using the f-stop timing method via test strips
2. Find the correct hard grade base exposure using the f-stop timing method via a second set of test strips
3. Decide the print plan for soft and for hard grade separately. Note this in F-stops from base exposure
4. Execute the print plan

When I do normal Printing, I do:
1. Find the correct base exposure using the f-stop timing method via test strips
2. Find the correct contrast grade with a second set of test strips
3. Decide the print plan (again with soft and for hard grade separately). Note this in F-stops from base exposure
4. Execute the print plan

Please bear in mind I am a total beginner. So if this can be done much easier and faster, any comments are highly appreciated.

Thanks, Josh

Get any decent darkroom guide and a copy of Ansel Adam's "The Print", or most any other book on basic printing techniques. Read the books, make some prints. It's easy. Your computerised approach is like going into the neighbor's yard, digging a hole, and tunneling into you own basement when you have the keys to your door right in your pocket.
 

David Brown

Member
Joined
Feb 16, 2004
Messages
4,046
Location
Earth
Format
Multi Format
Please bear in mind I am a total beginner. So if this can be done much easier and faster, any comments are highly appreciated.

One can print with a second hand on a clock and an on/off switch on the enlarger. Or, one can completely automate the entire process from scratch using computers. Or, maybe somewhere in the vast spectrum between those two extremes. :wink:

My advice to a beginner would be to keep it simple until you gain some skill with basic printing. I am a big fan of using f/stop timing, but I did not utilize it for almost 40 years. It doesn't necessarily make things any faster or easier, except that sometimes my test strips give me more accurate and/or useful information. Your outline of 4 steps for either straight or split grade printing is right on target. That's really all there is to it, the rest is secondary.

Perhaps you're just over-thinking this, or trying to use skills you already have mastered to learn a new skill set, where it may not be necessary.

Record keeping is a whole other discussion.
 

MattKing

Moderator
Moderator
Joined
Apr 24, 2005
Messages
52,178
Location
Delta, BC Canada
Format
Medium Format
It would really be good if you could somehow combine your efforts with Darkroom Automation and Modern Enlarger Lamps to end up with a new source of Darkroom Automation's timer, and a better control for Modern Enlarger Lamps' LED replacement variable contrast heads.

Here are the respective websites:

Darkroom Automation: http://www.darkroomautomation.com/fst.htm

Darkroom Automation is an APUG advertiser and its principal, Nicholas Lindan is a regular contributor here.

Modern Enlarger Lamps: http://www.modernenlargerlamps.com/Modern_Enlarger_Lamps/Model_3.html
 
Photrio.com contains affiliate links to products. We may receive a commission for purchases made through these links.
To read our full affiliate disclosure statement please click Here.

PHOTRIO PARTNERS EQUALLY FUNDING OUR COMMUNITY:


Ilford ADOX Freestyle Photographic Stearman Press Weldon Color Lab Blue Moon Camera & Machine
Top Bottom