Carbon Transfer Questions

Recent Classifieds

Forum statistics

Threads
199,029
Messages
2,784,918
Members
99,780
Latest member
Theb
Recent bookmarks
0

Vaughn

Subscriber
Joined
Dec 13, 2006
Messages
10,104
Location
Humboldt Co.
Format
Large Format
What would you mix it with, Vaughn....some alcohol or water or...? I was thinking maybe mixing it in a mortar and pestle with a liquid...

I have not had to do it, but that is how I would go about it -- make a paste of it with a mortar and pestle. I'd use water -- and I would be tempted to add a little photo flo, but that may not be needed, nor desired.

But that is the joy of using watercolor paint in tubes -- someone has already done that for me...and it is not very expensive at the concentration I use. And there are other options for liquid pigments.
 

Curt

Member
Joined
Sep 22, 2005
Messages
4,618
Location
Pacific Nort
Format
Multi Format
Or Black Cat if you can accept the color. Since Vlad didn't filter could someone describe their method?

Watercolors are very refined so the work is nearly done for you like Vaughn said.

This is an outstanding thread.

Sent from iPhone.
 
Joined
Aug 6, 2005
Messages
1,798
Location
Ventura, Ca
Format
ULarge Format
To filter I take some old cheesecloth and fold it over a couple of times. I raise the temperature of the glop to 115 degrees and filter 4 times. I let it cool to about 100 and then filter into a smaller container when I pour.

Now if you want to use dry pigments I feel that if you wish to use more than a gram of dry you are going to need to make a watercolor paste. I have had experience with trying to mix more than a gram into water or should I say into the glop. It has a hard time blending in. You need to make a paste with gum Arabic, honey, dextrin, water and some other stuff. I don't have the formula in front of me. You need to mix and blend the paste for an hour or so.
 

Vaughn

Subscriber
Joined
Dec 13, 2006
Messages
10,104
Location
Humboldt Co.
Format
Large Format
For filtering I use an old stocking -- about 4 layers -- stretched over the mouth of the jar. I filter just once -- when I am measuring the glop for a pour.

I wet the stocking in hot water right before I use it.

Sandy King wrote that he used an old pair of cotton underwear.
 

banana_legs

Member
Joined
Jan 9, 2010
Messages
48
Location
Wiltshire, U
Format
4x5 Format
I use soot straight out of my chimney for pigment. I use 3 grams of soot in 100ml of 10% gelatine. I put the soot in a mortar and give it a grind to break down the lumps, then add a few drops of gum Arabic and grind it well to a thick paste for about 5 minutes. I then add my hot gelatine a little at a time to the mortar, mixing it in well until all of the gelatine is in. I then filter it once through a double layer of old stockings. I do get small 'gritty' specks in the final print, but I like the effect as it seems a part of using home-gathered pigments.

The downside of using soot is that the kitchen smells of soot for a fair few hours as the tissue dries out!

Best regards,

Evan

EDIT: once the tissue dries out, it is just like the posted image of a bumpy surface, some of my tissues have been extremely rough. When I spirit sensitise, the gelatine swells back up and the bumps disappear, allowing a decent contact between the tissue and the negative. I normally also use an old comb for spreading out the glop onto the backing paper. If I did a bad job at grinding the soot in the mortar, the pattern that the comb teeth made can be still visible on the surface after drying the tissue. For these tissues, I do not try to print deeply to get a relief as I get a pattern of gritty/not gritty swirls in the final image.
 
Last edited by a moderator:

Vaughn

Subscriber
Joined
Dec 13, 2006
Messages
10,104
Location
Humboldt Co.
Format
Large Format
Evan -- thanks for sharing your method of making tissue. It is always great to hear how others approach this process and make it their own!

Vaughn
 
OP
OP
Vlad Soare

Vlad Soare

Member
Joined
Jan 16, 2009
Messages
261
Location
Bucharest, R
Format
8x10 Format
I bought liquid pigments today - a black one based on lampblack, and a brown one based on iron oxide. I can't wait to try them out. But I'm out of dichromate until next week. :sad:
By the way, if you use colored pigments, is it still a carbon transfer print? :D
How about using Prussian blue? Will that make it a cyanotype? :D
I noticed that people who sensitize by brush tend to prefer ammonium dichromate. Is this just a coincidence, or is potassium dichromate actually unsuitable for this method?
I can't seem to find Thymol locally. Is there anything else that could work as a preservative?
 
Last edited by a moderator:

Vaughn

Subscriber
Joined
Dec 13, 2006
Messages
10,104
Location
Humboldt Co.
Format
Large Format
AD vs PD -- as long as it does not react with one's "spirit" is does not matter which one is used...but AD is a little more active by weight, so one must take that into account. Rubbing alcohol and PD supposively do not mix (or at least that was the old wisdom), so we tended to go with AD.

Well -- there are 3 and four color carbon prints -- I guess we should call them gelatin pigment transfer prints or something like that!
 
OP
OP
Vlad Soare

Vlad Soare

Member
Joined
Jan 16, 2009
Messages
261
Location
Bucharest, R
Format
8x10 Format
Here's my first 8x10", made from a more contrasty negative.
I used some cheap black watercolor (not the pigments I bought yesterday - those will have to wait until I get more dichromate). It was indeed much easier to mix than the powdered lampblack, and this time the surface has dried smooth, with no bumps.
This is one of my first negatives developed by inspection. At that time I was still experimenting with DBI and hadn't yet learned how the image should look under the green light when it's finished. I developed all sheets until I could see the image nice and clear on the back of the film, by which time they were already strongly overdeveloped. This was a good thing, though, because they now make beautiful vandyke prints. :D

The trouble with liquid pigments is that you don't know what's in them. I think this watercolor had some traces of oil, because I got some streaks (see the attached crop). Besides, the overly warm tone doesn't quite appeal to me.

The next step will be to coat my own paper. So far I've been using some cheap RC photo paper.
 

Attachments

  • carbon5_mic.jpg
    carbon5_mic.jpg
    143 KB · Views: 172
  • carbon5_crop.jpg
    carbon5_crop.jpg
    52.3 KB · Views: 167
Last edited by a moderator:

Vaughn

Subscriber
Joined
Dec 13, 2006
Messages
10,104
Location
Humboldt Co.
Format
Large Format
Vlad, those streaks, because they are so regular in size and direction, look like what I call "stress lines" -- created when removing the the temporary support during development. The more force one needs to use to separate the temp support from the final support, the stronger these lines get. The "stress lines" are ridges of unexposed gelatin that will disappear once development in the hot water is complete. If there is any hint of them on the print when one stops the development, they'll get slightly darker when the print dries. I always get these lines and use them to tell me when development is complete!

I of course could easily be wrong, but that is what the image looks like to me.

What color did you use? I find that most "Lampblack" is fairly neutral, but "Ivory black" is too warm and weak-looking. Also, after the print had dried and then has been soaked in a Sodium bisulfite bath to clear out any remaining dichromate, some of the warmth leaves -- as the warmth can be caused by the yellow of the dichromate.

Vaughn
 
Last edited by a moderator:

ghostcount

Member
Joined
Dec 27, 2008
Messages
252
Location
California
Format
Multi Format
Vaughn,

How do you minimize these "stress lines"? There were times when I let it develop longer in hot water but they are still visible (albeit slightly). Would a hotter bath (>120F) and longer soak time before lifting the tissue help?
 

Vaughn

Subscriber
Joined
Dec 13, 2006
Messages
10,104
Location
Humboldt Co.
Format
Large Format
I develop at 120F and usually put the print in fresh 120F water three or so times during the process -- I usually develop for around 15 minutes.

I have been waiting for about 3 minutes before removing the temp support - and I still get the lines. I just decided not to worry about them and develop until they are gone.

I have used some of Dick's tissue (B&S) and was amazed that his temp support just about floats off in the hot water -- and no stress lines, of course. I don't know if this is because it is very thin tissue or because his "secret" additives used to prolong the life of the tissue. But my basic receipe and the thickness of my tissue has always resulted in the stress lines.

If someone has found a way to minimize them, I certainly would like to hear about it!

Vaughn
 
OP
OP
Vlad Soare

Vlad Soare

Member
Joined
Jan 16, 2009
Messages
261
Location
Bucharest, R
Format
8x10 Format
I assumed those lines were caused by the pigment because of what Sandy King says in his article:

"14. The final image contains streaks.
Cause: In the home manufacture of tissue one will find that certain pigments, most notably some varieties of lampblack, can cause slight streaking on the face of the tissue. This apparently results from a small residue of oil in the pigment. If this problem occurs, eliminate the guilty pigment. The problem can also result from inadequate dispersion of the pigments within the gelatin solution.
"

I developed until the water that dripped off the print when I lifted it out of the tray was perfectly clean, with no trace of pigment. Maybe I should have developed longer. Next time, if I see any streaks I'll prolong the development.

I didn't use a clearing bath because I didn't see any hint of yellowing. The highlights are clean white. Also, the powdered lampblack used to give me perfectly neutral blacks. That's why I think the extreme warmth is caused by the pigment itself, not by the dichromate. I don't know what kind of pigment it was. It was part of a cheap tempera color set. Nothing fancy. In the meantime I managed to get to an arts supply store and to get some real pigments. I can't wait to try them out.
 

ghostcount

Member
Joined
Dec 27, 2008
Messages
252
Location
California
Format
Multi Format
I use Blick Black Cat Waterproof India Ink and I believe it is water soluble. I don't think it contains oil.
 

Vaughn

Subscriber
Joined
Dec 13, 2006
Messages
10,104
Location
Humboldt Co.
Format
Large Format
I do not know exactly is in the B&S gelatin. The temp. support material is also interesting, as it does seem to have some kind of coating on it that might help it release from the gelatin -- I just don't know much about it. I have considered re-using some of the B&S temp support, but in the processing, the slick stuff on its surface seems to come off so I haven't tried to coat it.

Clearing -- way back when several of us were communicating via a list sort of thing (pre-internet forum style), we batted around the need for clearing and at one point decided that it was not needed. At the time I was clearing in Potassium alum...a 5% solution for 10 to 15 minutes right after developing. The solution would be slightly yellow at the end of the session.

Further research into old prints by Dick Sullivan and others seemed to show that with single transfers, there is some dichromate trapped between the gelatin and the final support. And if the dichromate was not cleared, the dichromate continues to react with the gelatin. Over time (a long time) the gelatin can become brittle and more prone to cracking if the print is bent.

Double transfers allow the dichromate to wash off easier during the process.

Even with very long wash times and clean looking whites, I have found that clearing with Sodium bisulfite reduced the warmth of the print. It is the whites where there is very little gelatin -- and thus less gelatin to hold the residual dichromate (and easier to wash out). It will be the darker tones where the gelatin is thicker that will have the most dichromate and have the greater yellowing of the image.

Streaking -- I believe Sandy is referring more to an oil-slick looking type of streaking, rather than the more regular pattern on your print.
 
Joined
Aug 6, 2005
Messages
1,798
Location
Ventura, Ca
Format
ULarge Format
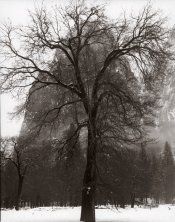
Clearing white in carbon prints can be problematic. Your work flow has to be very good. I am now having much better success with this. It is a combination of factors that each of us has to adjust to their work flow. I do think that the stress pattern does come from something in the pigment along with the dichromate, exposure and even the pigment load. There are many factors. As my good friend Vaughn told me early on make adjustments one at a time and keep good notes and you will figure it out. The attached image is from Yosemite in March just after the huge snow storm. The whites are nice and clean with just a tad of pigment particles but not so much as to be distracting. The actual print shows less pigment in the highlights than the scan.
 

Attachments

  • El-Capitan-Oak,-Sentinel-Do.jpg
    El-Capitan-Oak,-Sentinel-Do.jpg
    173.4 KB · Views: 178

ghostcount

Member
Joined
Dec 27, 2008
Messages
252
Location
California
Format
Multi Format
Wow Jim! Nice clean skies! I suppose more printing experience will yield better results. Good thing making tissues is cheap.
 
OP
OP
Vlad Soare

Vlad Soare

Member
Joined
Jan 16, 2009
Messages
261
Location
Bucharest, R
Format
8x10 Format
Vaughn, you were right. They were indeed stress marks. I reimmersed the print in hot water and left it face down for half an hour, then let it dry overnight. All streaks are gone.

I'll try a clearing bath later today, to see if it gets rid of the warmth, at least partially.
Clearing the skies might be a problem when you use normal paper for your final support, which can absorb some dichromate. So far I've always got perfectly white highlights, probably because my final support was a fixed out RC photo paper, whose plastic base didn't absorb chemicals. When I have the process under control I'll try to use drawing or watercolor paper, and I'll probably start having clearing problems, too. :smile:
 

artonpaper

Subscriber
Joined
Aug 7, 2007
Messages
336
Location
Staten Island, New York
Format
Multi Format
All photo sensitive compounds, the way I understand it it, produce less contrast as they become more sensitive to light. No dichromate, no sensitivity. A little and only the deepest shadows where the negative is clear will begin to expose. As the exposure gets longer, the less dense areas continue to expose and the dense areas are still without tone. This is the typical high contrast look. More dichromate will make the tissue (or gum mixture) faster, producing middle tone and highlight exposure sooner after the shadows have darkened.
 
Last edited by a moderator:
OP
OP
Vlad Soare

Vlad Soare

Member
Joined
Jan 16, 2009
Messages
261
Location
Bucharest, R
Format
8x10 Format
I tried to clear the print in a 3% potassium metabisulfite for ten minutes. There's no visual indication of any clearing having taken place. The print looks exactly the same (at least as far as I can tell without having another print to compare it with), and the clearing bath has remained totally colorless.
 

Vaughn

Subscriber
Joined
Dec 13, 2006
Messages
10,104
Location
Humboldt Co.
Format
Large Format
Great! One problem solved, and one possible cause of another problem eliminated! I'd call that a good day!

Time for bed for me!

Vaughn
 
Photrio.com contains affiliate links to products. We may receive a commission for purchases made through these links.
To read our full affiliate disclosure statement please click Here.

PHOTRIO PARTNERS EQUALLY FUNDING OUR COMMUNITY:


Ilford ADOX Freestyle Photographic Stearman Press Weldon Color Lab Blue Moon Camera & Machine
Top Bottom