BELPLASCA foggy viewfinder

Tōrō

H
Tōrō

  • 1
  • 0
  • 21
Signs & fragments

A
Signs & fragments

  • 4
  • 0
  • 61
Summer corn, summer storm

D
Summer corn, summer storm

  • 2
  • 2
  • 60
Horizon, summer rain

D
Horizon, summer rain

  • 0
  • 0
  • 59

Recent Classifieds

Forum statistics

Threads
198,821
Messages
2,781,375
Members
99,717
Latest member
dryicer
Recent bookmarks
0

AlexT

Member
Joined
Mar 19, 2017
Messages
4
Location
Chicago
Format
35mm RF
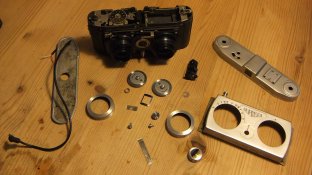
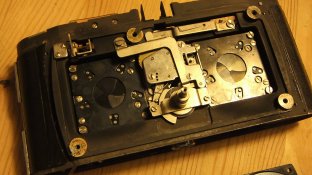
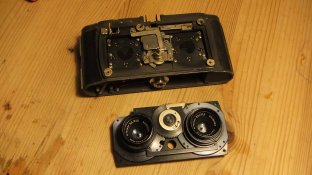
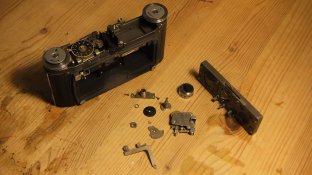
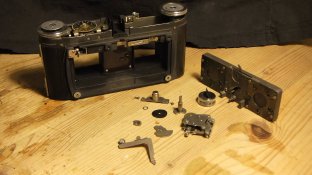
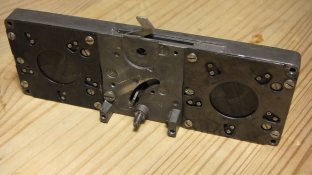
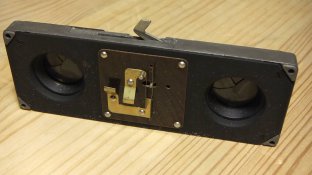
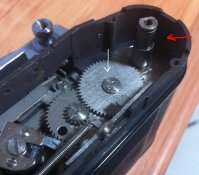
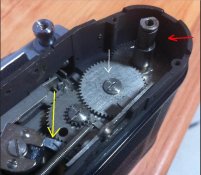
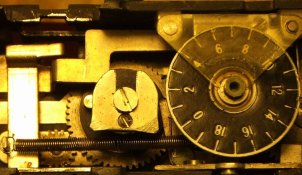
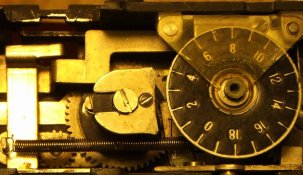
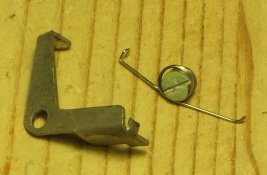
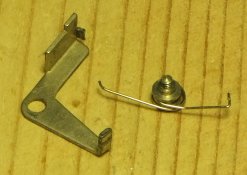
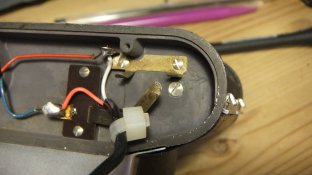
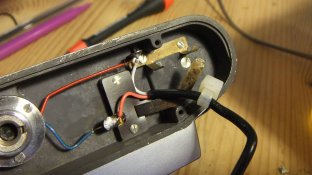
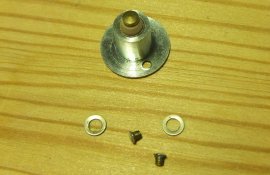
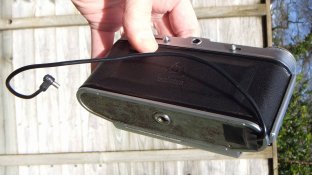
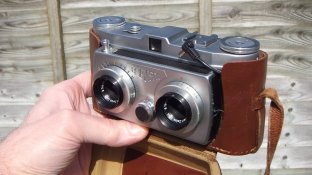
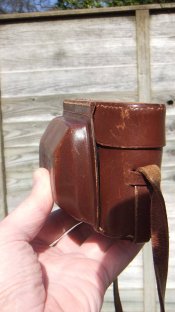
Here are some pictures of partially dissembled Belplasca recently listed on eBay. It may be helpful to anybody trying to work on the shutter. I was able to lubricate the shutter without much disassembly. I removed the top for the viewfinder cleaning (thanks Jack!) and applied few tiny drops of oil with a syringe and needle through the hole over the shutter mechanism. It made the slow speeds working again. I can't wait to see your hot shoe project as well! s-l1600 (9).jpg s-l1600 (10).jpg
 

mdanie789

Member
Joined
Dec 26, 2014
Messages
11
Format
35mm
I'd like to thank everyone contributing to this thread. I've just bought a Belplasca from Germany knowing I would need to clean the viewfinder, so you've told me how. Unfortunately, although described as "Technically in order" the shutter sticks open, so I'm waiting for the seller (a proper photo store!) to decide how they wish to deal with it before trying any repairs.
 

AlexT

Member
Joined
Mar 19, 2017
Messages
4
Location
Chicago
Format
35mm RF
I'd like to thank everyone contributing to this thread. I've just bought a Belplasca from Germany knowing I would need to clean the viewfinder, so you've told me how. Unfortunately, although described as "Technically in order" the shutter sticks open, so I'm waiting for the seller (a proper photo store!) to decide how they wish to deal with it before trying any repairs.

Hi, does stick open at all speeds or only at slow speeds bellow 1/25?
 

mdanie789

Member
Joined
Dec 26, 2014
Messages
11
Format
35mm
Hi Alex, at all speeds. Makes me suspect a defective or broken spring but don't want to mess with it until I know what the seller's view is. Rather disappointing as paid full (European) price and you'd expect a photo store to check something as obvious as this.
 

AlexT

Member
Joined
Mar 19, 2017
Messages
4
Location
Chicago
Format
35mm RF
I got mine from an on line camera shop as well. I asked detailed questions, the seller answered each of them, like everything was great. When I received the camera the shutter was off and slow speeds didn't work at all. I decided to keep it because focus and aperture were smooth, lenses clear and the film transport didn't cause any problems. The best improvement I did it was to stick some flocking fabric to the bottom of the chambers. It reduced the internal reflection helped with contrast and saturation.
If you purchased your camera on eBay, it's seller's responsibility to deliver the camera safely, even if the damage occurred during shipping.
 

mdanie789

Member
Joined
Dec 26, 2014
Messages
11
Format
35mm
Yes, I've had a few frustrating eBay camera purchases recently (especially 2 Contaflexes) where simple checks could have avoided false descriptions. Thanks for the flocking suggestion - I'll bear that in mind if I find another Belplasca. The seller has offered a refund, so it's sensible if I accept that.
 

3DJack

Member
Joined
Jul 5, 2015
Messages
44
Format
Medium Format
I'm glad to hear all this Belplasca activity, but sorry that some of you have frustrations. The general construction of this camera seems very 'open' to me. By that I mean that it can largely be worked on with very few special tools and will go back together the same way it came apart. As an aside, I looked at my Panasonic 3D1 recently (touch screen stopped working) and it's glued together! No chance of fixing that!

Anyway, the results of my shutter speed measurements were:
1 sec = 1.04 seconds
1/2 = 364ms (500ms)
1/5 = 440ms (200ms)
1/10 = 69.5ms (100ms)
1/25 = 33.7ms (40ms)
1/50 = 20.5ms (20ms)
1/100 = 7.8ms (10ms)
1/200 = Sticks open!
I've put in brackets what the times should be. Each measurement is an average of three. So apart from that 1/5, not too bad for a 50+ year old camera. The exposures from this camera always seemed correct. (Luckily I never used 1/5.) I made the measurements so that after re-assembly I can measure again and I'll know if I've got everything right.

It's a long weekend here in the UK, so I should find time to remove the top and font of the camera and look at the film advance mech and shutter speeds. I will record what I find.
Regards,
Jack
 
Last edited:

3DJack

Member
Joined
Jul 5, 2015
Messages
44
Format
Medium Format
I've dismantled my camera as far as I need for the shutter fix. The problem was simply that the speed knob was in the wrong position. There's slop between the shaft and the knob. Dunno how I'm gonna fix that. Does anyone want to know more about the film advance mech before I carry on? Avortex, did you fix your advance problem? Mine was jamming because there was a part missing. This part keeps the advance knob from jamming against the camera top. I wonder who it was that went inside the camera and lost the part? Photo 'MissingPart.jpg' attached, there should be two, I only got one. I guess I could make one by cutting a suitable washer. I'll have a go next weekend. Photos show where I am with this. Love that shutter module. It's completely self-contained, no risk of the leafs getting out of place. You can see the flash contacts on the back.

Bad news about the hot-shoe conversion. It will require drilling a hole in the main casting. I don't expect many Belplasca owners are prepared to do that. If I can keep swarf from getting everywhere I might go for it. There will be no risk of light-leaks, just swarf to clean out.

More photos tomorrow.
 

Attachments

  • MissingPart.jpg
    MissingPart.jpg
    144.9 KB · Views: 346
  • LensAndShutterRemoval1.jpg
    LensAndShutterRemoval1.jpg
    248.5 KB · Views: 330
  • LensAndShutterRemoval2.jpg
    LensAndShutterRemoval2.jpg
    258.5 KB · Views: 311
  • LensAndShutterRemoval3.jpg
    LensAndShutterRemoval3.jpg
    240.7 KB · Views: 324
  • LensAndShutterRemoval4.jpg
    LensAndShutterRemoval4.jpg
    250.5 KB · Views: 306
  • LensAndShutterRemoval5.jpg
    LensAndShutterRemoval5.jpg
    222.9 KB · Views: 327
  • ShutterModule1.jpg
    ShutterModule1.jpg
    201.2 KB · Views: 322
  • ShutterModule2.jpg
    ShutterModule2.jpg
    182.5 KB · Views: 321
OP
OP
avortex

avortex

Member
Joined
May 16, 2012
Messages
136
Location
The Twilight Zone
Format
35mm
Thanks a lot for the update, Jack.
No, I still haven't fixed the advance problem, as I'm not skilled repairing cameras. :sad:
I've started to open the advance system, but I can't remove the screw pointed with the white arrow in the attached picture. Is this resistence normal?
I've also observed that the piece pointed with the red arrow moves a bit freely when I touch it. Perhaps the problem is there.
 

Attachments

  • tornillo.jpg
    tornillo.jpg
    156.2 KB · Views: 226

3DJack

Member
Joined
Jul 5, 2015
Messages
44
Format
Medium Format
That doesn't sound unreasonable. One of my Belps is still in pieces so I could check if it's the same, but I can't do that until the weekend. (06/05/17) If you want to remove that screw you will most likely need a very good quality screwdriver and sufficient downward force if the slot so not to be damaged. I think it will have locking compound on it. Does the screw have to be removed?
 
OP
OP
avortex

avortex

Member
Joined
May 16, 2012
Messages
136
Location
The Twilight Zone
Format
35mm
I would like to inspect the dancing piece pointed with the red arrow, so removing the blocked screw looks mandatory, but perhaps I'm wrong and there's another way to access it.
I remember now that the repairman told me last year that he glued some pieces to secure them. Perhaps he glued exactly that blocked screw.
 

3DJack

Member
Joined
Jul 5, 2015
Messages
44
Format
Medium Format
I can see the problem with yours just by looking at that picture. The lever I have pointed to in LeverWrong.jpg with a yellow arrow is in the wrong place. It should be more to the right given the position of the 1/3 advance cam. It is sprung, so can you gently move it to the right with a screwdriver blade as shown in MoveWithScrewdriver.jpg? If you hold it to the right a couple of millimetres, the advance knob spindle should turn freely. Try it and tell me what happens. The top of this lever engages with two cutouts in the frame advance cam. You will notice that these cutouts are in 90 degree and 270 degree positions to provide the alternating 7-perf then 21-perf film advance. One frame then three frames.
Jack
 

Attachments

  • LeverWrong.JPG
    LeverWrong.JPG
    97 KB · Views: 217
  • LeverWrong.jpg
    LeverWrong.jpg
    97 KB · Views: 211
  • MoveWithScrewdriver.jpg
    MoveWithScrewdriver.jpg
    21.3 KB · Views: 214
OP
OP
avortex

avortex

Member
Joined
May 16, 2012
Messages
136
Location
The Twilight Zone
Format
35mm
Jack, you're right. If I push that lever to the right, the advance knob can be turned freely :smile:
If i quit pushing it, the advance knob stops again. This is promising...How can I fix this?

Thanks again for your amazing and valuable help!
 

3DJack

Member
Joined
Jul 5, 2015
Messages
44
Format
Medium Format
It's good news that the advance knob tuns, but that lever should be held to the right by the contour of the film advance cam and it seems that's not happening on your camera. Is the top of that lever engaging in the cam? You must identify this cam; it's got the two cutouts at 90 and 270 degrees. On my camera it's black. I've attached a little sketch. The green arrow shows the rotation for one frame and the red arrow shows the rotation for three frames. Unfortunately, on my camera the two screws that hold the frame counter have been chewed up by whoever last had the thing apart, so I can't remove the frame counter, but anyway I've shown two photos of this cam. One photo shows the position after one frame has been advanced and the other shows the position after three frames have been advanced. The important thing is that if the cam is in any other position that lever should be held to the right so the advance knob can be turned. For some reason that isn't that happening for you. Try to see if that lever is engaging with the cam? I think I'll drill out those two chewed screws so I can remove the frame counter, but I won't be able to do that 'til next weekend. When I've done that you'll see how the cam controls that lever.
Jack
 

Attachments

  • OneThreeCam.jpg
    OneThreeCam.jpg
    7.9 KB · Views: 202
  • AfterOneFrame.jpg
    AfterOneFrame.jpg
    90.7 KB · Views: 201
  • AfterThreeFrames.jpg
    AfterThreeFrames.jpg
    88.4 KB · Views: 188

evdh

Member
Joined
May 21, 2017
Messages
2
Location
Netherlands
Format
Medium Format
I've just bought a Belplasca and a FED stereo projector. I'm very happy to find the information about the view finder! Mine needs cleaning as well.
I have one other issue with the camera: I can't focus the lenses. The distance ring is completely stuck at a setting of 4 meters. Would anyone be able to suggest me what I can do?
Also please let me know if it's ok to ask this question here or that I should start a new thread.
Best, Edwin
 

3DJack

Member
Joined
Jul 5, 2015
Messages
44
Format
Medium Format
A long while ago I promised to give what help I could with the Belplasca's film advance mechanism. I've finally got 'round to making this little video clip of the one-frame/three-frame mechanism at work. Please excuse my awful speaking voice!

Avortex, is this topic still alive? Sorry I was so long getting back to you. Let me know if this video clip is of any help.

Welcome Edwin! Yes, this subject might warrant a new thread, but we've been using this for general Belplasca repairs. I've just taken the front off one of my Belplascas as you will see from further back in the thread. To get to the focusing mechanism you have to loosen the three grub screws around the focusing ring, but what I failed to mention is that this could loose you the lens' register. The aperture ring is indexed by the iris mechanism, but the focus ring is NOT indexed. If you are confident that you can re-register the lens then you can just pull it all apart. If not, and I can find a few hours spare next weekend I'll describe what I did.

Bed time for me!
Jack
 

evdh

Member
Joined
May 21, 2017
Messages
2
Location
Netherlands
Format
Medium Format
Jack, thanks for the quick reply!
I'm o.k. to take of the focusing ring (and the apperture ring). I do understand that I'll have to calibrate it afterwards.
How can I take off the front cover? It seems I have to remove the black foil that is covering the camera. Any advice on how to do this? And how can I put it back the best way? what glue to use?
Best! Edwin
 
OP
OP
avortex

avortex

Member
Joined
May 16, 2012
Messages
136
Location
The Twilight Zone
Format
35mm
Hi, Jack!
Yes, I'm still stuck on it. After pressing the shutter, the camera doesn't advance. If I keep the shutter pressed, it advances freely.
I've made this little video where you can see it:


Thanks again!
 
Last edited:

3DJack

Member
Joined
Jul 5, 2015
Messages
44
Format
Medium Format
Okay, I can see the problem. There's something wrong with the lever, the L shaped lever. The end that should engage in the cam isn't doing so. From your video clip it looks like it has been repaired? It that solder or weld I can see on it? I haven't got my Belplasca in front of me right now, so at the weekend I'll remove that lever from my camera and we can compare it with yours.
 
OP
OP
avortex

avortex

Member
Joined
May 16, 2012
Messages
136
Location
The Twilight Zone
Format
35mm
Thanks, Jack! Yes, it has been repaired three times by 2 different repairmen. In all cases, it stopped working after a pair of rolls...
In fact, I thought my camera was not possible to repair and closed the case some months ago.
 

3DJack

Member
Joined
Jul 5, 2015
Messages
44
Format
Medium Format
Nothing is impossible. Do you still want me to take this lever off my camera so we can see how it differs from yours? You'd have to remove yours too. I would strongly recommend you go ahead! This is a superb camera and I've used lots of cameras. If the repair involves work on this little lever, then it may take some time. Don't expect results for a while yet.
 
Last edited:

3DJack

Member
Joined
Jul 5, 2015
Messages
44
Format
Medium Format
Hello Avortex,
Attached are three photos of this lever taken from my working Belplasca. It is easily removed by undoing the single screw that is its pivot. Notice that on mine the head was smothered in locking compound. Dunno why they used so much? You must remove any such compound from the slot completely or you risk chewing the screw head. I suggest you remove the same lever on your camera and compare it with my photos. The retaining screw is a clever little component with a cut in it to retain the spring. There is no need to remove the spring from the screw.

Look carefully at both the spring and the lever. Repairing the lever is quite possible, but if the spring isn't right, that's a much bigger problem. Notice that one end of the spring is bent into a hook shape. The picture 'Suspect. jpg' is the tab that engages in the cam that provides the 1/3 frame advance; is yours the same?

Good luck!
Jack
 

Attachments

  • ViewFromAbove.jpg
    ViewFromAbove.jpg
    87.7 KB · Views: 179
  • ViewFromBelow.jpg
    ViewFromBelow.jpg
    95 KB · Views: 184
  • Suspect.jpg
    Suspect.jpg
    17.9 KB · Views: 180

3DJack

Member
Joined
Jul 5, 2015
Messages
44
Format
Medium Format
A slight change of subject here. Attached are some photos of how I've been using flash with my Belplasca for the last three years. This mod has the attraction of being completely reversible. I removed the bottom of the camera and soldered a PC cord to the two solder joints there. The existing X socket has to be removed (and kept somewhere safe) to allow the PC cord through, and the cord can be routed up through the ERC to the top where it can be plugged into the flashgun. The ERC can be closed if the PC connector is positioned just in front of the top cover as shown. The tape on the bottom of the camera looks a bit messy, but it's covered by the case! As you will notice, the PC cord has a PLUG on and not a socket like was originally in the bottom. This is because the PC connector on modern flash guns is always a socket? Seems the wrong way round to me, but that's how it is. Of course this doesn't solve the problem of the Belplasca's cold shoe shorting out the hot-shoe contact of modern flashguns. There were some flash guns where you could switch off the hot-shoe X contact, but the modern ones I've come across don't do that. I can't abide those wobbly hot/cold flash adaptors, so I just took the bottom of the flashgun and un-soldered the hot-shoe contact. This again is a mod that's completely reversible.

Curiously, the Belplasca's red wire in the chassis connection and the blue wire is the switched. At least that how mine was wired. Connect the screen of the PC cord to the chassis and the centre core to the switched.
 

Attachments

  • WiredFlashLead1.jpg
    WiredFlashLead1.jpg
    178.1 KB · Views: 178
  • WiredFlashLead2.jpg
    WiredFlashLead2.jpg
    221.2 KB · Views: 194
  • PCsocket1.jpg
    PCsocket1.jpg
    303.9 KB · Views: 200
  • PCsocket2.jpg
    PCsocket2.jpg
    362.1 KB · Views: 195
  • WiredFlashLead3.jpg
    WiredFlashLead3.jpg
    194.3 KB · Views: 178
  • WiredFlashLead4.jpg
    WiredFlashLead4.jpg
    204.7 KB · Views: 203
  • WiredFlashLead5.jpg
    WiredFlashLead5.jpg
    213.8 KB · Views: 209
  • WiredFlashLead6.jpg
    WiredFlashLead6.jpg
    155.6 KB · Views: 197
OP
OP
avortex

avortex

Member
Joined
May 16, 2012
Messages
136
Location
The Twilight Zone
Format
35mm
Jack, sorry for my late answer. Lots of work during the last weeks...
I finally took some pictures of my lever. My phone doesn't have macro, but the problem is visible. I believe the repairman did a so-so work with it. Here it is:
 

Attachments

  • 2017-06-25 17.09.44.jpg
    2017-06-25 17.09.44.jpg
    299.6 KB · Views: 162
  • 2017-06-25 17.10.15.jpg
    2017-06-25 17.10.15.jpg
    389 KB · Views: 174
Photrio.com contains affiliate links to products. We may receive a commission for purchases made through these links.
To read our full affiliate disclosure statement please click Here.

PHOTRIO PARTNERS EQUALLY FUNDING OUR COMMUNITY:


Ilford ADOX Freestyle Photographic Stearman Press Weldon Color Lab Blue Moon Camera & Machine
Top Bottom