The Zone VI method is a mechanical solution to an optical problem. There are obvious pitfalls. Vaughn's suggestion is a direct and simple optical solution to an optical problem.
Jstraw -- Both the head and the lens plane on my DeJur Versatile Professional 4x5 are tiltable, so perspective correction can be made on the baseboard with edge to edge sharpness. With many enlargers, the easel and either the film plane or the lens board must be tilted for this.
His method is fine, as far as it goes...if you don't have a concern about convergence of parallel lines.
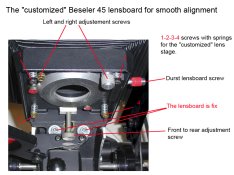
Is there a real reason to use the versalab if your lens stage cannot be adjusted independently from the negative stage? Your DeJur is properly designed for such adjustments. My Beseler is not, unless I incorporate the modifications to the lensboard.
Some here seem to be describing a version of the Beseler MX series that has an adjustable lens stage that I'm unfamiliar with. Rather than deny its existance, I continue to ask for more information about it. It may be that it exists or it may be that some people are unaware that altering the position of the entire head does nothing to correct any lack of parallelism between the lens and negative stages.
With the stock configuration as I know it, those adjustments can be based on the position of the lens stage or the position of the negative stage but their relative positions will remain unchanged.
I can't afford to change enlargers at this time but if I knew then what I know now, I'd have never bought the MXT for two primary reasons...the lack of these separate alignment controls and the difficulties in fine focus adjustments..both inherent in the design.
When anyone hints at things that I don't know about that can make life with an MXT more tolerable, my curiousity is aroused!
 My alignment tool is the Versalab. I hadnt used it for a while so I had to go down and look last night. I knew it looked like the Versalab unit but I would have bet the farm that it was from Zig Align. Anyway, its a nice tool, and, although the rubber band solution is a little hokey, it works really well. I make a lot of large (36 to 40 wide) prints from 4x5 and 5x7 negs and proper alignment makes a big difference when printing that big.