I recently acquired one of these on ebay,but the only instructions I can find are in German(it is mde by a German company). Doe s anyone have English instructions,or can you tell me how it works? I need all the help I can get with this one! Thanks. Alex Muir
-
Welcome to Photrio!Registration is fast and free. Join today to unlock search, see fewer ads, and access all forum features.Click here to sign up
You are using an out of date browser. It may not display this or other websites correctly.
You should upgrade or use an alternative browser.
You should upgrade or use an alternative browser.
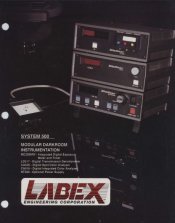
Wallner Report enlarger meter/timer
-
A
- Thread starter Alex Muir
- Start date


Recent Classifieds
-
For Sale Canonet QL17 Rangefinder
- Started by davela
-
For Sale 85mm F2 Olympus Zuiko for OM 35mm System - Bargain!
- Started by davela
-
Want to Buy Clean Zeiss Ikon ZM
- Started by NortheastPhotographic
-
Want to Buy WTB FM3a Black
- Started by samuelphoto
-
For Sale FS: Lomo LC-Wide, 35mm point and shoot w/ 17mm f/4.5
- Started by dirkfletcher
Forum statistics
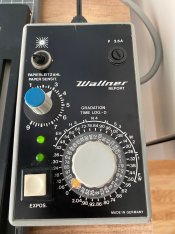
It likely has a light sensing probe and base unit with a paper sensitivity dial, a time dial (likely both have log scales) and maybe a set once overall calibration dial, as well as some way to figure when the sense bridge has been balanced. There is likely a switch to swing it from balance mode to expose mode, and a button to initaite exposure. It may have a socke for the safelight, and want to extinguish the safelight when balancing the bridge. I describe it generially because they all work similarly; I have a Melico.
You make a print without the ananlyser. Note the time that made it Don't change anything on the enlarger, except perhaps to remove filtration if you printed with a filter in the light path. Put the probe on the baseboard where the first hint of tone away from pure white happens in the successful print.
Set the unit in expose mode, and press the expose start button. Note how long the enlarger light stays on once it has been connected to the enlarger socket on this device. It won't match the successful exposure time on first try. Adjust and iterate the test unitl the timer leaves the enlarger on for as long as the test print took.
Don't touch the time adjust dial again for now, and leave the spot probe in place as well. Turn off the safe light (if not switched thought the timer/analyser) Adjust the paper sesnitivity dial unit the bridge balances. If there is a thrid overall dial, it may need to be tweaked to allow the paper sensitivity dial to get into its mid range to balance the bridge. Once the overall sensitivity range is set it is not changed unit you change enlargers, or the bulb burns out, maybe.
Now change the head elevation of the enlarger, and refocus. Put the spot probe in the same place as you proviously wanted to place the lightest tone away from white - usually the densest part of the neg that still contains information (but perhaps not clouds in a sunny sky line for landscapes, which will likely need burning in).
Now, withotu changing the paper sensitivity dial, adjust the time dial to make the bidge indicator balance. You may need to adjust the lens aperture if the change was large. make the print, using the ananlyser to time the enlarger. It wil adjust the time so the same amount of light intensity hits the paper at the new head height. Then, once you are set up, you are set to go with that paper on any negative.
I write the paper speed on the paper envelope for future reference. Paper speed can vary with different filtration, and not all probes are multi spectrally snesitive, so I have described how to work with white light; you might need to flick filters in and out; you might not.
You can also set them up to test for contrast range. Set time to 1, and meter the thinnest spot in neg projection where you want detail in the shadows. Adjust paper speed to balance bridge. Move spot to densest part of neg, where you ant to place just white. leave paper speed alone, and move time dial to see how much more time than the 1 setting to get tone in the dense part. My unit when it measures 2 needs a grade 4 or higher paper, when it reads 10 or more needs a grade 1 or less paper, and I have calibrated it for points in between. Be sure to reset paper speed to that which suits the paoer after this test.
If the timer analyser has colour filters and different sensitivities for different colours then it is meant for colour printing, but what I have described here can let you use the device to pick the white light filter position in the spot head, and likely use it the way I have outlined. Hope you find this help info is worthwhile.
- Joined
- Jul 9, 2011
- Messages
- 1
- Format
- Medium Format
Please help 
You said you found some manual in German. Could you tell me where - German works perfectly for me
Or if you could answer my question - is it possible to set a time shorter than 1 sec? It seems so, but I can't figure out how..
You said you found some manual in German. Could you tell me where - German works perfectly for me
Or if you could answer my question - is it possible to set a time shorter than 1 sec? It seems so, but I can't figure out how..
craigclu
Subscriber
- Joined
- Oct 25, 2011
- Messages
- 1
- Format
- 127 Format
hi dear.
someone can help me with wallner system500?
i have got one but i haven't the instructions!
thank you
matteo/cameraoscura.org
someone can help me with wallner system500?
i have got one but i haven't the instructions!
thank you
matteo/cameraoscura.org
craigclu
Subscriber
Get me your email address and I'll send a copy to you.... It's a bit unique so you'll appreciate a bit of guidance to acclimate but in practice, the system is quite effective.
craigclu
Subscriber
PM Sent for email address....
HI,
I'm looking also for a manual or some description for Wallner CA2009 as I can't find any information about this device anywhere in the Internet. Would you be able to share some information if you have? Many thanks in advance.
Slawek
craigclu
Subscriber
HI,
I'm looking also for a manual or some description for Wallner CA2009 as I can't find any information about this device anywhere in the Internet. Would you be able to share some information if you have? Many thanks in advance.
Slawek
I lost some things in a computer glitch awhile back. Let me do a little looking here and get back to you....
craigclu
Subscriber
I've found copies of LD517 Densitometer.PDF, Wallner MC509MW Meter_Timer.PDF, WallnerSystem 500 Brochure.PDF, Wallner CA526 Color Analyzer.PDF. If you get me your email address, I can send them along in case there is some crossover information for you.
I've found copies of LD517 Densitometer.PDF, Wallner MC509MW Meter_Timer.PDF, WallnerSystem 500 Brochure.PDF, Wallner CA526 Color Analyzer.PDF. If you get me your email address, I can send them along in case there is some crossover information for you.
Many thanks!
Please send me to: sdejneka@hotmail.com
I'm really happy!
craigclu
Subscriber
Sent. Hope it helps!
- Joined
- Jun 8, 2012
- Messages
- 1
- Format
- 35mm
Can you send me all pdf ?I've found copies of LD517 Densitometer.PDF, Wallner MC509MW Meter_Timer.PDF, WallnerSystem 500 Brochure.PDF, Wallner CA526 Color Analyzer.PDF. If you get me your email address, I can send them along in case there is some crossover information for you.
Many thanks
massimorussello@alice.it
I have acquired a Wallner D8901 timer, which works with a logaritmic timing method but I do not know how to use it properly. Also the mentioned "probe" is missing. Is there a manual available? Can I still use it?
Also I am looking for more information about this kind of timing to use with my enlarger, without the probe. I am confortable with traditional timing and wish I could use it with this basic method. Any tips on where to start?
Also I am looking for more information about this kind of timing to use with my enlarger, without the probe. I am confortable with traditional timing and wish I could use it with this basic method. Any tips on where to start?
Attachments
craigclu
Subscriber
I have some Wallner materials but nothing that seems to pertain to this timer. I can send it if you get me your email address. There could be some crossover info as a general approach?
uyucel@yahoo.com Thank you.I have some Wallner materials but nothing that seems to pertain to this timer. I can send it if you get me your email address. There could be some crossover info as a general approach?
I have acquired a Wallner D8901 timer.
You have not.
"D8901" was a postal code.
The photo of yours shows the plain "Report" model.
(There had at least been one further Report model, though with added figures and from a two generations more modern series.)
Thanks for the clarification. I am still open to suggestions on how to use it.You have not.
"D8901" was a postal code.
The photo of yours shows the plain "Report" model.
(There had at least been one further Report model, though with added figures and from a two generations more modern series.)
You will have to calibrate the Wallner for you paper, the highlighted numbers on the big wheel are seconds or parts of seconds. The switch is to turn on and off the enlarger connected to the Wallner.
When you a have a correct exposed paper you set the time with the big knob, choose a mid grey with the sensor then you change the sensitivity with the top knob until both green leds are on.
Now your Wallner is calibrated and you can enjoy enlarging. The white button is to expose the paper with the time set.
craigclu
Subscriber
Generalizing on Wallner gear a bit.... The Wallner system that I have had me indexing paper batches and dialing in the batch index. The main procedure they promoted with their gear was to find the minimum exposure for maximum black and then determine the contrast range of the negative. Once I became accustomed to it and with a little experience, I was getting very acceptable initial prints. Virtually all prints of general subjects have at least a small amount of something that can go black and once you are tuned into their system, it is quite easy to get nice results on a wide range of negatives. This equipment seems to have been developed for commercial printing applications and minimizing test prints.
I hesitate bringing up the max black concept as it seems to arouse some folks to balk at the idea. Even if it's just eyelashes, it can get you 95% right on when you know the contrasts you're dealing with on the negative, too. I was printing some old, found family negatives and it was a handy system for printing an extreme spread of other peoples' negatives. Almost everything worked one-shot.
I hesitate bringing up the max black concept as it seems to arouse some folks to balk at the idea. Even if it's just eyelashes, it can get you 95% right on when you know the contrasts you're dealing with on the negative, too. I was printing some old, found family negatives and it was a handy system for printing an extreme spread of other peoples' negatives. Almost everything worked one-shot.
Anyway, Wallner had a good reputation in West-Germany. They produced several generations of meters. One triple combo even got the name Wallner-Tower. Then the small firm was taken over by an employee and proceeded as FEM-Kunze, which has long gone too.
Hi, does anyone still have manuals for the Wallner 500 (darkroom clock, densitometer and colour analyser)? I'd very much appreciate if you could contact me via priv or send them to ***@***
Moderator's note to @Mikszo and others:
We have deleted the email address in this thread, and strongly recommend that people don't post private email addresses or other private information in publicly visible threads. We see that there has already been a response to this request - great.
In general, we recommend that people with low post counts post their request that longer term members start a Private Conversation ("DM") them, so that they can share the email address there. If that doesn't work, feel free to report your own post and make the request that we consider turning on access to the Private Conversation for them.
Last edited by a moderator:
| Photrio.com contains affiliate links to products. We may receive a commission for purchases made through these links. To read our full affiliate disclosure statement please click Here. |
PHOTRIO PARTNERS EQUALLY FUNDING OUR COMMUNITY:  |