Very high glossy surface on Silver Gelatin Print - how to make it?

Brentwood Kebab!

A
Brentwood Kebab!

  • 0
  • 0
  • 0
Summer Lady

A
Summer Lady

  • 0
  • 0
  • 0
DINO Acting Up !

A
DINO Acting Up !

  • 0
  • 0
  • 0
What Have They Seen?

A
What Have They Seen?

  • 0
  • 0
  • 0
Lady With Attitude !

A
Lady With Attitude !

  • 0
  • 0
  • 0

Recent Classifieds

Forum statistics

Threads
198,755
Messages
2,780,464
Members
99,698
Latest member
Fedia
Recent bookmarks
2

xkaes

Subscriber
Joined
Mar 25, 2006
Messages
4,790
Location
Colorado
Format
Multi Format
That's the way it's usually done. It must be fiber-based paper and the ferro-type press must be spotless.
 

bdial

Subscriber
Joined
Jan 2, 2005
Messages
7,465
Location
North East U.S.
Format
Multi Format
ferro-type plates are not very common these days. Basically they are a sheet of chrome plated steel which has been polished to a mirror finish. A heated dryer helps but isn’t essential. There are (were) dryers with a built in ferro-type surface.
If you cannot find any of that stuff, it might work to squeegee the print onto a piece of glass. With either a ferro-type plate, or a substitute, the print should pop off once it is fully dry. The surface must be very clean. The risk is that the emulsion will stick instead of popping off, and tear. There are reasons it is not a popular process. 😉

I took a plate to the recycling center last week, but it was corroded and badly scratched, so not usable for its purpose.
 

JensH

Member
Joined
May 30, 2017
Messages
505
Location
Schaumburg, Germany
Format
Multi Format
Hi,

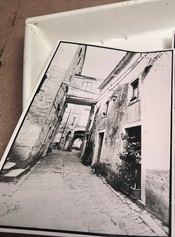
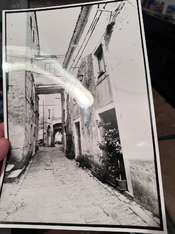
I would like to make my glossy print even more glossy, almost like a glass. Something like here:


I suppose that is achieved with hot paper drier, emulsion side on metal? Or?

Thanks,
Darko

Moin Darko,

indeed such a high gloss fb print has it's special beauty. :smile:
A hot paper drier is best (Büscher Presse or such), the paper is bathed in a solution containing gelatine and photo flo (I used Tetenal Glanzol), rolled onto a ultra clean cromium coated high gloss metal plate and put on the drier. After some time a crackling sound indicates that the process is on it's way...
Glas plates can be used without heating, but it can be tricky to get an even surface.

Jens

P.S.: Some good points here in our german forum:
https://forum.grossformatfotografie.de/forum/thread/2529-baryt-papier-trocken/?pageNo=2
 

Paul Howell

Subscriber
Joined
Dec 23, 2004
Messages
9,678
Location
Scottsdale Az
Format
Multi Format
You can find the plates as part of a electric print dryer. Most are two sided, there is a canvas cover that is used to keep the print flat. Issues are finding a polish to clean the plate. I use chrome polish, the kind used on classic cars. Next is that no one makes a print flattening solution, I have an old bottle of Kodak, not sure if it is still good. I don't plug my dryer in, I soak the prints in distilled water (my water is very hard and I don't want any white spots) swiggy the print onto the plate and allow to air dry until it pops off. It will take one try after another until you a decent gloss. I think the print dyer are easier to find than just the plates.


DREW WILEY

Member
Joined
Jul 14, 2011
Messages
13,928
Format
8x10 Format
A true high gloss medium was briefly and experimentally made back when Ilford coated a black and white VC emulsion onto the same polyester base material as Cibachrome used. I don't think it was ever available to the public. That kind of substrate can't be drymounted; but it is distinctly shinier than even ferrotyped paper. My brother sometimes ferrotyped his prints; but that was back in the 60's.

While it would be technically feasible to make something like that again, the cost would probably be prohibitive.
 

xkaes

Subscriber
Joined
Mar 25, 2006
Messages
4,790
Location
Colorado
Format
Multi Format
Along the same lines, if you can find one of these dryers, they are usually very inexpensive -- but make sure it's in good shape. Another drawback is that they limit the size of the print you can make -- they were only made in a few sizes.
 

Don_ih

Member
Joined
Jan 24, 2021
Messages
7,719
Location
Ontario
Format
35mm RF
It's worth keeping in mind that the old glossy paper would've been fixed in a hardening fixer. Prints were also quite small, for the most part. The larger the paper, the greater the potential for edge wrinkling as drying - which will mess up the ferrotyping. I don't think using heat is a good idea. I did that once then had to work rather hard to get the print off (which was destroyed). The best luck I've had was using some furniture paste polish on the dryer surface and squeegeeing the print onto it and waiting for it to come off on its own.
 

Ian Grant

Subscriber
Joined
Aug 2, 2004
Messages
23,262
Location
West Midland
Format
Multi Format
A true high gloss medium was briefly and experimentally made back when Ilford coated a black and white VC emulsion onto the same polyester base material as Cibachrome used. I don't think it was ever available to the public. That kind of substrate can't be drymounted; but it is distinctly shinier than even ferrotyped paper. My brother sometimes ferrotyped his prints; but that was back in the 60's.

While it would be technically feasible to make something like that again, the cost would probably be prohibitive.

There may well have been an experimental coating on Ilford's small coating machine & line, it's used for test coatings, and filters, But you are right it was never old commercially.

A company called John Blishen, in London, a Graphic Arts supplier, used to sell a range of papers with colour bases, and also Opaline. The latter was on a polyester base and had a very high gloss, like Cibachrome. It may have been coated by Kentmere. The emulsions were all Grdae 3

I was told by Ilford that one of the reasons they bought Kentmere was because they were the market leaders for similar Inkjet paper, Opaljet, which had large volume sales in the Graphics industry.

Ian
 

koraks

Moderator
Moderator
Joined
Nov 29, 2018
Messages
22,725
Location
Europe
Format
Multi Format
Will try to find one of those dryers, my most used paper size is 30x40cm, so I will see how difficult is to find one.

Alternatively (and probably easier, certainly cheaper): get a plate of plexiglass and squeegee your wet print to it, emulsion to the place. The plexiglass needs to be virgin; no burrs, scratches etc. Prints will release *a lot* easier from plexi than from actual glass, metal plates etc.
No drier needed, just a little patience.

There are some threads on this here on Photrio as well as at least one video by the Naked Photographer as I recall.

I obtain a similar effect when doing dual-transfer carbon prints; after the second transfer from an intermediate support to the final paper, the print also dries to a high gloss since the gelatin layer conforms to the surface of the intermediate support (sheets of polythene film in my case):
1718284869862.png
 

Paul Howell

Subscriber
Joined
Dec 23, 2004
Messages
9,678
Location
Scottsdale Az
Format
Multi Format
If you are not interested in an "archival" print, in the old days for judged exhibitions folks just lacquered prints for a gloss finish. I have a few how to books that provide details, basic dust free print, dust free spay room, and good quality lacquer, and spray gun. You might get the same effect with a poly type gloss spray can.
 

DREW WILEY

Member
Joined
Jul 14, 2011
Messages
13,928
Format
8x10 Format
Traditional butyl acetate print lacquers are now banned in much of the country - highly flammable and very risky to health. Those tend to yellow within ten years anyway. But spray can clear acrylics are available at art stores everywhere. To my eye, lacquering lends more of a cheapie look; in other words, it looks coated. There are also cold mount clear veneers available; but that requires more skill and special equipment.

I never got around to testing whether pure teflon sheeting could be used in lieu of metal plates for ferrotyping.
It would be hell to polish, so everything would depend on how smooth and consistently thick the sheet is to begin with.

Some people have experimented with simply brushing on extra gloss gelatin. It's hard to get even without a coating machine. Since I have experience coating hardwood floors and furniture surfaces, I have had good luck applying thinned out gum arabic using a microfiber applicator on the print surface; but success varies depending on the type paper itself, and requires practice and pre-testing. Most FB papers simply absorb it too much, especially the more "open-weave" type of paper base being used today.
 

koraks

Moderator
Moderator
Joined
Nov 29, 2018
Messages
22,725
Location
Europe
Format
Multi Format
Some people have experimented with simply brushing on extra gloss gelatin.

A fairly easy way to do this would be to soak the print, put it on a level board/glass plate/worktop and blot off excess water. Let dry briefly until the surface is still tacky. Then pour a 6%-8% gelatin solution onto it; about 50ml covers an 8x10" surface. Spread it with fingers or a comb. It'll pool nicely and set within a few minutes.

However...this will not create a high gloss by itself. It'll just create a thicker supercoat that can consequently be used for ferrotyping, and may be easier to get to ferrotype than the original paper's top coat.

Without ferrotyping, an extra gelatin layer will simply conform to the existing print surface, only evening out the unevenness very slightly. The "gloss gain" will be limited.
 

Erik L

Subscriber
Joined
May 9, 2007
Messages
829
Location
Grand Junction CO
Format
8x10 Format
I’ve used a tea kettle and steam the print by moving it around while the kettle is producing steam. It adds a bit of gloss. It also has the benefit of making any retouching spots appear less noticeable.
 

Ian Grant

Subscriber
Joined
Aug 2, 2004
Messages
23,262
Location
West Midland
Format
Multi Format
I’ve used a tea kettle and steam the print by moving it around while the kettle is producing steam. It adds a bit of gloss. It also has the benefit of making any retouching spots appear less noticeable.

Something I've done many times, and it works well, RC or FP papers.

Ian
 
Joined
Jul 31, 2012
Messages
3,347
Format
35mm RF
I was the one that came up with the plexiglas thing years ago after being frustrated with ferrotyping plates that just didn't work. I think the static is what makes the plexiglas work. It needs to be clean and it helps to put a tiny bit of wax on the plate. I used to use Butcher's Wax but I don't think it is around anymore. Any organic wax should be fine. Avoid car waxes. One of the benefits of using plexi is you can flip the shebang over and see if the print is making good contact. Any dust that is trapped will be apparent. You could also put the print on the plexi underwater and that should solve the problem. I use a brayer to remove all the excess water. Once I started using the plexi I had far more success than failures. One thing to add is I put a towel over the print so it doesn't dry too fast. That seems to help. When the print is done it won't fall off the plexi like it does off a ferrotyping plate. I use a guitar pick to catch an edge and remove it.

Hope that helps you.
 
OP
OP
darkosaric

darkosaric

Member
Joined
Apr 15, 2008
Messages
4,568
Location
Hamburg, DE
Format
Multi Format
There are some threads on this here on Photrio as well as at least one video by the Naked Photographer as I recall.

I looked at the video - and it looks really not that much complicated. I have found some metal plate in my basement, 2 test prints already drying there. But I will definetlly get some plexiglas.
 

koraks

Moderator
Moderator
Joined
Nov 29, 2018
Messages
22,725
Location
Europe
Format
Multi Format
I have found some metal plate in my basement, 2 test prints already drying there.

OK, great. In case they don't pop off when dry, you can soak them for a couple of hours and then peel them off again. The prints usually don't survive.
Then again, maybe they will pop off nicely. I've had some luck with small (13x18cm) prints. Larger prints - not so much.
 

bernard_L

Member
Joined
Feb 17, 2008
Messages
2,031
Format
Multi Format
Last edited:

DREW WILEY

Member
Joined
Jul 14, 2011
Messages
13,928
Format
8x10 Format
Overcoating with a sheet of plexi more applies to framing options, not the print surface itself. That whole category of framing is called "face mounting", and there is a variety of kinds. I developed my own proprietary hermetically sealed method to do that, which would be quite expensive to do today, given the dramatic price hike in materials. Thirty years ago it was already a thousand dollar upcharge over normal framing cost per large print. It involved a special big vacuum chamber which I have since dismantled (took up too much space).

That linked service uses fairly common current technology, but doesn't factor the serious expansion/contraction differential between acrylic and the backing material, which comes into serious play on bigger sizes. An alleged 75 year warranty means nothing, since neither the company itself nor its clients are going to be around anywhere near that long. And under serious commercial lighting, the extrapolated fade rate is going to be faster anyway.

But one could hypothetically print a monochrome subject on present Fujiflex Supergloss RA4 polyester media. It would just be rather difficult to tame a black and white negative to neutrality without some sort of special digital tweaking and commercial laser output.

Otherwise, No - an acrylic face-mounted glossy RC print does not really match the deep "3D" look of face-mounted Ciba or Fuji Supergloss. I should know. I've done a lot of both. Ferrotyping of FB prints is something more subtle, with its own due niche, and suitable for prints in portfolios, and not just framed on walls. In this day and age, one could design their own oversized hot ferrotyping press without too much difficulty, though probably not inexpensively.

I will never forget the special look of ferrotyped little 8x10 dye transfer prints from back in the 60's, which were on Kodak F surface FB paper. I've also seen full gloss handmade color carbon transfer prints - beautiful, but also a bit unnerving seeing gloss with surface relief - I personally prefer looking at carbon prints which aren't so shiny.
 
Last edited:
OP
OP
darkosaric

darkosaric

Member
Joined
Apr 15, 2008
Messages
4,568
Location
Hamburg, DE
Format
Multi Format
OK, first test of ferrotyping was actually not bad. It is hard to show this on pictures, but here is before and after. Test print was 20x30cm in size, and after looks very similar to high gloss of RC paper, it is not extreme, but definitely more glossy than without.
 

Attachments

  • before.jpg
    before.jpg
    1.3 MB · Views: 36
  • after.JPG
    after.JPG
    614.4 KB · Views: 41
Joined
Jun 11, 2005
Messages
1,807
Location
Plymouth. UK
Format
Multi Format
Ilford Multigrade Deluxe RC Glossy paper dried in an Ilford 1250 RC paper drier will give you the look you are after with much less rigmarole than ferrotype of FB papers.
 

DREW WILEY

Member
Joined
Jul 14, 2011
Messages
13,928
Format
8x10 Format
Fair or not, RC is still looked upon by many as an unwanted step-child. Different look, really. It certainly doesn't drymount well.
 
Last edited:
Photrio.com contains affiliate links to products. We may receive a commission for purchases made through these links.
To read our full affiliate disclosure statement please click Here.

PHOTRIO PARTNERS EQUALLY FUNDING OUR COMMUNITY:


Ilford ADOX Freestyle Photographic Stearman Press Weldon Color Lab Blue Moon Camera & Machine
Top Bottom