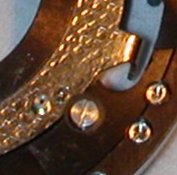
Use of Tri-Flow on shutter?

Mansion

A
Mansion

  • 0
  • 1
  • 18
Lake

A
Lake

  • 3
  • 0
  • 16
One cloud, four windmills

D
One cloud, four windmills

  • 1
  • 0
  • 16
Priorities #2

D
Priorities #2

  • 0
  • 0
  • 16
Priorities

D
Priorities

  • 0
  • 0
  • 14

Recent Classifieds

Forum statistics

Threads
199,016
Messages
2,784,665
Members
99,773
Latest member
jfk
Recent bookmarks
0

mdarnton

Member
Joined
Mar 4, 2008
Messages
463
Location
Chicago
Format
35mm RF
I have a story, though I'm not going to suggest this approach in this case. I bought a view camera that had been stored who-knows-where, and everything in the old dial-set shutter had rusted. The blades had completely rusted, no screws could be removed, and the shutter really stuck. The lens, an uncoated Tessar, was filthy, but that's a different issue. I removed the lens, then I started by soaking the whole shutter in toluene, then while it was wet, I steel-wooled the blades as much as I could reach them and rinsed with toluene.

Eventually I got the shutter going, wet, but not dry. At that point I started dumping in powdered teflon, way too much, working the shutter and washing in the teflon with more toluene, and let the whole thing dry out. After it was completely dry, I wiped away what I could of the teflon, worked the shutter over and over, and blew out what air would reach with an air hose.

Now, believe it or not, the shutter is working as new. What I have, of course, is a completely oil-free shutter with a lot of teflon in it. It works. It probably won't last forever now, but it was already a total loss when I started. I'm pretty impressed with teflon powder.

Teflon powder is used in piano work, and piano tech places sell it. But hey, there's the internet--if you can't find it there, there's something wrong with you, right? It's handy stuff to have around, for other reasons.

By the way, some shutters are made to be run completely dry! Ilex, for one, and they're a mass of stamped steel inside, not finely machined brass.
 
Last edited by a moderator:
OP
OP
peter k.

peter k.

Member
Joined
Nov 27, 2011
Messages
1,404
Location
Sedona Az.
Format
Multi Format
02Pilot said:
None of that gets lubricated. Lubrication is selectively to the parts above that. See this link for some photos of the Copal SV; there are links to other photo sets for the MXV, which is similar: http://pheugo.com/cameras/index.php?page=lynx5000

Newbie Newbie don't be blue... there's allot to learn, just soak it up and do ... :whistling::sad::blink::D
from link given...
"Usually a slow shutter indicates that there is dried lubricant and dirt in the mechanism."

Makes sense, its not just the shutter leaves which I have been concentrating on.. so welcome to new territory..
Next...
going deeper (into 20 thousand leagues under the sea..) :tongue:
 

shutterfinger

Member
Joined
Feb 25, 2013
Messages
5,020
Location
San Jose, Ca.
Format
4x5 Format
Peter, the blade controller with blades in place and main plate installed in the case/shutter housing with no springs or mechanism connected, should move with the weight of a 1/4 inch long down feather applied to it, be it the opening or closing direction.

mdarnton, submerge rusted parts in cider vinegar and allow to sit for 15 minutes for lightly rusted pieces to an hour or more for heavily rusted parts. Remove from the vinegar, rinse with water , dry or wipe off the vinegar and immediately coat with oil, teflon, graphite, or metal bluing to prevent rust from forming back which will happen within 30 minutes on steel. The dial set Compound shutters I have seen are very robust so it does not surprise me that yours came back to full operation. They are not that complex If you decide to disassemble it for a full CLA.
 

lxdude

Member
Joined
Apr 8, 2009
Messages
7,094
Location
Redlands, So
Format
Multi Format
submerge rusted parts in cider vinegar and allow to sit for 15 minutes for lightly rusted pieces to an hour or more for heavily rusted parts.

I've heard this before. What's the benefit of cider vinegar over regular vinegar?
 
OP
OP
peter k.

peter k.

Member
Joined
Nov 27, 2011
Messages
1,404
Location
Sedona Az.
Format
Multi Format
Peter, the blade controller with blades in place and main plate installed in the case/shutter housing with no springs or mechanism connected, should move with the weight of a 1/4 inch long down feather applied to it, be it the opening or closing direction.

Decided before I got into 'ell fire with the speed governor, I decided to give a test as you described.
With the speed mechanism out, and everything disconnected.. and not having a 1/4" down feather that I wanted to sacrifice, :cool: I instead took a tooth pick, holding it by its very tip, tried to move the blades... Hmmm.. its seems just to stiff, and wouldn't move.
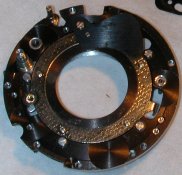
Sooooo... will take it apart tomorrow and clean it again... :whistling:
 

shutterfinger

Member
Joined
Feb 25, 2013
Messages
5,020
Location
San Jose, Ca.
Format
4x5 Format
The starting position of the blades, the assembly rotation, and blade type are important. The other obstacle is sitting the case onto the plate without knocking the blades out of position. The large hole with slot in front of it are where the blade controller pins go to allow for correct operation. I would loosen the plate mounting screws 1 turn and try moving the controller. Sometimes blades and controller will seat themselves. Never force blades controller, or aperture.

This picture http://flickrhivemind.net/blackmagi...ww.flickr.com/photos/48300526@N08/17878174698 shows the blade positions.
 
Last edited by a moderator:
OP
OP
peter k.

peter k.

Member
Joined
Nov 27, 2011
Messages
1,404
Location
Sedona Az.
Format
Multi Format
Yes.. loosening up the 4 plate screws did allow it to turn much easier.
Sooo... Yes the blades are in correctly, so my intuitive.. non knowledge about shutters, is not the blades that need to be cleaned again.. but a more through cleaning of the slot where the silver blade controller (?) goes.
Does the slot, and blade controller get any lubrication?
Apug Question #2.jpg
Notice that there is a washer under the screw that acts as the pivot point for the blade.
Hmmm... when I dismantled this, and cleaned this area, there where some 'grains' or something under these washers.. that came free when the washer came off. Where these perhaps particle remains of a paper washer, that disintegrated, acting as a spacer?
I don't have time to dismantle it down to this area this morning, to see if those washers are actually touching the controller, as there is a list of pressing Honey~due requirements, that must take preference. :kissing:
Apug Question #2.1.jpg
Thanks for the help...
 

shutterfinger

Member
Joined
Feb 25, 2013
Messages
5,020
Location
San Jose, Ca.
Format
4x5 Format
The blade controller does not get lubricated. A light coat of powdered graphite or teflon might help it operate smoother.
If paper washers were used as spacers it is likely there would be more than a few grains left of them.
The screws that retain the blades and act as a pivot will A. have a shoulder that just fits the hole in the blade and is larger than the screw shaft or B. a unthreaded space under the head that just fits the blade hole.
The clearance between the main plate and the aperture cover is very shallow and the plate must be in proper alignment for it to work properly. The blade controller may not be against the edge of its slot when correctly in position.

In your picture of the main plate is this the top side or the side that is next to the aperture plate when installed?
 

paul ron

Member
Joined
Jan 22, 2004
Messages
2,706
Location
NYC
Format
Medium Format
i doubt they'd use paper shims... maybe a diy fix.

proper shims should be brass washers.
 
OP
OP
peter k.

peter k.

Member
Joined
Nov 27, 2011
Messages
1,404
Location
Sedona Az.
Format
Multi Format
Well got it apart again.. the washers where black, and they were not against the blade controller, which could turn freely under them. So I suppose they are there to keep the blade controller from moving out of the slot. See #33 bottom image. Looking closely, there was no tell tails of any other 'shims'. But took it all apart and cleaned it carefully again, and the graphite came off the Q tip, so what I put on there, was on the surface.
Got it all back together again.. and did a shutter test.. better but still not good.
So took it apart to where I could take out the speed governor. Didn't want to dismantle it, so took a toothpick and dipped the end into some sewing machine oil, and touched it on rotating ends, and then worked the governor 5 times, and repeated this three times. Gently wiped off the little excess, and flip it over and did the same again for the other side.
Put it together again, and did another shutter test...
All Right... Success..
Lowest shutter (25) speed a little slow... and (50) within min max, as was all speeds up to about 150.. (half way between 100 and 300 marks) From that location up to 300, is all the same speed.
Not bad for a camera that would not function at all, and who's shutter had been cocked, for .... many a year I'm sure, and worked on by a newbie.
It's been quite an experience... for a first time repair and CLA.
Had one problem today when removing the pin, that acts as the 'finger' so the lens can be cocked. Was pulling it out with some needle nose pliers, and instead of stopping when the one got to the shaft, I kept on pulling.. it came out of course, and the pliers closed down and it spun off to never never land.
They had nothing that small at Ace.. so for now confiscated one of my wife's needles, cut it to size and flied the ends flat, and.... wood glued, yes wood glued it in place. Will see how long this lasts. :whistling:

Is there any place you can order these from?

It should work long enough, so tomorrow when I put it all back together, and cut a 4x5 B&W strip down to 35mm will take a shot and see how light tight the case is, as it shows evidence of having been dropped in two places.

Hehawww.. and Happy New Year to all...
 

paul ron

Member
Joined
Jan 22, 2004
Messages
2,706
Location
NYC
Format
Medium Format
yup that black hole! lay a light on the floor to cast shadows of missing parts. just doing a regular sweep of your area n dumping the dirt onto newspaper will also find missing parts. you can run a magnet in the dirt to pull out steel parts.

i have a theory its a guy from the future that steals my tools n parts. he's not suposed to mess with the time continuum and return everything exactly where he got it from but i think he's suffering Alzheimer's... it may be future me.

my kids accuse me of never finishing projects.... i know future me is taking care of that so someday my kids will be surprised to see everything done.


use the force luke!
 
OP
OP
peter k.

peter k.

Member
Joined
Nov 27, 2011
Messages
1,404
Location
Sedona Az.
Format
Multi Format
As I suspected the test shot was fogged. As it turns out, top, bottom, and left, lock side of back is leaking light.
Not surprising for it had been dropped twice, once on the top side of the lens, which did not effect the adjustments, except you could never put a filter on its ring, as that was heavily dented.
And I don't think replacing the seals would do any good, as it was also dropped on the right hinge side top, which did not effect the winding mechanism, or clocking the camera once cleaned. But when first looking at it, suspected it may have a sprung back which caused it to be assigned to a shelf some where to collect dust, because with the back closed, you can push on the back and it springs back.

But one never knows until one can give it a test.. and this has been very rewarding learning experience on camera repair and CLA, and wish to thank everyone who pitched in with suggestions and comments.. thank you..

I'll be now keeping my eye open for other dead camera's that are not in as ruff condition, that actually maybe resurrected, and try my hand at it again.
 

paul ron

Member
Joined
Jan 22, 2004
Messages
2,706
Location
NYC
Format
Medium Format
good job n lots of valuable lessons learned.

how about loading your film in the dark then using electrical tape to seal out the light?... itll look like a holga.

great job, keep it up.
 
OP
OP
peter k.

peter k.

Member
Joined
Nov 27, 2011
Messages
1,404
Location
Sedona Az.
Format
Multi Format
What? More challenges... :D

Hahaha... ok your pulling a Yogi on me... " ... it ain't over till it's over "

I'm game... still have nothing to lose...

So from itsy bitsy, finey, tiny screws who want to go loose, and run on the floor like a galloping goose! To lets mold and form with gently persuasion, and finally tune a camera back, and make it true, so without a light that leaks, but at its lens that peeks, it can shoot an image, without fog, clean and clear through.
 

Sirius Glass

Subscriber
Joined
Jan 18, 2007
Messages
50,389
Location
Southern California
Format
Multi Format
Want a challenge? Try working over a carpeted floor and dropping a tiny screw.
 

paul ron

Member
Joined
Jan 22, 2004
Messages
2,706
Location
NYC
Format
Medium Format
the magnetic plate for all my years of use never worked! the got dam tiny ones the pop up like jumping beans are ALWAYS brass!

can't win some days. but if you collect enough junkers, you'll always have a spare somewhere in that overstuffed closet that requires an archeological dig.
 

paul ron

Member
Joined
Jan 22, 2004
Messages
2,706
Location
NYC
Format
Medium Format
can't quit yet. go for it!
 
OP
OP
peter k.

peter k.

Member
Joined
Nov 27, 2011
Messages
1,404
Location
Sedona Az.
Format
Multi Format
Well ...Ok will do another Yogi quote... "If you ask me anything I don’t know, I’m not going to answer."
... yet.. its so funny.. that I have to confess... alas... Hahaha,,, What we have is a Da... moment!!!
Sigh...

Ok here's the story:
So I sat down with the defunct rangefinder... to "reform it..." after taking an image that turned out fogged on three edges.. Hmmm... back did not look twisted... wasn't humped, in the center, from its drop and dribble phase from some time in the past, by person or persons unknown.
So why does the back spring back when pushed on, most likely the cause of the light leak?
Looking closer, with a magnifying glass looked at the seals... maybe one has come undone, and is doubled over, and then compressing, and springing back when pressed.
Hmmm used but... nothing like that... hmmm.. ah.. the edge where it locks into the case has its wide seal, but way down there, where the lip meets the body.. shinny, with a little black edge in the middle. Is that what is left of a seal, on and in the camera body, not the door, that's suppose to be there?
Couldn't really see ... Used a toothpick.. couldn't get it 'out' or do anything with it, and its so dang small and down in there....
Hmmm... got out a Jon Goodman kit I had, and e-mailed him to see if with the YK, if he knew if a seal was suppose to be there.
He replied... wasn't sure.. couldn't recall.
Hmmm.. well lets seal it and find out what will happen!
Cut another 35mm size piece off of the B&W 4x5 that I was using to get a single film test strip off of, and took a shot.
Grabbed the light tight roll tank to place the image again in the bottom of it... and then .... the Da Hit!!!

You silly son of a gun... because it was such a small single image, I just used 200mm of liquid in the bottom of the roll tank, without the reel. Had the top piece that you can rotate the reel with... but had not used, or put in the tank, the column that the reel gets placed on.
It was sitting aside.. with the two 35mm reels still attached to it.

Da... the light leak was from the developing... as the the top rotate piece, was letting light into the tank, as it's end had nothing that it could be inserted into, to make it light tight!
Da... Ha... Ok... oh well, ... Next... lets develop what we got and see what happens.
Yep... looks great.. no light leak.. and then this morning .. took out the seal that I had made yesterday, cut another test strip, took a shot, and developed it, Yep...
Got a new (1959) rustic, quaint, realistic, 35mm Rangefinder.
Awesome!!! Ha... It almost got put back on a shelf to collect dust, or worse, bounce again off the floor.

So why does the back spring back when pushed on?
I dunna know... but its working.. could this be normal for this kind of camera?
Anyone got one out there?
Does it do the same?
Ha.. I know nothing..
Which is obvious.. :D

Whatever... in goes a roll of 35mm, for full field test...
Venture forth... ta da...
 
Photrio.com contains affiliate links to products. We may receive a commission for purchases made through these links.
To read our full affiliate disclosure statement please click Here.

PHOTRIO PARTNERS EQUALLY FUNDING OUR COMMUNITY:


Ilford ADOX Freestyle Photographic Stearman Press Weldon Color Lab Blue Moon Camera & Machine
Top Bottom