Uneven light from Chromega D Dichroic II

Leaf

D
Leaf

  • 1
  • 0
  • 15
White Sands NP

A
White Sands NP

  • 3
  • 0
  • 21

Forum statistics

Threads
200,591
Messages
2,810,609
Members
100,308
Latest member
Sverre gjesdal
Recent bookmarks
0

gfeucht

Member
Joined
Mar 2, 2013
Messages
14
Format
35mm RF
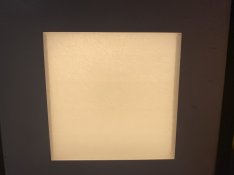
I've been having issues with uneven light from my enlarger. I'm running an Omega Chromega D Dichroic II. It was mostly on the D-B mixing box. One edge was definitely getting a lot less light.

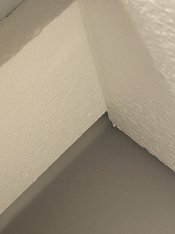
I opened up the mixing box and it all looks fresh and white - probably doesn't need a relining. However, I saw that the styrofoam is touching the diffusion plastic on the edges and it crops the light a bit. Could this be it? Is this normal?
 

Attachments

  • Photo Nov 14, 11 22 11 AM.jpg
    Photo Nov 14, 11 22 11 AM.jpg
    676.1 KB · Views: 147
  • Photo Nov 14, 11 22 53 AM.jpg
    Photo Nov 14, 11 22 53 AM.jpg
    327.8 KB · Views: 174

ic-racer

Member
Joined
Feb 25, 2007
Messages
16,664
Location
USA
Format
Multi Format
EDIT: I see you have the smaller mixing box (B-D) so maybe my comments below don't apply. I read it as "D-D"

Original Post:
Are you sure you have the correct diffusion plate? It does not look smooth. I use the D5500 which is a little different, but I thought the 4x5" mixing box also had a diffusion plate thicker in the middle like shown here. Maybe someone correct me if I'm wrong.
Are you able to post a print with no negative in the carrier to see the issue at hand?

mixer7.jpg
 
OP
OP

gfeucht

Member
Joined
Mar 2, 2013
Messages
14
Format
35mm RF
Here's a print I made with no negative. Definitely seeing the dodged edges, but the overlapping styrofoam is on the top and bottom relative to the print. So I guess something else is happening.
 

Attachments

  • Photo Nov 14, 1 09 54 PM.jpg
    Photo Nov 14, 1 09 54 PM.jpg
    577.1 KB · Views: 152

ic-racer

Member
Joined
Feb 25, 2007
Messages
16,664
Location
USA
Format
Multi Format
Probably the diffuser has been replaced with the wrong item. Again I have never seen anything like what you posted.
 

Andrew O'Neill

Moderator
Moderator
Joined
Jan 16, 2004
Messages
12,436
Location
Coquitlam,BC Canada
Format
Multi Format
Years ago I had a similar issue with an Ilford Multigrade 500 head. The styrofoam in the 4x5 diffusion chamber had severely warped beyond repair from hot halogen bulbs, creating a vignette on the print. The head always sat directly over the negative tray. If one wanted to change formats, one would just change the diffusion chamber inside the head. No adjustment of head to negative stage was necessary. I'm not familiar with the Omega head in regards to what is necessary when printing different formats.
 
OP
OP

gfeucht

Member
Joined
Mar 2, 2013
Messages
14
Format
35mm RF
I'm using an El Nikor 105mm f5.6 for 6x7. Coverage is rated to 6x9.

What should the diffusion panel look like? Mine seems to be a brushed texture on the matte side that does look like it has more density in the middle.

What side should be down? Glossy or matte?

Styrofoam is fine. I realized that the foam overlap was due to the tapered top and bottom pieces being installed opposite, so the tapered portion was against the wall. That would be my easy answer to the problem, except that those were top and bottom and I am seeing the light fall off on the sides.
 
OP
OP

gfeucht

Member
Joined
Mar 2, 2013
Messages
14
Format
35mm RF
Yes I'm using it at F8 or 11 minimum. I'll stop down more if I can.
 

Robert Poole

Member
Joined
Aug 12, 2009
Messages
14
Location
Sheffield UK
Format
4x5 Format
And you use it at ? f8 or f11?
Probably the diffuser has been replaced with the wrong item. Again I have never seen anything like what you posted.


Has anybody made a nd filter for use either below the diffuser light box or at negative level (or anywhere else!) that will compensate for light intensity falling off at the edges. I think ic-racer reported similar. How is it made please?
 

Sirius Glass

Subscriber
Joined
Jan 18, 2007
Messages
50,623
Location
Southern California
Format
Multi Format
Has anybody made a nd filter for use either below the diffuser light box or at negative level (or anywhere else!) that will compensate for light intensity falling off at the edges. I think ic-racer reported similar. How is it made please?

It is easy and more practical to get the enlarger properly aligned first rather than making a hand crafted one of a kind item.
 

DREW WILEY

Member
Joined
Jul 14, 2011
Messages
14,594
Format
8x10 Format
Center to edge falloff is going to happen with a plain diffuser anytime the lens is not longer than "normal". In other words, the falloff is due to the enlarging lens itself. That's why optional diffusion plates exist which are thicker at the center than the edge. You can grind you own custom version from translucent white acrylic plastic, but it's trickier than you might think if you don't have the right equipment or prior skills. A graduated center filter under the lens is not a generally a good solution because these need the lens well stopped-down to be effective; and they're also quite expensive.
You might be able to make an analogous grad effect by digitally printing or airbrushing the pattern onto frosted mylar, and placing that atop the normal diffuser, but any ink involved would have to be fade-proof as well as truly neutral black, making that idea a bit tricky too. It is also possible to fabricate an effective oval scrim out of very fine sifting stainless steel screening, and placing that atop the diffuser. With some experimentation, all you need is a pair of scissors to do that.
I grind my own convex acrylic diffusers if needed; but simply using a longer than normal focal length lens is generally the easiest option.
Incidentally, a 105 lens is just slightly longer than "normal" for 6X7 film, so pretty good. The next length up, 135mm, might or might not lead to more even illumination.
 
Last edited:

distributed

Member
Joined
Sep 11, 2020
Messages
127
Location
Switzerland
Format
Multi Format
Has anybody made a nd filter for use either below the diffuser light box or at negative level (or anywhere else!) that will compensate for light intensity falling off at the edges. I think ic-racer reported similar. How is it made please?

I'm kinda late to the party but I only saw this now. Better late than never, I guess?

I have had a similar issue in an enlarger I converted to RGB LEDs. After my diffuser material, the light is not even enough. There is a falloff of about one stop between the center and the corners of a 6x6 negative. My solution was to print a center filter with a laser printer on transparencies.

I have designed the filter using circular gradients in Inkscape, the free vector graphics tool. Unfortunately I cannot upload .svg files here, so I am posting a PNG rendering of the SVG. If you are interested in the file, please PM me. The PNG can be seen below. Because I wasn't sure what I need exactly I just printed two different filters on one A4 transparency. The top filter is the one I am using, IIRC. There are also some gray scales on the side that I used to find a relationship between brightness values in the SVG and density of the transparency.

The laser print on the transparency shows a very apparent dithering pattern, which is to be expected. I sandwich the center filter directly above my diffusor material. After diffusion, I cannot make out this pattern on the baseboard, so I think it's not an issue. With the filter I get a falloff at the corner of a 6x6 negative of only about 1/6 of a stop. This is acceptable to me.

centerfilter_photrio.svg.png
 
Photrio.com contains affiliate links to products. We may receive a commission for purchases made through these links.
To read our full affiliate disclosure statement please click Here.

PHOTRIO PARTNERS EQUALLY FUNDING OUR COMMUNITY:


Ilford ADOX Freestyle Photographic Stearman Press Weldon Color Lab Blue Moon Camera & Machine
Top Bottom