Understanding Split Grade Printing

Water from the Mountain

A
Water from the Mountain

  • 2
  • 0
  • 17
Rijksmuseum Amsterdam

A
Rijksmuseum Amsterdam

  • 0
  • 0
  • 21
Lotus

A
Lotus

  • 3
  • 0
  • 38
Magpies

A
Magpies

  • 4
  • 0
  • 75
Abermaw woods

A
Abermaw woods

  • 5
  • 0
  • 72

Recent Classifieds

Forum statistics

Threads
197,520
Messages
2,760,474
Members
99,393
Latest member
sundaesonder
Recent bookmarks
0

JimEA

Member
Joined
Aug 25, 2020
Messages
14
Location
UK
Format
Medium Format
Hi - I've been trying to get my head around split grade printing. In the process of trying to visualise what was going on I decided to do a bunch of tests which I'm putting here in case it helps anyone else who is going through the same learning curve.

The picture shows the output of my testing. It's just an iphone pic of the page in the scrapbook I'm using to document stuff, but looks fairly true to the tones on the actual page

The top horizontal row is a set of exposures just using the Grade 00 filter in half stop increments. The left vertical column is a set of exposures using the Grade 5 filter in the same half stop increments. The elements of the 'table' are the combined print G00 + G5 at each of those exposures. (I usually use F-Stop timing, but in this case realised it was quicker; less error prone; and in-theory - the same result; to expose each test for the same time and adjust the exposure using the lens using 1/2 stop clicks).

IMG_7309.jpg


If you're going through the same learning process then I'd really recommend having a go at something similar. It's made me see a whole bunch of things including how the G5 exposure (even where it doesn't show any density on its own at lower exposures), definitely adds contrasts to the G00 exposure (which I guess is the same process of activation threshold that flashing uses?). I'm hoping that this will remain a useful reference to go back to when I'm printing actual prints :smile:

Really interested to hear any other approaches people have used for getting up-to-speed / learning about split grade.
 

pentaxuser

Member
Joined
May 9, 2005
Messages
19,621
Location
Daventry, No
Format
35mm
A great set of shots Jim. I watched several videos on this by our own Greg Davis who posts here on Photrio and Dave Butcher an Ilford master printer. Both speak of what is happening with the process and things like not confusing contrast with exposure etc but these pics of yours really brings it out in front of your eyes With grade 0 you see the effect of overexposure which can look as if it is better for contrast but isn't and then with grade 5 on top of the grade 0 it is almost as if the face is coming out of a kind of a mist to demonstrate that at some point the face has both the highlight detail in the tee shirt and the necessary contrast and shadow detail.

pentaxuser
 

radiant

Member
Joined
Aug 18, 2019
Messages
2,135
Location
Europe
Format
Hybrid
it is important to understand that there is no gradation split-grade printing can achieve that couldn't be achieved with a single color-filtered exposure.

+1

Printing with single filter is just "multigrade" printing. If you use two filters on whole exposure it is not "split grade" because it is essentially the same as one filter.

I believe split grade printing is that one uses multiple filters for different times on different parts of the paper.
 

138S

Member
Joined
Dec 4, 2019
Messages
1,776
Location
Pyrenees
Format
Large Format
It looks you tested with a very low contrast negative, becasue you don't need much green. I would experiment with a more suitable negative.

As mentioned, with split grade you end in a particular grade. An advantage of split grade is that you can dodge certain areas when doing the green or the blue exposure in particular. If instead you make the general exposure with a particular grade then you can still burn certain areas with 00 or with 5, but the dodging will be made in that grade.

With the traditional method you may adjust exposure to have the light greys correct and later you increase grade until shadows are black enough. With split grade you usually set the green exposure time to have the light greys ok and later you adjust the blue exposure time to have the dark greys ok. The green exposure modifies way less the shadows and the blue exposure modifies way less the highlights.

Split grade is no miracle, simply you adjust the print in a particular way that can be more or less convenient depending on the particular print and on your preference.
 

Donald Qualls

Subscriber
Joined
Jan 19, 2005
Messages
12,087
Location
North Carolina
Format
Multi Format
What I see as the advantage of split grade over using a single filter for the print is that it's much easier to arrive at the correct contrast by doing two test strips (one at Grade 0 or 00, and then another at Grade 5, with most negatives) than it is to find the right filter by printing a test strip, estimating the grade needed, printing another test strip, adjusting filter grade, and printing (at the least) a third test strip to verify the result. Further, you can get subtle grade fractions, much finer gradations of final contrast than 1/2 grade (more like the difference you'd get by having Dektol, Selectol Soft, and a mix of the two in three trays and fine tuning contrast by switching between trays).

Beyond that, split filtering makes it easier to dodge and burn highlights, shadows, and midtones selectively, with less overrun -- because burning with Grade 5 will have little effect on a highlight next to the dark area you're burning, while burning with Grade 0 won't do anything to the shadow you're trying not to burn down to detail free black.

Last (for me) I can split print with pieces of theater lighting gels that, for the two, cost me half as much as a set of Ilford or Kodak contrast filters. One blue (because I couldn't find a magenta will a sharp enough green cut) and one yellow.
 

Dan0001

Member
Joined
Nov 22, 2005
Messages
84
Location
Farmington Hills MI USA
Format
Multi Format
it is important to understand that there is no gradation split-grade printing can achieve that couldn't be achieved with a single color-filtered exposure.
While this is probably true and for someone who is still learning the "split grade" technique, I feel by using several different filters, I have more control over the image with less burning and dodging. I happen to use filter 1 and then blast with filter 4 1/2 for my method but that's just me. I really like the images I am getting so far.
 

pentaxuser

Member
Joined
May 9, 2005
Messages
19,621
Location
Daventry, No
Format
35mm
It looks you tested with a very low contrast negative, becasue you don't need much green. I would experiment with a more suitable negative.
Is the "you " in this case the OP called JimEA? He appears to have used separate filters. Maybe you have translated this into the colours of green and blue. Can you say what it is about his exposures that indicates his negative was very low contrast? It might help the rest of us in terms of a learning process if you indicate which of his final portraits you believe to be the best and why .

Thanks

pentaxuser
 

warden

Subscriber
Joined
Jul 21, 2009
Messages
2,949
Location
Philadelphia
Format
Medium Format
It's made me see a whole bunch of things including how the G5 exposure (even where it doesn't show any density on its own at lower exposures), definitely adds contrasts to the G00 exposure

Excellent observation, and a good reason to expose low contrast first and add the high contrast on top. Thanks for sharing your experiment! Split contrast printing is an enjoyable and flexible way to print.
 
Joined
Sep 10, 2002
Messages
3,565
Location
Eugene, Oregon
Format
4x5 Format
Agreed, split-grade printing allows incremental grades when using filters. Those of us that use continuously-variable dichroic heads have that built in.

I'll reiterate what's already been said: split-grade printing really shows its advantages when dodging and burning with different-grade filters. Often, I'll use an intermediate overall contrast setting for a print, say, 30M (for the sake of example), but dodge and area and burn it back with 170mm, then give a blank white area a burning at 170Y to get some tonality in the highlights. The permutations are endless...

Best,

Doremus
 
OP
OP

JimEA

Member
Joined
Aug 25, 2020
Messages
14
Location
UK
Format
Medium Format
re dodging and burning .... I guess that's why I made the tests - I wanted to get a sense of the impact. i.e. if the centre image was part of a print at base exposure (however that was made) then a 1 stop dodge with the 00 is two to the left, a burn two to the right. Equally a one stop burn with the 5 is two down, a dodge two up (if that makes sense).

Really appreciate all the comments and advice - this forum is such a helpful resource

Jim
 

Pieter12

Member
Joined
Aug 20, 2017
Messages
7,521
Location
Magrathean's computer
Format
Super8
A note on your technique of changing f-stops rather than time--this could lead to trouble in large prints as some lenses shift focus as they are stopped down.
 

warden

Subscriber
Joined
Jul 21, 2009
Messages
2,949
Location
Philadelphia
Format
Medium Format
re dodging and burning .... I guess that's why I made the tests - I wanted to get a sense of the impact. i.e. if the centre image was part of a print at base exposure (however that was made) then a 1 stop dodge with the 00 is two to the left, a burn two to the right. Equally a one stop burn with the 5 is two down, a dodge two up (if that makes sense).

Really appreciate all the comments and advice - this forum is such a helpful resource

Jim
I think you've got the gist of it. (and I agree with Pieter12, change time instead of f-stop) You should be able to achieve a proper working print (i.e. a print that has the highlight details that you want and the deepest shadows that you want) pretty easily with this method. Then it's up to you how and when to dodge and burn, and that's the fun part. The first time you burn in a sky in with a 5 filter without unwanted darkening of the clouds is fun.

I've found split grade printing makes it easier to avoid the telltale halos around objects when dodging and burning.
 

ic-racer

Member
Joined
Feb 25, 2007
Messages
16,482
Location
USA
Format
Multi Format
You can do the same thing with a step wedge too. The colored lines are isodensity on the print. The radial lines are log d of the tonal range or ISO(R) contrast.

ExtendedScale.jpg
 

MattKing

Moderator
Moderator
Joined
Apr 24, 2005
Messages
51,969
Location
Delta, BC Canada
Format
Medium Format
Excellent observation, and a good reason to expose low contrast first and add the high contrast on top.
Generally yes, but if you work with certain high key subjects - subjects that are primarily light mid-tones and highlights - it often works better to start with the high contrast and add the low contrast later.
I've posted this before. Make a good split grade print - low contrast exposure and high contrast exposure on the same print - with a good mix of tones and good contrast. Then using the same low contrast and high contrast exposures, print them separately.
You may be surprised at how much of the image comes from each of the respective exposures.
 

pentaxuser

Member
Joined
May 9, 2005
Messages
19,621
Location
Daventry, No
Format
35mm
JimEA, if you can spare the time it might help if you were able to take a digital camera pic of the negative in question. This might help to establish if it is a low contrast negative. Generally speaking and based on my reading of Les McClean's article on split grade printing a negative that is fairly high contrast suits the method best.

Thanks

pentaxuser
 

AgX

Member
Joined
Apr 5, 2007
Messages
29,973
Location
Germany
Format
Multi Format
I am puzzled... to me two things are mixed up in this thread as fellows speak of different approaches under same designation "split grade":
-) using 2 or more filters over the whole image, in order to achieve finer steps of contrast grading
-) using 2 or more filters seperately at different parts of the image to grade different parts of the image differently
 

warden

Subscriber
Joined
Jul 21, 2009
Messages
2,949
Location
Philadelphia
Format
Medium Format
I am puzzled... to me two things are mixed up in this thread as fellows speak of different approaches under same designation "split grade":
-) using 2 or more filters over the whole image, in order to achieve finer steps of contrast grading
-) using 2 or more filters seperately at different parts of the image to grade different parts of the image differently
I think it's more the first, because the second can be accomplished no matter how you get to the work print.
 

ic-racer

Member
Joined
Feb 25, 2007
Messages
16,482
Location
USA
Format
Multi Format
I am puzzled... to me two things are mixed up in this thread as fellows speak of different approaches under same designation "split grade":
-) using 2 or more filters over the whole image, in order to achieve finer steps of contrast grading
-) using 2 or more filters seperately at different parts of the image to grade different parts of the image differently
Sometimes also forced into it. My first 8x10 enlarger had a 14" Aristo, so the Ilford filters that fit in it's 12" filter holder were $480 USD for the set. So I only bought two and split the exposure between them (using the chart posted above #15).
 

Pieter12

Member
Joined
Aug 20, 2017
Messages
7,521
Location
Magrathean's computer
Format
Super8
Generally yes, but if you work with certain high key subjects - subjects that are primarily light mid-tones and highlights - it often works better to start with the high contrast and add the low contrast later.
I've posted this before. Make a good split grade print - low contrast exposure and high contrast exposure on the same print - with a good mix of tones and good contrast. Then using the same low contrast and high contrast exposures, print them separately.
You may be surprised at how much of the image comes from each of the respective exposures.
Yes, but the areas that are affected by both exposures w
I am puzzled... to me two things are mixed up in this thread as fellows speak of different approaches under same designation "split grade":
-) using 2 or more filters over the whole image, in order to achieve finer steps of contrast grading
-) using 2 or more filters seperately at different parts of the image to grade different parts of the image differently
Yes.
 
OP
OP

JimEA

Member
Joined
Aug 25, 2020
Messages
14
Location
UK
Format
Medium Format
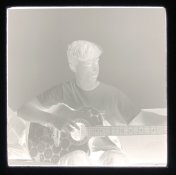
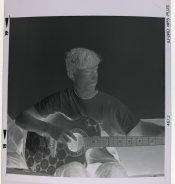
@pentaxuser here are iphone pics of the negative on a light table - I've put two here - one is with the negative masked with some black cardboard, the other just on the light table (the phone camera does all kinds of trickery so can;'t really say either of these looks quite like the negative does to my Mk1 eyeball - I did, however, switch HDR off so at least its not manipulating it that way). Having never actually seen another persons negatives in-the-flesh as it were, I have no idea how contrasty, or not these are. It was an indoor shot so could well be a bit underexposed I guess)


IMG_7310.jpg IMG_7311.jpg
 

pentaxuser

Member
Joined
May 9, 2005
Messages
19,621
Location
Daventry, No
Format
35mm
Thanks Jim. I confess I still have problems reading negatives and hopefully the person who thought your prints suggested a low contrast negative will say what he thinks and if he is still of the same mind will say what in the negative indicates low contrast.

The highlights, which are mainly the white tee-shirt, looked OK to me in that the tee-shirt was white but still retained some texture and what looks like a clear area on the negative should turn out to be virtually a featureless black area on the print. Of course on the head shots used for the examples of various exposures and grades does not have a full range of tones in terms shadows.

If the neg was developed using the maker's suggested times for the speed of the film in that developer then the contrast should be fine for split grade

I suppose that there is a possibility that with that very light coloured( in the positive) background the camer's meter may have been fooled into underexposing slightly but it will be interesting to hear what others' verdicts are on the question around which my request for the negative revolves, namely: What are the signs, if any that this negative is low contrast and how does this manifest itself in the split grade process?

pentaxuser
 

Donald Qualls

Subscriber
Joined
Jan 19, 2005
Messages
12,087
Location
North Carolina
Format
Multi Format
The left negative looks quite underexposed -- which might be the phone camera trying to make an average with the black area of the mask. The right one looks very normal -- which might also be the phone camera averaging the white area. Take an average of the two and it seems likely you're a stop or so under exposed, but approximately normal contrast.
 
Photrio.com contains affiliate links to products. We may receive a commission for purchases made through these links.
To read our full affiliate disclosure statement please click Here.

PHOTRIO PARTNERS EQUALLY FUNDING OUR COMMUNITY:


Ilford ADOX Freestyle Photographic Stearman Press Weldon Color Lab Blue Moon Camera & Machine
Top Bottom