To spot or not to spot, that is the question!

Pride

A
Pride

  • 2
  • 0
  • 39
Paris

A
Paris

  • 3
  • 0
  • 135
Seeing right through you

Seeing right through you

  • 4
  • 1
  • 172
I'll drink to that

D
I'll drink to that

  • 0
  • 0
  • 122

Recent Classifieds

Forum statistics

Threads
198,399
Messages
2,774,193
Members
99,606
Latest member
Tech500
Recent bookmarks
1

VinceInMT

Member
Joined
Nov 14, 2017
Messages
1,879
Location
Montana, USA
Format
Multi Format
There are some good suggestion to the original query. I use, I think, a 0000 brush and Spotone and Marshall dyes. I have a piece of glass on which I have put drops of the various colors and let them dry out. I mix them on that glass if needed. I use a small cup of water and the backside of an old print for testing. Rotate the brush to keep the point. When applying the dye I think of it as rebuilding the missing grain structure, that is, I am creating a texture, not just filling a space.

Back in the 70s I worked a graveyard shift in a medium sized film processing plant and when I would be waiting around for something I worked with our spotter and eventually got pretty good at it, if fact, I really like it. It’s meditative.

It’s no surprise that in my other art practice, drawing, stippling is my favorite technique.
 

mcfitz

Member
Joined
Nov 9, 2006
Messages
144
Format
Multi Format
Yes, I spot my prints, no, I don't mind doing so. It makes all the difference in the world for a print that is even slightly blemished.

Good light is necessary, I don't do too many in one session, and use a head loupe. The head loupe makes it far easier, I used to use a thread count magnifier which was good, but the loupe is far better.
 

AgX

Member
Joined
Apr 5, 2007
Messages
29,973
Location
Germany
Format
Multi Format
I always spot. I clean my negs carefully, and (heresy!) do not use a glass carrier. If you don't like spotting, you're better off scanning and printing inkjet. Digital files are much easier to clean up.
Other than the safety net of the undo button, is digital really all that much easier for a single print? It clearly 'wins' if you're printing 1000 copies, but how often does a photo typically get that kind of treatment either way?

But I will admit to playing around with some robotics and image processing with the goal of making a spotting-bot. Which would be more for the fun of tinkering with robotics than practical photography. [I've barely started doing actual darkroom prints as it is, but picking up spotting as a skill is on my to-do list.]
In PhotoShop, you can apply a curves adjustment layer that makes dust stand out quite easily. Then, using the healing brush tool you can clean up dust and retain grain. Less time-consuming than breaking out the spotting ink, brush, water and loupe and a strong light. And you can undo it unlike traditional spotting.

View attachment 238132 View attachment 238133


This a 100% analogue thread.
 

ic-racer

Member
Joined
Feb 25, 2007
Messages
16,529
Location
USA
Format
Multi Format
The only alternative to spotting I see is to re-print. This is what I do. Usually the previously undetected offending dust spot is easily removed when the print shows one where to look.
 
Joined
Sep 10, 2002
Messages
3,583
Location
Eugene, Oregon
Format
4x5 Format
I spot when necessary, and etch too, when needed, but I'm with ic-racer on this. If I can save myself spotting time at the printing stage, I'll gladly tear up an otherwise fine print with a dust spot on it and make another one without the spot if I can eliminate the cause easily.

Sometimes, though, it's not possible and this is where spotting skills become important. I use a strong light, an 8x binocular headset and a set of fine sable brushes and Spotone dyes. I have a white palette on which I mix color/strength and then test the dye first on the margin of the print or on a piece of unexposed, fixed and washed paper of the same kind (this latter I can hold right up to the area I'm working on for a better comparison).

I etch with a small surgeons scalpel, scraping very lightly. The goal is to scratch of some of the emulsion, but not go all the way through to the paper base. Sometimes this isn't possible though... Spotting back with dyes mixed with the right amount of gum Arabic to match the gloss of the print is the final step and minimizes the obvious difference between the etched area and the rest of the print.

Practice, practice, practice and be ready to trash the prints you ruin (I make extra of prints I know I will have to etch just so I have a couple to throw away after ruining them).

Best,

Doremus
 
Joined
Jul 31, 2012
Messages
3,321
Format
35mm RF
Etching is a monumental PITA. I'll admit I've never achieved a decent result with it. I'd rather just spot the neg with a Sakura pigment pen then deal with the white dot on the print. Of course on small negs that is nearly impossible.

I don't know why people use the super fine brushes. What you need is a super fine point, which any high quality Sable brush should have. The goal is to be able to spot the entire print without having to reload the brush. My most used spotting brush is a size 2 Winsor and Newton 707 pure Sable brush. I've been meaning to get an even larger one. Raphaël 8404 is another high quality brush. The other thing to do is work around the print. Don't try to fix one spot at a time. Work on a bunch at the same time gradually. Way faster and you will get a better result. And of course like others have mentioned, premix the colors and let them dry and use a magnifier of some sort. And a lot of light. I use a piece of paper to put my hand on, and it works well for drying out the brush and checking the density of the color.

Hope that helps someone.
 

Maris

Member
Joined
Jan 17, 2006
Messages
1,568
Location
Noosa, Australia
Format
Multi Format
Why spot? Well, it is possible to advance an argument like this:
If the wet-platers can get away with nasty emulsions, uneven pours, frilled edges, blobby development of bad exposures made with ancient lenses of wretched image quality AND have all the faults applauded as part of the charm and authenticity of the process .... why spot?
A photograph with visible cat hairs, grit, and fingerprints surely affirms its authenticity. When you see these flaws you know it has never been touched by the curse of the hidden pixel.
So what do I do? Of course I spot everything I show; Spotone, #00000 sable brushes, knife work, the whole kit. I even spot negatives if they are big enough. But I never succeed in making those spots truly invisible. I can still see them but it seems nobody else ever does. Strange.
 

Steve Goldstein

Subscriber
Joined
Jul 8, 2007
Messages
1,753
Location
Northeastern US
Format
Multi Format
My practice is similar to what Maris does - I spot any print I drymount, and I do it after mounting. My assumption is that I'll show that mounted print somewhere some day; if it's complete including spotting when it goes into the storage box then there's never a panic if I get called upon to hang some prints at short notice, which has happened.

I've never tested whether the heat from drymounting changes the colors of the Spotone - maybe it does, maybe it doesn't. But I find spotting a mounted print to be easier because the mount gives it more heft and keeps it flat.

Like others have said, I work around the print and don't try to do too many at one sitting. Good light and a good mood are essential.
 
Joined
Sep 10, 2002
Messages
3,583
Location
Eugene, Oregon
Format
4x5 Format
Etching is a monumental PITA. I'll admit I've never achieved a decent result with it. I'd rather just spot the neg with a Sakura pigment pen then deal with the white dot on the print. Of course on small negs that is nearly impossible.

I don't know why people use the super fine brushes. What you need is a super fine point, which any high quality Sable brush should have. The goal is to be able to spot the entire print without having to reload the brush....

I've never had much luck spotting negatives, for whatever reason. I etch small black spots on the print and have had fairly good luck with that. It does take a steady hand though. The gum Arabic helps a lot to restore lost sheen. I would really welcome some pointers on spotting negatives successfully.

I agree about brushes and points. I have a lot of brushes just because sometimes I don't want so fine a point; sometimes a wash of very dilute dye is just the thing for a bit of flare or for slightly darkening an edge or whatever.

Best,

Doremus
 

DREW WILEY

Member
Joined
Jul 14, 2011
Messages
13,861
Format
8x10 Format
Here's the argument for doing most of your spotting prior to drymounting : some emulsions progressively harden, especially after heat pressing, so accept dye best soon after air drying. I've learned that the hard way. But not all brands of paper are the same in this respect. Some can be a real headache if you wait too long (like years). I avoid etching like the plague. It's really tricky to hide a gum arabic repair, especially on cold-toned paper.
 

Steve Goldstein

Subscriber
Joined
Jul 8, 2007
Messages
1,753
Location
Northeastern US
Format
Multi Format
I print primarily on Ilford fiber MGWT and have found that breathing (like if I wanted to fog your glasses) on the area I want to spot Is helpful. I guess it softens and/or expands the emulsion just a bit.
 

DREW WILEY

Member
Joined
Jul 14, 2011
Messages
13,861
Format
8x10 Format
An alleged old trick is to mix a tad of wetting agent into your spotting ink. Makes sense; but it has never really worked for me.
 
Joined
Jul 31, 2012
Messages
3,321
Format
35mm RF
I've never had much luck spotting negatives, for whatever reason. I etch small black spots on the print and have had fairly good luck with that. It does take a steady hand though. The gum Arabic helps a lot to restore lost sheen. I would really welcome some pointers on spotting negatives successfully.

I agree about brushes and points. I have a lot of brushes just because sometimes I don't want so fine a point; sometimes a wash of very dilute dye is just the thing for a bit of flare or for slightly darkening an edge or whatever.

Best,

Doremus

Try a Sakura Pigment pen. Get the smallest one which is I think an 01. I just touch it to the back of the neg. Works really well. I've tried before with Spotone and other things, but they just don't work. I had the Sakura for labeling the edges of 4x5s so I thought, what the hay? And it worked great. You get a white dot of course, but it is easier to spot a white dot than knife a black one.

The other way to eliminate a black dot is to bleach it. I use Iodine from the pharmacy after wiping the surface. Takes a black dot right out. Then back in the fix. You probably already know about that, but I thought I'd throw it out there for anyone who doesn't...
 
Last edited:

DREW WILEY

Member
Joined
Jul 14, 2011
Messages
13,861
Format
8x10 Format
I keep a couple flavors of those fine Sakura pens around, but what they leave behind is more obvious than Spotone, which sinks in, as well as having a better selection of hues which can be fine-tuned by mixing them. I try to avoid bleaching. I've seen consequences from that years down the line which would not be apparent right away. But there might be some trick to mitigate the risk. I try to avoid the need to bleach anything to begin with, so the question, how to do it, rarely comes up.
 
Last edited:
Joined
Sep 10, 2002
Messages
3,583
Location
Eugene, Oregon
Format
4x5 Format
Try a Sakura Pigment pen. Get the smallest one which is I think an 01. I just touch it to the back of the neg. Works really well. I've tried before with Spotone and other things, but they just don't work. I had the Sakura for labeling the edges of 4x5s so I thought, what the hay? And it worked great. You get a white dot of course, but it is easier to spot a white dot than knife a black one.

The other way to eliminate a black dot is to bleach it. I use Iodine from the pharmacy after wiping the surface. Takes a black dot right out. Then back in the fix. You probably already know about that, but I thought I'd throw it out there for anyone who doesn't...

Thanks for the info. I'll maybe try the pen for negative spotting and see if I can get a fine-enough dot (and placed well enough) to warrant replacing etching. My attempts with Spotone and even a fine-point Sharpie were less-than-successful...

Doremus
 

Adrian Bacon

Subscriber
Joined
Oct 18, 2016
Messages
2,086
Location
Petaluma, CA.
Format
Multi Format
I have searched and failed to find info, tips and tricks on how to get rid of nasty spots on finished prints and what tools and products are currently available.

Do you spot?
How, when and what with?
Is it difficult to learn?
Does it wotk on RC paper as well as fiber?

All help is welcome. Thanks.

I am now off to vacuum clean my room again.......


Bill

I never spot. I run a very large HEPA filter in my darkroom (which *dramatically* cuts down the amount of dust present) and am pretty meticulous with cleaning everything before making a print. This really cuts down visible dust, though sometimes it does creep in. When that happens, unless it happened in a place on the print that isn't distracting, I just re-clean and re-print, and the print with the spot goes into the secondary choices box, though to be honest, sometimes I like seeing an occasional dust spot. It's a reminder that you're looking at a hand made print and can't possibly be perfect.
 

DREW WILEY

Member
Joined
Jul 14, 2011
Messages
13,861
Format
8x10 Format
I cut my teeth on big Cibachromes which are very difficult to retouch, and often involved multiple registered film masks, which had to be just as clean as the original chrome. My film room is set up like a true cleanroom. I've also sold thousands of true EPA-certified HEPA vacs (the real-deal, real expensive kind). But even with all these advantages, a certain amount of spotting is inevitable. Just part of the overall process. I like Maris' comment about cat hairs and crud equating to "authenticity" - exactly why I avoid authentically lousy pizza parlors and burger stands!
 

Vaughn

Subscriber
Joined
Dec 13, 2006
Messages
10,054
Location
Humboldt Co.
Format
Large Format
I spotted a lot when I was enlarging 4x5 to 16x20. Always used a #000 brush...never liked anything smaller. Spotone #3 for Ilford Gallerie Glossy (selenium toned to completion) and a mix of 3 or 4 drops of Stoptone #3 and one drop of Spotone S, if I remember right for Portriga Rapid III, selenium toned partially to a rich brown. I printed in a university darkroom, so I had lots of practise and got fairly good at it...one of the fine pleasures in life is to see a final print just snap to completion as you finish spotting! I rarely spot now since I am contact printing in alt processes.

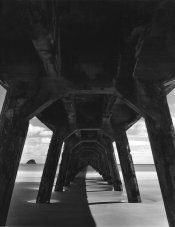
The image below took four hours to spot -- the only time I have gone to such length. But I love the image and the exposed film was damaged by high-humidity static from bouncing around in a film box on my bicycle for several months. The worse was on the sand -- thankfully.
 

Attachments

  • Tolaga bay Wharf.jpg
    Tolaga bay Wharf.jpg
    114.2 KB · Views: 95
OP
OP
BSP

BSP

Member
Joined
Aug 25, 2019
Messages
332
Location
The Netherlands
Format
35mm
And what a lovely print it has become.
Well worth the time spent spotting I can imagine.
Thx for sharing.
 

jvo

Subscriber
Joined
Dec 6, 2008
Messages
1,743
Location
left coast of east coast
Format
Digital
don't jinx me... fortunately in a half a dozen places i've lived and had darkrooms, dust has never been a pain. I don't do a lot of spotting.

i do clean and vacuum the area 3 foot around the enlarger. i use a 1" camel hair ( had it so long, i think that's what it is) brush on both side of the negative just before i place the carrier in the enlarger. I have a rug on the darkroom floor and vacuum about every 2 weeks, at most.

voila', not a lot of spotting for me!

p.s if you do the postcard exchange then you don't have to worry about dust - the world's postal systems add enough "character" to your image that it only adds to their value, and disguises any dust on the negative.:sideways:
 
Last edited:

Bill Burk

Subscriber
Joined
Feb 9, 2010
Messages
9,220
Format
4x5 Format
I also tried the old school trick of pin-prick on the base. Under the microscope it looks good but the diffusion enlarger I use makes the pinprick invisible. I think you need a condenser enlarger for that trick to work.

Instead now I use opaque. A gray spot on negative will have a halo. So you have to use something opaque and just guarantee a white spot to deal with on the print.
 

Old_Dick

Member
Joined
Apr 23, 2014
Messages
396
Location
03082
Format
Multi Format
Something to think about. You might want to think of your darkroom as being a somewhat cleanroom. The dust that is in your darkroom is there because it was brought in. Before retirement I spent 3-4 days a week working in a cleanroom at a company that made "steppers". Steppers are used to make digital displays. A $1,000,000 lens is used. Anyway, we always gowned up. Which brings me to the point. I use a hepa filter vacuum, I put my clothes in the dryer before go in. If you want to go an extra mile, a hair net, lab coat.

One more thing, paper towels. If you use something like Bounty, try taking a sheet off with sunlight coming in the house. at an angle you can see dust. It is an eye opener. I use the blue "shop towels" take the sheets apart outdoors and shake them out.

Happy Less Spotting
 
Photrio.com contains affiliate links to products. We may receive a commission for purchases made through these links.
To read our full affiliate disclosure statement please click Here.

PHOTRIO PARTNERS EQUALLY FUNDING OUR COMMUNITY:


Ilford ADOX Freestyle Photographic Stearman Press Weldon Color Lab Blue Moon Camera & Machine
Top Bottom