There is a bunch of other stuff I've archived on that site you (or others) may find of interest.
There sure is.


There is a bunch of other stuff I've archived on that site you (or others) may find of interest.
So, Bob... in your disassembly were there any clues as to what may have been causing the weird side of your negative frame?
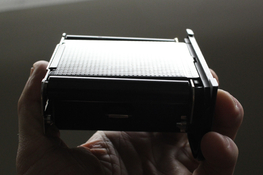
Picture example of the pressure plate angle. Is this normal? My thinking is that when the film is inserted and the holder goes back into its shell then that plane flattens out. Would I be correct with this assumption?
Picture example of the pressure plate angle. Is this normal? My thinking is that when the film is inserted and the holder goes back into its shell then that plane flattens out. Would I be correct with this assumption?
It looks to me that yaw was introduced in your back, (perhaps from a fall?) and it needs reforming.
What do the others think is going on?
And if so then that will increase the cost. I think I should send each piece of equipment one at a time maybe.I’d seriously assume that’s your problem with the negative.
I’d seriously assume that’s your problem with the negative.

No worries at all.Bob, I must retract this comment as I just looked at my A12 backs, which I know are in proper working condition, and they are the same. Never noticed that and never before have i ever seen film rollers angled like that. My apologies.

Bob, I must retract this comment as I just looked at my A12 backs, which I know are in proper working condition, and they are the same. Never noticed that and never before have i ever seen film rollers angled like that. My apologies.
Regarding sending out gear… I can’t address your anxieties but what other choice do you really have? Suggest bubblewrap and cardboard box rather than your storage cases for shipping. It will be okay. Use the USPS large fixed rate box. Free box (and a good one, too) plus tracking included in the price. The shipping cost is just part of the coat of keeping your gear maintained. Embrace and accept it. Ship sooner than later since shipping prices just keep going up.

Thank you for taking the time out to outline these steps. This has been trying but I know I can do this. I will print out these instructions. I am taking my time with this.Sorry, I'm a bit tired, so if you've already solved this and gotten your back back together, this may be out of date. If not--well, I think I can help you fix your situation. Remember, unless you lose a part--don't do that!--it's really hard to mess anything up on a Hasselblad back, particularly if you're just replacing a light seal.
In your photo, I've numbered all of the parts that could possibly fall out when you're doing this operation:
1 - This is the lock that secures the back onto the camera. In this photo, it is in the correct position. Make sure you put it back this way, and make sure the spring is connected at both ends. Push the release button, and make sure it slides back and forth--it will do so with a dark slide in, or if part 2 is *not* in place.
2 - This bit is in *exactly* the correct position in the photo. It will very probably fall out when you take off the plate--looks like yours did. To me, this is probably the trickiest thing to get back right, and to keep from falling back out when you re-install. You do have to use just a little bit of pressure when putting it back in place--don't bend it, but you do have to push on it to get it to flex just a little to get it to go back into the receptacle for it, because *the whole body of the thing acts like a spring*. The little tab facing left at the top (in the photo) must be pushing against the lip, as it is in the photo. The tooth at the bottom must be in the semi-circular receptacle, again as in the photo. The entire body of it must be entirely within the channel made for it. What this bit does is, when you insert the dark slide all the way, it will push up the tooth at the bottom (remember, with everything screwed securely back in place, the plate will trap it from popping out of the channel it's in) so that the tab on the left side of it (in the photo) no longer butts up against the opposing tab on part 1. See, if the dark slide is out, and you try to take off the back, those two tabs pointing at each other on parts 1 and 2 in the photo ram into each other, which keeps you from moving the release button far enough to take off the back--so you can't remove it without the darkslide protecting the film. When the darkslide is in place, the tab on part 2 will be out of the way of the tab on part 1, and that tab will slide into the little slot you can see below the tab on part 2--and now you can move the release button far enough for the back to pop off. This is a *pain* to keep in place when you're putting the plate back on--while using the dark slide to keep your new light seal in place, you also have to use the plate itself to keep that tab from popping up and out when you go to put everything back together. You'll probably fail the first few times, but after a bit you'll master it.
3 - This is the one thing in this photo that is *not* correct. The little V-shaped spring in the yellow circle is not doing its job. You have to bend that to an even more accute angle--its function is to push up the triangular tooth on Part 3, so it projects into the path of the dark slide; right now, one side of it is *under* part 3, instead of up against the bottom (right, in the photo) edge of part 3--one side of the spring should push on the lip on the back (on the right in the photo), the other side should push on the side of part 3 (on the left), forcing the tooth upward into the dark slide path. Here's how this part works: the hole on part 3 fits on that peg in the middle. With the dark slide out, that spring pushes the tooth up into the dark slide slot, but more importantly, the *other* end pivots down (right, in the photo) and allows the tab on the body to push on the tab in the back (which you can see uncovered in the photo), letting you fire the shutter and telling the back you've made an exposure. When you put the dark slide in, as it hits the tooth it pushes it down and out of the way, so the tab at the opposite end pivots up and covers the tab in the back--and prevents you from accidentally firing the shutter and making an exposure with the dark slide in.
For parts 2 and 3, you have to use the *plate* to hold them in place when you go to re-assembling. You'll actually hold the darkslide in place tightly against the plate when re-assembling, held as if it were inserted halfway, and try to lay it as evenly and flatly as possible across the back, which also must be lying flat and steady (this is described and shown very clearly in the instructions for the kit I recommended earlier). The dark slide you're tightly holding against the plate will be used to make sure the light seal folds properly and stays in its slot, and you can use the plate to make sure that parts 2 and 3 don't move. Again, the first time you do this, it's almost inevitable that parts 2 and/or 3 (and maybe the spring on part 3) will pop out of place. And you will do a lot of cussing. But eventually, with practice, you'll get the hang of it and be able to do it the first or second time, every time.
Basically, when you get the back put back together, if you can't put the back on your camera or can't take it off, *or* if you can take it off the camera with no dark slide inserted, part 2 is probably not in the right place. If you can't tighten the plate down flush using the screws, you can't insert the dark slide all the way, you can't make an exposure even with the dark slide out, or you can make one with the dark slide in (or any combination of the above), it's probably because part 3 is not in the right place and/or the spring is not pushing on it.
4 - You shouldn't have to mess with these, they're normally held in place by a bit of adhesive. These, with the outer shell of the back, form the slot that the "feet" on the bottom of the camera fit into. I have seen some, though, that are sitting in there loose (again, like the other parts, the plate when it's screwed down provides most of the force holding them in place). As they're kind of small, don't let them fall out and get away from you.
Speaking of small parts like springs, screws, and these tabs. Before doing *any* work involving tiny parts, what I do is this: I usually work over a white towel, as that tends to help restrict the movement of small parts, and makes them easy to see. I also thoroughly vacuum all around my work area and anywhere nearby that a small part might catapult itself to. I then fully empty the vacuum bag/chamber. By doing this, I make sure there is no debris lying around or within the vacuum cleaner that might interfere with me seeing said missing small parts. If I *do* lose something and can't find it visually, I just run the vacuum over all the area I cleaned earlier, and then check inside the vacuum cleaner for it. I can't tell you *how* many times this has helped me find screws, springs, washers, circlips, ball bearings, etc., etc. When I've needed it, *it has worked every time*. Some people use a magnet for this--but then, some parts aren't magnetic, the vacuum cleaner covers a far larger area, and most camera parts (although use discretion here) will survive passage through *most* vacuum cleaners undamaged.
Hope that makes sense and is helpful!
View attachment 360099
Picture example of the pressure plate angle. Is this normal? My thinking is that when the film is inserted and the holder goes back into its shell then that plane flattens out. Would I be correct with this assumption?
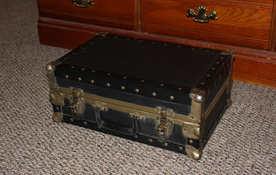
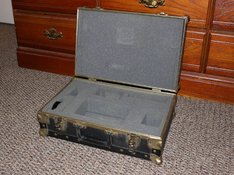
This is what I brought out from storage. Bought this in the 90s. This is what I was going to use. My thought was if this was in another box then if there are bumps or bangs along the way then my camera will not feel a thing, loool. It is heavy and would be a big cost issue with shipping.
I don't like these rubber foam filled cases, as this foam always disintegrates and releases fine and nasty dust which gets into the camera gear!
Hasselblad had a very well made nut-brown leather case with sturdy dividers (model #511), rather costly but elegant, sometimes you can find one used on eBuy (for around €500.-)...
I don't have one as I find it a bit superfluous, but a friend has, and it is very fine but rather heavy.
I think you're referring to what Canon used to put in their hard lens cases. None of the modern foams used in cases will go that far in a foreseeable future. I have a case bought in 1993, a Pelican, and there is zero deterioration to the foam. I bought a Mamiya RB67 kit in a case from its own era, some 1980's and same there. Whatever Canon used, it must have been some ill engineered product, but I'd say it's rare to see in most other products that use foam.
Easy to insert and stabilizes the film before entering the shell. Nice and simple.To my personal but rather poor experience, this looks quite normal (I checked with mine).
As I see it, this was a little 'trick' by Hasselblad: get the film and pressure plate held down, by a kind of 'hook' on the open side, so the holder can be easily inserted in the shell.
And once the locking key turned so it can fold in and the holder is secured, the whole hook-pressure plate-film returns to a flexible and flat system.
Try to have the film run, by turning that little ribbed wheel, when that hook is down, it will not happen that supple.
Don't forget that the Hasselblad designers were very resourceful, but sometimes ventured into a bit of overengineering (which isn't that bad after all)...
The thing about shipping in that case: the heavier the package is, the harder it hits the floor when they throw it in the truck.
Those aluminum cases are not for protecting against the sort of damage that results from shipping.
They are designed more to protect against the sort of damage that results from rough handling at photographic work sites - where the size and weight of a package isn't as important.
You want to ask advice from a packing company - well cushioned inner and outer boxes are more likely to work.
| Photrio.com contains affiliate links to products. We may receive a commission for purchases made through these links. To read our full affiliate disclosure statement please click Here. |
PHOTRIO PARTNERS EQUALLY FUNDING OUR COMMUNITY:  |